


摘要:Google發佈DataBinding已經有一年時間了,網上也有很多教程。但是在筆者看過的大部分關於MVVM在Android上的實現的教程中,都存在一個十分之嚴重的問題,就是大部分的介紹MVVM的文章只不過是介紹DataBinding的文章。而在這些教程中,幾乎都無一例外地把DataBinding生成的Binding類(或實體類當成是ViewModel層。這兩種方法都有一個十分之大的漏洞,就是作爲ViewModel層,幾乎沒有任何控制力。在這裏,筆者介紹一個筆者總結出來的如何結合DataBinding在Android實現MVVM模式。
什麼是MVVM模式?
MVVM模式是指Model-View-ViewModel。相信看過筆者關於MVP的文章的讀者也會發現,無論如何抽象化,在我們的View層中是無法避免的要處理一部分邏輯的。而MVVM模式中的View是將View的狀態和行爲完全抽象化,把邏輯與界面的控制完全交給ViewModel處理。
MVVM由下面三個核心組件組成:
- Model: 用於獲取業務數據模型
- View: 定義了界面中的佈局和外觀
- ViewModel: 邏輯控制層,負責處理數據和處理View層中的業務邏輯
下面是筆者採用的MVVM模型:
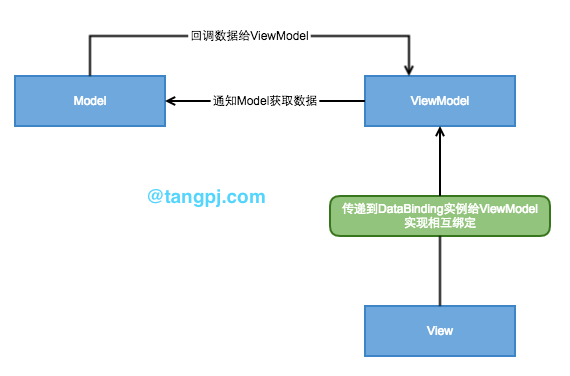
可以看出,這個MVVM的模型圖和網上介紹MVVM是有所不同的,下面會根據這個模型圖來介紹MVVM在Android。
DataBinding簡介
如果瞭解DataBinding的讀者可以直接跳過本小節
什麼是DataBinding
DataBinding是Google官方推出的數據綁定器,這個綁定器的作用是把數據和View綁定起來,然後數據改變的時候View會自動刷新,這個DataBinding就是我們實現MVVM模式的關鍵。
引入DataBinding
引入DataBinding的方式很簡單,我們只需要在Module的build.gradle添加如下代碼即可。
|
1 2 3 4 5 6
|
android{ .... dataBinding{ enabled true } }
|
使用DataBinding
注: 在這裏筆者只是介紹DataBinding的其中一個使用方法,更加詳細的教程讀者可以上網搜索,因爲這篇的重點不是DataBinding。
使用DataBinding的佈局文件和普通的佈局文件有點不同,DataBinding佈局文件的根標籤是layout標籤,layout裏面有一個data元素和View元素,這個View元素就是我們沒使用DataBinding時候的佈局文件。下面看看例子代碼:
|
1 2 3 4 5 6 7 8 9 10 11 12 13 14 15 16 17 18 19 20 21 22 23 24 25 26
|
<layout xmlns:android="http://schemas.android.com/apk/res/android"> <data> <variable name="user" type="com.example.mvvmdemo.UserBean"/> </data> <LinearLayout android:orientation="vertical" android:layout_width="match_parent" android:layout_height="match_parent"> <TextView android:layout_width="match_parent" android:layout_height="wrap_content" android:text="@{user.name}"/> <TextView android:layout_width="match_parent" android:layout_height="wrap_content" android:text="@{user.sex}"/> </LinearLayout> </layout>
|
data元素裏面的user就是我們自定義的user實體類,當我們向DataBinding中設置好user類以後,我們的兩個Text會自動設置text的值。
UserBean實體類代碼:
|
1 2 3 4 5 6 7 8 9 10 11 12 13
|
public class UserBean { public ObservableField<String> name = new ObservableField<>(); public ObservableField<String> sex = new ObservableField<>(); public ObservableField<Integer> age = new ObservableField<>() ; public UserBean(){ name.set("張三"); sex.set("男"); age.set(19); } }
|
這個實體類有點特別,裏面的元素是DataBinding中的ObservableField類,ObservableField的作用是,當我們實體類中的值發生改變時會自動通知View刷新。所以使用DataBinding的時候,我建議使用ObservableField來定義我們的實體類。
之後,我們只需要在Activity中綁定layout就可以了。下面是使用代碼:
|
1 2 3
|
ActivityTesBinding activityTesBinding = DataBindingUtil.setContentView(this,R.layout.activity_tes); UserBean user = new UserBean(); activityTesBinding.setUser(user);
|
在使用DataBinding的時候,我們設置佈局使用DataBindingUtil工具類中的setContentView()方法,這普通的設置方法有點不一樣,大家需要注意。按照我們的理論,我們設置好了user後,我們layout中的TextView顯示爲“張三”和“男”。在這裏我就不作演示了,大家去嘗試下,很簡單的。
好了,這就是關於DataBinding的簡單介紹了,讀者如果想知道更加詳細的使用方法需要自行搜索。DataBinding還有更多更有趣的功能的,希望大家看完這篇文章後去實踐下。
大部分MVVM教程的侷限性
在筆者看過的大部分關於MVVM在Android上的實現的教程中,都存在一個十分之嚴重的問題,就是大部分的介紹MVVM的文章只不過是介紹DataBinding的文章。而在這些教程中,幾乎都無一例外地把DataBinding生成的Binding類(上一小節中 ActivityTesBinding)或實體類(UserBean)當成是ViewModel層。
這兩種方法都有一個十分之大的漏洞,就是作爲ViewModel層,幾乎沒有任何控制力。如果要添加其他的拓展功能的話,幾乎都需要在Activity、Fragment等View層中實現。這樣的做法不但無法實現代碼解耦,而且如果一個頁面處理的功能過多的話,代碼的可讀性會非常差。
那麼我們如何在Android上正確使用MVVM模式呢?請看下一章
如何在Android上正確使用MVVM模式
在MVVM模式中,DataBinding應該是作爲一個綁定器用於綁定實體類與View層,而我們的業務邏輯和View的控制應該抽象我們的ViewModel層中。其實方法很簡單,我們只需要簡單地把我們的Binding類傳遞到我們的ViewModel層中就可以實現通過ViewModel層對View層的控制了。下面我們來看看優化後的layout代碼。
activity_main.xml :
|
1 2 3 4 5 6 7 8 9 10 11 12 13 14 15 16 17 18 19 20 21 22 23 24 25 26 27 28 29 30 31 32 33 34 35 36 37 38 39
|
<layout xmlns:android="http://schemas.android.com/apk/res/android" xmlns:app="http://schemas.android.com/apk/res-auto" xmlns:tools="http://schemas.android.com/tools"> <android.support.design.widget.CoordinatorLayout android:layout_width="match_parent" android:layout_height="match_parent" android:fitsSystemWindows="true" tools:context="com.example.mvvmdemo.MainActivity"> <android.support.design.widget.AppBarLayout android:layout_width="match_parent" android:layout_height="wrap_content" android:theme="@style/AppTheme.AppBarOverlay"> <android.support.v7.widget.Toolbar android:id="@+id/toolbar" android:layout_width="match_parent" android:layout_height="?attr/actionBarSize" android:background="?attr/colorPrimary" app:popupTheme="@style/AppTheme.PopupOverlay" /> </android.support.design.widget.AppBarLayout> <include layout="@layout/content_main" android:id="@+id/content_main" /> <android.support.design.widget.FloatingActionButton android:id="@+id/fab" android:layout_width="wrap_content" android:layout_height="wrap_content" android:layout_gravity="bottom|end" android:layout_margin="@dimen/fab_margin" app:srcCompat="@android:drawable/ic_dialog_email" /> </android.support.design.widget.CoordinatorLayout> </layout>
|
content_main:
|
1 2 3 4 5 6 7 8 9 10 11 12 13 14 15 16 17 18 19 20 21 22 23 24 25 26 27 28 29 30 31 32 33 34 35 36 37 38 39 40 41 42 43 44 45 46 47 48 49 50 51 52 53 54 55 56 57 58 59 60 61 62 63 64 65 66 67 68 69 70 71 72 73 74 75
|
<layout xmlns:android="http://schemas.android.com/apk/res/android" xmlns:app="http://schemas.android.com/apk/res-auto" xmlns:tools="http://schemas.android.com/tools"> <data> <variable name="viewModel" type="com.example.mvvmdemo.MainViewModel"/> </data> <LinearLayout android:layout_width="match_parent" android:layout_height="match_parent" android:padding="@dimen/activity_vertical_margin" android:orientation="vertical" app:layout_behavior="@string/appbar_scrolling_view_behavior" tools:context="com.example.mvvmdemo.MainActivity" tools:showIn="@layout/activity_main"> <android.support.design.widget.TextInputLayout android:layout_width="match_parent" android:layout_height="wrap_content"> <EditText android:id="@+id/name" android:layout_width="match_parent" android:layout_height="wrap_content" android:hint="姓名" android:layout_margin="@dimen/activity_vertical_margin" /> </android.support.design.widget.TextInputLayout> <android.support.design.widget.TextInputLayout android:layout_width="match_parent" android:layout_height="wrap_content"> <EditText android:id="@+id/sex" android:layout_width="match_parent" android:layout_height="wrap_content" android:hint="性別" android:layout_margin="@dimen/activity_vertical_margin" /> </android.support.design.widget.TextInputLayout> <android.support.design.widget.TextInputLayout android:layout_width="match_parent" android:layout_height="wrap_content"> <EditText android:id="@+id/age" android:layout_width="match_parent" android:layout_height="wrap_content" android:hint="年齡" android:inputType="number" android:layout_margin="@dimen/activity_vertical_margin" /> </android.support.design.widget.TextInputLayout> <Button android:layout_width="match_parent" android:layout_height="wrap_content" android:text="提交" android:onClick="@{viewModel.applyUser}"/> <TextView android:layout_width="wrap_content" android:layout_height="wrap_content" android:layout_margin="@dimen/activity_vertical_margin" android:text="@{viewModel.user.name + '\n' + viewModel.user.sex + '\n' + viewModel.user.age}" /> </LinearLayout> </layout>
|
這裏依然是採用MD風格的界面設計,現在我們主要來看content_main中的代碼。我們可以看到layout中的代碼和上一節中介紹的差不多,但是這裏引入了一個叫MainViewModel的類,這個就是筆者提到的ViewModel類。我們可以看到,button中的android:onClick="@{viewModel.applyUser}"這句代碼的作用就是把View層中這個
Button的點擊邏輯交給 MainViewModel中的 applyUser方法處理,並且我們的User類也是通過ViewModel來引用的。
上面這個只是ViewModel在這裏的其中一個應用而已。下面來看看Activity和ViewModel中的代碼。
MainActivity:
|
1 2 3 4 5 6 7 8 9 10 11
|
public class MainActivity extends AppCompatActivity { protected void onCreate(Bundle savedInstanceState) { super.onCreate(savedInstanceState); // 創建ViewModel ActivityMainBinding activityMainBinding = DataBindingUtil.setContentView(this,R.layout.activity_main); MainViewModel mainViewModel = new MainViewModel(this,activityMainBinding); }
|
MainActivity的代碼很簡單,它的核心就是創建MainViewModel這一句,其他的邏輯都交給了ViewModel處理。當我們的遇到無法在ViewModel內部處理的業務時(例如菜單監控等),我們可以通過在View層中調用ViewModel的方法來實現。
MainViewModel:
|
1 2 3 4 5 6 7 8 9 10 11 12 13 14 15 16 17 18 19 20 21 22 23 24 25 26 27 28 29 30 31 32 33 34 35 36 37
|
public class MainViewModel { private ActivityMainBinding activityMainBinding; private ContentMainBinding contentMainBinding; private AppCompatActivity activity; private UserBean user; public MainViewModel(AppCompatActivity activity, ActivityMainBinding activityMainBinding){ this.activity = activity; this.activityMainBinding = activityMainBinding; this.contentMainBinding = activityMainBinding.contentMain; init(); } public void init(){ activity.setSupportActionBar(activityMainBinding.toolbar); activityMainBinding.fab.setOnClickListener(new View.OnClickListener() { @Override public void onClick(View view) { Snackbar.make(view, "Replace with your own action", Snackbar.LENGTH_LONG) .setAction("Action", null).show(); } }); user = new UserBean(); contentMainBinding.setViewModel(this); } public void applyUser(View v){ Snackbar.make(v,"提交成功",Snackbar.LENGTH_SHORT).setAction("Action",null).show(); user.name.set(contentMainBinding.name.getText().toString()); user.sex.set(contentMainBinding.sex.getText().toString()); user.age.set(Integer.valueOf(contentMainBinding.age.getText().toString())); } }
|
上面的代碼中要特別注意的一句代碼就是:
|
1
|
contentMainBinding.setViewModel(this);
|
這句代碼就實現了我們的ViewModel層與View層layout文件的綁定,這樣就使得View層中的layout能調用ViewModel中的一些方法,在本例子中就是button控件調用public
void applyUser(View v)方法。
代碼很簡單,這種方案的核心思想就是:
- View層中通過DataBinding生成Binding實例
- View層把生成的Binding實例傳遞給ViewModel層
- ViewModel層通過把自身與Binding實例綁定,從而實現View中layout與ViewModel的綁定。
通過這種方法還有一個好處就是,我們的layout文件中data標籤中只需要引入ViewModel就可以了,其它的數據對象統一在ViewModel中處理。
我們來看看Demo效果圖
初始化: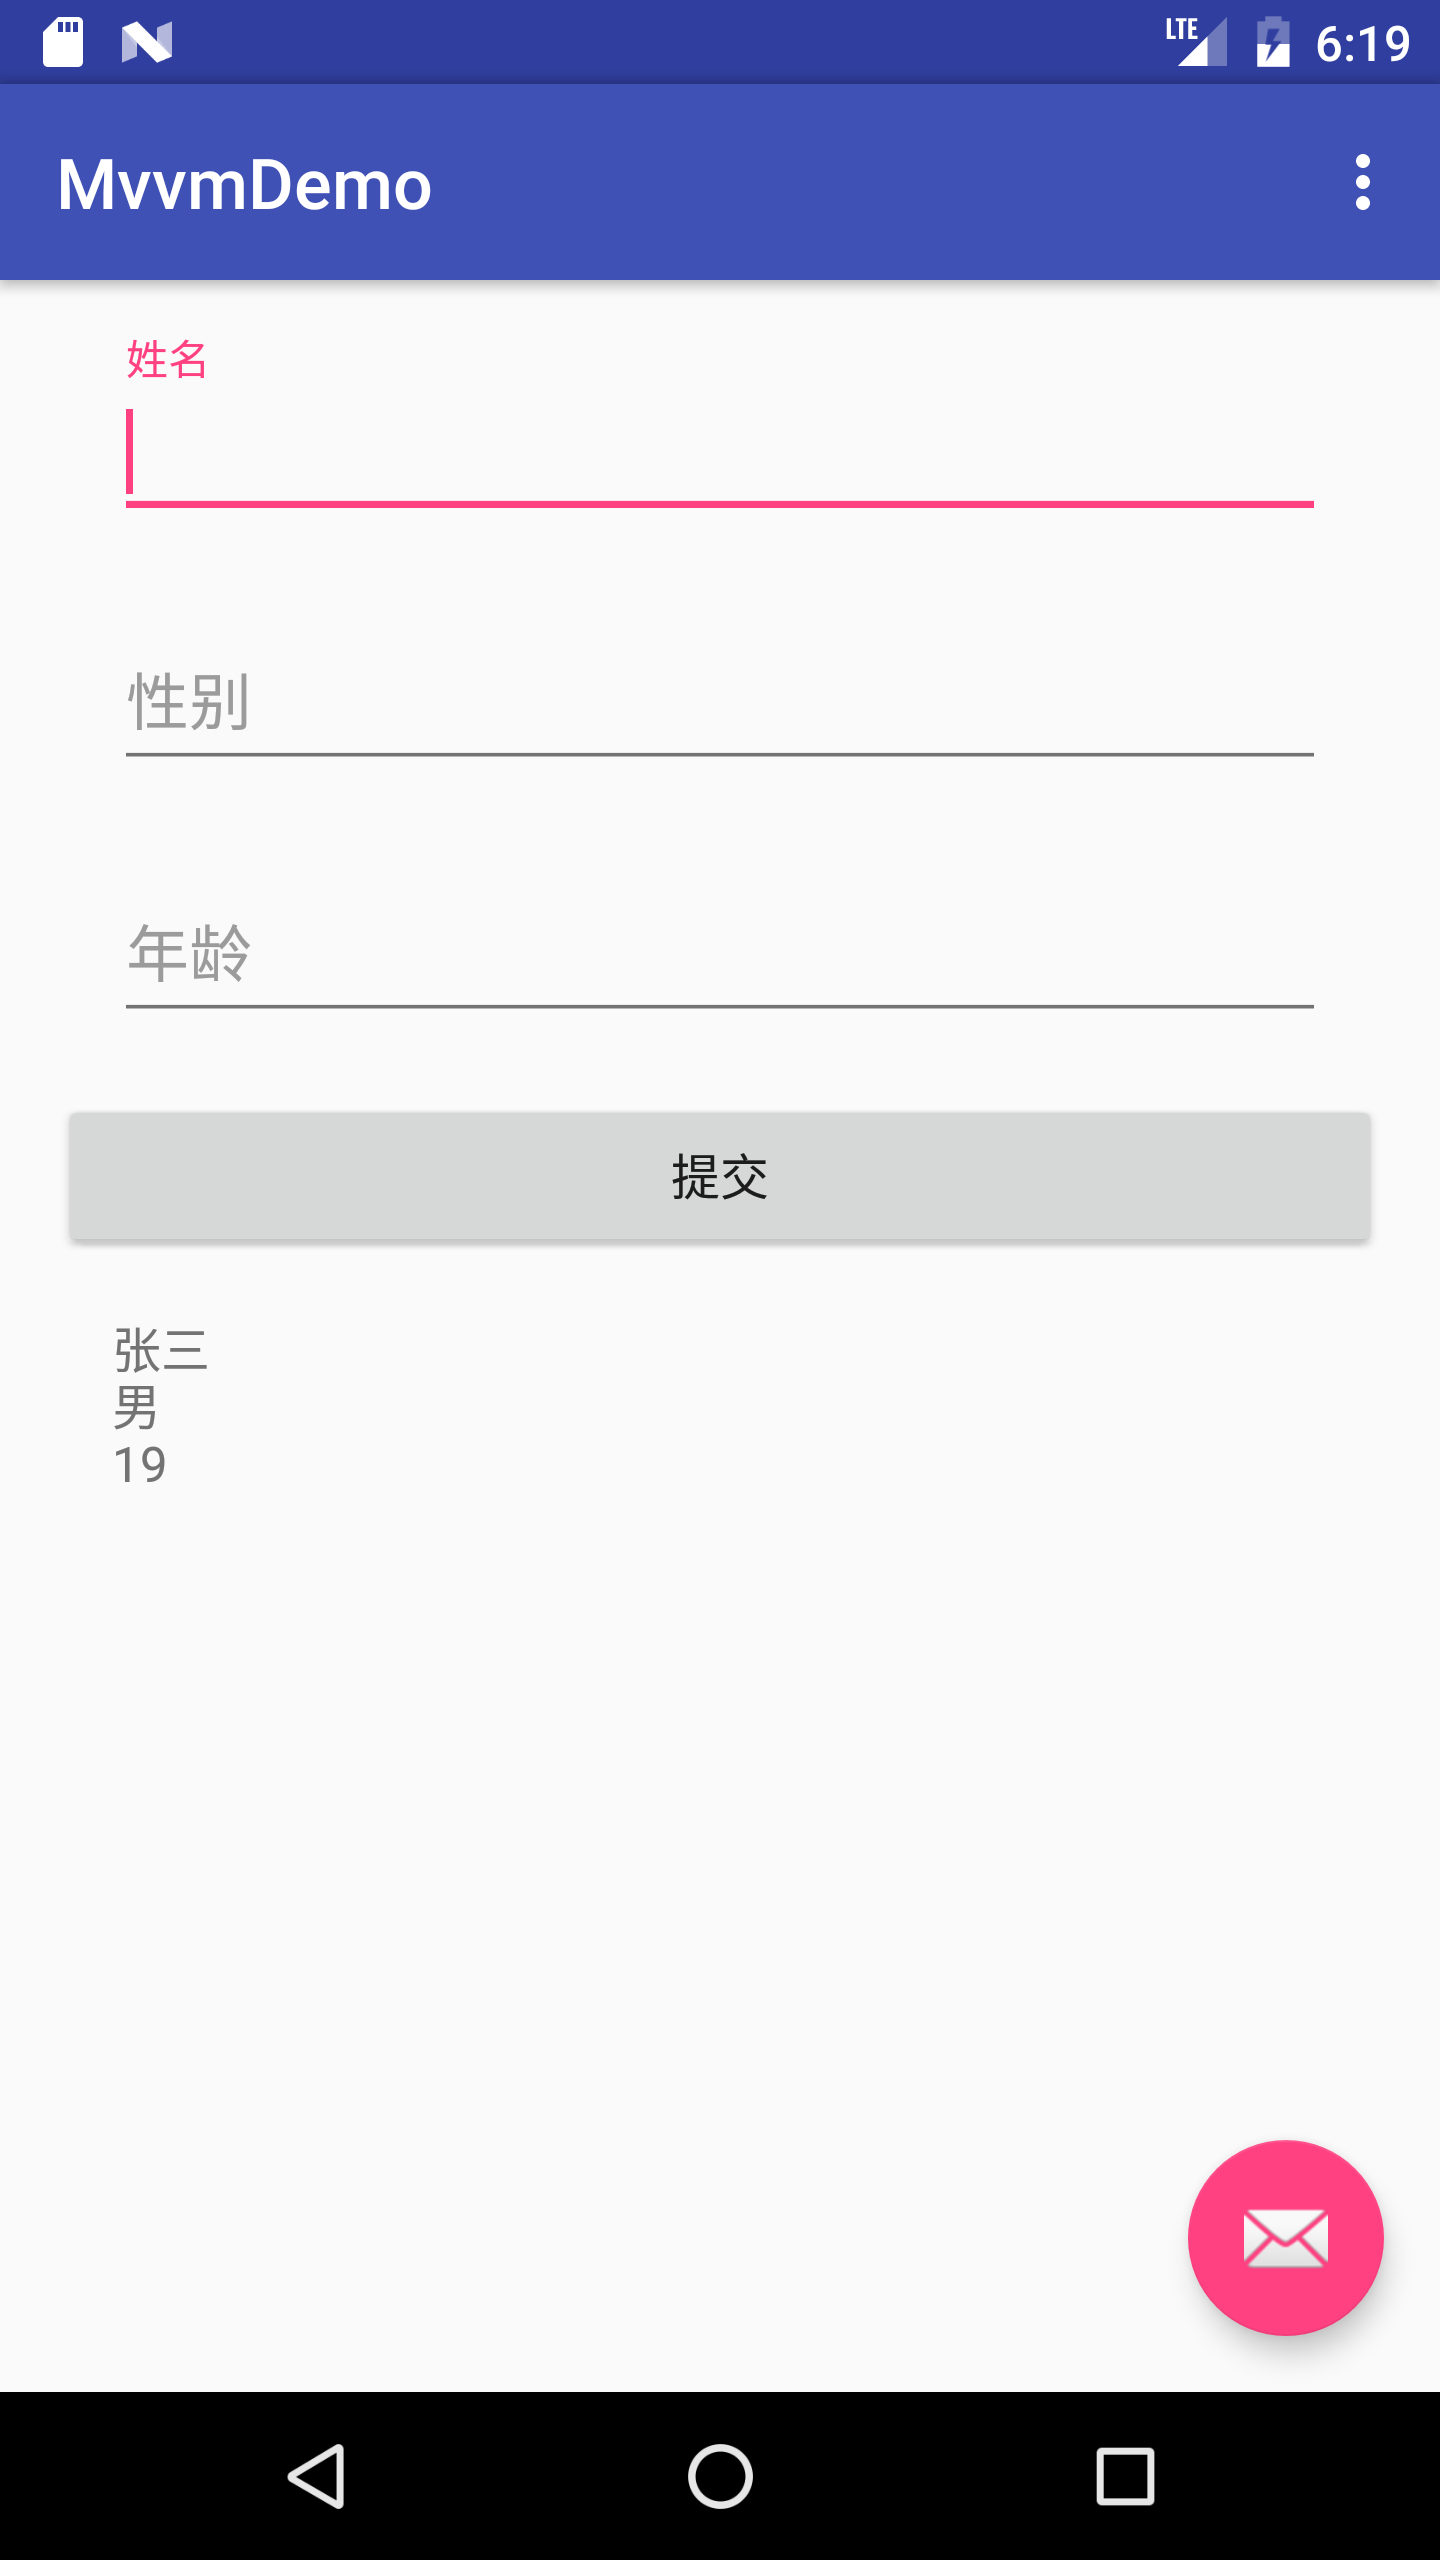
對User重新復賦值: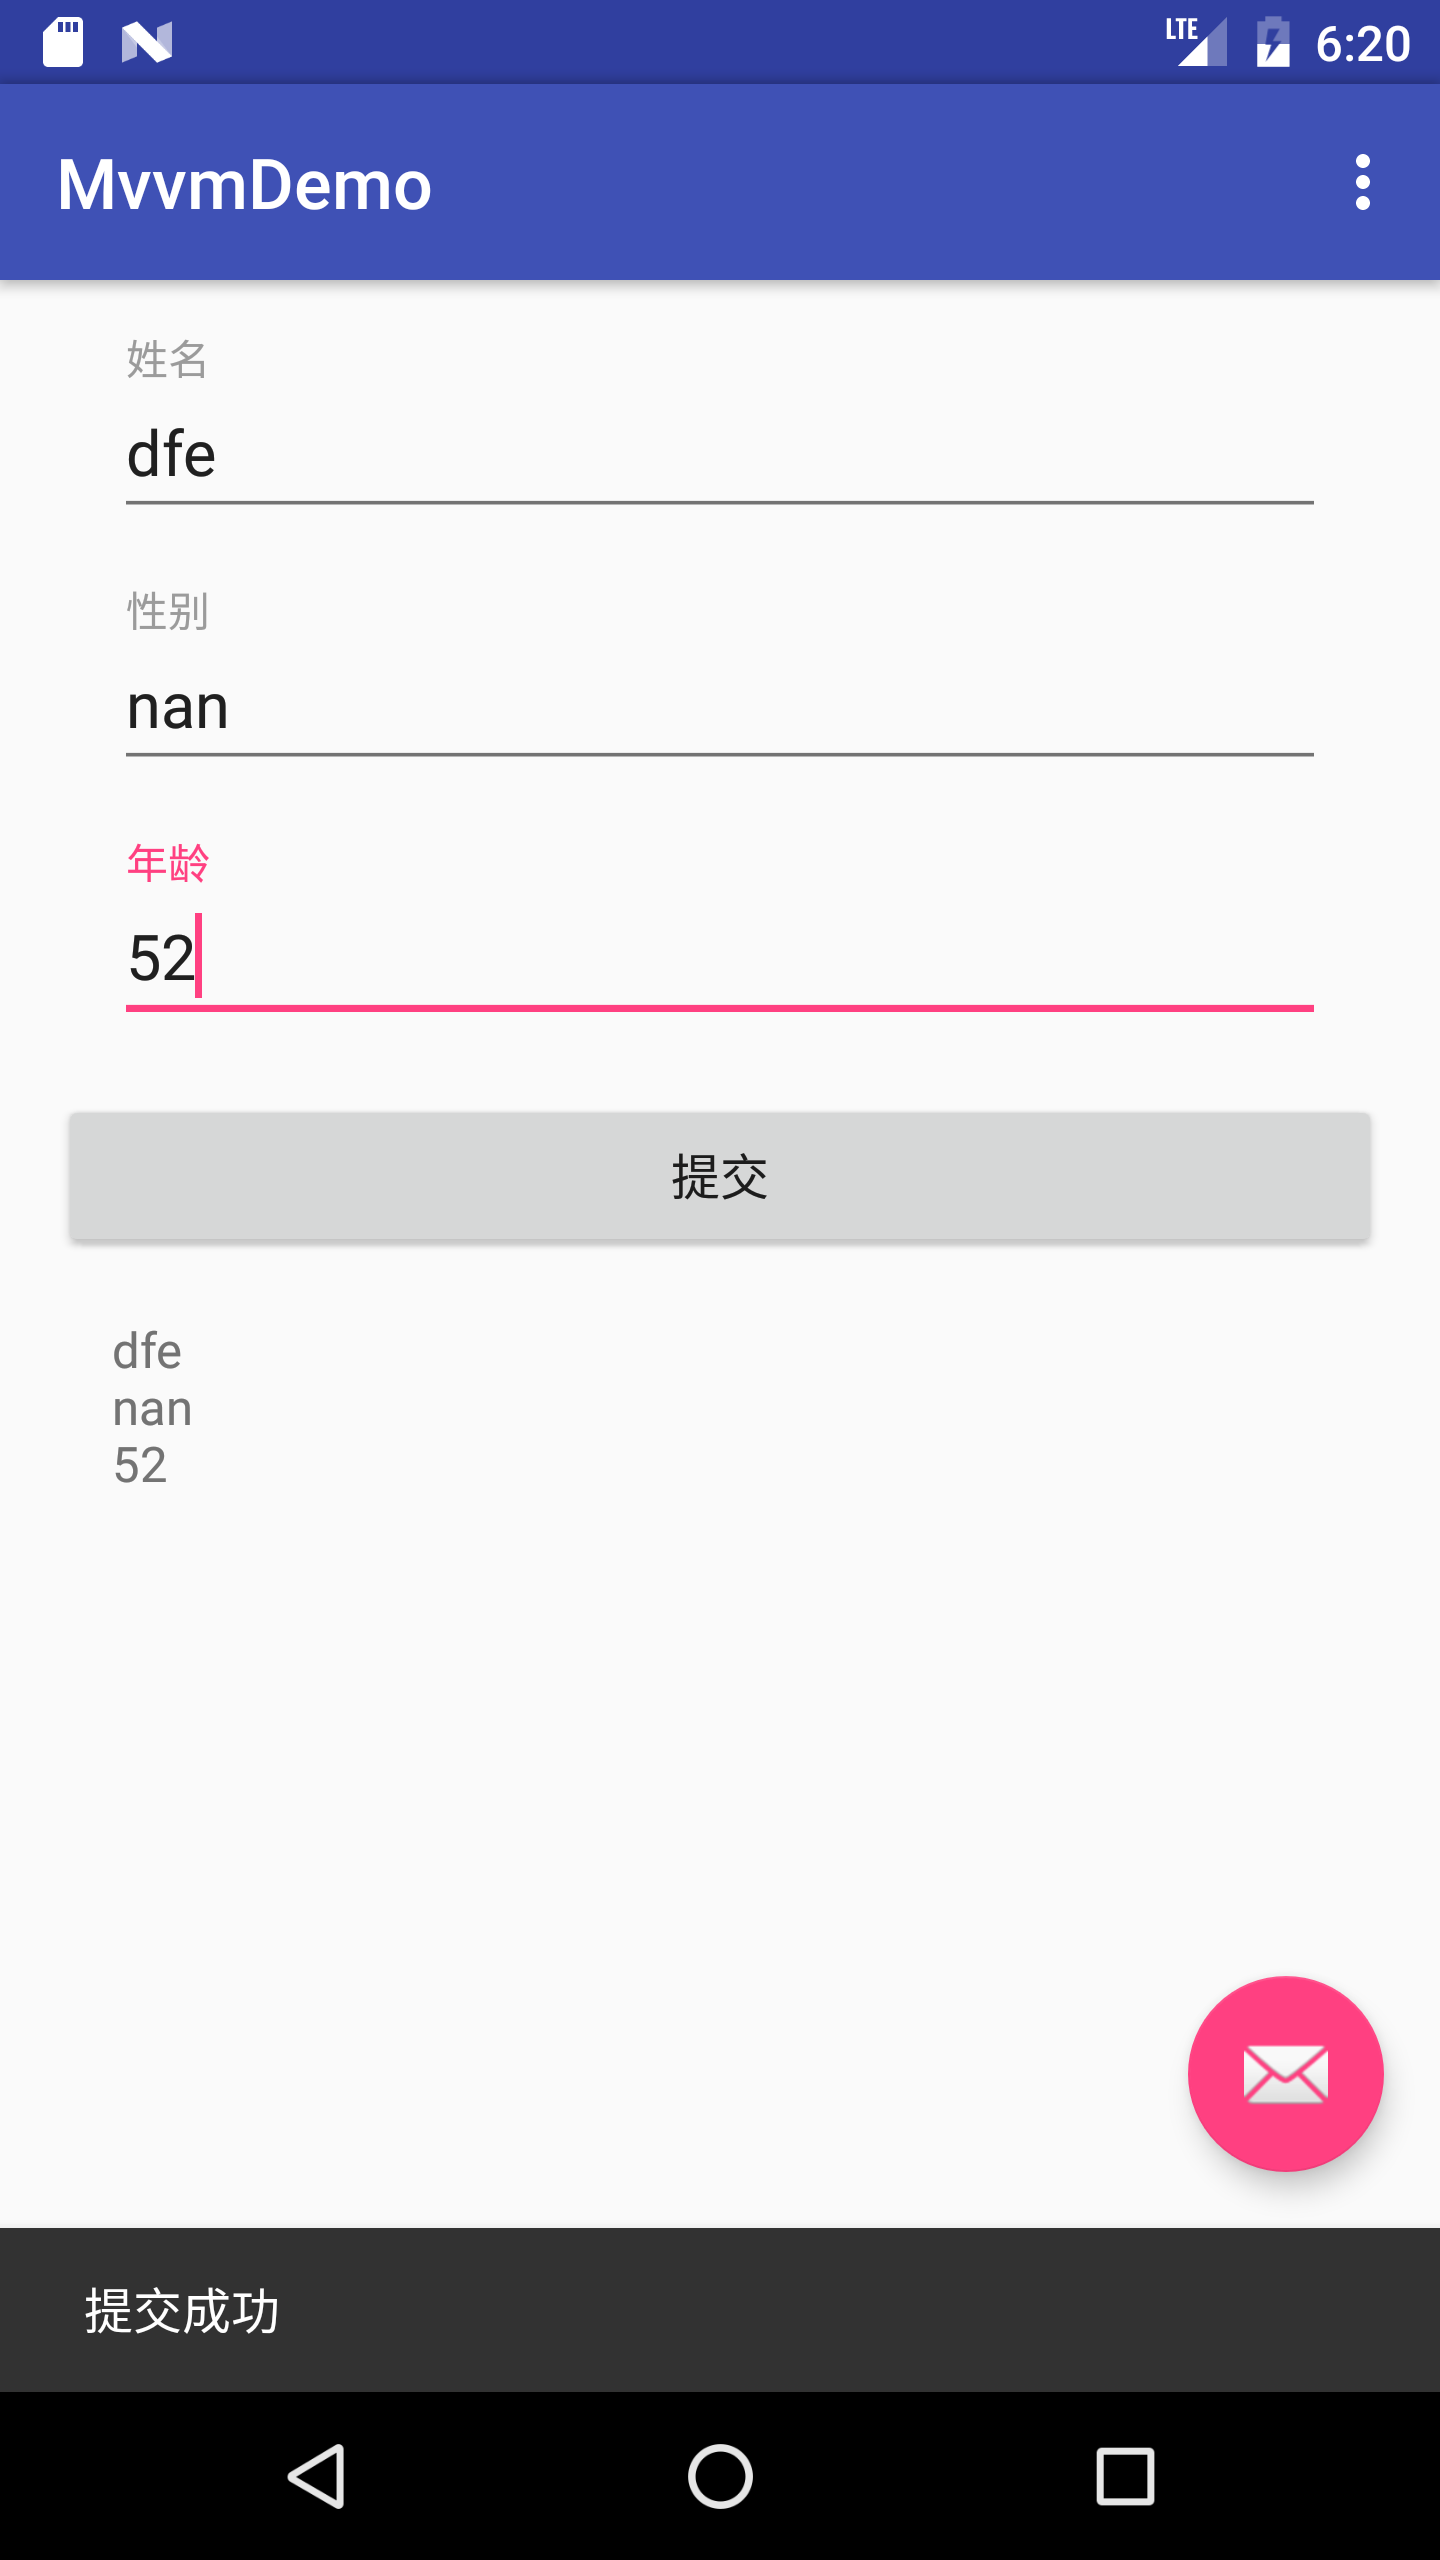
網上對於MVVM的一些錯誤解讀
除了上述提到的使用Binding充當ViewModel層的錯誤解讀外,還有一種大家注意的模式就是所謂的MVPVM模式。這種模式的核心思想就是在MVVM的基礎上加上Presenter層。筆者實在是有點搞不懂爲什麼要這樣分層,首先Presenter和ViewModel層都是邏輯控制層,同一個功能沒必要分出兩層。其次就是筆者認爲在APP中分出三層已經能很好地完成任務了,如果分成四層的話不好管理的同時還會增加代碼的複雜度,因爲你無法很好區分Presenter和ViewModel的具體功能。所以筆者在這裏建議,絕對不要使用所謂的MVPVM模式來進行開發。MVVM已經能很好地滿足我們的開發需求了。
小結
對MVVM在Android上的應用到這裏就結束了,看過筆者關於MVP模式框架設計的讀者應該會知道,這只是個開端。所以筆者在後面會專門寫一個系列關於介紹如何設計一個MVVM框架的文章的。在寫這個系列文章之前,首先會有一系列的基礎技術的介紹和一些技術解決方案,有興趣的讀者請留意哦。