


Android 拍照或從相冊取圖片並裁剪
在Android中,Intent觸發Camera程序,拍好照片後,將會返回數據,但是考慮到內存問題,Camera不會將全尺寸的圖像返回給調用的Activity,一般情況下,有可能返回的是縮略圖,比如120*160px。
這是爲什麼呢?這不是一個Bug,而是經過精心設計的,卻對開發者不透明。
比如攝像頭800W像素,根據我目前設置拍出來的圖片尺寸爲3200*2400px。有人說,那就返回唄,大不了耗1-2M的內存,不錯,這個尺寸的圖片確實只有1.8M左右的大小。但是你想不到的是,這個尺寸對應的Bitmap會耗光你應用程序的所有內存。Android出於安全性考慮,只會給你一個寒磣的縮略圖。
在Android2.3中,默認的Bitmap爲32位,類型是ARGB_8888,也就意味着一個像素點佔用4個字節的內存。我們來做一個簡單的計算題:3200*2400*4 bytes = 30M,所以用拍照得到的圖片需要裁剪處理後使用。
Android裁剪圖片的Intent附加數據的具體含義,拿圖說事兒:
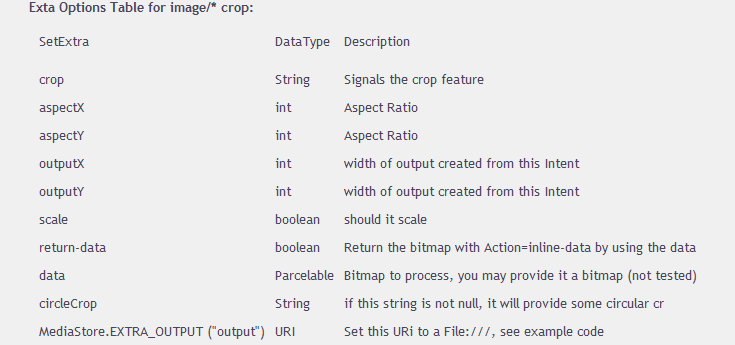
Intent("com.android.camera.action.CROP")對應的所有可選數據都一目瞭然。在瞭解上面個個選項的含義之後,我們將目光着眼於三個極爲重要的選項:
data、MediaStore.EXTRA_OUTPUT以及return-data。
data和MediaStore.EXTRA_OUTPUT都是可選的傳入數據選項,你可以選擇設置data爲Bitmap,或者將相應的數據與URI關聯起來,你也可以選擇是否返回數據(return-data: true)。
爲什麼還有不用返回數據的選項?如果對URI足夠了解的話,應該知道URI與File相似,你所有的操作如裁剪將數據都保存在了URI中,你已經持有了相應的URI,也就無需多此一舉,再返回Bitmap了。
前面已經說到,可以設置data爲Bitmap,但是這種操作的限制在於,你的Bitmap不能太大。因此,我們前進的思路似乎明確了:截大圖用URI,小圖用Bitmap。
我將這個思路整理成一張圖片:
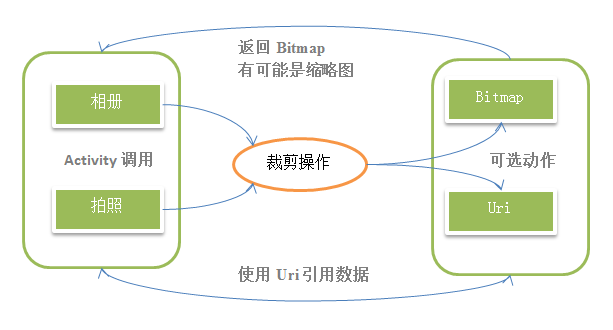
從相冊截圖
在上面,我就拍照截圖這一需求進行了詳細的分析,試圖讓大家瞭解Android本身的限制,以及我們應當採取的實現方案。
根據我們的分析與總結,圖片的來源有拍照和相冊,而可採取的操作有
- 使用Bitmap並返回數據
- 使用Uri不返回數據
前面我們瞭解到,使用Bitmap有可能會導致圖片過大,而不能返回實際大小的圖片,我將採用大圖Uri,小圖Bitmap的數據存儲方式。
我們將要使用到URI來保存拍照後的圖片:
private static final String IMAGE_FILE_LOCATION = "file:///sdcard/temp.jpg";//temp file
Uri imageUri = Uri.parse(IMAGE_FILE_LOCATION);//The Uri to store the big bitmap
不難知道,我們從相冊選取圖片的Action爲Intent.ACTION_GET_CONTENT。
根據我們上一篇博客的分析,我準備好了兩個實例的Intent。
一、從相冊截大圖:
Intent intent = new Intent(Intent.ACTION_GET_CONTENT, null);

intent.setType("image/*");

intent.putExtra("crop", "true");

intent.putExtra("aspectX", 2);

intent.putExtra("aspectY", 1);

intent.putExtra("outputX", 600);

intent.putExtra("outputY", 300);

intent.putExtra("scale", true);

intent.putExtra("return-data", false);

intent.putExtra(MediaStore.EXTRA_OUTPUT, imageUri);

intent.putExtra("outputFormat", Bitmap.CompressFormat.JPEG.toString());

intent.putExtra("noFaceDetection", true); // no face detection

startActivityForResult(intent, CHOOSE_BIG_PICTURE);
二、從相冊截小圖
Intent intent = new Intent(Intent.ACTION_GET_CONTENT, null);

intent.setType("image/*");

intent.putExtra("crop", "true");

intent.putExtra("aspectX", 2);

intent.putExtra("aspectY", 1);

intent.putExtra("outputX", 200);

intent.putExtra("outputY", 100);

intent.putExtra("scale", true);

intent.putExtra("return-data", true);

intent.putExtra("outputFormat", Bitmap.CompressFormat.JPEG.toString());

intent.putExtra("noFaceDetection", true); // no face detection

startActivityForResult(intent, CHOOSE_SMALL_PICTURE);
三、對應的onActivityResult可以這樣處理返回的數據
switch (requestCode) {

    case CHOOSE_BIG_PICTURE:

    Log.d(TAG, "CHOOSE_BIG_PICTURE: data = " + data);//it seems to be null

    if(imageUri != null){

    Bitmap bitmap = decodeUriAsBitmap(imageUri);//decode bitmap

    imageView.setImageBitmap(bitmap);

    }

    break;

    case CHOOSE_SMALL_PICTURE:

    if(data != null){

    Bitmap bitmap = data.getParcelableExtra("data");

    imageView.setImageBitmap(bitmap);

        }else{

    Log.e(TAG, "CHOOSE_SMALL_PICTURE: data = " + data);

        }

    break;

    default:

    break;

    }

private Bitmap decodeUriAsBitmap(Uri uri){

    Bitmap bitmap = null;

    try {

    bitmap = BitmapFactory.decodeStream(getContentResolver().openInputStream(uri));

        } catch (FileNotFoundException e) {

    e.printStackTrace();

        return null;

        }

    return bitmap;

    }
拍照截圖
拍照截圖有點兒特殊,要知道,現在的Android智能手機的攝像頭都是幾百萬的像素,拍出來的圖片都是非常大的。因此,我們不能像對待相冊截圖一樣使用Bitmap小圖,無論大圖小圖都統一使用Uri進行操作。
一、首先準備好需要使用到的Uri:
private static final String IMAGE_FILE_LOCATION = "file:///sdcard/temp.jpg";//temp file
Uri imageUri = Uri.parse(IMAGE_FILE_LOCATION);//The Uri to store the big bitmap
二、使用MediaStore.ACTION_IMAGE_CAPTURE可以輕鬆調用Camera程序進行拍照:
Intent intent = new Intent(MediaStore.ACTION_IMAGE_CAPTURE);//action is capture

intent.putExtra(MediaStore.EXTRA_OUTPUT, imageUri);

startActivityForResult(intent, TAKE_BIG_PICTURE);//or TAKE_SMALL_PICTURE
三、接下來就可以在 onActivityResult中拿到返回的數據(Uri),並將Uri傳遞給截圖的程序。
switch (requestCode) {

    case TAKE_BIG_PICTURE:

    Log.d(TAG, "TAKE_BIG_PICTURE: data = " + data);//it seems to be null
    //TODO sent to crop

    cropImageUri(imageUri, 800, 400, CROP_BIG_PICTURE);

    break;

    case TAKE_SMALL_PICTURE:

    Log.i(TAG, "TAKE_SMALL_PICTURE: data = " + data);

    //TODO sent to crop

    cropImageUri(imageUri, 300, 150, CROP_SMALL_PICTURE);

    break;

    default:

    break;

    }
可以看到,無論是拍大圖片還是小圖片,都是使用的Uri,只是尺寸不同而已。我們將這個操作封裝在一個方法裏面。
private void cropImageUri(Uri uri, int outputX, int outputY, int requestCode){

    Intent intent = new Intent("com.android.camera.action.CROP");

    intent.setDataAndType(uri, "image/*");

    intent.putExtra("crop", "true");

    intent.putExtra("aspectX", 2);

    intent.putExtra("aspectY", 1);

    intent.putExtra("outputX", outputX);

    intent.putExtra("outputY", outputY);

    intent.putExtra("scale", true);

    intent.putExtra(MediaStore.EXTRA_OUTPUT, uri);

    intent.putExtra("return-data", false);

    intent.putExtra("outputFormat", Bitmap.CompressFormat.JPEG.toString());

    intent.putExtra("noFaceDetection", true); // no face detection

    startActivityForResult(intent, requestCode);

    }
四、最後一步,我們已經將數據傳入裁剪圖片程序,接下來要做的就是處理返回的數據了:
    switch (requestCode) {

    case CROP_BIG_PICTURE://from crop_big_picture

    Log.d(TAG, "CROP_BIG_PICTURE: data = " + data);//it seems to be null

    if(imageUri != null){

    Bitmap bitmap = decodeUriAsBitmap(imageUri);

    imageView.setImageBitmap(bitmap);

    }

    break;

    case CROP_SMALL_PICTURE:

    if(imageUri != null){

    Bitmap bitmap = decodeUriAsBitmap(imageUri);

    imageView.setImageBitmap(bitmap);

    }else{

    Log.e(TAG, "CROP_SMALL_PICTURE: data = " + data);

    }

    break;

    default:

    break;

    }