google支付回調驗證
Google支付問題
20150218,掛機的日本服務器出現google支付被刷單現象,雖然目前進行的修補,但是這個問題並沒有完全從根源上解決。並且公司以前的GooglePlay支付也有不完善的地方,在SDK端給支付回調發送支付信息後,支付回調程序沒有調用Google API進行訂單驗證。因此Google支付流程需要進行完善。
Google支付解決方案
上面的支付問題,Google有自己的解決方案,就是根據訂單號去向Google API發送驗證申請,Google API會返回訂單相關信息。可以根據這個信息和SDK返回的信息進行對比驗證。
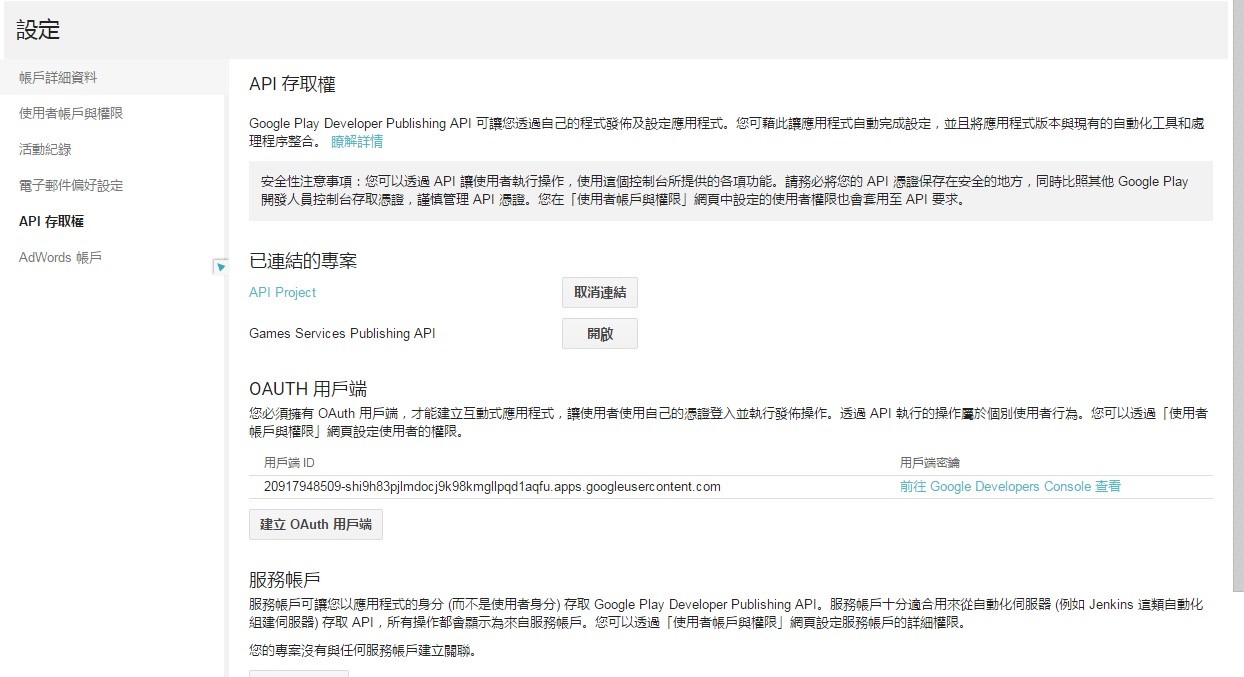
對於申請Google賬號之類的流程,相信運營已經很清楚了,但是使用Google API還需要使用Google Developer Console創建Web Application賬戶,而後獲取到client_id、client_secret、refresh_token。具體流程見下面:
1. 登陸 Google Developer Console,地址:https://code.google.com/apis/console/
2. 在APIs & auth 項中找到 Credentials,點擊創建一個auth2.0 的web應用
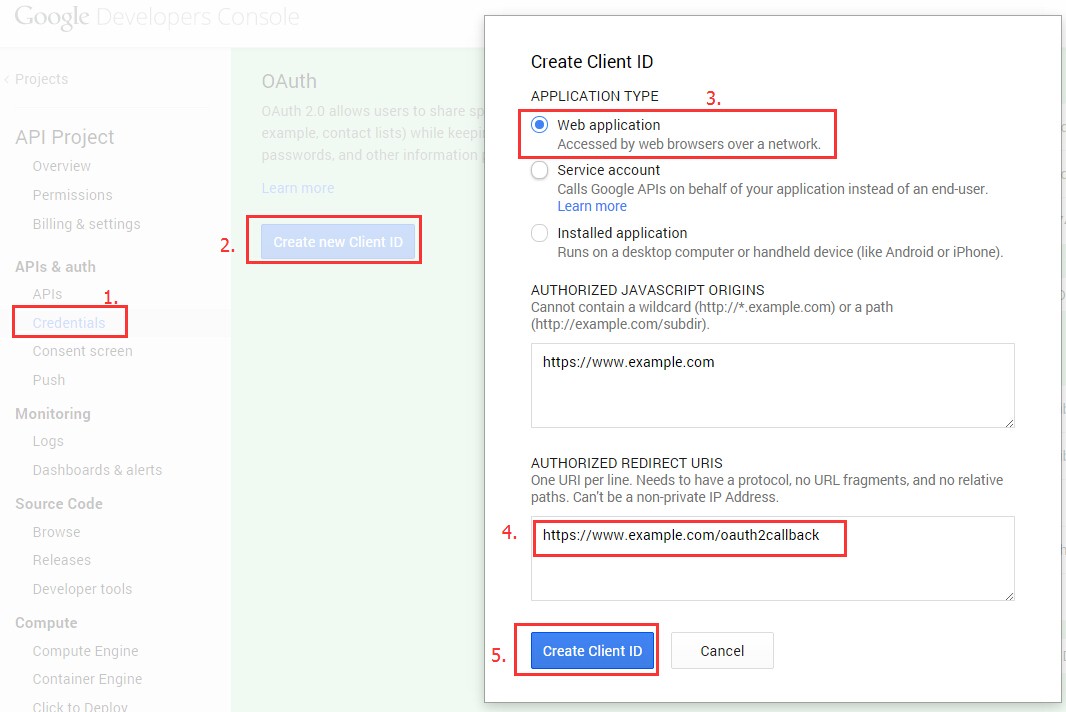
其中4的地址一定是可用域名 + /oauth2callback
創建完後,可以獲得,client_id, client_secret, redirect_url
3. 獲取Authorization code
google中心在登陸狀態,打開新頁面輸入如下地址:
https://accounts.google.com/o/oauth2/auth?scope=https://www.googleapis.com/auth/androidpublisher&response_type=code&access_type=offline&redirect_uri={REDIRECT_URIS}&client_id={CLIENT_ID}
將藍色部分根據相應的值進行替換;
這時會提示你是否要授權,點擊授權,url地址欄會自動跳轉,之後會獲得code例如:https://www.example.com/oauth2callback?code=4/CpVOd8CljO_gxTRE1M5jtwEFwf8gRD44vrmKNDi4GSS.kr-GHuseD-oZEnp6UADFXm0E0MD3FlAI
4. 利用code獲取refresh_token,這裏需要post請求
請求地址:https://accounts.google.com/o/oauth2/token
請求參數:code, client_id, client_secret, redirect_uri, grant_type
其中 grant_type 值爲authorization_code
第一次發起請求得到的JSON字符串如下所示,以後再請求將不再出現refresh_token(長令牌,一般不會失效),需要保存好refresh_token,可以存放到配置文件(或者寫到數據庫),以備後用。
要保存好。expires_in是指access_token的時效,爲3600秒
{
"access_token":"ya29.3gC2jw5vm77YPkylq0H5sPJeJJDHX93Kq8qZHRJaMlknwJ85595eMogL300XKDOEI7zIsdeFEPY6zg",
"token_type":"Bearer",
"expires_in":3600,
"refresh_token":"1/FbQD448CdDPfDEDpCy4gj_m3WDr_M0U5WupquXL_o"
}
在獲取到client_id、client_secret、refresh_token後,我們的支付回調程序就可以使用訂單號去請求Google Api進行驗證。
有愛Google支付回調驗證流程
通過上一步獲取到client_id、client_secret、refresh_token之後,支付回調程序就可以調用google api進行支付驗證。具體流程如下:
1. 獲取access_token。
請求地址:https://accounts.google.com/o/oauth2/token
請求方式:post
請求參數:client_id, client_secret, refresh_toke, grant_type
grant_type 值固定爲 refresh_token
返回:json
2. 通過獲得access_token 就可以請求谷歌的 API接口,獲得訂單狀態
在這裏我所需要獲取的是我在應用內給GooglePlay支付的購買信息,此類信息包含以下幾個屬性:(可參考Google Play Developer API下的Purchases.products)
A ProductPurchase resource indicates the status of a user's inapp product purchase.
請求接口:https://www.googleapis.com/androidpublisher/v2/applications/packageName/purchases/products/productId/tokens/purchaseToken?access_token=access_token
| packageName | The package name of the application the inapp product was sold in (for example, 'com.some.thing'). | |
| productId |
The inapp product SKU (for example, 'com.some.thing.inapp1'). |
|
| purchaseToken | The token provided to the user's device when the inapp product was purchased.
就是訂單中purchaseToken |
返回數據:
{
"kind": "androidpublisher#productPurchase",
"purchaseTimeMillis": long,
"purchaseState": integer, (purchased:0 cancelled:1,我們就是依靠這個判斷購買信息)
"consumptionState": integer,
"developerPayload": string
}
到此支付驗證完成!
參考文檔:
http://www.vimer.cn/2014/04/google%E6%94%AF%E4%BB%98%E6%8E%A5%E5%8F%A3%E8%A2%AB%E5%88%B7%E4%BB%A5%E5%8F%8A%E8%A7%A3%E5%86%B3%E6%96%B9%E6%A1%88.html
http://blog.csdn.net/hjun01/article/details/42032841
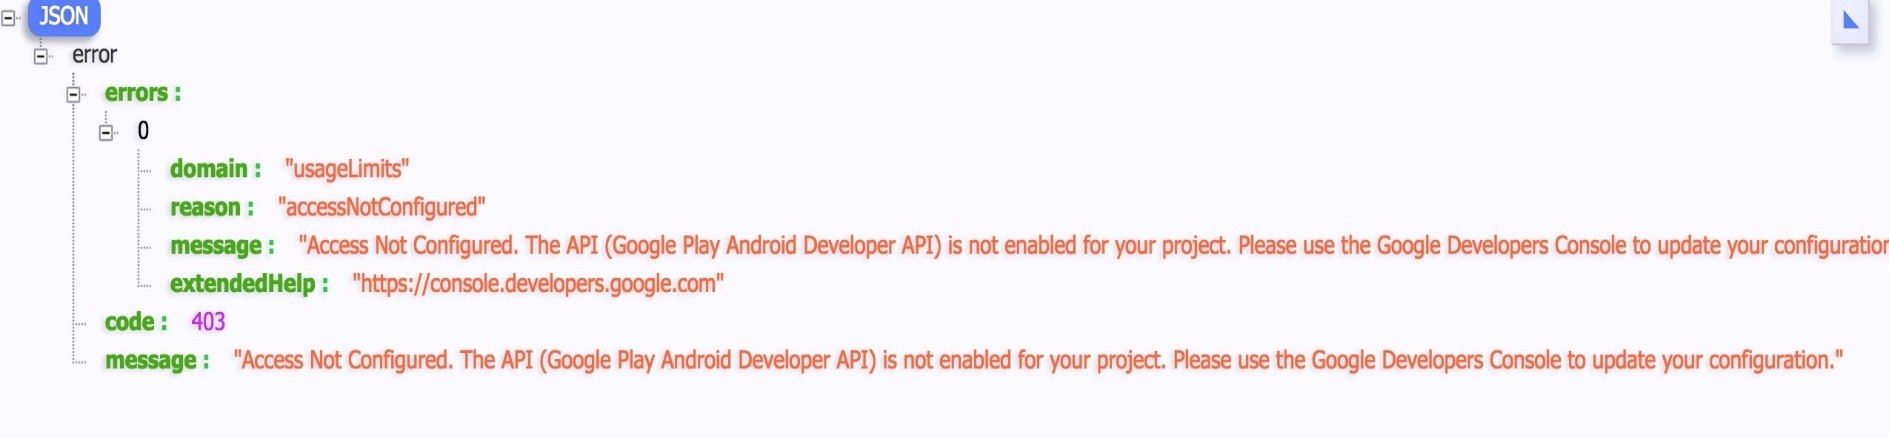
調用接口遇到的幾個問題:
1. Access Not Configured.
{
"error": {
"errors": [
{
"domain": "usageLimits",
"reason": "accessNotConfigured",
"message": "Access Not Configured. The API(Google Play Android Developer API)is not enabled for you project.Please use Google Developers Console to update your configuration."
}
],
"code": 403,
"message": "Access Not Configured. The API(Google Play Android Developer API)is not enabled for you project.Please use Google Developers Console to update your configuration."
}
}
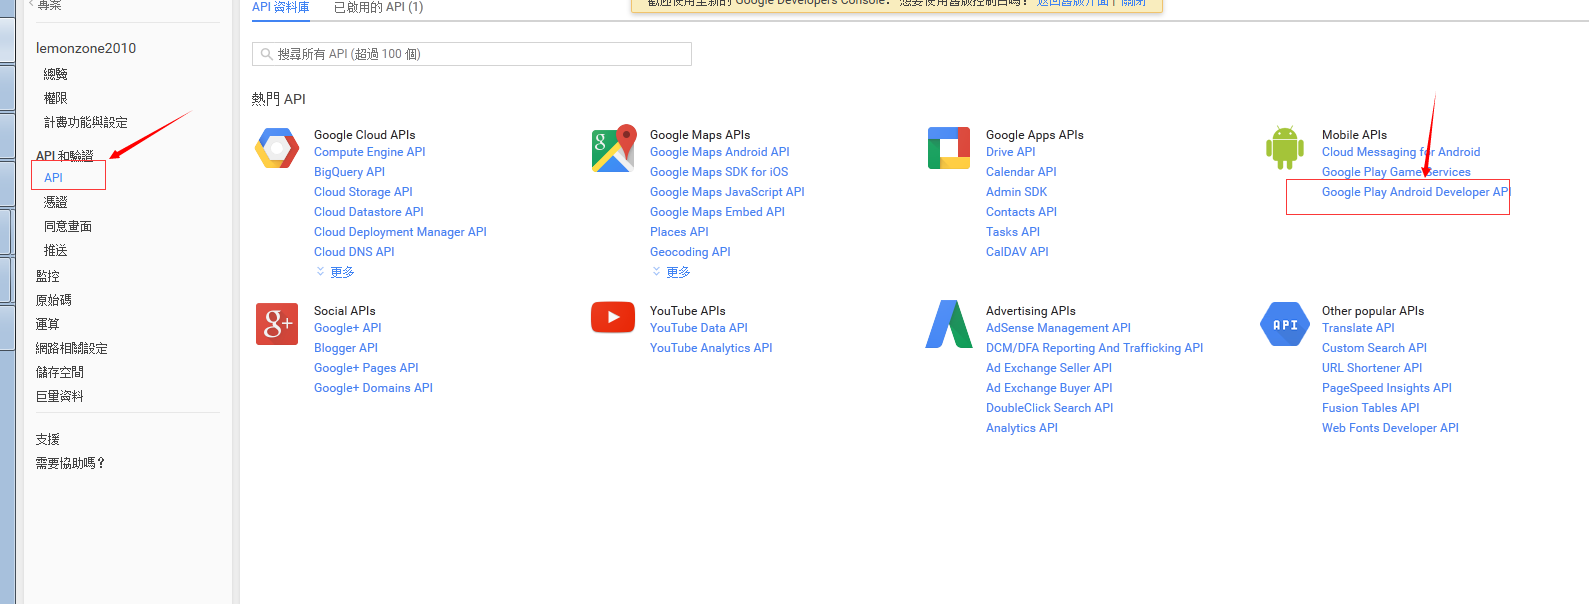
在這個頁面:https://console.developers.google.com
Google Developer Console
1. "Google Developer Console" > "APIs & Auth" subcategory "APIs" > (api list) "Google Play Android Developer API". Set "STATUS" to "ON".
2. "APIs & auth" subcategory "Credentials" > "Create new Client ID". Choose "Service account" and create the id.
3. You should get a P12 key from the browser.
問題2: projectNotLinked
{
"error": {
"errors": [
{
"domain": "androidpublisher",
"reason": "projectNotLinked",
"message": "The project id used to call the Google Play Developer API has not been linked in the Google Play Developer Console."
}
],
"code": 403,
"message": "The project id used to call the Google Play Developer API has not been linked in the Google Play Developer Console."
}
}
在這個頁設置關聯:https://play.google.com/apps/publish/
Google Play Developer Console
1. "Google Play Developer Console" > "Settings" > subcategory "API access".
2. Make a link to your "Linked Project".
3. "Service Account" place maybe already showing ur "Service account" CLIENT ID which made "google developer console".