


爲了更好的創建代碼和組織代碼結構,改進團隊合作,以及減少代碼量。在Ext JS 4引入了MVC模式, 更進一步,在Ext JS 5引入了MVVM模式。
MVC and MVVM模式
首先我們學習一些基本概念
- Model: fields(字段)和數據的集合. 它被用於存放需要被顯示的數據。同我們的組件或代碼一起使用。 可以參考 Ext JS Data Package
- View: 它是與用戶進行交互的視覺部分。主要爲容器類型的組件 - grids, panels trees
- Controller: 用於處理View與Model的數據交互,它包含大部分的邏輯。它就是model和view的中間層
- ViewController: 它是一個controller, 被添加到一個特定的view實例中,並且管理這個view和它的子組件。每次創建一個View, 則ViewController的實例也將被創建。
- ViewModel: 這個類用來管理數據對像,並且能夠讓我們將它的數據綁定到view中,在 angular中,稱爲雙向綁定。類似於ViewController, 新創建的view, 也就創建了ViewModel
What is MVC?
在MVC架構中,大部分類爲Models, Views 或者Controllers中的一種。 用戶跟View進行交互,並且顯示Models中保存的數據。View與Models的交互是通過Controller層進行,它負責更新View和Model.
MVC的目的是明確application中每個類的職責。因爲每一個類都有明確的責任劃分,對於大的應用來說,它擁有更好的解耦。易於測試和維護,代碼更具可用性

What is MVVM?
MVVM的優點在於數據綁定。通過這種方式,model與框架有了更多的內部交互,因此可以減少操作 view的應用邏輯。儘管名字爲Model-View-ViewModel, MVVM模式可能依舊使用了controllers(許多開發都稱它爲MVC+VM體系)

如上圖所示,ViewMOdel將數據與form中的文本框進行綁定。
Building a Sample App
在我們繼續之前,我們通過Sencha Cmd創建一個樣例.
sencha -sdk local/path/to/ExtJS generate app MyApp MyApp
cd app
sencha app watch
Application Overview
在我們討論MVC, MVVM, MVC+VM模式之前,讓我們看看Cmd生成的文件結構
File Structure
Ext js application遵循統一的目錄結構,即每個app都有相同的目錄結構。我們推薦將Layout, Store, Model, ViewModel以及ViewController的類都放到app目錄下(ViewModes/Controllers 放到 app/view), 如下圖所示. 最佳的原則是進行邏輯分組,將ViewControllers與ViewModels相關的View保存到app/view的子目錄中。如下圖的app/view/main以下classic/src/view/main.

Namespace
每個類的第一行是一個分類地址,這個”address”稱爲命名空間,命間的命名爲
<AppName>.<foldername>.<ClassAndFileName>
在我們的樣例中, app的名稱爲”MyApp”, “view”是它的文件夾名稱, “main”是這個子文件夾名。 “Main”是這個類和文件名稱。基於這些信息,框架會從以下位置查找一個稱爲Main.js的文件
// Classic
classic/src/view/main/Main.js

// Modern
modern/src/view/main/Main.js

// Core
// "MyApp.view.main.MainController" shared between toolkits would be located at:
app/view/main/MainController.js
如果沒有找到,會拋出一個異常,直到你改正錯誤

Application
通過index.html,我們開始瞭解整個應用
<!DOCTYPE HTML>
<html manifest="">
<head>
    <meta http-equiv="X-UA-Compatible" content="IE=edge">
    <meta charset="UTF-8">

    <title>MyApp</title>


    <script type="text/javascript">
        var Ext = Ext || {}; // Ext namespace won't be defined yet...

        // This function is called by the Microloader after it has performed basic
        // device detection. The results are provided in the "tags" object. You can
        // use these tags here or even add custom tags. These can be used by platform
        // filters in your manifest or by platformConfig expressions in your app.
        //
        Ext.beforeLoad = function (tags) {
            var s = location.search,  // the query string (ex "?foo=1&bar")
                profile;

            // For testing look for "?classic" or "?modern" in the URL to override
            // device detection default.
            //
            if (s.match(/\bclassic\b/)) {
                profile = 'classic';
            }
            else if (s.match(/\bmodern\b/)) {
                profile = 'modern';
            }
            else {
                profile = tags.desktop ? 'classic' : 'modern';
                //profile = tags.phone ? 'modern' : 'classic';
            }

            Ext.manifest = profile; // this name must match a build profile name

            // This function is called once the manifest is available but before
            // any data is pulled from it.
            //
            //return function (manifest) {
                // peek at / modify the manifest object
            //};
        };
    </script>


    <!-- The line below must be kept intact for Sencha Cmd to build your application -->
    <script id="microloader" type="text/javascript" src="bootstrap.js"></script>

</head>
<body></body>
</html>
Ext JS使用Microloader加載在app.json文件中描述的應用資源, 而不是將需要的資源添加到index.html文件中。通過app.js將應用程序需要的所在元數據,保存在一個地方。
然後可以通過Sencha Cmd對應用程序進行編譯。
通過beforeLoad部分和平臺特性,可以參考 Developing for Multiple Environments and Screens guide.
app.js
當我們在之前生成了我們的application, 我們就創建了一個類(in Application.js). 並且在app.js中啓動了它的實例。你可以看到app.js的內容如下
/*
 * This file is generated and updated by Sencha Cmd. You can edit this file as
 * needed for your application, but these edits will have to be merged by
 * Sencha Cmd when upgrading.
 */
Ext.application({
    name: 'MyApp',

    extend: 'MyApp.Application',

    requires: [
        'MyApp.view.main.Main'
    ],

    // The name of the initial view to create. With the classic toolkit this class
    // will gain a "viewport" plugin if it does not extend Ext.Viewport. With the
    // modern toolkit, the main view will be added to the Viewport.
    //
    mainView: 'MyApp.view.main.Main'

    //-------------------------------------------------------------------------
    // Most customizations should be made to MyApp.Application. If you need to
    // customize this file, doing so below this section reduces the likelihood
    // of merge conflicts when upgrading to new versions of Sencha Cmd.
    //-------------------------------------------------------------------------
});
通過mainView屬性,以一個容器類作爲應用程序的Viewport, 我們在這裏使用了一個 MyApp.view.main.Main(一個TabPanel Class)作爲我們的窗口。
mainView會讓application創建指定的View,並且附上Viewport插件。
Application.js
每一個 Ext JS都是從Application Class的一個實例開始, 這個類主要被用於app.js啓動一個實例,或者用於測試時,創建一個實例。
以下是通過Sencha Cmd創建的Application.js
Ext.define('MyApp.Application', {
    extend: 'Ext.app.Application',

    name: 'MyApp',

    stores: [
        // TODO: add global / shared stores here
    ],

    launch: function () {
        // TODO - Launch the application
    },

    onAppUpdate: function () {
        Ext.Msg.confirm('Application Update', 'This application has an update, reload?',
            function (choice) {
                if (choice === 'yes') {
                    window.location.reload();
                }
            }
        );
    }
});
更多的配置可以查看Application Class. onAppUpdate方法是當應用過期時調用(瀏覽器緩存跟服務器的最新版本不同時). 提示用戶重新加載應用。
The views
一個View只不過是一個組件,它是Ext.Component的一個子類。一個View包含了應用程序的視圖要素。
如果你打開 classic/src/view/main/Main.js文件, 你將看到如下的代碼
Ext.define('MyApp.view.main.Main', {
    extend: 'Ext.tab.Panel',
    xtype: 'app-main',

    requires: [
        'Ext.plugin.Viewport',
        'Ext.window.MessageBox',

        'MyApp.view.main.MainController',
        'MyApp.view.main.MainModel',
        'MyApp.view.main.List'
    ],

    controller: 'main',
    viewModel: 'main',

    ui: 'navigation',

    tabBarHeaderPosition: 1,
    titleRotation: 0,
    tabRotation: 0,

    header: {
        layout: {
            align: 'stretchmax'
        },
        title: {
            bind: {
                text: '{name}'
            },
            flex: 0
        },
        iconCls: 'fa-th-list'
    },

    tabBar: {
        flex: 1,
        layout: {
            align: 'stretch',
            overflowHandler: 'none'
        }
    },

    responsiveConfig: {
        tall: {
            headerPosition: 'top'
        },
        wide: {
            headerPosition: 'left'
        }
    },

    defaults: {
        bodyPadding: 20,
        tabConfig: {
            plugins: 'responsive',
            responsiveConfig: {
                wide: {
                    iconAlign: 'left',
                    textAlign: 'left'
                },
                tall: {
                    iconAlign: 'top',
                    textAlign: 'center',
                    width: 120
                }
            }
        }
    },

    items: [{
        title: 'Home',
        iconCls: 'fa-home',
        // The following grid shares a store with the classic version's grid as well!
        items: [{
            xtype: 'mainlist'
        }]
    }, {
        title: 'Users',
        iconCls: 'fa-user',
        bind: {
            html: '{loremIpsum}'
        }
    }, {
        title: 'Groups',
        iconCls: 'fa-users',
        bind: {
            html: '{loremIpsum}'
        }
    }, {
        title: 'Settings',
        iconCls: 'fa-cog',
        bind: {
            html: '{loremIpsum}'
        }
    }]
});請注意一個view不會包含任何的應用邏輯。所有的應用邏輯應該包含在ViewController
view的兩個有趣的配置是`controller和viewModel。
下一個View是 “List”, classic/src/main/view/List
Ext.define('MyApp.view.main.List', {
    extend: 'Ext.grid.Panel',
    xtype: 'mainlist',

    requires: [
        'MyApp.store.Personnel'
    ],

    title: 'Personnel',

    store: {
        type: 'personnel'
    },

    columns: [
        { text: 'Name',  dataIndex: 'name' },
        { text: 'Email', dataIndex: 'email', flex: 1 },
        { text: 'Phone', dataIndex: 'phone', flex: 1 }
    ],

    listeners: {
        select: 'onItemSelected'
    }
});
controller config
``controller配置允許你爲 view指派一個ViewController. 當一個ViewController通過這種方式指定,它變爲事件處理器和引用的引用的容器, 使得來自於這個view中的組件事件形成一對一的關係 。
瞭解ViewController, 可以參考文檔 View Controllers
ViewModel config
viewModel配置允許你指派一個ViewModel. 這個ViewModel爲這個組件和它的子View提供數據。ViewModel中包含的數據通過bind配置進行添加到組件。
在”Main” view中,你可以看到header中的title, 就綁定了ViewModel的數據。這意味着,title的值存放爲data爲”name”的值。這些都是通過ViewModel進行管理。如果ViewModel的數據被改變,title的值也將自動被更新。
瞭解更多View Model, 可以參考文檔 View Models & Binding 和 View Model Internals
Models and Stores
Models和Stores 組成了應用程序的信息門戶,大部分的數據都是它們發送,接收,組件和模式化(標準化數據).
Models
Ext.data.Model表示應用程序中任何可持化的數據類型。每一個model都有字段和函數,使用應用可以”model”數據。 Models常跟Stores一起使用。Stores常被用於grids, trees, charts等組件。
我們創建一個app/model/user.js文件
Ext.define('MyApp.model.User', {
    extend: 'Ext.data.Model',
    fields: [
        {name: 'name',  type: 'string'},
        {name: 'age',   type: 'int'}
    ]
});
Stores
stores 是一個客戶端記錄緩存(多個model實例). Stores提供排序,過濾,查詢等函數
app/store/Users.js
Ext.define('MyApp.store.Users', {
    extend: 'Ext.data.Store',
    alias: 'store.users',
    model: 'MyApp.model.User',
    data : [
     {firstName: 'Seth', age: '34'},
     {firstName: 'Scott', age: '72'},
     {firstName: 'Gary', age: '19'},
     {firstName: 'Capybara', age: '208'}
    ]
});
你可以在Application.js中, 通過store配置,使用上面定義的users store
stores: [
    'Users'
],
在這個例子中,store直接包含數據。在實中應該能過store中的proxy獲取記錄。關於更多,你可以查看 Data Guide
The controller
跟View一樣,我們先看看自動生成的Controllers. 文件爲MainController.js
Ext.define('MyApp.view.main.MainController', {
    extend: 'Ext.app.ViewController',

    alias: 'controller.main',

    onItemSelected: function (sender, record) {
        Ext.Msg.confirm('Confirm', 'Are you sure?', 'onConfirm', this);
    },

    onConfirm: function (choice) {
        if (choice === 'yes') {
            //
        }
    }
});
回過頭來看一下,我們上一節,自動生成的List.js文件,它監聽一個select 事件。監聽處理函數onItemSelected將通過父視圖Main.js的controller進行配置。
當選擇grid的一行,將創建一個消息框,這個消息框包含控制器自已定義的onConfirm函數。
ViewControllers的作用:
- 使用 “listeners”和 “reference”配置,就可以在view中使用ViewController中的函數
- 利用view的生命週期,自動管理它們相關聯的 ViewController. 相同View的第二個實例,將獲得自己的ViewController實例。當View被刪除,相應的ViewController也將被刪除.
- 爲可視化的view嵌套,提供封裝
ViewModels
接下來,讓我們看看app/view/main/MainModel.js 的ViewModel.
Ext.define('MyApp.view.main.MainModel', {
    extend: 'Ext.app.ViewModel',

    alias: 'viewmodel.main',

    data: {
        name: 'MyApp',

        loremIpsum: 'Lorem ipsum dolor sit amet, consectetur adipisicing elit, sed do eiusmod tempor incididunt ut labore et dolore magna aliqua. Ut enim ad minim veniam, quis nostrud exercitation ullamco laboris nisi ut aliquip ex ea commodo consequat. Duis aute irure dolor in reprehenderit in voluptate velit esse cillum dolore eu fugiat nulla pariatur. Excepteur sint occaecat cupidatat non proident, sunt in culpa qui officia deserunt mollit anim id est laborum.'
    }

    //TODO - add data, formulas and/or methods to support your view
});
ViewModel是一個管理數據對像的類,這個類允許view, 將想要的數據綁定到 view, 並且當這些數據改變量,可以通知view. ViewModel類似於ViewController, 只屬於引用它們的view. 由於ViewModels跟view相關聯,所以它們也可以被View的子組件引用。
Example
自定義View
Ext.define('myApp.view.myViewport', {
    extend: 'Ext.container.Viewport',
    alias: 'widget.myviewport',
    requires: [
        'myApp.view.appZone',
        'Ext.panel.Panel'
    ],
    layout: 'border',
    items: [{
        xtype: 'panel',
        region: 'north',
        height: 76,
        itemId: 'appHeader',
        bodyPadding: 0,
        cls: 'appheaderbg',
        title: '',
        header: false,
        html: '<div class="appheader appheaderbg"><img src=
        "resources/images/myapp_logo.png"/></div>',
    },{
        xtype: 'appzone',
        region: 'center',
        itemId: 'myappZone'
    }]
});
在上面的代碼中,我們創建了一個基礎佈局的viewport. 它將使用border layout並且包含兩個組件。頂部是一個panel(region: ‘north’), 中間部分是一個類爲’appzone’的組件。它是我們新創建的一個組件。所以我們在app/view文件夾下,創建一個appZone.js的文件
Ext.define('myApp.view.appZone', {
    extend: 'Ext.panel.Panel',
    alias: 'widget.appzone',
// Alias property let us define the xtype to appzone on the
    viewport previously
    requires: [
        'myApp.store.modulesTreeDs',
        'Ext.tab.Panel',
        'Ext.tab.Tab',
        'Ext.tree.Panel',
        'Ext.tree.View'
    ],
    layout: 'border',
    header: false,
    title: '',
    items: [{
        xtype: 'tabpanel',
        region: 'center',
        itemId: 'mainZone',
        header: false,
        title: '',
        items: [{
            xtype: 'panel',
            itemId: 'startappPanel',
            title: 'Dashboard',
            bodyPadding: 5,
            html:'myApp Dashboard',
            region: 'center'
        }]
    },{
        xtype: 'panel',
        itemId: 'accessPanel',
        region: 'west',
        split: true,
        width: 180,
        layout: 'fit',
        title: 'App modules',
        items: [{
            xtype: 'treepanel',
            header: false,
            title: 'My Tree Panel',
            store: Ext.create( 'myApp.store.modulesTreeDs', {
                storeId: 'accessmodulesDs'
            }), //'modulesTreeDs'
        }]
    }]
});
在這個類中,我們創建了一個擁有 border佈局的面板,它包含兩個組件, 第一個是tab panel組件,用來放置我們即將創建的 module的內容。
第二個組件是一個 tree panel, 通過它,我們可以訪問 application的模塊。這個組件需要一個tree store和data model, 因些我們需要創建這些文件
在app/model文件中,我們創建一個modulesModel.js的文件
Ext.define('myApp.model.modulesModel', {
    extend: 'Ext.data.Model',
    requires: [
        'Ext.data.field.String',
        'Ext.data.field.Boolean',
        'Ext.data.field.Integer'
    ],
    fields: [
        {type: 'string', name: 'description'},
        {type: 'boolean', name: 'allowaccess'},
        {type: 'int', name: 'level'},
        {type: 'string', name: 'moduleType', defaultValue: ''},
        {type: 'string', name: 'moduleAlias', defaultValue: ''},
        {type: 'string', name: 'options'}
    ]
});
接着,在app/store創建 modulesTreeDs.js
Ext.define('myApp.store.modulesTreeDs', {
    extend: 'Ext.data.TreeStore',
    requires: [
        'myApp.model.modulesModel',
        'Ext.data.proxy.Ajax'
    ],
    constructor: function(cfg) {
        var me = this;
        cfg = cfg || {};
        me.callParent([Ext.apply({
            storeId: 'mymodulesTreeDs',
            autoLoad: true,
            model: 'myApp.model.modulesModel',
            proxy: {
                type: 'ajax',
                url: 'serverside/data/menu_extended.json'
            }
        }, cfg)]);
    }
});
現在我們需要在resources/images中添加logo圖片(header部分使用),同時在resource/css目錄中創建一個style.css
.appheader {width:100%; padding:5px;}
.appheaderbg {background-color:#CCC;}
.appheader img {width:185px;}
接着在index.html中添加這個樣式文件
<!DOCTYPE HTML>
<html manifest="">
<head>
<meta http-equiv="X-UA-Compatible" content="IE=edge">
<meta charset="UTF-8">
<title>myApp</title>
<!-- The line below must be kept intact for Sencha Cmd to build your
application -->
<script id="microloader" type="text/javascript" src="bootstrap.js"></
script>
<link rel="stylesheet" type="text/css" href="resources/css/style.
css">
</head>
<body></body>
</html>
接着修改app.js文件
Ext.Loader.setConfig({});
Ext.application({
name: 'myApp',
views: [
    'myViewport',
    'appZone'
],
launch: function() {
Ext.create('myApp.view.myViewport');
}
});
在Ext.application配置中, launch函數將在index.html完全加載完成調用。之前的例子中,我們都是使用 Ext.onReady方法
application的name:’myApp’ 也很重要,Ext JS將基於此來加載類所對應的文件。

Controller
現在我們的例子中有了基礎部分,我們現在需要爲tree panel添加交互, 爲此,我們將創建一個基本的controller(MVC類型), 來控制對app模塊的訪問
讓我們 創建一個 app/controller/app.js文件
Ext.define( 'myApp.controller.app' , {
    extend: 'Ext.app.Controller',
    requires: [
        'myApp.view.appZone',
        'myApp.view.myViewport'
    ],
    config: { },
    init: function() {
        console.log ('app controller init');
    }
});
在這段代碼中,我們擴展了Ext.app.Controller類,這個類包含許多方法,這些方法將幫助我們監聽和保存引用。基本上,我們都將在這裏添加代碼邏輯。
至於上面的init方法,這個方法在controller創建時執行。類似於類的constructor,它是我們controller首次執行的代碼,所以 通常在這裏創建監聽器。
現在我們創建了一個空的controller, 它只在控制檯顯示一條消息。接下來我們需要在application定義時,添加這個控制器。 打開app.js文件
Ext.application({
    name: 'myApp',
    controllers: ['app'],
    views: [
        'myViewport','appZone'
    ],
    launch: function() {
        Ext.create('myApp.view.myViewport');
    }
});
Listening to events
一旦創建了controller,我們就可以爲view添加行爲。當用戶雙擊任何子節點時(leaf: true),我們都需要打開一個模塊. 現在我們需要做的是爲tree panel添加itemdblclick事件.
我們需要使用Controller類中的control方法。
Ext.define('myApp.controller.app', {
    extend: 'Ext.app.Controller',
    requires:[
        'myApp.view.appZone',
        'myApp.view.myViewport'
    ],
    config:{
        refs:{
            myappzone:{
                selector:'appzone',
                xtype:'appzone',
                autoCreate:false
            }
        }
    },
    init: function() {
        console.log('app controller init');
        var me=this;
        this.control({
            'appzone #accessPanel treepanel' :{
                itemdblclick: me.handleAccess
            }
        });
    },
    handleAccess:function (cmpView, record, itemx, index, evt, eOpts ){
        console.log('handle access for: ' + record.data.text );
        var me=this, moduleData = record.data;
        if (moduleData.hasOwnProperty('moduleType')){
            var typeModule = moduleData.moduleType;
            if (typeModule==''){
                return;
            } else if (typeModule=='link'){
                me.executeLink(moduleData);
            } else if (typeModule=='window'){
                me.runWindow(moduleData);
            } else if (typeModule=='module'){
                me.addModule(moduleData);
            }
        }
    },
    addModule:function(Data){
        console.log('Adding Module: ' + Data.options);
    },
    runWindow:function(Data){
        console.log('Execute window: ' + Data.options );
    },
    executeLink:function(Data){
        console.log('launch Link: ' + Data.options );
    }
});
首先我們在config屬性中,設置了refs屬性,作爲我們view引用的名字(appzone類), 這樣我們就可以controller中通過名字myappzone,識別view.
在init 函數中,我們設置controller的control配置。這個control屬性,利用一個選擇器(Ext.ComponentQuery 文檔,瞭解更多組件選擇器),爲引用的元素調置事件監聽器. 在這裏是appzone #accessPanel treepanel, 表示整個中間視圖appzone下面的ID爲accessPanel面板下的樹形面板.
我們創建一個目錄數據serverside/data/menu_extended.json
對於第一個節點, Customers的數據如下
{
    "leaf": true,
    "text": "Customers",
    "allowaccess": false,
    "description": "Customer administration",
    "level": 3,
    "moduleType": "module",
    "options": "myApp.view.modules.customers"
}
然後是Submit a ticket節點
{
    "leaf": true,
    "text": "Submit a ticket",
    "allowaccess": false,
    "description": "Submit support tickets",
    "level": 3,
    "moduleType": "window",
    "options": "myApp.view.ticket"
}
最後一步的Forum元素
{
    "leaf": true,
    "text": "Forum",
    "allowaccess": false,
    "description": "Go to Forum",
    "level": 3,
    "moduleType": "link",
    "options": "http://www.sencha.com/forum/"
}
你將看到如下的控制檯輸出

Opening modules
現在我們可以監聽雙擊事件,所以我們可以利用它來打開一個模塊(雖然我們還沒有創建它們,但在下步我們會創建一個模塊)。 所以我們在一次修改controller文件,修改addModule, runWindow, 和executeLink函數
addModule:function(data){
    console.log('Adding Module: ' + data.options);
    var me=this;
    var myZone = me.getMyappzone();
    var ModulesTab = myZone.query('tabpanel #mainZone')[0];
    var existModule= false;
    for (var i=0;i<ModulesTab.items.items.lenght;i++){
        if (ModulesTab.items.items[i].xtype==data.moduleAlias){
            existModule= true;
            break;
        }
    }
    if (existModule){
        ModulesTab.setActiveTab(i);
        return;
    } else {
        var mynewModule = Ext.create(data.options);
        ModulesTab.add(mynewModule);
        ModulesTab.setActiveTab((ModulesTab.items.items.lenght -1));
        return;
    }
},
runWindow:function(data){
    console.log('Execute window: ' + data.options );
    Ext.Msg.alert("Window module", "here we show window:<b>" +
            data.text+ "</b>");
},
executeLink:function(data){
    console.log('launch Link: ' + data.options );
    window.open(data.options);
}
創建一個模塊
我們定義一個model類
Ext.define(' myApp.model.Customer',{
    extend: 'Ext.data.Model',
    requires: ['myApp.model.Contract'],
    idProperty: 'id',
    fields: [
    {name: 'id', type: 'int'},
    {name: 'name', type: 'string'},
    {name: 'phone', type: 'string'},
    {name: 'website', type: 'string'},
    {name: 'status', type: 'string'},
    {name: 'clientSince', type: 'date', dateFormat: 'Y-m-d H:i'},
    {name: 'country', type: 'string'},
    {name: 'sendnews', type: 'boolean'},
    {name: 'employees', type: 'int'},
    {name: 'contractInfo', reference: 'Contract', unique:true}
    ]
});
接着在定義Customer對應的store
Ext.define('myApp.store.Customers', {
    extend: 'Ext.data.Store',
    requires: [
        'myApp.model.Customer',
        'Ext.data.proxy.Ajax',
        'Ext.data.reader.Json'
    ],
    constructor: function(cfg) {
        var me = this;
        cfg = cfg || {};
        me.callParent([Ext.apply({
            storeId: 'Customers',
            autoLoad: true,
            model: 'myApp.model.Customer',
            proxy: {
                type: 'ajax',
                url: 'serverside/data/customers.json',
                actionMethods: {read:"POST"},
                reader: {
                    type: 'json',
                    rootProperty: 'records',
                    useSimpleAccessors: true
                }
            }
        }, cfg)]);
    }
});
現在我們創建一個 Grid panel. app/view/modules/customers.js
Ext.define('myApp.view.modules.customers', { //step 1
    extend: 'Ext.grid.Panel',
    requires: [
        'myApp.view.modules.customersController',
        'Ext.grid.column.Number',
        'Ext.grid.column.Date',
        'Ext.grid.column.Boolean',
        'Ext.view.Table',
        'Ext.button.Button',
        'Ext.toolbar.Fill',
        'Ext.toolbar.Paging'
    ],
    xtype: 'customersmodule', //step 2
    alias: 'widget.customersmodule',
    controller: 'customersmodule',
    frame: true,
    closable: true,
    iconCls: '',
    title: 'Customers...',
    forceFit: true,
    listeners: {//step 3
        'afterrender': {fn: 'myafterrender'},
        'render': {fn: 'myrenderevent'}
    },
    initComponent: function() { //step 4
        var me = this;
        me.store = me.createCustomersStore();
        me.columns = [/* columns definition here… */];
        me.dockedItems= [/* items here… */];
        me.callParent();
    },
    createCustomersStore:function(){
        return Ext.create('myApp.store.Customers');
    }
});
讓我們分析一下上面的代碼
- 首先,我們定義一個’myApp.view.modules.customers’的類。它繼承自Ext.grid.Panel
- 然後我們定義了這個組件的xtype, alias, controller屬性。是爲了使得整個應用可以使用”customersmodule”來識別這個組件類型,而ViewController將是這個view使用
- 我們定義了一個grid監聽器
listeners: { //step 3
    afterrender: {fn: 'myafterrender'},
    render: {fn: 'myrenderevent'}
},- 在最後,initComponent函數中,我們定義了其它屬性。通過這種方式,我們可以根據不同的配置或者特定權限來設置屬性,或者根據不同條件,改變View的子組件
上面中columns的配置如下
me.columns =[{
xtype: 'rownumberer',
width: 50,
align:'center'
},{
xtype: 'numbercolumn',
width: 70,
dataIndex: 'id',
text: 'Id',
format: '0'
},{
xtype: 'templatecolumn',
text: 'Country',
dataIndex: 'country',
tpl: '<div><divclass="flag_{[values.country.toLowerCase()]}">' +
' </div> {country}</div>'
},{
xtype: 'gridcolumn',
width: 210,
dataIndex: 'name',
text: 'Customer name'
},{
xtype: 'datecolumn',
dataIndex: 'clientSince',
width: 120,
text: 'Client Since',
format: 'M-d-Y',
align:'center'
},{
xtype: 'booleancolumn',
dataIndex:'sendnews',
width: 100,
align:'center',
text: 'Send News?',
falseText: 'No',
trueText: 'Yes'
}];dockedItems如下
me.columns =[{
xtype: 'rownumberer',
width: 50,
align:'center'
},{
xtype: 'numbercolumn',
width: 70,
dataIndex: 'id',
text: 'Id',
format: '0'
},{
xtype: 'templatecolumn',
text: 'Country',
dataIndex: 'country',
tpl: '<div><divclass="flag_{[values.country.toLowerCase()]}">' +
' </div> {country}</div>'
},{
xtype: 'gridcolumn',
width: 210,
dataIndex: 'name',
text: 'Customer name'
},{
xtype: 'datecolumn',
dataIndex: 'clientSince',
width: 120,
text: 'Client Since',
format: 'M-d-Y',
align:'center'
},{
xtype: 'booleancolumn',
dataIndex:'sendnews',
width: 100,
align:'center',
text: 'Send News?',
falseText: 'No',
trueText: 'Yes'
}];ViewController
如我們之前所說,view controller需要附件到view上面,每創建一次視圖,也就創建一個ViewController的實例。如果不使用ViewController,而是Controller. 那麼所有的模塊視圖將使用同一樣Controller, 則不易於代碼維護

對於我們新創建的模塊customers , 我們將使用view controller. 現在我們在app/view/modules文件夾下,我們將創建customerControllers.js
Ext.define('myApp.view.modules.customersController', {
    extend: 'Ext.app.ViewController',
    alias: 'controller.customersmodule',
    config: {
        control: {
// Other alternative on how to listen some events
            'customersmodule button[action=showhelp]': {
                click: 'btnactionclick'
            }
        }
    },
    init: function() {
        console.log('customers view controller init');
    },
    myrenderevent:function(cmpx, eOpts){
        console.log('Grid - customers render event');
    },
    myafterrender:function(cmpx, eOpts){
        console.log('Grid - customers afterrender event');
    },
    btnactionclick:function(btnx, evt, eOpts){
        console.log('Button clicked : ' + btnx.action);
    }
});
在上面的代碼中,我們爲customer視圖,創建了一個ViewController. 它的名字爲App.view.modules.customersController, 繼承
app.ViewController, 我們使用別名爲controller.customersmodule, 它將在views的controller配置中使用, controller: ‘customersmodule’, 通過它,Ext JS將view與ViewController連接在一起。
同樣,你可能注意到,在customer view中,我們有一個toolbar(dockeditems), 它有三個按紐,每個按紐都設置了一個監聽器處理函數。但對於help按紐,我們還沒有監聽器。所以在ViewController中,設置以下代碼
config:{
    control: {
        // Other alternative on how to listen some events
        'customersmodule button[action=showhelp]': {
            click:'btnactionclick'
        }
    }
},
這段代碼將被監聽view中的Help 按紐的點擊事件,然後運行btnactionclick。整個customer模塊的效果如下圖所示

現在我們點擊新模塊中的按紐,控制檯輸出如下結果

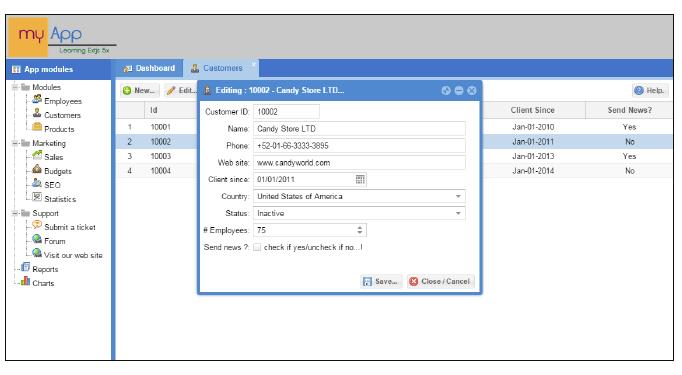
現在我們看到 View與ViewController正確的連接,並做出我們需要的響應。現在,讓我們創建一個form, 用來添加新的customer記錄。 在這個新的form中,我們將實現ViewModel, 將form的行爲與model中定義的數據能過數據綁定進行連接。
ViewModel
Ext JS中的ViewModel類用來管理數據對像,它將監聽ViewModel中定義的數據的變化。這個類還可以連接到父ViewModel(從components/views中繼承過來), 即它允許child view繼承父ViewModel中的數據
在第5章中, 組件有一個新的配置屬性bind, 它允許我們關聯ViewModel中定義的數據
如我們之前所說, 一旦ViewModel相關聯的view實例創建時,ViewModel也將創建一個新的實例,類似於ViewController. 現在爲Customer form創建一個ViewModel, 文件爲app/view/forms/customerFormViewModel.js
Ext.define('myApp.view.forms.customerFormViewModel', { //step 1
    extend:'Ext.app.ViewModel',
    alias:'viewmodel.customerform',
    data:{ //step 2
        action: 'add',
        ownerCmp: null,
        rec: null
    },
    formulas:{ //Step 3
        readOnlyId:function(get){
            return (get('action')!=='add');
        },
        ownerNotNull:function(get){
            var cmpx = get('ownerCmp');
            return (cmpx!==null && cmpx!==undefined);
        },
        refName:function(get){
            var value='';
            if (get('action')!=='add'){ //Edit action
                var id = get('rec.id'), custname =get('rec.name');
                if (custname===''){ custname ='(not defined)'; }
                value = 'Editing : ' + id + ' - ' + custname + "..." ;
            } else {
                value = 'New customer...';
            }
//Step 4
            var xtypeOwner= this.getView().ownerCt.getXType();
            if (xtypeOwner=="customerwindow"){
                this.getView().ownerCt.setTitle(value);
            }
            Return value;
        }
    }
});
讓我們一步步的解釋下上面的代碼:
- 我們定義了一個Ext.app.ViewModel的子類, 並且設置別名viewmodel.customerform. 所以我們可以通過customerform引用
- 我們設置了默認的data配置對像,它將在創建新的view時,被重寫
- 我們設置了一個formulas屬性, 它是一個對像,這個對像中指定的值,將通過函數進行管理,所以我們可以操作這些值, 比如,定義一個name的屬性,它由data中的firstName 和 lastName, 則可以返回
return get("firstName") + get("lastName")。在這裏,我們設置了三個新的屬性,稱爲readOnlyId, ownerNotNull 和 refName. - 如果你仔細觀察了formulas.refName函數, 你會注意到,我們使用了this.getView()方法,這個方法,允許我們訪問連接到的view實例,並且操作它
Binding and data binding
在Ext JS5中,組件多了一個新的配置,bind, 它允許我們關聯 ViewModel中的數據,所以,使用bind, 我們可以綁定想要的數據,發生改變時,這個配置也將自動更新。
爲了引用model中相應的數據,我們需要使用bind描述符
- 直接綁定:
bind:{ value: '{firstName}'} - 綁定模板: 我們可以像Ext.Template那樣,使用自定義的字符串
bind:{ title: 'Hello {firstName} {lastName}..!'} - 綁定布爾值: 對於綁定一個Boolean配置非常有用,
{!isAdmin.checked}
你可以查看Ext JS文檔 瞭解更多ViewModel與binding
我們創建customers form, app/view/forms/customerForm.js
Ext.define('myApp.view.forms.customerForm', { //Step 1
    extend: 'Ext.form.Panel',
    alias: 'widget.customerform',
    xtype: 'customerform',
    requires:[
        'Ext.form.field.Number',
        'Ext.form.field.Date',
        'Ext.form.field.ComboBox',
        'Ext.toolbar.Toolbar',
        'Ext.toolbar.Fill',
        'Ext.button.Button',
        'myApp.view.forms.customerFormViewController',
        'myApp.view.forms.customerFormViewModel',
        'myApp.model.Customer'
    ],
    controller: 'customerform', //Step 2
    ViewModel: {type: 'customerform' }, //Step 2
    bodyPadding: 6,
    header: false,
    title: 'Customer...',
    bind:{ title: '{refName}' }, //Step 3
    defaults:{
        labelAlign: 'right',
        labelWidth: 80,
        msgTarget: 'side',
        anchor: '-18'
    },
    items: [{
        xtype: 'numberfield',
        fieldLabel: 'Customer ID',
        name: 'id',
        anchor: '100%',
        maxWidth: 200,
        minWidth: 200,
        hideTrigger: true,
        bind:{ value:'{rec.id}', readOnly:'{readOnlyId}'}//Step 3
    },{
        xtype: 'textfield',
        fieldLabel: 'Name',
        name: 'name',
        bind: '{rec.name}' //Step 3
    },{
        xtype: 'textfield',
        fieldLabel: 'Phone',
        name: 'phone',
        bind: '{rec.phone}' //Step 3
    },{
        xtype: 'textfield',
        fieldLabel: 'Web site',
        name: 'website',
        bind: '{rec.website}' //Step 3
    },{
        xtype: 'datefield',
        anchor: '60%',
        fieldLabel: 'Client since',
        name:'clientSince',
        submitFormat: 'Y-m-d',
        bind:'{rec.clientSince}' //Step 3
    },{
        xtype: 'combobox',
        fieldLabel: 'Country',
        name: 'country',
        store: Ext.create('Ext.data.Store', {
            fields: ['id', 'name'],
            data : [
                {"id": "USA", "name": "United States of America"},
                {"id": "Mexico", "name": "Mexico"}
            ]
        }),
        valueField: 'id',
        displayField: 'name',
        bind:'{rec.country}' //Step 3
    },{
        xtype: 'combobox',
        fieldLabel: 'Status',
        name: 'status',
        store: Ext.create('Ext.data.Store', {
            fields: ['id', 'name'],
            data: [
                {"id": "Active", "name": "Active"},
                {"id": "Inactive", "name": "Inactive"},
                {"id": "Suspended", "name": "Suspended"},
                {"id": "Prospect", "name": "Prospect"},
            ]
        }),
        valueField: 'id',
        displayField: 'name',
        bind: '{rec.status}' //Step 3
    },{
        xtype: 'numberfield',
        anchor: '60%',
        fieldLabel: '# Employees',
        name:'employees',
        bind:'{rec.employees}' //Step 3
    },{
        xtype:'checkbox',
        fieldLabel: 'Send news ?',
        boxLabel:'check if yes/uncheck if no...!',
        name:'sendnews',
        inputValue:1,
        bind:'{rec.sendnews}' //Step 3
    }],
    dockedItems: [{
        xtype: 'toolbar', dock: 'bottom',
        items: [{
            xtype: 'tbfill'
        },{
            xtype: 'button',
            iconCls: 'save-16',
            text: 'Save...', action:'savecustomer'
        },{
            xtype: 'button',
            iconCls: 'cancelicon-16',
            text: 'Close / Cancel',
            action:'closeform',
            bind:{ hidden:'{ownerNotNull}'}
        }]
    }],
    initComponent: function(){
// place your code....
        this.callParent();
    },
    listeners:{ //Step 4
        'titlechange':{
            fn:function( panelx, newtitle, oldtitle, eOpts){
                if (panelx.rendered){
                    panelx.ownerCt.setTitle(newtitle);
                }
            }
        },
        'afterrender':{
            fn:function( panelx, eOpts ){
                panelx.ownerCt.setTitle(panelx.title);
            },
            single:true
        }
    }
});- 我們創建一個繼承Ext.form.Panel的類
- 定義controller和 ViewModel {type: ‘customform’}
- 通過bind屬性,將viewModel(customerForm)中的配置與表單的字段連接, 綁定時,可以爲字符串,或者對像, 如{refName} or {rec.id}。對於許多組件,默認綁定到value屬性上
- 注意一下,我們設置close按紐的綁定,
bind: {hidden: '{ownerNotNull}'}, ownerNotNull取決於ownCmp屬性,如果formPanel有一個父窗器,或者設置了ownCmp,則這個按紐出現,否則隱藏。 - 我們使用事件來監聽title的改變,我們一開始設置了form view的 header: false. 但我們又綁定了它的title到ViewModel. 所以title改變時,我們的ownerCt組件,也將改變它的title
最後,我們在app/view/forms文件夾中,創建一個customFormViewController.js,作爲customer form的ViewController
Ext.define('myApp.view.forms.customerFormViewController', {
    extend: 'Ext.app.ViewController',
    alias: 'controller.customerform',
    config: {
        control: {
            'customerform button[action=savecustomer]': {
                click:'saveCustomer'
            },
            'customerform button[action=closeform]': {
                click:'formClose'
            }
        }
    },
    init: function() {
        console.log('customers form view controller init');
    },
    formClose: function(cmpx, eOpts){
        console.log('Closing Form');
        var closeCmp= this.getViewModel().get('ownerCmp');
        if(closeCmp!==null && closeCmp!==undefined){
            var xtypeUsed = closeCmp.getXType();
            if (xtypeUsed ==='panel' || xtypeUsed ==='gridpanel' ||
                    xtypeUsed ==='window' || xtypeUsed ==="customerwindow"){
                closeCmp.close();
            }
        }
        return;
    },
    saveCustomer:function(btnx, evt, eOpts){
        var action= this.getView().getViewModel().get('action');
        console.log('Performing action in form : ' + btnx.action);
        if(action=='add'){
            if( this.getView().getForm().isValid() ) {
                var newCustomerData =this.getView().getForm().getValues();
                var mycustomer = Ext.create('myApp.model.Customer',
                        newCustomerData );
                this.getView().gridModule.getStore().add(mycustomer);
                Ext.Msg.alert('Ok', 'New customer added successfully..!');
                this.formClose();
            } else {
                Ext.Msg.alert('Error!', 'There are' + 'some errors in the
                form , please check' + ' the information!');
                return;
            }
        } else { //Edit action
            if ( this.getView().getForm().isValid()){
                var newCustomerData = this.getView().getForm().
                getValues();
                var Record = this.getView().gridModule.getStore().getById(
                        newCustomerData.id);
                var editResult = Record.set(newCustomerData);
                if (editResult!=null){
                    Record.commit();
                    Ext.Msg.alert('Ok', 'Customer edited successfully.!');
                    this.formClose();
                } else {
                    Ext.Msg.alert('Error.!', 'Error updating customer.!');
                    return;
                }
            } else {
                Ext.Msg.alert('Error..!', 'There are some errors in the
                form, please check the information..!');
                return;
            }
        }
    }
});
在這個控制器中,我們爲表單的 save和 close按鈕添加了save 和 close函數。接下來,我們創建一個新的View, 這個視圖實際上是對customerForm進行了包裝,app/view/forms/customerWindow.js
Ext.define('myApp.view.forms.customerWindow', { //Step 1
    extend: 'Ext.window.Window',
    alias: 'widget.customerwindow',
    xtype: 'customerwindow',
    requires: [
        'myApp.view.forms.customerWindowViewController',
        'myApp.view.forms.customerForm'
    ],
    controller: 'customerwindow', //Step 2
    height: 368,
    width: 489,
    iconCls: 'customer-16',
    layout:'fit',
    closable:true,
    minimizable:true,
    title: '',
    tools:[{ //Step 3
        type:'restore',
        tooltip: 'Restore window...',
        handler: function(event, toolEl, panelHeader) {
            var cmpx=panelHeader.up('window');
            if (cmpx.collapsed){
                cmpx.expand();
            }
        }
    }],
    initComponent: function() {
        var me=this;
//Step 4
        var myForm =Ext.create('myApp.view.forms.customerForm',{
            gridModule: me.gridModule,
            ViewModel:{
                data:{
                    action:me.action,
                    ownerCmp: me,
                    rec: me.record || null
                }
            }
        });
        me.items=[myForm];
        me.callParent(arguments);
    }
});- 在第一步, 我們定義一個類
- 然後,定義了一個controller
- 創建了一個工具,當最小化時,用來還原window
- 在initComponent函數中,我們創建了一個customerForm的實例,即這個window將包含的表單對像。在配置對像中,我們設置了ViewModel和它的數據。它將讓Ext JS創建一個customerForm的實例,並且應用這些配置中指定的數據
以下是window的controller
Ext.define('myApp.view.forms.customerWindowViewController', {
    extend: 'Ext.app.ViewController',
    alias: 'controller.customerwindow',
    config: {
        control:{
            'customerwindow':{
                'minimize':'mywindowMinimize',
                'expand':'myExpand'
            },
        }
    },
    mywindowMinimize:function(cmpx, eOpts){
        console.log('customerWindow minimizing..!');
        cmpx.collapse();
        cmpx.alignTo(Ext.getBody(),'tr-tr');
    },
    myExpand:function(cmpx, eOpts){
        cmpx.center();
    }
});
這個controller將控制window的 minimizes and restored. 與網頁或者瀏覽器居中對齊。
Router – implementing and using
對於路由的使用,可以查看文檔 Using the router
在我們的應用程序中,還可以使用路由。路由可以通過瀏覽器的歷史,用來追蹤應用程序的狀態。比如Sencha的官方例子 Kitchen Sink

URL的#basic-panels部分,我們稱爲hash or fragment標識符。當它改變量,瀏覽器會觸發一個hashchange事件,它可以被我們的application捕獲, 我們可以在 application中使用這個hash。
所以在這個URL例子中,如果你複製了這個URL, 然後關閉瀏覽器,在打開這個URL, 它將打開最後的模塊(視圖). 在這裏是打開basic-panels這個例子.
爲了實現他,我們需要修改app.js文件
init:function() {
    this.setDefaultToken('');
}
如果沒有指定token, 將使用setDefaultToken設置的token. 接下來,改變app/controller/app.js文件的handleAccess 函數
handleAccess: function(cmpView, record, itemx, index, evt, eOpts ){
    console.log('Action for handle access : ' + record.data.text);
    var me=this, moduleData = record.data;
    if (moduleData.hasOwnProperty('moduleType')){
        var typeModule = moduleData.moduleType;
        if (typeModule==''){
            return;
        } else if(typeModule=='link'){
            me.executeLink(moduleData);
        } else if (typeModule=='window'){
            me.runWindow(moduleData);
        } else if (typeModule=='module'){
            //Change to be made for router
            if (moduleData.options=="myApp.view.modules.customers"){
                this.redirectTo('customers', true);
                return;
            } else {
                me.addModule(moduleData);
            }
        }
    }
},
redirectTo方法將更新這個hash, 默認情況下,如果當前token與傳遞 過來的token相同,則不執行, 在這裏,我們傳遞了customers參數和true. 第一個參數用於設置hash字符串, 第二個字串則用來強制更新hash, 而不管當前的token是什麼. 我們在config中添加routes屬性
config:{
    refs:{
        myappzone:{
            selector:'appzone',
                    xtype:'appzone',
                    autoCreate:false
        }
    },
    routes:{
        ':id': {
            action: 'handleRoute',
                    before: 'beforeHandleRoute'
        }
    }
},
beforeHandleRoute: function(id, action) {
    if (id!='customers'){
        Ext.Msg.alert("Route error", "invalid action...!");
        action.stop();
    } else {
        action.resume();
    }
},
handleRoute: function(id) {
    if (id=='customers'){
        var myStore=this.getMyappzone().query('treepanel')[0].
        getStore();
        var myRecord = myStore.findNode('text', 'Customers');
        if (myRecord!=undefined){
            this.addModule(myRecord.data);
        } else {
            Ext.Msg.alert("Route error", "error getting customers data
            access...!");
        }
    }
}
如果路徑中有一個hash片段,那麼會先執行beforeHandleRoute. 當所有都可以,我們需要調用action.resume()函數, 讓Ext JS繼續執行路由.否則調用action.stop(), 路由器什麼也不做
handleRoute函數,將從tree panel中獲取一個數據記錄,並且調用addModule創建想要的模塊(在這裏爲Customer)
所以,當你運行這個應用,並且打開customer module. 你會看到 URL中的hash已經被更新了。在更新完成後,重新加載頁面. 如下圖所示
