《整合 spring 4(包括mvc、context、orm) + mybatis 3 示例》一文簡要介紹了最新版本的 Spring MVC、IOC、MyBatis ORM 三者的整合以及聲明式事務處理。現在我們需要把緩存也整合進來,緩存我們選用的是 Redis,本文將在該文示例基礎上介紹 Redis 緩存 + Spring 的集成。
1. 依賴包安裝
pom.xml 加入:
<!-- redis cache related.....start -->
<dependency>
 <groupId>org.springframework.data</groupId>
 <artifactId>spring-data-redis</artifactId>
 <version>1.6.0.RELEASE</version>
</dependency>
<dependency>
 <groupId>redis.clients</groupId>
 <artifactId>jedis</artifactId>
 <version>2.7.3</version>
</dependency>
<!-- redis cache related.....end -->
2. Spring 項目集成進緩存支持
要啓用緩存支持,我們需要創建一個新的 CacheManager bean。CacheManager
接口有很多實現,本文演示的是和 Redis 的集成,自然就是用 RedisCacheManager 了。Redis 不是應用的共享內存,它只是一個內存服務器,就像 MySql 似的,我們需要將應用連接到它並使用某種“語言”進行交互,因此我們還需要一個連接工廠以及一個 Spring 和 Redis 對話要用的 RedisTemplate,這些都是 Redis 緩存所必需的配置,把它們都放在自定義的 CachingConfigurerSupport 中:
/**
 * File Name:RedisCacheConfig.java
 *
 * Copyright Defonds Corporation 2015
 * All Rights Reserved
 *
 */
package com.defonds.bdp.cache.redis;

import org.springframework.cache.CacheManager;
import org.springframework.cache.annotation.CachingConfigurerSupport;
import org.springframework.cache.annotation.EnableCaching;
import org.springframework.context.annotation.Bean;
import org.springframework.context.annotation.Configuration;
import org.springframework.data.redis.cache.RedisCacheManager;
import org.springframework.data.redis.connection.RedisConnectionFactory;
import org.springframework.data.redis.connection.jedis.JedisConnectionFactory;
import org.springframework.data.redis.core.RedisTemplate;

/**
 *
 * Project Name:bdp
 * Type Name:RedisCacheConfig
 * Type Description:
 * Author:Defonds
 * Create Date:2015-09-21
 *
 * @version
 *
 */
@Configuration
@EnableCaching
public class RedisCacheConfig extends CachingConfigurerSupport {

 @Bean
 public JedisConnectionFactory redisConnectionFactory() {
  JedisConnectionFactory redisConnectionFactory = new JedisConnectionFactory();

  // Defaults
  redisConnectionFactory.setHostName("192.168.1.166");
  redisConnectionFactory.setPort(6379);
  return redisConnectionFactory;
 }

 @Bean
 public RedisTemplate<String, String> redisTemplate(RedisConnectionFactory cf) {
  RedisTemplate<String, String> redisTemplate = new RedisTemplate<String, String>();
  redisTemplate.setConnectionFactory(cf);
  return redisTemplate;
 }

 @Bean
 public CacheManager cacheManager(RedisTemplate redisTemplate) {
  RedisCacheManager cacheManager = new RedisCacheManager(redisTemplate);

  // Number of seconds before expiration. Defaults to unlimited (0)
  cacheManager.setDefaultExpiration(3000); // Sets the default expire time (in seconds)
  return cacheManager;
 }

}
當然也別忘了把這些 bean 注入 Spring,不然配置無效。在 applicationContext.xml 中加入以下:
<context:component-scan base-package="com.defonds.bdp.cache.redis" />
3. 緩存某些方法的執行結果
設置好緩存配置之後我們就可以使用 @Cacheable 註解來緩存方法執行的結果了,比如根據省份名檢索城市的 provinceCities 方法和根據 city_code 檢索城市的 searchCity 方法:
// R
@Cacheable("provinceCities")
public List<City> provinceCities(String province) {
 logger.debug("province=" + province);
 return this.cityMapper.provinceCities(province);
}

// R
@Cacheable("searchCity")
public City searchCity(String city_code){
 logger.debug("city_code=" + city_code);
 return this.cityMapper.searchCity(city_code);
}
4. 緩存數據一致性保證
CRUD (Create 創建,Retrieve 讀取,Update 更新,Delete 刪除) 操作中,除了 R 具備冪等性,其他三個發生的時候都可能會造成緩存結果和數據庫不一致。爲了保證緩存數據的一致性,在進行 CUD 操作的時候我們需要對可能影響到的緩存進行更新或者清除。
// C
@CacheEvict(value = { "provinceCities"}, allEntries = true)
public void insertCity(String city_code, String city_jb,
  String province_code, String city_name,
  String city, String province) {
 City cityBean = new City();
 cityBean.setCityCode(city_code);
 cityBean.setCityJb(city_jb);
 cityBean.setProvinceCode(province_code);
 cityBean.setCityName(city_name);
 cityBean.setCity(city);
 cityBean.setProvince(province);
 this.cityMapper.insertCity(cityBean);
}
// U
@CacheEvict(value = { "provinceCities", "searchCity" }, allEntries = true)
public int renameCity(String city_code, String city_name) {
 City city = new City();
 city.setCityCode(city_code);
 city.setCityName(city_name);
 this.cityMapper.renameCity(city);
 return 1;
}

// D
@CacheEvict(value = { "provinceCities", "searchCity" }, allEntries = true)
public int deleteCity(String city_code) {
 this.cityMapper.deleteCity(city_code);
 return 1;
}
業務考慮,本示例用的都是 @CacheEvict 清除緩存。如果你的 CUD 能夠返回 City 實例,也可以使用 @CachePut 更新緩存策略。筆者推薦能用 @CachePut 的地方就不要用 @CacheEvict,因爲後者將所有相關方法的緩存都清理掉,比如上面三個方法中的任意一個被調用了的話,provinceCities 方法的所有緩存將被清除。
5. 自定義緩存數據 key 生成策略
對於使用 @Cacheable 註解的方法,每個緩存的 key 生成策略默認使用的是參數名+參數值,比如以下方法:
@Cacheable("users")
public User findByUsername(String username)
這個方法的緩存將保存於 key 爲 users~keys 的緩存下,對於 username 取值爲 "趙德芳" 的緩存,key 爲 "username-趙德芳"。一般情況下沒啥問題,二般情況如方法 key 取值相等然後參數名也一樣的時候就出問題了,如:
@Cacheable("users")
public Integer getLoginCountByUsername(String username)
這個方法的緩存也將保存於 key 爲 users~keys 的緩存下。對於 username 取值爲 "趙德芳" 的緩存,key 也爲 "username-趙德芳",將另外一個方法的緩存覆蓋掉。
解決辦法是使用自定義緩存策略,對於同一業務(同一業務邏輯處理的方法,哪怕是集羣/分佈式系統),生成的 key 始終一致,對於不同業務則不一致:
@Bean
public KeyGenerator customKeyGenerator() {
 return new KeyGenerator() {
  @Override
  public Object generate(Object o, Method method, Object... objects) {
   StringBuilder sb = new StringBuilder();
   sb.append(o.getClass().getName());
   sb.append(method.getName());
   for (Object obj : objects) {
    sb.append(obj.toString());
   }
   return sb.toString();
  }
 };
}
於是上述兩個方法,對於 username 取值爲 "趙德芳" 的緩存,雖然都還是存放在 key 爲 users~keys 的緩存下,但由於 key 分別爲 "類名-findByUsername-username-趙德芳" 和 "類名-getLoginCountByUsername-username-趙德芳",所以也不會有問題。
這對於集羣系統、分佈式系統之間共享緩存很重要,真正實現了分佈式緩存。
筆者建議:緩存方法的 @Cacheable 最好使用方法名,避免不同的方法的 @Cacheable 值一致,然後再配以以上緩存策略。
6. 緩存的驗證
6.1 緩存的驗證
爲了確定每個緩存方法到底有沒有走緩存,我們打開了 MyBatis 的 SQL 日誌輸出,並且爲了演示清楚,我們還清空了測試用 Redis 數據庫。
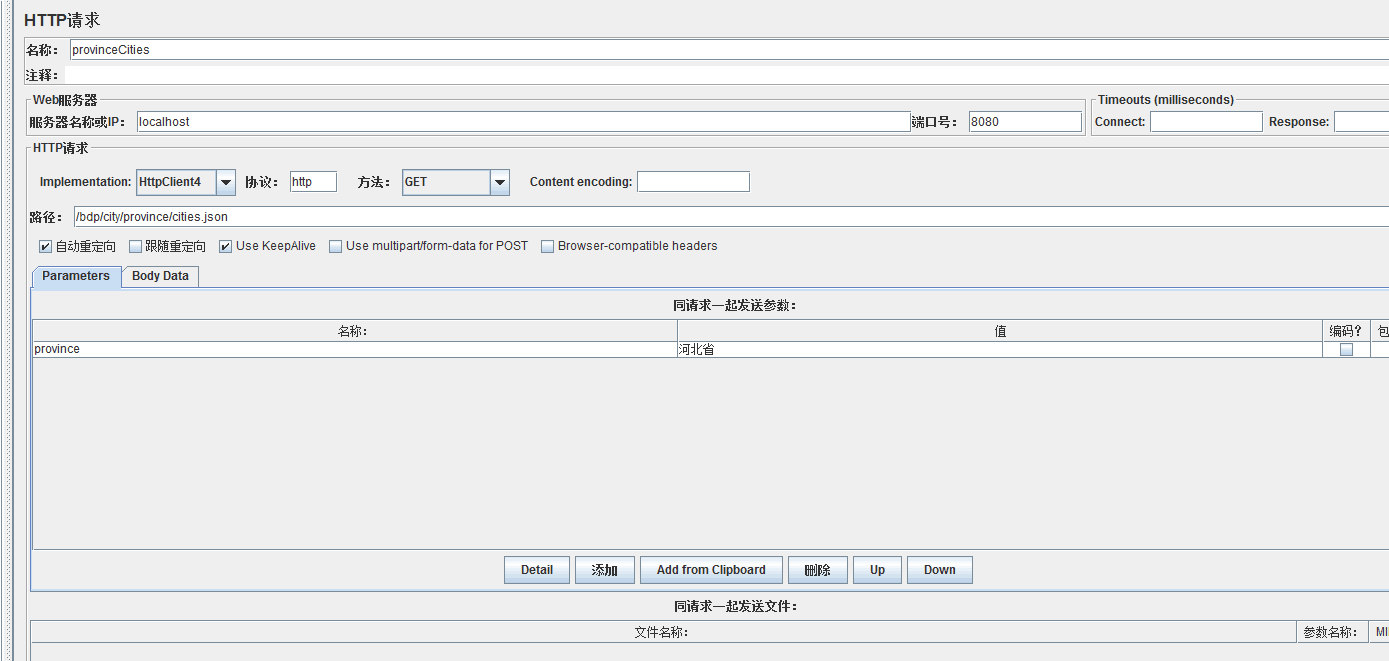
先來驗證 provinceCities 方法緩存,Eclipse 啓動 tomcat 加載項目完畢,使用 JMeter 調用 /bdp/city/province/cities.json 接口:
![使用 JMeter 調用 /bdp/city/province/cities.json 接口.png]()
Eclipse 控制檯輸出如下:
![Eclipse 控制檯輸出如下.png]()
說明這一次請求沒有命中緩存,走的是 db 查詢。JMeter 再次請求,Eclipse 控制檯輸出:
輸出:
![Eclipse 控制檯輸出]()
標紅部分以下是這一次請求的 log,沒有訪問 db 的 log,緩存命中。查看本次請求的 Redis 存儲情況:
![查看本次請求的 Redis 存儲情況.png]()
同樣可以驗證 city_code 爲 1492 的 searchCity 方法的緩存是否有效:
![同樣可以驗證 city_code 爲 1492 的 searchCity 方法的緩存是否有效.png]()
圖中標紅部分是 searchCity 的緩存存儲情況。
6.2 緩存一致性的驗證
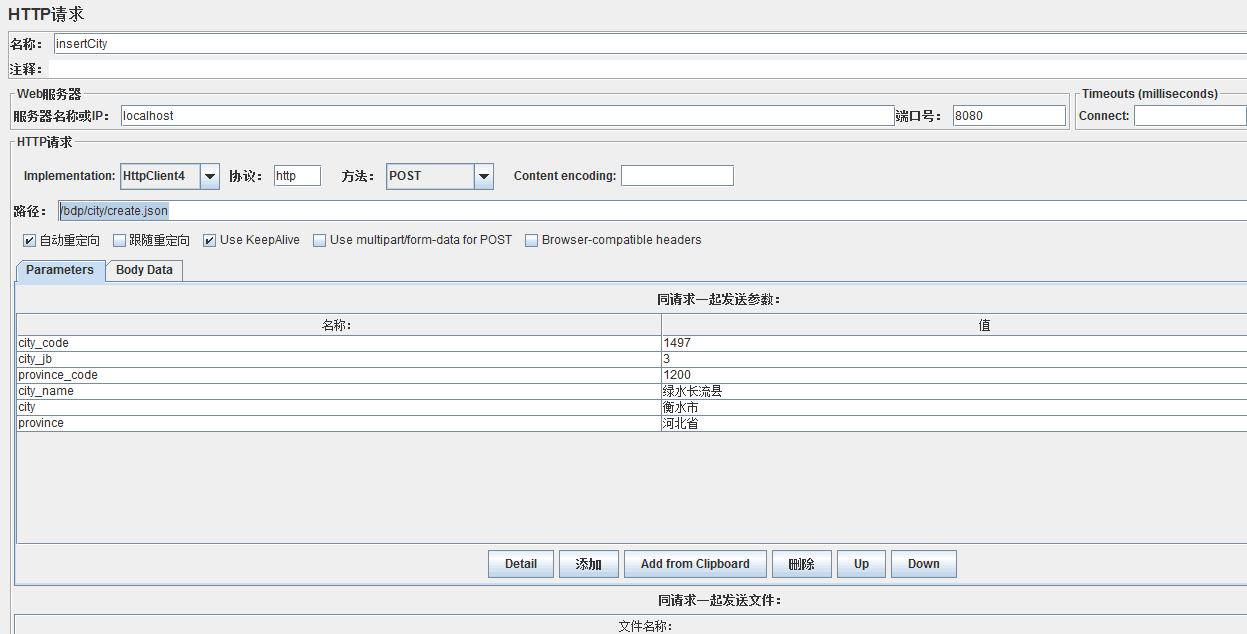
先來驗證 insertCity 方法的緩存配置,JMeter 調用 /bdp/city/create.json 接口:
![JMeter 調用 /bdp/city/create.json 接口.png]()
之後看 Redis 存儲:
![之後看 Redis 存儲]()
可以看出 provinceCities 方法的緩存已被清理掉,insertCity 方法的緩存奏效。
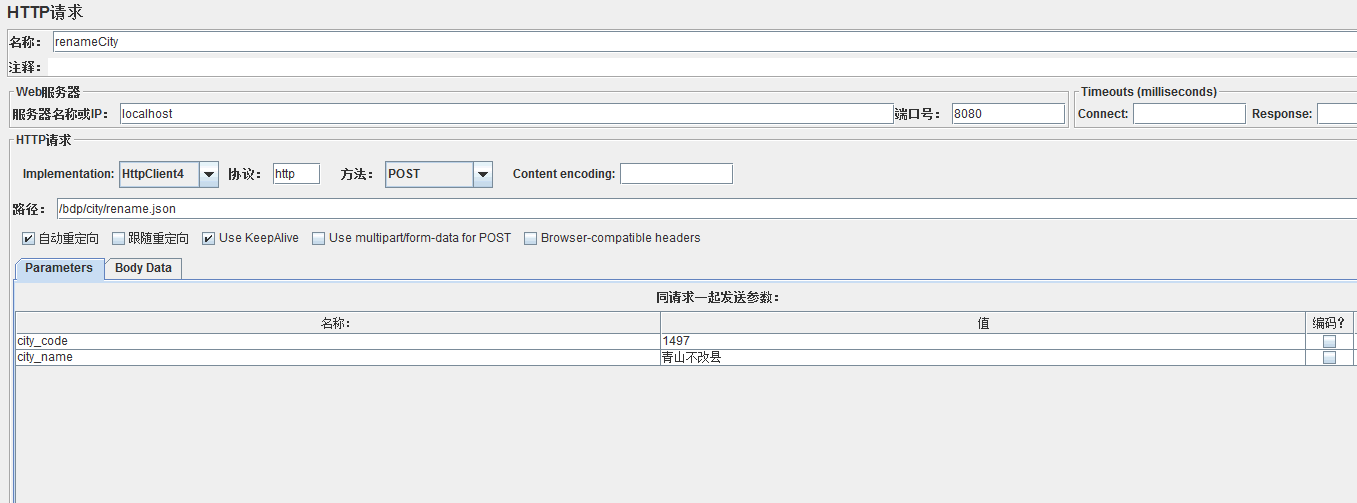
然後驗證 renameCity 方法的緩存配置,JMeter 調用 /bdp/city/rename.json 接口:
![JMeter 調用 /bdp/city/rename.json 接口.png]()
之後再看 Redis 存儲:
![之後再看 Redis 存儲.png]()
searchCity 方法的緩存也已被清理,renameCity 方法的緩存也奏效。
7. 注意事項
- 要緩存的 Java 對象必須實現 Serializable 接口,因爲 Spring 會將對象先序列化再存入 Redis,比如本文中的 com.defonds.bdp.city.bean.City 類,如果不實現 Serializable 的話將會遇到類似這種錯誤:nested
exception is java.lang.IllegalArgumentException: DefaultSerializer requires a Serializable payload but received an object of type [com.defonds.bdp.city.bean.City]]。
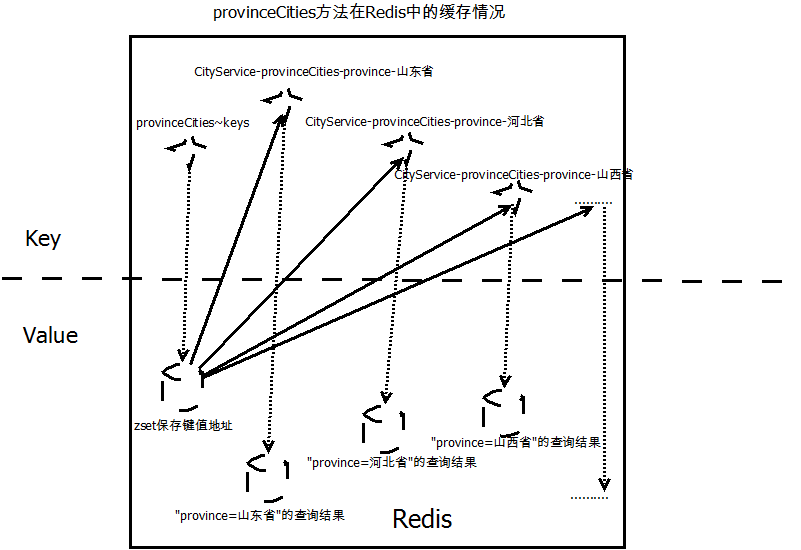
- 緩存的生命週期我們可以配置,然後託管 Spring CacheManager,不要試圖通過 redis-cli 命令行去管理緩存。比如 provinceCities 方法的緩存,某個省份的查詢結果會被以 key-value 的形式存放在 Redis,key 就是我們剛纔自定義生成的 key,value 是序列化後的對象,這個 key 會被放在 key 名爲 provinceCities~keys
key-value 存儲中,參考下圖"provinceCities 方法在 Redis 中的緩存情況"。可以通過 redis-cli 使用 del 命令將 provinceCities~keys 刪除,但每個省份的緩存卻不會被清除。
- CacheManager 必須設置緩存過期時間,否則緩存對象將永不過期,這樣做的原因如上,避免一些野數據“永久保存”。此外,設置緩存過期時間也有助於資源利用最大化,因爲緩存裏保留的永遠是熱點數據。
- 緩存適用於讀多寫少的場合,查詢時緩存命中率很低、寫操作很頻繁等場景不適宜用緩存。
![provinceCities方法在Redis中的存儲.png]()
以上就是本文的全部內容,希望對大家的學習有所幫助,也希望大家多多支持腳本之家。