


配置開發環境
開發工具
- Node.js
- VS Code / IntelliJ IDEA / WebStorm
搭建NPM私服
推薦使用Nexus,概念和配置方法同Maven私服一致,分爲proxy、hosted、group三類。
創建proxy如下: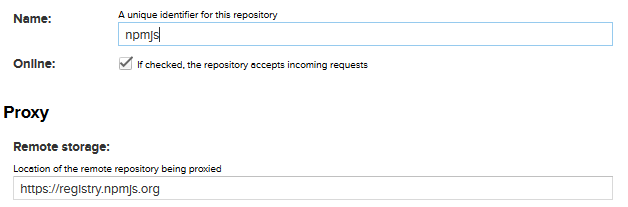
Remote URL: https://registry.npmjs.org
然後創建hosted、group,不再贅述。
最後在home下創建.npmrc文件,其內填寫public地址,如下:
registry=http://localhost:8081/repository/npm-public/
NPM
Angular 6開發,Node.js版本要求8.x或以上,npm版本要求5.x或以上。運行node -v、npm -v查看版本。
安裝Node.js後,更新npm:
npm i npm@latest -gNPM幫助
npm help
npm -l 列出所有命令用法
npm <command> -h 查看某一命令用法,如:
npm ls -h
npm help npm 在瀏覽器中查看幫助文檔,如:
npm help index (Index of all npm documentation)
npm help folders
npm help install
運行npm ls 可查看版本是否匹配。
運行npm view [package] 可查看某一package發佈的版本,如:
npm view ngx-bootstrap [versions]
進入package目錄下,運行npm version可查看安裝的版本。
Angular CLI
安裝Angular CLI
npm install -g @angular/cli@latest注意:要用@latest
更新Angular CLI
Global package:
npm uninstall -g @angular/cli
npm cache clean
# if npm version is > 5 then use `npm cache verify` to avoid errors (or to avoid using --force)
npm install -g @angular/cli@latest
Local project package:
# use rmdir /S/Q node_modules dist in Windows Command Prompt
# use rm -r -fo node_modules,dist in Windows PowerShell
rm -rf node_modules dist
npm install --save-dev @angular/cli@latest
npm install
ng幫助
ng help 顯示所有命令的幫助
ng [command name] --help  顯示某一命令的幫助
ng add <collection> Add support for a library to your project
ng new <name> [options] Creates a new directory and a new Angular app.
ng generate <schematic> [options] Generates and/or modifies files based on a schematic.
ng update <packages> [options] Updates your application and its dependencies.
ng build <project> [options] Builds your app and places it into the output path (dist/ by default).
ng serve <project> [options] Builds and serves your app, rebuilding on file changes.
ng test <project> [options] Run unit tests in existing project.
ng e2e <project> [options] Run e2e tests in existing project.
常用參數:
--aot Build using Ahead of Time compilation
--base-href Base url for the application being built
--i18n-file Localization file to use for i18n
--prod Flag to set configuration to "prod"
Available schematics:
- serviceWorker
- application
- class
- component
- directive
- enum
- guard
- interface
- module
- pipe
- service
- universal
- appShell
- library
Angular CLI 6.0新增功能
ng add、ng update、ng generate library是Angular CLI 6.0新增功能。
ng add <collection> Add support for a library to your project
ng update <packages> [options] Updates your application and its dependencies.
ng generate library <name> create a library project within your CLI workspace
更新package
在Project根目錄下運行ng update後會顯示需要更新的package,可以選擇更新某一package或全部package。
package.json中的version語法請參見The semantic versioner for npm
npm-check-updates
使用npm-check-updates是另一種更新package的方式:
- 安裝npm-check-updates
npm i -g npm-check-updates - 升級
ncu -u - 安裝新版本
npm install
常用組件
ngx-bootstrap
- Install ngx-bootstrap
npm install ngx-bootstrap --save- Adding bootstrap CSS 4.0
<link href="https://maxcdn.bootstrapcdn.com/bootstrap/4.0.0/css/bootstrap.min.css" rel="stylesheet">- Datepicker
// RECOMMENDED (doesn't work with system.js)
import { BsDatepickerModule } from 'ngx-bootstrap/datepicker';
// or
import { BsDatepickerModule } from 'ngx-bootstrap';

@NgModule({
  imports: [BsDatepickerModule.forRoot(),...]
})
export class AppModule(){}
adding css to your index.html
<link rel="stylesheet" href="https://unpkg.com/ngx-bootstrap/datepicker/bs-datepicker.css">or
node_modules/ngx-bootstrap/datepicker/bs-datepicker.cssDatepicker支持日期和日期範圍:
<div class="row">
  <div class="col-xs-12 col-12 col-md-4 form-group">
    <input type="text"
           placeholder="Datepicker"
           class="form-control"
           bsDatepicker>
  </div>
  <div class="col-xs-12 col-12 col-md-4 form-group">
    <input type="text"
           placeholder="Daterangepicker"
           class="form-control"
           bsDaterangepicker>
  </div>
</div>
Pagination
使用ngx-bootstrap的Pagination組件,演示如何自定義組件,如何使用HttpParams。
- 引入pagination
// RECOMMENDED (doesn't work with system.js)
import { PaginationModule } from 'ngx-bootstrap/pagination';
// or
import { PaginationModule } from 'ngx-bootstrap';

@NgModule({
  imports: [PaginationModule.forRoot(),...]
})
export class AppModule(){}- 自定義組件,設定一些默認參數
page.components.ts
import {Component, EventEmitter, Input, Output} from '@angular/core';
import {PAGE_PARAMS} from '../../vo/page-params';

@Component({
  selector: 'app-page',
  templateUrl: './page.component.html'
})
export class PageComponent {
  @Input()
  totalItems: number;

  @Input()
  currentPage: number;

  maxSize: number = PAGE_PARAMS.maxSize;

  @Output()
  pageChanged: EventEmitter<any> = new EventEmitter();

  changePage(event: any) {
    this.pageChanged.emit(event);
  }
}
page.components.html
<pagination name="page" [totalItems]="totalItems" [(ngModel)]="currentPage" (pageChanged)="changePage($event)" [maxSize]="maxSize"
            class="pagination-sm" [boundaryLinks]="true">
</pagination>
page-params.ts
export class PageParams {
  maxSize: number;
  itemsPerPage: number;

  constructor(maxSize: number, itemsPerPage: number) {
    this.maxSize = maxSize;
    this.itemsPerPage = itemsPerPage;
  }
}

export const PAGE_PARAMS = new PageParams(5, 10);- 頁面調用
<app-page [totalItems]="totalItems" [currentPage]="currentPage" (pageChanged)="pageChanged($event)"></app-page> pageChanged(event: any): void {
this.getItems(event.page - 1, event.itemsPerPage);
}- HttpParams
其餘方法略過,最終要調用HttpClient的get方法,需要封裝查詢參數、分頁參數(後臺使用Spring Data分頁方法):
...
this.http.get<T>('url', {params})
...
封裝方法如下:
import {HttpParams} from '@angular/common/http';

...
  pageParams<T>(data: T, page?: number, size?: number): HttpParams {
    let params = new HttpParams()
      .set('page', page ? page.toString() : '0')
      .set('size', size ? size.toString() : PAGE_PARAMS.itemsPerPage.toString());

    Object.keys(data).forEach(function (key) {
      let value = data[key];
      if (value === '') {
        return;
      }
      if (value instanceof Date) {
        value = value.toISOString();
      }
      params = params.set(key, value);
    });
    return params;
  }
注意,不能寫成這樣:
let params = new HttpParams();
params.set('orderBy', '"$key"')
params.set('limitToFirst', "1");
HttpParams是不可變的,上面寫法將返回空值。
CKEditor
- Include CKEditor javascript files in your application
<script src="https://cdn.ckeditor.com/4.7.3/full-all/ckeditor.js"></script>- Install ng2-ckeditor
npm install --save ng2-ckeditor3.Include CKEditorModule in your main module
import { CKEditorModule } from 'ng2-ckeditor';

@NgModule({
  // ...
  imports:      [
    CKEditorModule
  ],
  // ...
})
export class AppModule { }- usage
<ckeditor [(ngModel)]="content" [config]="{extraPlugins: 'divarea'}" name="editor"></ckeditor>常見問題
Cannot match any routes
當訪問不存在的頁面時會報這個錯誤,那怎麼跳轉到一個默認頁面呢,可以使用通配符:
{ path: '**', component: PageNotFoundComponent }參考文檔
Angular
Angular中文
Angular中文社區
Angular 4.x 修仙之路
TypeScript
TypeScript中文網
Angular CLI
NPM Docs
RxJS
Angular HTTP Client - Quickstart Guide
Angular Architecture - Smart Components vs Presentational Components
Multiple solutions for Angular Ahead of Time (AOT) Compilation
Angular - CKEditor component