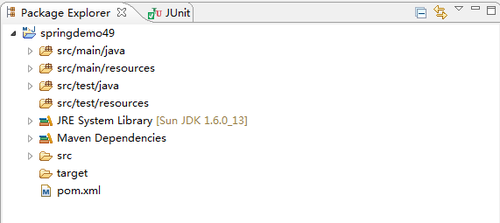
1.創建Maven項目,項目名稱springdemo49,如圖所示
![QQ截圖20170325134223.png wKiom1jWA3CCDpY3AAA9d353Sik676.png-wh_50]()
2.配置Maven,修改項目中的pom.xml文件,修改內容如下
<project xmlns="http://maven.apache.org/POM/4.0.0"
xmlns:xsi="http://www.w3.org/2001/XMLSchema-instance"
xsi:schemaLocation="http://maven.apache.org/POM/4.0.0 http://maven.apache.org/xsd/maven-4.0.0.xsd">
  <modelVersion>1.0.0</modelVersion>
  <groupId>shequ</groupId>
  <artifactId>springdemo13</artifactId>
  <version>0.0.1-SNAPSHOT</version>

  <properties>
  	<java.version>1.7</java.version>
  	<project.build.sourceEncoding>UTF-8</project.build.sourceEncoding>
  	<project.reporting.outputEncoding>UTF-8</project.reporting.outputEncoding>
  </properties>

  <repositories>
  	<repository>
  		<id>codelds</id>
  		<url>https://code.lds.org/nexus/content/groups/main-repo</url>
  	</repository>
  </repositories>

  <dependencies>
  	<dependency>
  		<groupId>javax.annotation</groupId>
  		<artifactId>jsr250-api</artifactId>
  		<version>1.0</version>
  	</dependency>

  	<dependency>
  		<groupId>org.springframework</groupId>
  		<artifactId>spring-test</artifactId>
  		<version>4.1.4.RELEASE</version>
  	</dependency>

  	<dependency>
  		<groupId>junit</groupId>
  		<artifactId>junit</artifactId>
  		<version>4.10</version>
  	</dependency>

  	<dependency>
  		<groupId>org.springframework</groupId>
  		<artifactId>spring-core</artifactId>
  		<version>4.1.4.RELEASE</version>
  	</dependency>

  	<dependency>
        <groupId>org.springframework</groupId>
        <artifactId>spring-context</artifactId>
        <version>4.1.4.RELEASE</version>
    </dependency>

    <dependency>
        <groupId>org.springframework</groupId>
        <artifactId>spring-jdbc</artifactId>
        <version>4.1.4.RELEASE</version>
    </dependency>

    <dependency>
        <groupId>mysql</groupId>
        <artifactId>mysql-connector-java</artifactId>
        <version>5.1.34</version>
    </dependency>

  </dependencies>
  <build/>
</project>
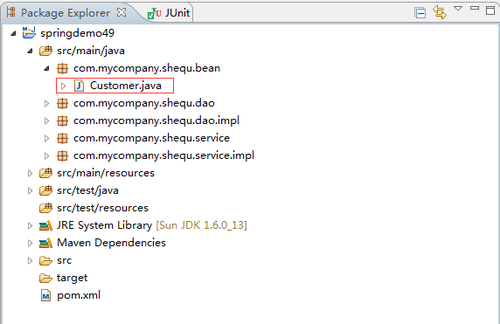
3.在src/main/java下創建實體Bean Customer,包名(com.mycompany.shequ.bean)如圖所示
![QQ截圖20170325134339.png wKioL1jWA8my5sI1AABf2EdnAd8185.png-wh_50]()
4.實體Bean Customer的內容如下
package com.mycompany.shequ.bean;

import org.springframework.beans.factory.annotation.Value;
import org.springframework.stereotype.Component;

@Component("customerBean")
public class Customer {
	private String name;
	private String email;
	public String getName() {
		return name;
	}
	public void setName(String name) {
		this.name = name;
	}
	public String getEmail() {
		return email;
	}

	@Value("#{('[email protected]' matches '^[_A-Za-z0-9-]+(\\.[_A-Za-z0-9-]+)" +
	"*@[A-Za-z0-9]+(\\.[A-Za-z0-9]+)*(\\.[A-Za-z]{2,})$') ? '[email protected]':'不合法'}")
	public void setEmail(String email) {
		this.email = email;
	}
}
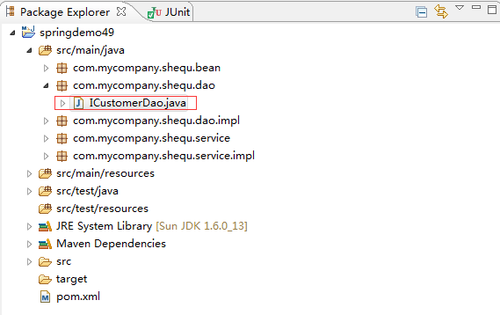
5.在src/main/java下創建dao ICustomerDao,包名(com.mycompany.shequ.dao)如圖所示
![QQ截圖20170325134532.png wKiom1jWBDCS7X9VAABgfKnKlIo077.png-wh_50]()
6.ICustomerDao的內容如下
package com.mycompany.shequ.dao;

public interface ICustomerDao {
	public void showMe();
}
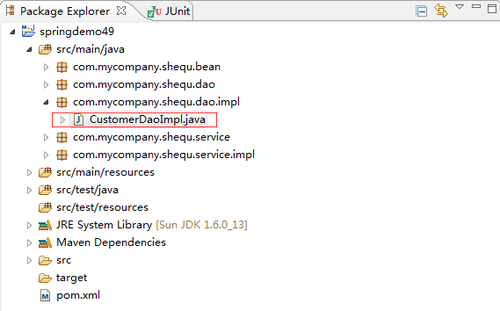
7.在src/main/java下創建ICustomerDao的實現類CustomerDaoImpl,包名(com.mycompany.shequ.dao.impl)如圖所示
![QQ截圖20170325134701.png wKioL1jWBInRRGDlAABg90vmiB0592.png-wh_50]()
8.ICustomerDao的實現類CustomerDaoImpl的內容如下
package com.mycompany.shequ.dao.impl;

import com.mycompany.shequ.dao.ICustomerDao;

public class CustomerDaoImpl implements ICustomerDao {

	public void showMe() {
		System.out.println("I'm CustomerDaoImpl");
	}

}
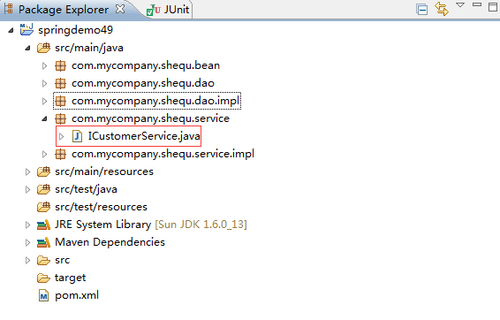
9.在src/main/java下創建業務Bean ICustomerService接口,包名(com.mycompany.shequ.service)如圖所示
![QQ截圖20170325134930.png wKioL1jWBRzRH3qXAABfAlMNK60374.png-wh_50]()
10.ICustomerService接口的內容如下
package com.mycompany.shequ.service;

public interface ICustomerService {
	public void showMe();
}
11.在src/main/java下創建業務Bean ICustomerService接口的實現類CustomerServiceImpl,包名(com.mycompany.shequ.service.impl)如圖所示
![QQ截圖20170325135109.png wKiom1jWBX6ThklVAABhVoC2U5o425.png-wh_50]()
12.業務Bean ICustomerService接口的實現類CustomerServiceImpl的內容如下
package com.mycompany.shequ.service.impl;

import org.springframework.beans.factory.annotation.Autowired;

import com.mycompany.shequ.dao.ICustomerDao;
import com.mycompany.shequ.service.ICustomerService;

public class CustomerServiceImpl implements ICustomerService {

	private ICustomerDao customerDao;

	public ICustomerDao getCustomerDao() {
		return customerDao;
	}

	@Autowired
	public void setCustomerDao(ICustomerDao customerDao) {
		this.customerDao = customerDao;
	}

	public void showMe() {
		customerDao.showMe();
	}

}
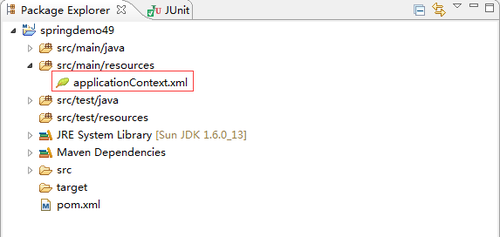
13.在src/main/resource下創建核心的配置文件applicationContext.xml,如圖所示
![QQ截圖20170325135332.png wKioL1jWBg3xqdI9AABCmCJBOFU943.png-wh_50]()
14.配置文件applicationContext.xml,如圖所示
<beans xmlns="http://www.springframework.org/schema/beans"
	xmlns:xsi="http://www.w3.org/2001/XMLSchema-instance"
	xmlns:p="http://www.springframework.org/schema/p"
	xmlns:context="http://www.springframework.org/schema/context"
	xmlns:util="http://www.springframework.org/schema/util"
	xsi:schemaLocation="http://www.springframework.org/schema/beans
	http://www.springframework.org/schema/beans/spring-beans-4.0.xsd
	http://www.springframework.org/schema/util
	http://www.springframework.org/schema/util/spring-util-4.0.xsd
	http://www.springframework.org/schema/context
	http://www.springframework.org/schema/context/spring-context-4.0.xsd">

	<context:component-scan base-package="com.mycompany.shequ">
	    <context:include-filter type="regex" expression="com.mycompany.shequ.dao.impl.*Impl"/>
	    <context:include-filter type="regex" expression="com.mycompany.shequ.service.impl.*Impl"/>
	</context:component-scan>

</beans>
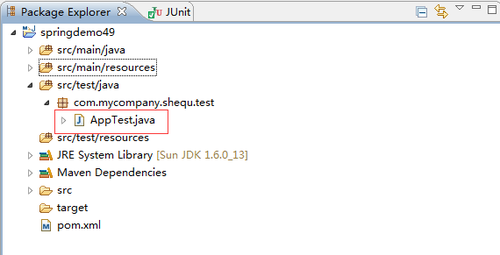
15.在src/test/java下創建測試文件AppTest,包名(com.mycompany.shequ.test)如圖所示
![QQ截圖20170325135507.png wKiom1jWBm-xbXXPAABJulvbJEc270.png-wh_50]()
16.測試文件AppTest的內容如下
package com.mycompany.shequ.test;

import org.junit.Test;
import org.springframework.context.ConfigurableApplicationContext;
import org.springframework.context.support.ClassPathXmlApplicationContext;
import com.mycompany.shequ.service.ICustomerService;

public class AppTest {

	@Test
	public void beanTest(){
	ConfigurableApplicationContext context = new
	ClassPathXmlApplicationContext("applicationContext.xml");
	ICustomerService customerService = (ICustomerService) context.getBean("customerServiceImpl");
		customerService.showMe();
	}
}
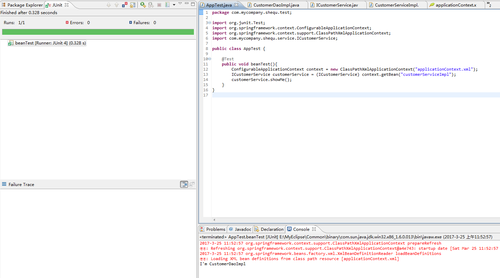
17.在測試類AppTest的beanTest方法上右鍵運行,輸出結果如圖所示
![QQ截圖20170325135636.png wKiom1jWBsSwUvOQAAEAG4Fnjhw252.png-wh_50]()
![QQ截圖20170324102905.png wKioL1jWBs3RoHu5AABwCKMO5XE327.png-wh_50]()

