


檢查內核配置
(RHEL6默認已經配置好內核)
系統內核和捕捉內核都需要的內核選項:
在 "Processor type and features."選項中啓用"kexec system call"。
CONFIG_KEXEC=y
在"Filesystem" -> "Pseudo filesystems." 中啓用"sysfs file system support"。
CONFIG_SYSFS=y
在"Kernel hacking."中啓用"Compile the kernel with debug info"。
CONFIG_DEBUG_INFO=Y
配置捕捉內核的與架構無關的選項:
在"Processor type and features"中啓用"kernel crash dumps"。
CONFIG_CRASH_DUMP=y
在"Filesystems" -> "Pseudo filesystems"中啓用"/proc/vmcore support"。
CONFIG_PROC_VMCORE=y
配置捕捉內核的與架構相關的選項:
在"Processor type and features"中啓用高端內存支持(可不配置)
CONFIG_HIGHMEM64G=y
在"Processor type and features"中啓用"Build a relocatable kernel"。
CONFIG_RELOCATABLE=y
在"Processor type and features"->"Physical address where the kernel is loaded"中,爲內核設置一個加載起始地址。在大多數的機器上,16M 是一個合適的值。
CONFIG_PHYSICAL_START=0x1000000
安裝kdump工具
Kdump 用到的各種工具都在 kexec-tools 中。kernel-debuginfo 則是用來分析 vmcore 文件。
系統默認安裝了kexec-tools:
rpm -qa|grep kexec
kexec-tools-2.0.0-188.el6.x86_64
[hisun@FJXM-DM2-HP-GYAPP-03 ~]$
調試 kdump 生成的 vmcore 文件,則需要手動安裝 kernel-debuginfo 包。
Wget http://debuginfo.centos.org/6/x86_64/kernel-debuginfo-common-x86_64-2.6.32-131.0.15.el6.x86_64.rpm
wget http://debuginfo.centos.org/6/x86_64/kernel-debuginfo-2.6.32-131.0.15.el6.x86_64.rpm
上傳到服務器安裝:
rpm -i kernel-debuginfo-common-x86_64-2.6.32-131.0.15.el6.x86_64.rpm
warning: kernel-debuginfo-common-x86_64-2.6.32-131.0.15.el6.x86_64.rpm: Header V3 RSA/SHA1 Signature, key ID c105b9de: NOKEY
rpm -i kernel-debuginfo-2.6.32-131.0.15.el6.x86_64.rpm
warning: kernel-debuginfo-2.6.32-131.0.15.el6.x86_64.rpm: Header V3 RSA/SHA1 Signature, key ID c105b9de: NOKEY
修改內核引導參數,爲啓動捕獲內核預留內存
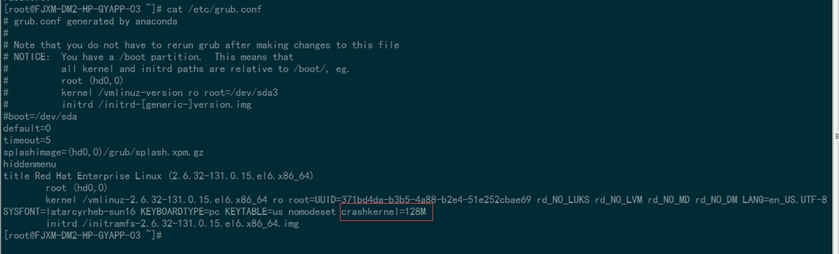
編輯/etc/grub.conf, 在內核行的最後添加修改"crashkernel=128M" :(使用crashkernel=auto無法正常啓動kdump服務)
kdump 配置
kdump 的配置文件是 /etc/kdump.conf,將以***釋去掉:
#################
path /var/crash
core_collector makedumpfile -c --message-level 1 -d 31
#################
加載捕捉內核(沒有重新編譯內核不用加載)
在系統內核引導完成後,需要將捕捉內核加載到內存中。使用 kexec 工具將捕捉內核加載到內存:
kexec -p /vmlinuz-2.6.32-131.0.15.el6.x86_64 --initrd=initramfs-2.6.32-131.0.15.el6.x86_64.img --append="root=UUID=371bd4da-b3b5-4a88-b2e4-51e252cbae69"
設置開機啓動kdump
# chkconfig kdump on
重新啓動服務器:reboot
查看kdump狀態是否正常:
# service kdump status
Kdump is operational
測試配置是否有效
可以通過 kexec 加載內核鏡像,讓系統準備好去捕獲一個崩潰時產生的 vmcore。可以通過 sysrq 強制系統崩潰。(慎重使用,會重啓設備)
# echo 1 > /proc/sys/kernel/sysrq
# echo c > /proc/sysrq-trigger
這造成內核崩潰,如配置有效,系統將重啓進入 kdump 內核,當系統進程進入到啓動 kdump 服務的點時,vmcore 將會拷貝到你在 kdump 配置文件中設置的位置。RHEL 的缺省目錄是 : /var/crash
通過以下命令來分析crash的日誌
#[root@FJXM-DM2-HP-GYAPP-03 ~]# crash /usr/lib/debug/lib/modules/2.6.32-131.0.15.el6.x86_64/vmlinux /var/crash/127.0.0.1-2015-03-23-16\:24\:17/vmcore
參考資料
http://www.ibm.com/developerworks/cn/linux/l-cn-kdump1/index.html
http://www.ibm.com/developerworks/cn/linux/l-cn-kdump4/index.html