一、使用/refresh端點手動刷新配置
很多場景下,需要在運行期間動態調整配置。如果配置發生了修改,微服務要如何實現配置的刷新呢?
1、複製config-client,重命名爲config-client-refresh(端口:5021)
2、添加actuator依賴的jar
<dependency>
    <groupId>org.springframework.boot</groupId>
    <artifactId>spring-boot-starter-actuator</artifactId>
</dependency>
3、在Controller上添加@RefreshScope註解,添加@RefreshScope的類會在配置更改時得到特殊的處理
package com.liuy.controller;

import org.springframework.beans.factory.annotation.Value;
import org.springframework.cloud.context.config.annotation.RefreshScope;
import org.springframework.web.bind.annotation.GetMapping;
import org.springframework.web.bind.annotation.RestController;

/**
 * @description 描述
 * @author luis
 * @version 1.0
 * @date:2017年8月29日下午5:54:47
 */
@RestController
@RefreshScope
public class ConfigClientController {
	@Value("${profile}")
	private String profile;

	@GetMapping("/profile")
	public String hello() {
		return this.profile;
	}
}
4、測試
a、訪問http://localhost:5021/profile,獲得結果:dev-1.0
b、修改git倉庫的spring-cloud-demo-dev.yml文件內容爲:profile: dev-1.0-update
c、重新訪問http://localhost:5021/profile,獲得結果:dev-1.0,說明配置還沒有更新
d、POST請求http://localhost:5021/refresh
e、再次訪問http://localhost:5021/profile,獲得結果:dev-1.0-update,說明配置已經刷新
二、使用Spring Cloud Bus自動刷新配置
2.1、Spring Cloud Bus簡介
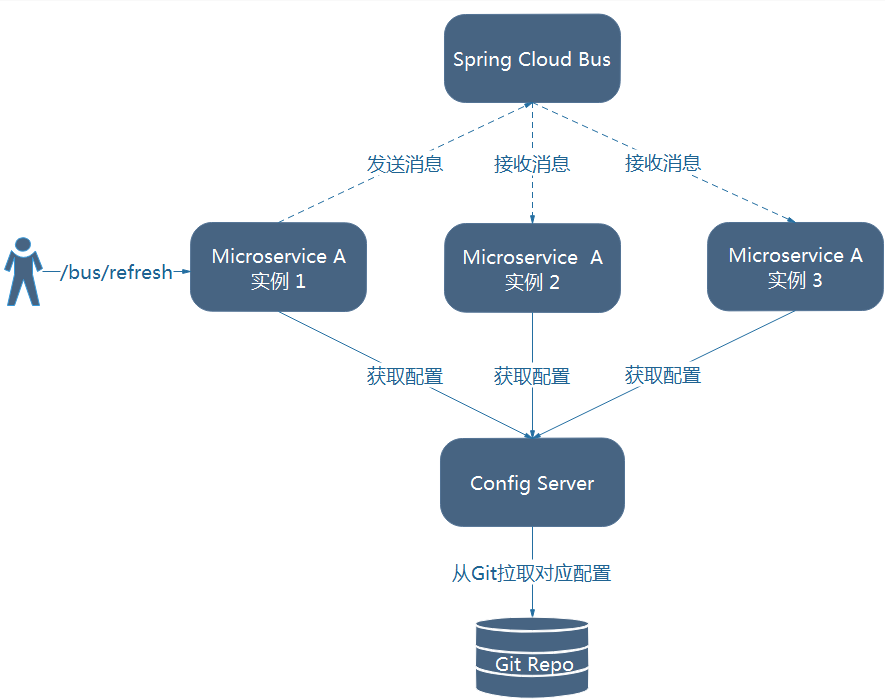
Spring Cloud Bus使用輕量級的消息代理(如:RabbitMQ/kafaka)連接分佈式系統的節點,這樣就可以廣播狀態的更改(如:配置的更新)或者其它的管理指令。可將Spring Cloud Bus想象成一個分佈式的Spring Boot Actuator。使用Spring Cloud Bus後的架構如下:
A/B/C客戶端都通過消息總線連接到了一起,每個客戶端都會訂閱配置更新事件。當其中一個微服務節點的/bus/refresh端點被請求時,該客戶端就會向消息總線發送一個配置更新事件,其它客戶端獲得該事件後也會更新配置。
上面說明:
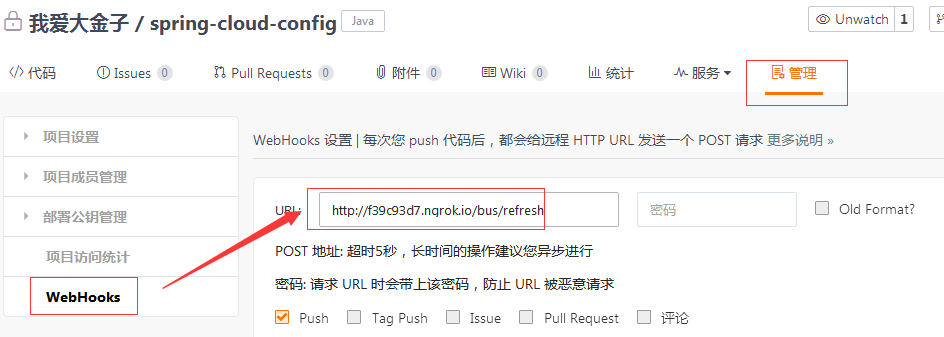
a、提交代碼觸發post給客戶端A發送bus/refresh
b、客戶端A接收到請求從Server端更新配置並且發送給Spring Cloud Bus
c、Spring Cloud bus接到消息並通知給其它客戶端
d、其它客戶端接收到通知,請求Server端獲取最新配置
e、全部客戶端均獲取到最新的配置
2.2、實現自動刷新
a、複製config-client-refresh項目,重命名爲config-client-refresh-cloud-bus(端口:5021)
b、添加amqp依賴
<!-- amqp -->
<dependency>
    <groupId>org.springframework.cloud</groupId>
    <artifactId>spring-cloud-starter-bus-amqp</artifactId>
</dependency>
c、修改bootstrap.yml
spring:
  application:
    # 對應config Server所獲取的配置文件的{application}
    name: spring-cloud-demo
  cloud:
    config:
      # config Server的地址
      uri: http://localhost:5020/
      # profile對應config Server所獲取的配置文件的{profile}
      profile: dev
      # 指定git的分支,對應config Server所獲取的配置文件的{label}
      label: master
  rabbitmq:
    host: 192.168.175.13
    port: 5672
    username: liuy
    password: 123456
d、複製一份config-client-refresh-cloud-bus,重命名爲config-client-refresh-cloud-bus-2(端口:5022)
e、測試
1、依次啓動config-server、config-client-refresh-cloud-bus、config-client-refresh-cloud-bus-2。
2、訪問http://localhost:5021/profile,獲取結果:dev-1.0-update
3、修改git倉庫的spring-cloud-demo-dev.yml文件內容爲:profile: dev-1.0-update222
4、POST請求http://localhost:5021/bus/refresh刷新配置
5、訪問http://localhost:5021/profile與http://localhost:5022/profile,獲取結果:dev-1.0-update222,說明配置內容已被刷新
補充:使用Git倉庫的WebHooks,就可以輕鬆實現配置的自動刷新。
2.3、局部刷新
某些場景下,如只想刷新部分微服務的配置,可通過/bus/refresh端點的destination參數來定位要刷新的應用程序。
如:/bus/refresh?destination=customers:9090,這樣消息總線上的微服務實例就會根據destination參數的值來判斷是否需要刷新。其中customers:9090指的是各個微服務的ApplicationContext ID。
destination參數也可以用來定位特定的微服務。例如:/bus/refresh?destination=customers:**,這樣就可以觸發customers微服務所有實例的配置刷新。
默認情況下ApplicationContext ID是spring.application.name:server.prot。
2.4、架構改進
通過請求某個微服務的/bus/refresh端點的方式來實現配置的刷新的方式並不優雅,原因如下:
1、破壞了微服務的職責單一原則。業務微服務只應關注自身業務,不應該承擔配置刷新的職責。
2、破壞了微服務各節點的對等性。
3、有一定的侷限性。如:微服務在遷移時,網絡地址常常會發送變化,此時如果想自動刷新配置,就不得不修改WebHook的配置。
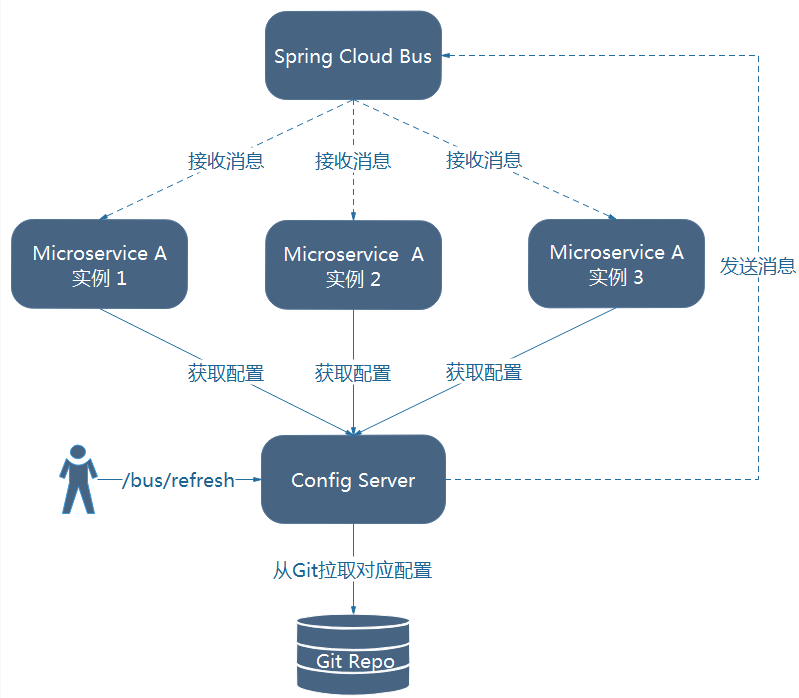
改進:
將Config Server也加入到消息總線中,並使用Config Server的/bus/refresh端點來實現配置的刷新。
Config Server改動:(端口5020)
a、添加依賴
<!-- amqp -->
<dependency>
    <groupId>org.springframework.cloud</groupId>
    <artifactId>spring-cloud-starter-bus-amqp</artifactId>
</dependency>
b、修改application.yml配置
server:
  port: 5020
#端點的配置
endpoints:
  sensitive: true
  shutdown:
    enabled: true
management:
  security:
    enabled: false
spring:
  profiles:
    active:
    - dev
  application:
    name: config-server-refresh-bus
  cloud:
    config:
      server:
        git:
          uri: https://git.oschina.net/wadjz/spring-cloud-config.git
          username:
          password:
  rabbitmq:
    host: 192.168.175.13
    port: 5672
    username: liuy
    password: 123456
刷新就可以訪問:http://localhost:5020/bus/refresh
2.5、跟蹤總線事件
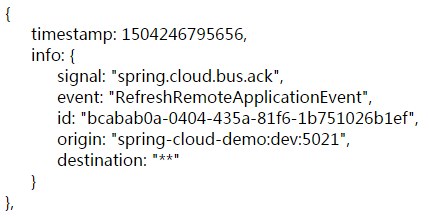
一些場景下如果希望知道Spring cloud Bus事件傳播的細節,可以跟蹤總線事件(Re-moteApplicationEvent的子類都是總線事件)。
想要跟蹤總線事件非常簡單,只須設置spring.cloud.bus.trace.enabled=true,這個在/bus/refresh端點被請求後,訪問/trace端點就可獲得類似如下的結果:


