


Mongo DB ,是目前在IT行業非常流行的一種非關係型數據庫(NoSql),其靈活的數據存儲方式,備受當前IT從業人員的青睞。Mongo DB很好的實現了面向對象的思想(OO思想),在Mongo DB中 每一條記錄都是一個Document對象。Mongo DB最大的優勢在於所有的數據持久操作都無需開發人員手動編寫SQL語句,直接調用方法就可以輕鬆的實現CRUD操作。
一、下載mongodb
前往mongodb官網下載頁面:https://www.mongodb.org/downloads下載相應的版本,比如目前的Linux x64位最新版:mongodb-linux-x86_64-2.6.4.tgz
不過有點坑爹是,下載鏈接明明是tgz格式,結果下載後變成了gz格式:
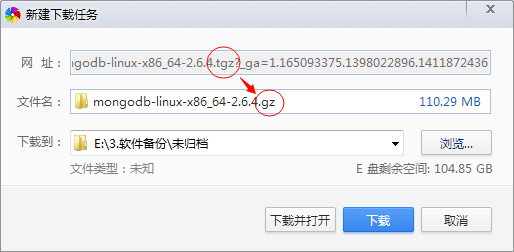
先下載看看好了。
二、解壓mongodb
1 | [root@test6 ~]# gzip -d mongodb-linux-x86_64-2.6.4.gz |
得到的是mongodb-linux-x86_64-2.6.4,居然是個文件,而不是文件夾,和網上說的大相徑庭:
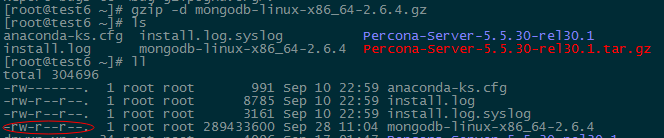
看來前面下載的確實存在問題!實際上應該是tgz文件纔對,按經驗分析了一下,下載的實際上還是tgz文件,顯示爲gz文件只是形式上的假象!所以,gzip只解壓了壓縮包的外層,實際上還需要解壓一層tar存檔屬性!
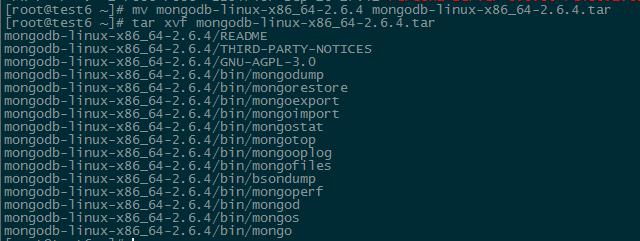
於是,先將解壓後的文件重命名加上tar格式:
1 | [root@test6 ~]# mv mongodb-linux-x86_64-2.6.4 mongodb-linux-x86_64-2.6.4.tar |
然後,使用tar解壓即可:
1 | [root@test6 ~]# tar xvf mongodb-linux-x86_64-2.6.4.tar |
將解壓後的文件夾移動&重命名至/usr/local/mongodb
1 2 3 | [root@test6 ~]# mv mongodb-linux-x86_64-2.6.4 /usr/local/mongodb[root@test6 ~]# cd /usr/local/mongodb/bin/[root@test6 ~]# ll |
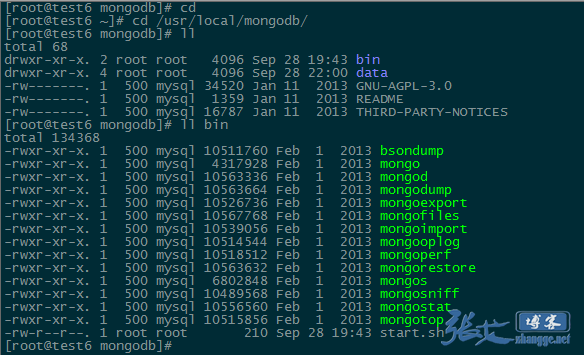
bin下的mongod就是MongoDB的服務端進程,mongo就是其客戶端,其它的命令用於MongoDB的其它用途如MongoDB文件導出等。
三、啓動mongodb
啓動前,先指定mongodb的data目錄,如果沒有就創建一個:
1 2 | [root@test6 ~]# cd /usr/local/mongodb[root@test6 mongodb]# mkdir data |
然後,執行如下命令即可啓動mongodb:
1 | [root@test6 mongodb]# /usr/local/mongodb/bin/mongod --dbpath=/usr/local/mongodb/data/ --logpath=/usr/local/mongodb/data/mongodb.log --logappend& |

啓動成功後,可查看是否啓動成功了,默認端口號是27017,當然在啓動時也可以指定未使用的其它端口。

最後,將客戶端mogo文件在/bin下軟鏈接,方便隨處執行:
1 | ln -s /usr/local/mongodb/bin/mongo /bin/mongo |

現在使用mongo客戶端訪問一下該數據庫:
1 2 3 4 | [root@test6 bin]# ./mongoMongoDB shell version: 2.6.4connecting to: test> |
安裝成功!
四、附:基本操作
1 2 3 4 5 6 7 8 9 10 11 12 13 14 15 16 17 18 19 20 21 22 23 24 25 26 27 28 29 30 31 32 33 34 35 36 37 38 39 40 41 42 43 44 45 46 47 48 49 50 51 52 53 54 55 56 57 58 59 60 61 62 63 64 65 66 67 68 69 70 71 72 73 74 75 76 77 78 79 80 81 82 83 84 85 86 87 88 89 90 91 92 93 94 95 96 97 98 99 100 101 102 103 104 105 106 107 108 109 110 111 112 113 114 115 116 117 118 119 120 121 122 123 124 125 126 127 128 129 130 131 132 133 134 135 136 137 138 139 140 141 142 143 144 145 146 147 148 149 150 151 152 153 154 155 156 157 158 159 160 161 162 163 164 165 166 167 168 169 170 171 172 173 174 175 176 177 178 179 180 181 182 183 184 185 186 187 188 189 190 191 192 193 194 195 196 197 198 199 200 201 202 203 204 205 206 207 208 209 210 211 212 213 214 215 216 217 218 219 220 221 222 223 224 225 226 227 228 229 230 231 232 233 234 235 236 237 238 239 240 241 242 243 244 245 246 247 248 249 250 251 252 253 254 255 256 257 258 259 260 261 262 263 264 265 266 267 268 269 270 271 272 273 274 275 276 277 278 279 280 281 282 283 284 285 286 287 288 289 290 291 292 293 294 295 296 297 298 299 300 301 302 303 304 305 306 307 308 309 310 311 | MongoDB數據庫基本用法show dbs:顯示數據庫列表 show collections:顯示當前數據庫中的集合(類似關係數據庫中的表) show users:顯示用戶use <db name>:切換當前數據庫,這和MS-SQL裏面的意思一樣 db.help():顯示數據庫操作命令,裏面有很多的命令 db.foo.help():顯示集合操作命令,同樣有很多的命令,foo指的是當前數據庫下,一個叫foo的集合,並非真正意義上的命令 db.foo.find():對於當前數據庫中的foo集合進行數據查找(由於沒有條件,會列出所有數據) db.foo.find( { a : 1 } ):對於當前數據庫中的foo集合進行查找,條件是數據中有一個屬性叫a,且a的值爲1MongoDB沒有創建數據庫的命令,但有類似的命令。如:如果你想創建一個“myTest”的數據庫,先運行use myTest命令,之後就做一些操作(如:db.createCollection('user')),這樣就可以創建一個名叫“myTest”的數據庫。數據庫常用命令1、Help查看命令提示 help db.help(); db.yourColl.help(); db.youColl.find().help(); rs.help();2、切換/創建數據庫 use yourDB; 當創建一個集合(table)的時候會自動創建當前數據庫3、查詢所有數據庫 show dbs;4、刪除當前使用數據庫 db.dropDatabase();5、從指定主機上克隆數據庫 db.cloneDatabase(“127.0.0.1”); 將指定機器上的數據庫的數據克隆到當前數據庫6、從指定的機器上覆制指定數據庫數據到某個數據庫 db.copyDatabase("mydb", "temp", "127.0.0.1");將本機的mydb的數據複製到temp數據庫中7、修復當前數據庫 db.repairDatabase();8、查看當前使用的數據庫 db.getName(); db; db和getName方法是一樣的效果,都可以查詢當前使用的數據庫9、顯示當前db狀態 db.stats();10、當前db版本 db.version();11、查看當前db的鏈接機器地址 db.getMongo();Collection聚集集合1、創建一個聚集集合(table) db.createCollection(“collName”, {size: 20, capped: 5, max: 100});2、得到指定名稱的聚集集合(table) db.getCollection("account");3、得到當前db的所有聚集集合 db.getCollectionNames();4、顯示當前db所有聚集索引的狀態 db.printCollectionStats();用戶相關1、添加一個用戶 db.addUser("name"); db.addUser("userName", "pwd123", true); 添加用戶、設置密碼、是否只讀2、數據庫認證、安全模式 db.auth("userName", "123123");3、顯示當前所有用戶 show users;4、刪除用戶 db.removeUser("userName");其他1、查詢之前的錯誤信息 db.getPrevError();2、清除錯誤記錄 db.resetError(); 查看聚集集合基本信息1、查看幫助 db.yourColl.help();2、查詢當前集合的數據條數 db.yourColl.count();3、查看數據空間大小 db.userInfo.dataSize();4、得到當前聚集集合所在的db db.userInfo.getDB();5、得到當前聚集的狀態 db.userInfo.stats();6、得到聚集集合總大小 db.userInfo.totalSize();7、聚集集合儲存空間大小 db.userInfo.storageSize();8、Shard版本信息 db.userInfo.getShardVersion()9、聚集集合重命名 db.userInfo.renameCollection("users"); 將userInfo重命名爲users10、刪除當前聚集集合 db.userInfo.drop();聚集集合查詢1、查詢所有記錄db.userInfo.find();相當於:select* from userInfo;默認每頁顯示20條記錄,當顯示不下的情況下,可以用it迭代命令查詢下一頁數據。注意:鍵入it命令不能帶“;”但是你可以設置每頁顯示數據的大小,用DBQuery.shellBatchSize= 50;這樣每頁就顯示50條記錄了。 2、查詢去掉後的當前聚集集合中的某列的重複數據db.userInfo.distinct("name");會過濾掉name中的相同數據相當於:select distict name from userInfo; 3、查詢age = 22的記錄db.userInfo.find({"age": 22});相當於: select * from userInfo where age = 22; 4、查詢age > 22的記錄db.userInfo.find({age: {$gt: 22}});相當於:select * from userInfo where age >22; 5、查詢age < 22的記錄db.userInfo.find({age: {$lt: 22}});相當於:select * from userInfo where age <22; 6、查詢age >= 25的記錄db.userInfo.find({age: {$gte: 25}});相當於:select * from userInfo where age >= 25; 7、查詢age <= 25的記錄db.userInfo.find({age: {$lte: 25}}); 8、查詢age >= 23 並且 age <= 26db.userInfo.find({age: {$gte: 23, $lte: 26}}); 9、查詢name中包含 mongo的數據db.userInfo.find({name: /mongo/});//相當於%%select * from userInfo where name like ‘%mongo%'; 10、查詢name中以mongo開頭的db.userInfo.find({name: /^mongo/});select * from userInfo where name like ‘mongo%'; 11、查詢指定列name、age數據db.userInfo.find({}, {name: 1, age: 1});相當於:select name, age from userInfo;當然name也可以用true或false,當用ture的情況下河name:1效果一樣,如果用false就是排除name,顯示name以外的列信息。 12、查詢指定列name、age數據, age > 25db.userInfo.find({age: {$gt: 25}}, {name: 1, age: 1});相當於:select name, age from userInfo where age >25; 13、按照年齡排序升序:db.userInfo.find().sort({age: 1});降序:db.userInfo.find().sort({age: -1}); 14、查詢name = zhangsan, age = 22的數據db.userInfo.find({name: 'zhangsan', age: 22});相當於:select * from userInfo where name = ‘zhangsan' and age = ‘22'; 15、查詢前5條數據db.userInfo.find().limit(5);相當於:selecttop 5 * from userInfo; 16、查詢10條以後的數據db.userInfo.find().skip(10);相當於:select * from userInfo where id not in (selecttop 10 * from userInfo); 17、查詢在5-10之間的數據db.userInfo.find().limit(10).skip(5);可用於分頁,limit是pageSize,skip是第幾頁*pageSize 18、or與 查詢db.userInfo.find({$or: [{age: 22}, {age: 25}]});相當於:select * from userInfo where age = 22 or age = 25; 19、查詢第一條數據db.userInfo.findOne();相當於:selecttop 1 * from userInfo;db.userInfo.find().limit(1); 20、查詢某個結果集的記錄條數db.userInfo.find({age: {$gte: 25}}).count();相當於:select count(*) from userInfo where age >= 20; 21、按照某列進行排序db.userInfo.find({***: {$exists: true}}).count();相當於:select count(***) from userInfo;索引1、創建索引db.userInfo.ensureIndex({name: 1});db.userInfo.ensureIndex({name: 1, ts: -1}); 2、查詢當前聚集集合所有索引db.userInfo.getIndexes(); 3、查看總索引記錄大小db.userInfo.totalIndexSize(); 4、讀取當前集合的所有index信息db.users.reIndex(); 5、刪除指定索引db.users.dropIndex("name_1"); 6、刪除所有索引索引db.users.dropIndexes(); 修改、添加、刪除集合數據1、添加db.users.save({name: ‘zhangsan', age: 25, ***: true});添加的數據的數據列,沒有固定,根據添加的數據爲準 2、修改db.users.update({age: 25}, {$set: {name: 'changeName'}}, false, true);相當於:update users set name = ‘changeName' where age = 25; db.users.update({name: 'Lisi'}, {$inc: {age: 50}}, false, true);相當於:update users set age = age + 50 where name = ‘Lisi'; db.users.update({name: 'Lisi'}, {$inc: {age: 50}, $set: {name: 'hoho'}}, false, true);相當於:update users set age = age + 50, name = ‘hoho' where name = ‘Lisi'; 3、刪除db.users.remove({age: 132}); 4、查詢修改刪除db.users.findAndModify({ query: {age: {$gte: 25}}, sort: {age: -1}, update: {$set: {name: 'a2'}, $inc: {age: 2}}, remove: true}); db.runCommand({ findandmodify : "users", query: {age: {$gte: 25}}, sort: {age: -1}, update: {$set: {name: 'a2'}, $inc: {age: 2}}, remove: true});update 或 remove 其中一個是必須的參數; 其他參數可選。參數詳解默認值query查詢過濾條件{}sort如果多個文檔符合查詢過濾條件,將以該參數指定的排列方式選擇出排在首位的對象,該對象將被操作{}remove若爲true,被選中對象將在返回前被刪除N/Aupdate一個 修改器對象N/Anew若爲true,將返回修改後的對象而不是原始對象。在刪除操作中,該參數被忽略。falsefields參見Retrieving a Subset of Fields (1.5.0+)All fieldsupsert創建新對象若查詢結果爲空。 示例 (1.5.4+)false語句塊操作1、簡單Hello Worldprint("Hello World!");這種寫法調用了print函數,和直接寫入"Hello World!"的效果是一樣的; 2、將一個對象轉換成jsontojson(new Object());tojson(new Object('a')); 3、循環添加數據> for (var i = 0; i < 30; i++) {... db.users.save({name: "u_" + i, age: 22 + i, ***: i % 2});... };這樣就循環添加了30條數據,同樣也可以省略括號的寫法> for (var i = 0; i < 30; i++) db.users.save({name: "u_" + i, age: 22 + i, ***: i % 2});也是可以的,當你用db.users.find()查詢的時候,顯示多條數據而無法一頁顯示的情況下,可以用it查看下一頁的信息; 4、find 遊標查詢>var cursor = db.users.find();> while (cursor.hasNext()) { printjson(cursor.next()); }這樣就查詢所有的users信息,同樣可以這樣寫var cursor = db.users.find();while (cursor.hasNext()) { printjson(cursor.next); }同樣可以省略{}號 5、forEach迭代循環db.users.find().forEach(printjson);forEach中必須傳遞一個函數來處理每條迭代的數據信息 6、將find遊標當數組處理var cursor = db.users.find();cursor[4];取得下標索引爲4的那條數據既然可以當做數組處理,那麼就可以獲得它的長度:cursor.length();或者cursor.count();那樣我們也可以用循環顯示數據for (var i = 0, len = c.length(); i < len; i++) printjson(c[i]); 7、將find遊標轉換成數組> var arr = db.users.find().toArray();> printjson(arr[2]);用toArray方法將其轉換爲數組 8、定製我們自己的查詢結果只顯示age <= 28的並且只顯示age這列數據db.users.find({age: {$lte: 28}}, {age: 1}).forEach(printjson);db.users.find({age: {$lte: 28}}, {age: true}).forEach(printjson);排除age的列db.users.find({age: {$lte: 28}}, {age: false}).forEach(printjson); 9、forEach傳遞函數顯示信息db.things.find({x:4}).forEach(function(x) {print(tojson(x));}); |