


前述
這裏使用的阿里雲服務器部署,雲服務器ssh登陸成功後,如果幾分鐘沒有操作的話,sshd會自動斷開登陸,對於我們來說,在部署軟件有時要等很久,經常會發生ssh斷開的情況,又或是上個側所回來ssh就斷開了,非常頭痛。
這裏我們要先解決ssh斷開連接的問題
# egrep ^Client /etc/ssh/sshd_config
ClientAliveInterval 15 --間隔多少秒發送一次心跳
ClientAliveCountMax 1800 --多少秒沒有數據產生時斷開連接
部署py3+uwsgi+nginx用於運行py3應用程序
部署Docker
- CentOS 7 安裝Docker
# yum -y install docker
# echo 1 > /proc/sys/net/ipv4/ip_forward   --打開路由轉發,用於給容器上外網
# systemctl restart network
2、配置阿里Docker鏡像源
如果直接使用DockerHub官方倉庫上傳下載鏡像的話,網速不快,因爲跨國了,這裏使用國內的阿里Docker鏡像源:
https://cr.console.aliyun.com/ ->登陸->管理中心->鏡像加速(根據提示配置)
#  vi /etc/docker/daemon.json              --這是我機器的配置
{
  "registry-mirrors": ["https://uss01m1d.mirror.aliyuncs.com"]
}

#  systemctl daemon-reload
#  systemctl restart docker
#  docker pull centos:7
Docker裏部署py3+uwsgi+nginx
1、運行docker容器
#  docker run --name py3 -v /data/:/www -p 172.18.108.136:80:80 --privileged -d centos7:py3  /usr/sbin/init

#  docker exec -it py3  bash     --登陸py3容器
2、編譯安裝python3.6
--安裝前先安裝依賴軟件包
# yum install wget openssl-devel bzip2-devel expat-devel gdbm-devel readline-devel sqlite-devel gcc-c++ libxml* gzip zlib zlib-devel--下載python3.6軟件包
# wget https://www.python.org/ftp/python/3.6.3/Python-3.6.3.tgz--解壓編譯
#  tar -zxvf Python-3.6.3.tar.gz  -C /usr/src/
#  cd /usr/src/Python-3.6.3
#  ./configure --prefix=/usr/local/python3  && make && make install
#  ln -s /usr/local/python3/bin/python3.6 /usr/bin/python3
#  ln -s /usr/local/python3/bin/pip3 /usr/bin/pip3
3、安裝django和uwsgi
#  pip3 install django
#  pip3 install uwsgi
--安裝的django 和 uwsgi 全部在python的安裝目錄下下# ln -s /usr/local/python3/bin/uwsgi /usr/bin/uwsgi3
4、測試uwsgi
#  vim test.py
def application(env, start_response):
    start_response('200 OK', [('Content-Type','text/html')])
    return [b"Hello World"]
--運行uwsgi3
#  uwsgi3 --http :80 --wsgi-file test.py
#  lsof -i:80
COMMAND  PID USER   FD  TYPE DEVICE SIZE/OFF NODE NAME
uwsgi3  1178 root   3u  IPv4 813312      0t0  TCP *:80 (LISTEN)
--uwsgi3已經監聽80端口
訪問http:// 172.18.108.136:80 可見Hello World。
--停止uwsgi3,釋放80端口,測試django# kill -9 1178
5、測試Django
--將django項目創建在/www/apply目錄下
# mkdir /www/apply && cd /www/apply --創建django項目:webapp
# python3 /usr/local/python/bin/django-admin.py startproject webapp--運行python3
#  cd webapp/
#  python manage.py runserver 0.0.0.80
訪問http:// 172.18.108.136:80 可見下圖算成功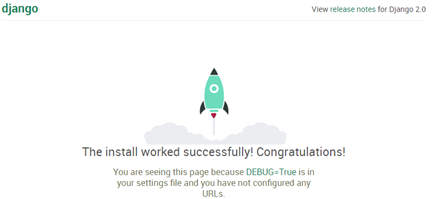
如訪問看到的是以下錯誤,則需要修改訪問的權限
#  vi /www/apply/webapp/webapp/setti ngs.py
28  ALLOWED_HOSTS = ['*']      --在[]里加上*代表允許所有ip訪問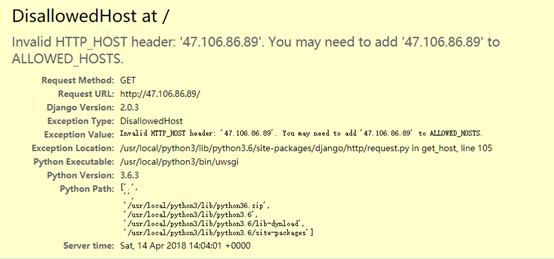
6、將uwsgi和django連接起來
前面uwsgi和django測試已經沒問題,接下來將兩個連起來
--確認80端口沒有被佔用# uwsgi3 --http :80 --chdir /www/apply/webapp --module webapp.wsgi
備 –chdir 指定項目的絕對路徑,--module 是指項目的wsgi模塊
#  lsof -i:80
COMMAND  PID USER   FD  TYPE DEVICE SIZE/OFF NODE NAME
uwsgi3  1178 root   3u  IPv4 813312      0t0  TCP *:80 (LISTEN)
訪問http:// 172.18.108.136:80 可見下圖
代表uwsgi和django已經連起來
附:啓動uwsgi時需要加很多參數不方便記,我們可以參照官網寫一個配置文件來啓動
# cd /www/apply/webapp
# vim webapp.ini
[uwsgi]
# Django-related settings
# the base directory (full path)
chdir = /www/apply/webapp

# Django's wsgi file
module = webapp.wsgi

# the virtualenv (full path)
# home = /path/to/virtualenv

# process-related settings
# master master = true

# maximum number of worker processes
processes = 5

# the socket (use the full path to be safe)
# socket = /path/to/your/project/mysite.sock
socket = :81

# ... with appropriate permissions - may be needed
# chmod-socket = 664

# clear environment on exit
vacuum = true啓動時就改用webapp.ini來啓動# uwsgi3 --ini /www/apply/webapp/webapp.ini
部署nginx反向代理
1、編譯安裝nginx
--編譯之前,先安裝nginx軟件所依賴的軟件包
# yum install patch make cmake gcc gcc-c++ gcc-g77 flex bison file libtool libtool-libs autoconf kernel-devel libjpeg libjpeg-devel libpng libpng-devel libpng10 libpng10-devel gd gd-devel freetype freetype-devel libxml2 libxml2-devel zlib zlib-devel glib2 glib2-devel bzip2 bzip2-devel libevent libevent-devel ncurses ncurses-devel curl curl-devel e2fsprogs e2fsprogs-devel krb5 krb5-devel libidn libidn-devel openssl openssl-devel vim-minimal nano fonts-chinese gettext gettext-devel ncurses-devel gmp-devel pspell-devel unzip libcap diffutils pcre

# wget http://nginx.org/download/nginx-1.13.8.tar.gz
# tar -zxvf nginx-1.13.8.tar.gz  -C /usr/local
# cd /usr/local/nginx-1.13.8
# ./configure --user=nginx --group=nginx --prefix=/usr/local/nginx --with-http_stub_status_module --with-http_ssl_module --with-http_gzip_static_module --with-ipv6  &&  make  && make install
--停掉80端口,啓動nginx,如沒有報錯,
打開瀏覽器: http:// 172.18.108.136:80 可見:Welcome to nginx
2、配置nginx代理uwsgi
#  vi /usr/local/nginx/conf/nginx.conf
    upstream webapp {         --該段添加在server{}外面,http{}裏面
        server 127.0.0.1:81;      --uwsgi3服務器和監聽的端口
    }
    server {
        listen 80;
        server_name webapp.com;
        charset utf-8;
        client_max_body_size 75M;
        location / {
            include uwsgi_params
            uwsgi_pass webapp;
        }
    }
--啓動uwsgi3監聽81端口
# uwsgi3 --ini /www/apply/webapp/webapp.ini

# lsof -i:80
COMMAND  PID USER   FD  TYPE DEVICE SIZE/OFF NODE NAME
uwsgi3  1178 root   3u  IPv4 813312      0t0  TCP *:81 (LISTEN)
--啓動nginx監聽80端口
# /usr/local/nginx/sbin/nginx -t --確定nginx沒有報錯

# lsof -i:80
COMMAND PID USER FD TYPE DEVICE SIZE/OFF NODE NAME
nginx 18535 root 6u IPv4 842111 0t0 TCP *:http (LISTEN)
nginx 18536 nginx 6u IPv4 842111 0t0 TCP *:http (LISTEN)訪問http:// 172.18.108.136:80 又看到django界面
代表nginx已經成功代理了uwsgi3
3、配置MariaDB
--安裝mariadb
# yum install mariadb mariadb-devel mariadb-server--修改配置,將數據目錄指向到/www/共享目錄下
# vi /etc/my.cnf
[mysqld]
datadir=/www/MariaDB/mysql
socket=/www/MariaDB/mysql/mysql.sock
log-error=/www/MariaDB/log/mariadb.log
pid-file=/www/MariaDB/log/mariadb.pid
log-bin=mariadb-bin

# mkdir /www/MariaDB
# chown mysql.mysql -R /www/MariaDB

# systemctl restart mariadb
# ln -s /www/MariaDB/mysql/mysql.sock /var/lib/mysql/mysql.sock
# mysqladmin -u root password 123456
--創建user和database給django用
# mysql -uroot -p123456
MariaDB [(none)]> CREATE DATABASE webapp;
MariaDB [(none)]> show databases like 'webapp';
+----------------+
| Database        |
+----------------+
| webapp          |
+----------------+
1 rows in set (0.00 sec)

MariaDB [(none)]> grant all privileges on webapp.* to apply@'%' identified by 'apply';
MariaDB [(none)]> select host,user,password from mysql.user where user='apply';
+--------------+-------+-------------------------------------------+
| host          | user  | password                                     |
+--------------+-------+-------------------------------------------+
| %             | apply | *09B402E6D1FBDF77CD0F6F0CE586137BAD897877 |
+--------------+-------+-------------------------------------------+
1 rows in set (0.00 sec)

MariaDB [(none)]> exit;
4、創建django項目
--創建django項目,測試django連接MySQL
--安裝連接mysql數據庫插件
# pip install --allow-all-external mysql-connector-python
# vim /www/apply/webapp/webapp/settings.py
DATABASES = {
    'default': { 'ENGINE': 'mysql.connector.django',
    'NAME': 'webapp',
    'USER': 'apply',
    'PASSWORD': 'apply',
    }
}
--安裝blog
# cd /www/apply/webapp/
# python3 manage.py startapp blog
# ls              --可以看到在webapp項目下已經有了一個blog文件夾
blog  manage.py  webapp
--修改settings.py 配置文件,添加blog應用
# vim webapp/settings.py
INSTALLED_APPS = (
    'django.contrib.admin',
    'django.contrib.auth',
    'django.contrib.contenttypes',
    'django.contrib.sessions',
    'django.contrib.messages',
    'django.contrib.staticfiles',
    'blog',    --添加此句
 )
--初始化blog數據庫數據
# python3 manage.py migrate
Operations to perform:
    Apply all migrations: admin, auth, contenttypes, sessions
Running migrations:
    Applying contenttypes.0001_initial... OK
    Applying auth.0001_initial... OK
    Applying admin.0001_initial... OK
    Applying admin.0002_logentry_remove_auto_add... OK
    Applying contenttypes.0002_remove_content_type_name... OK
    Applying auth.0002_alter_permission_name_max_length... OK
    Applying auth.0003_alter_user_email_max_length... OK
    Applying auth.0004_alter_user_username_opts... OK
    Applying auth.0005_alter_user_last_login_null... OK
    Applying auth.0006_require_contenttypes_0002... OK
    Applying auth.0007_alter_validators_add_error_messages... OK
    Applying auth.0008_alter_user_username_max_length... OK
    Applying auth.0009_alter_user_last_name_max_length... OK
    Applying sessions.0001_initial... OK
--確認數據庫webapp裏已經生成了庫表
# mysql -uroot -p123456
MariaDB [(none)]> use webapp
MariaDB [webapp]> show tables;
+----------------------------+
| Tables_in_webapp            |
+----------------------------+
| auth_group                  |
| auth_group_permissions     |
| auth_permission             |
| auth_user                   |
| auth_user_groups            |
| auth_user_user_permissions |
| django_admin_log            |
| django_content_type         |
| django_migrations           |
| django_session              |
+----------------------------+
10 rows in set (0.00 sec)
--創建登陸blog的帳號/密碼
# python3 manage.py createsuperuser
Username (leave blank to use 'root'): admin
Email address: [email protected]
Password:    --輸入密碼
Password (again):    --再次輸入
Superuser created successfully.

--啓動uwsgi3,並訪問blog論壇
# uwsgi3 --ini /www/apply/webapp/webapp.ini
--訪問http:// 172.18.108.136/admin 能看到以下內容,代表已經搭建成功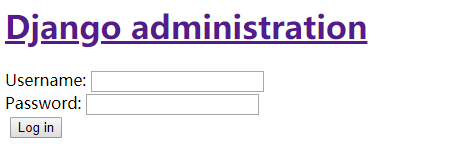
使用前面創建的帳號admin/admin123登陸,如登陸成功則表示成功連接上數據庫
注:看到此界面沒有任何的css樣式和圖片,接下來我們做靜態圖版的反向代理
5、nginx代理靜態圖片
前面我們已經訪問到了blog,但沒有css樣式,這時我們在瀏覽器裏按下F12->Network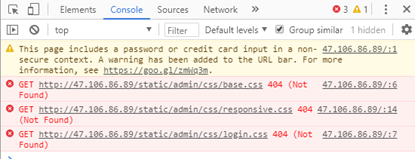
可以看到css的訪問路徑是http://localhost/static/admin/css 這個路徑。
在webapp下新建static,然後nginx進行設置
# cd /www/apply/webapp
# mkdir static
# cp -fr /usr/local/python3/lib/python3.6/site-packages/django/contrib/admin/static/admin/ ./static/
--設置nginx代理static
#  vim /usr/local/nginx/conf/nginx.conf
 --在server{}里加入以下
        location /static {
            alias /www/apply/webapp/static;
        }
--重啓uwsgi和nginx
#  kill -9 `ps -ef|egrep "uwsgi3|nginx" |grep -v grep |awk '{print $2}'`

#  nohup uwsgi3 --ini webapp-up.ini &   --啓動uwsgi3
#  /usr/local/nginx/sbin/nginx           --啓動nginx

 netstat -anlp|egrep "80|81"
tcp  0  0   0.0.0.0:80     0.0.0.0:*    LISTEN    15767/nginx: master
tcp  0  0   0.0.0.0:81     0.0.0.0:*    LISTEN    15756/uwsgi3
--訪問http:// 172.18.108.136/admin 能看到以下內容,代表已經搭建成功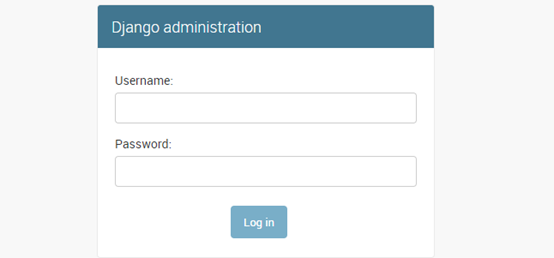
可以看到這次訪問已經有css樣式了,比之前美觀
--使用前面創建的帳號/密碼登陸進去:admin/admin123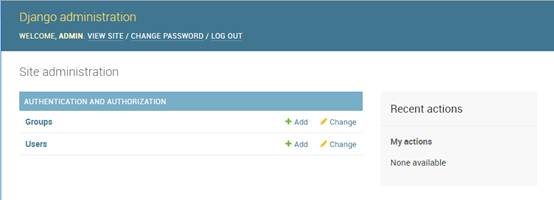
--至此搭建完成