


1.前言
在前兩篇文章中,大家瞭解了swarm集羣的管理、數據的持久化等技術點。大家可能會問,我會了這些有啥用?公司的業務大多數是跑在nginx、tomcat、php等這些集羣應用中,技術是死的,思路是活的。在本文中我們來通過相關案例一起去探索這些應用集羣的服務是如何發佈的。
2.環境
本文的環境還是沿用上次的swarm集羣環境,不過這一次多增加一臺nginx服務器,用4臺服務器來演示。如果你沒有這麼多服務器,可以把其中一臺agent節點替換成nginx服務器也一樣。並且在swarm集羣中創建3個nginx副本來演示,你也可以創建tomcat或php副本都一樣。
| 服務器 | 角色 | 運行服務 | 系統版本 |
|---|---|---|---|
| 172.18.18.32 | Manager | docker 17.12.0-ce、swarm創建nginx副本 | centos7.4 x64 |
| 172.18.18.33 | agent01 | docker 17.12.0-ce 、swarm創建nginx副本 | centos7.4 x64 |
| 172.18.18.34 | agent02 | docker 17.12.0-ce 、swarm創建nginx副本 | centos7.4 x64 |
| 172.18.18.90 | nginx | 源碼安裝nginx | centos7.4 x64 |
3.案例演示nginx集羣副本
在上文中描述了,我們會在swarm集羣中創建3個nginx副本來進行演示。(副本你也可以理解成容器的意思,在docker中稱作容器、swarm和k8s中稱爲副本),筆者畫了一張簡易的架構圖,我們先通過下圖的信息來了解一下本文的案例演示: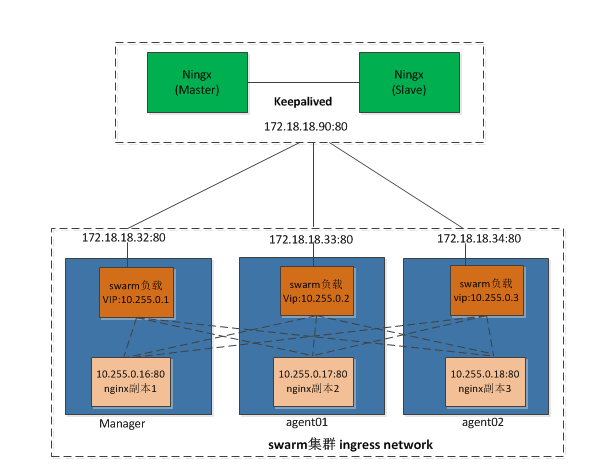
本次案例是通過訪問nginx服務器 172.18.18.90負載到swarm集羣中的3個nginx副本中(172.18.18.32/33/34)。當我們創建swarm集羣時,在swarm所有的集羣節點中會自動創建ingress網絡,swarm模式內置DNS組件,自動爲每個服務分配DNS記錄,然後服務的DNS名稱在集羣內的服務直接分發請求。Ingress網絡會自動分配一個虛擬IP(VIP),在DNS解析時返回VIP,到達VIP的流量將自動發送(IPVS)該服務的任務,也就是下發到副本中(容器中)。
上圖中,Ingress網絡分配的虛擬IP網段爲(10.255.0.0/16),VIP爲(10.255.0.1/2/3),其餘3個副本分配的IP爲(10.255.0.16/17/18)。由此可以得出訪問順序是這樣的:
客戶端請求 >>> nginx服務器 >>> swarm集羣宿節點 >>> VIP >>> IPVS >>> nginx副本
3.1 部署nginx服務器
nginx部署安裝不是本文的重點,筆者就用源碼包簡易安裝來達到本文的實驗目的。
1、下載並解壓nginx:
你可以用docker的鏡像運行nginx、也可以用源碼包編譯安裝nginx。在本文中nginx用源碼包的方式安裝
[root@nginx /]# cd /usr/src/
[root@nginx src /]# tar -zxvf nginx-1.12.1.tar.gz
2、編譯安裝nginx:
[root@nginx src]# yum -y install gcc gcc-c++ make openssl-devel pcre-devel
[root@nginx src]# cd nginx-1.12.1/
[root@nginx nginx-1.12.1]# ./configure --prefix=/usr/local/nginx   --with-http_stub_status_module --with-http_realip_module --with-pcre  --with-http_ssl_module
[root@nginx nginx-1.12.1]# make -j 2
[root@nginx nginx-1.12.1]# make install
3、配置nginx.conf,省略部分內容:
[root@nginx conf]# vim nginx.conf
  http {
    ...
    ...
    upstream swarm_nginx {
        server 172.18.18.32;
        server 172.18.18.33;
        server 172.18.18.34;
    }

    server {
        listen 80;
        server_name localhost;
        location / {
            proxy_pass http://swarm_nginx;
        }
    }
...
...
4、啓動nginx服務:
[root@nginx conf]# /usr/local/nginx/sbin/nginx 3.2 swarm集羣中創建nginx副本
1、在Manager節點上創建nginx副本
[root@Manager ~]#docker service create --replicas 3 --name web_nginx -p 80:80 nginx 2、查看副本狀態
[root@Manager ~]# docker service ps web_nginx
ID                  NAME                IMAGE               NODE                DESIRED STATE       CURRENT STATE         ERROR               PORTS
g0zkll6wasu7        web_nginx.1         nginx:latest        agent01             Running             Running 5 hours ago
o7dkinqaofla        web_nginx.2         nginx:latest        agnet02             Running             Running 5 hours ago
ko8t7stwm7qs        web_nginx.3         nginx:latest        Manager             Running
3個nginx副本分別分配到了3臺swarm集羣中。
3、查看ingress網絡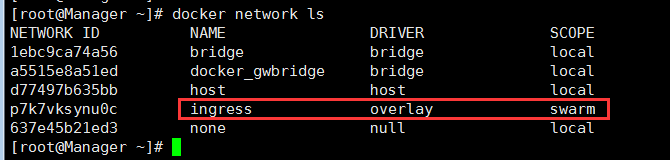
通過docker network ls可以看出,ingress屬於overlay網絡驅動,此驅動採用IETE標準的VXLAN方式,並且是VXLAN中被普遍認爲最適合大規模的雲計算虛擬化環境的SDN controller模式。
在Manager節點上查看ingress詳細信息:
[root@Manager ~]# docker network inspect ingress
...
#下面可以看到ingress的網絡,網關信息:
"Config": [
                {
                    "Subnet": "10.255.0.0/16",
                    "Gateway": "10.255.0.1"
                }
            ]

...
#下面這段可以看到Manager節點上nginx副本的IP和MAC等信息:
 "Containers": {
            "fac0f4270885e34f19c42932041c0259858ac181439ac576ad9022bec1ef3047": {
                "Name": "web_nginx.3.ko8t7stwm7qsi7l9346g6hvyn",
                "EndpointID": "5b22bd2419bfc245ce2a354e64aeb5166ceb31981edb463fb0d8a7c843835c7a",
                "MacAddress": "02:42:0a:ff:00:12",
                "IPv4Address": "10.255.0.16/16",

#下面這段內容可以看到哪些swarm節點在ingress網絡中:
 "Peers": [
            {
                "Name": "24f08eb37fc4",
                "IP": "172.18.18.32"
            },
            {
                "Name": "cd12c6d569bf",
                "IP": "172.18.18.33"
            },
            {
                "Name": "41609535c963",
                "IP": "172.18.18.34"
            }
        ]
...
當然,你還可以通過“docker inspect 容器ID”命令查看副本分配的IP相關信息:
[root@Manager ~]# docker ps
CONTAINER ID        IMAGE               COMMAND                  CREATED             STATUS              PORTS               NAMES
fac0f4270885        nginx:latest        "nginx -g 'daemon of…"   5 hours ago         Up 5 hours          80/tcp              web_nginx.3.ko8t7stwm7qsi7l9346g6hvyn
[root@Manager ~]# docker inspect fac0f4270885
其它兩個swarm集羣節點不做演示查看了,大家可以看行在另外兩臺agent節點上查看IP相關信息。
3.3 訪問測試
接下來,我們通過瀏覽器訪問nginx服務器 http://172.18.18.90 進行驗證測試,多刷新幾次試試: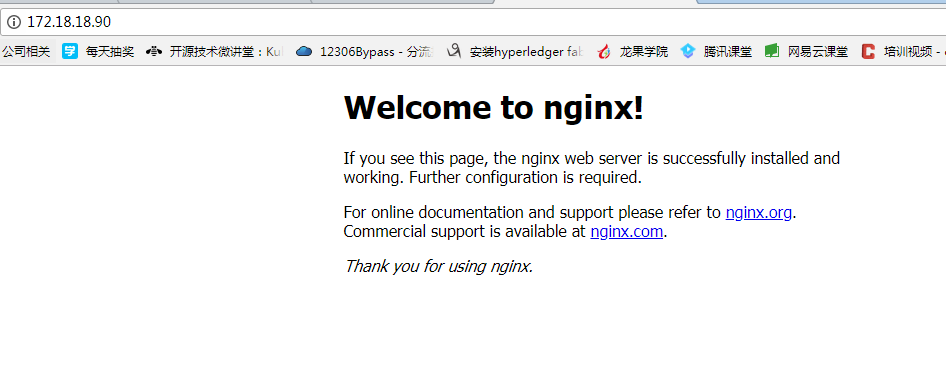
然後,在Manager節點上跟蹤一下副本的日誌:
[root@Manager ~]# docker service logs web_nginx -f
通過日誌跟蹤,可以發現訪問nginx服務器被分別負載到了swarm集羣中的3個副本上了,這就說明了swarm副本的集羣狀態都是可用的。
4.案例演示tomcat集羣副本
可能有些朋友看了有點暈,nginx負載到nginx副本,啥玩意啊。爲了讓大家能夠更好的理解,我把swarm集羣中的nginx副本換成tomcat副本進行演示:
1、在swarm中創建3個tomcat副本
[root@Manager ~]# docker service create --replicas 3 --name web_tomcat -p 8080:8080 tomcat
v12jxeo8cq0tialjezd0lvn7q
overall progress: 3 out of 3 tasks
1/3: running   [==================================================>]
2/3: running   [==================================================>]
3/3: running   [==================================================>]
verify: Service converged
注意:我這裏用的tomcat鏡像爲docker hub官方的,這個鏡像比較大,所以這個步驟很長,建議大家先在每臺swarm節點上提前docker pull tomcat。如果有私有鏡像倉庫就用私有倉庫的鏡像來測試。
2、查看tomcat副本狀態:
[root@Manager ~]# docker service  ps web_tomcat
ID                  NAME                IMAGE               NODE                DESIRED STATE       CURRENT STATE                ERROR               PORTS
3i30jp0uee5d        web_tomcat.1        tomcat:latest       agent01             Running             Running about a minute ago
k6kz95io17al        web_tomcat.2        tomcat:latest       agnet02             Running             Running about a minute ago
rohntxnifnh3        web_tomcat.3        tomcat:latest       Manager             Running             Running 2 minutes ago
也都很均勻的分配到了每個swarm集羣節點上了。
3、配置nginx服務器:
[root@nginx conf]# vim nginx.conf
    upstream swarm_tomcat {
        server 172.18.18.32:8080;
        server 172.18.18.33:8080;
        server 172.18.18.34:8080;
    }

    server {
        listen 8080;
        server_name localhost;
        location / {
            proxy_pass http://swarm_tomcat;
        }
    }
重啓下nginx:
[root@nginx conf]# ../sbin/nginx -s reload4、驗證訪問
我們用瀏覽器訪問nginx的8080端口測試一下:http://172.18.18.90:8080 ,也同樣多刷新幾次。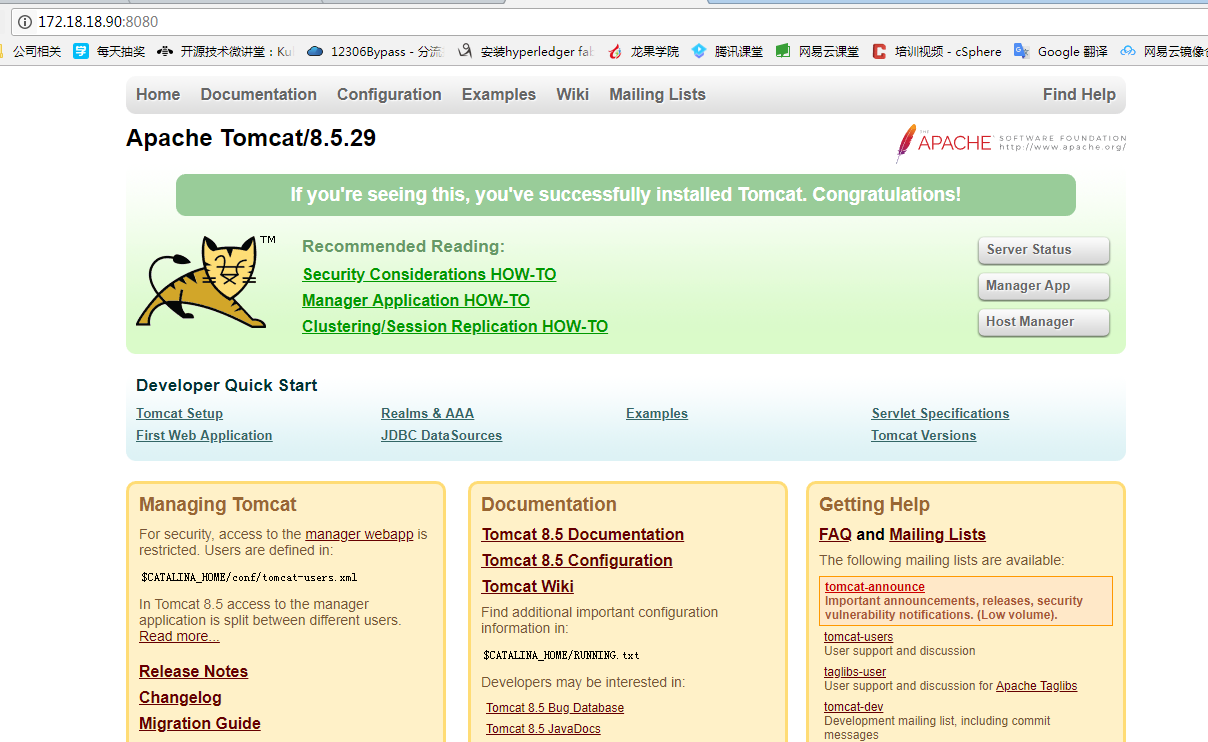
然後,在Manager節點跟蹤tomcat副本的日誌:
[root@Manager ~]# docker service logs web_tomcat -f你會發現跟蹤tomcat的副本日誌只是tomcat啓動的日誌,並沒有訪問的日誌,需要進入副本里面查看tomcat的localhost_access_log日誌。
5.案例演示自定義overlay網絡
下面通過自己創建自定網絡test_net、創建nginx副本test_nginx並加入test_net、創建busybox副本test_busy並加入test_net,然後通過ping測試兩個副本是否相通。
1、創建自定義overlay網絡test_net
[root@Manager ~]# docker network  create --driver overlay test_net
7zapi1r90xghatyetzg048eo6
[root@Manager ~]# docker network ls
NETWORK ID          NAME                DRIVER              SCOPE
...
7zapi1r90xgh        test_net            overlay             swarm
...
2、創建nginx副本test_nginx
[root@Manager ~]# docker service create --name  test_nginx --replicas 1 --network test_net  nginx
0kn7kx6er0r2ijuffe6w4bwux
overall progress: 1 out of 1 tasks
1/1: running
verify: Service converged
3、創建busybox副本test_busy
[root@Manager ~]# docker service  create --name test_busy --replicas 1 --network test_net busybox top
fiyi3jhnc9qhnthwo12doj5is
overall progress: 1 out of 1 tasks
1/1: running
verify: Service converged
4、進入test_busy副本ping busy_nginx測試:
[root@Manager ~]# docker exec -it
test_busy.1.coypjdeytu4latnmrww8yswyr  web_nginx.3.lzbgset0cwlmwxzb71prr9q7q
[root@Manager ~]# docker exec -it test_busy.1.coypjdeytu4latnmrww8yswyr sh
/ # ping test_nginx
PING test_nginx (10.0.0.5): 56 data bytes
64 bytes from 10.0.0.5: seq=0 ttl=64 time=0.030 ms
64 bytes from 10.0.0.5: seq=1 ttl=64 time=0.033 ms
64 bytes from 10.0.0.5: seq=2 ttl=64 time=0.047 ms
64 bytes from 10.0.0.5: seq=3 ttl=64 time=0.046 ms
^C
--- test_nginx ping statistics ---
4 packets transmitted, 4 packets received, 0% packet loss
round-trip min/avg/max = 0.030/0.039/0.047 ms
進入test_busy副本可以發現可以ping通test_nginx副本。
6、其它相關命令
#查看副本虛IP
[root@Manager ~]# docker service inspect  -f '{{json .Endpoint.VirtualIPs}}' test_nginx
[{"NetworkID":"7zapi1r90xghatyetzg048eo6","Addr":"10.0.0.5/24"}]

[root@Manager ~]# docker service inspect  -f '{{json .Endpoint.VirtualIPs}}' test_busy
[{"NetworkID":"7zapi1r90xghatyetzg048eo6","Addr":"10.0.0.7/24"}]
#還可以進入副本nslookup解析測試
[root@Manager ~]# docker exec -it test_busy.1.coypjdeytu4latnmrww8yswyr sh
/ # nslookup  test_nginx
Server:    127.0.0.11
Address 1: 127.0.0.11
Name:      test_nginx
Address 1: 10.0.0.5

/ # nslookup  test_busy
Server:    127.0.0.11
Address 1: 127.0.0.11
Name:      test_busy
Address 1: 10.0.0.7
6.案例演示端點模式dnsrr負載均衡
其實,當我們創建副本的時候,有1個參數是省略的 --endpoint-mode vip,也就是負載均衡的模式(dnsrr 和 vip),默認是vip模式的方式,下面我們用dnsrr模式來演示一下。
1、用busy鏡像創建3個副本test_dnsrr,也把它加入test_net網絡
[root@Manager ~]# docker service create --name test_dnsrr --replicas 3 --network test_net --endpoint-mode dnsrr busybox top
v574isy80agvuru***bl8htyx
overall progress: 3 out of 3 tasks
1/3: running
2/3: running
3/3: running
verify: Service converged
2、查看一下test_dnsrr副本
[root@Manager ~]# docker service ps  test_dnsrr
ID                  NAME                IMAGE               NODE                DESIRED STATE       CURRENT STATE            ERROR               PORTS
uem1xiwnla5t        test_dnsrr.1        busybox:latest      Manager             Running             Running 29 seconds ago
wtje7pgstmeg        test_dnsrr.2        busybox:latest      agnet02             Running             Running 3 minutes ago
3xzanggatp4d        test_dnsrr.3        busybox:latest      agent01             Running             Running 2 minutes ago
每個swarm節點都分配到了副本在運行。
3、進入test_dnsrr副本測試
[root@Manager ~]# docker exec -it test_dnsrr.1.uem1xiwnla5tbnh0kfcxr89xh sh
/ # nslookup  test_dnsrr
Server:    127.0.0.11
Address 1: 127.0.0.11

Name:      test_dnsrr
Address 1: 10.0.0.14 test_dnsrr.3.3xzanggatp4d8e8hayz99ngyc.test_net
Address 2: 10.0.0.16 46c86efbd56b.test_net
Address 3: 10.0.0.15 0cd47777c912
進入副本,通過nslookup發現dnsrr模式生效 ,同時能解析到3個副本的IP地址。如果你用默認的VIP模式,只能解析當前的副本IP,大家可以在創建3個副本不配置dnsrr模式,然後進入其中一個副本用nslookup測試一下看看。
本章內容到此結束,喜歡我的文章,請點擊最上方右角處的《關注》!!!
