Sonar 是一個用於代碼質量管理的開放平臺。通過插件機制,Sonar 可以集成不同的測試工具,代碼分析工具,以及持續集成工具。與持續集成工具(例如 Hudson/Jenkins 等)不同,Sonar 並不是簡單地把不同的代碼檢查工具結果(例如 FindBugs,PMD 等)直接顯示在 Web 頁面上,而是通過不同的插件對這些結果進行再加工處理,通過量化的方式度量代碼質量的變化,從而可以方便地對不同規模和種類的工程進行代碼質量管理。
Sonar介紹
Sonar 是一個用於代碼質量管理的開放平臺。通過插件機制,Sonar 可以集成不同的測試工具,代碼分析工具,以及持續集成工具。與持續集成工具(例如 Hudson/Jenkins 等)不同,Sonar 並不是簡單地把不同的代碼檢查工具結果(例如 FindBugs,PMD 等)直接顯示在 Web 頁面上,而是通過不同的插件對這些結果進行再加工處理,通過量化的方式度量代碼質量的變化,從而可以方便地對不同規模和種類的工程進行代碼質量管理。
在對其他工具的支持方面,Sonar 不僅提供了對 IDE 的支持,可以在 Eclipse和IntelliJ IDEA 這些工具裏聯機查看結果;同時 Sonar 還對大量的持續集成工具提供了接口支持,可以很方便地在持續集成中使用 Sonar。
此外,Sonar 的插件還可以對 Java 以外的其他編程語言提供支持,對國際化以及報告文檔化也有良好的支持。
Sonar部署
Sonar的相關下載和文檔可以在下面的鏈接中找到:http://www.sonarqube.org/downloads/。需要注意最新版的Sonar需要至少JDK 1.8及以上版本。
上篇文章我們已經可以成功的使用git進行拉去,Sonar的功能就是來檢查代碼是否有BUG。除了檢查代碼是否有bug還有其他的功能,比如說:你的代碼註釋率是多少,代碼有一些建議,編寫語法的建議。所以我們叫質量管理
Sonar還可以給代碼打分,並且引用了技術宅的功能(告訴你有很多地方沒改)
Sonar部署
[root@linux-node1 ~]# yum install -y java-1.8.0
[root@linux-node1 ~]# cd /usr/local/src
軟件包我們通過wget或者下載,rz上傳到服務器
#軟件包下載:https://sonarsource.bintray.com/Distribution/sonarqube/sonarqube-5.6.zip
[root@linux-node1 src]# unzip sonarqube-5.6.zip
[root@linux-node1 src]# mv sonarqube-5.6 /usr/local/
[root@linux-node1 src]# ln -s /usr/local/sonarqube-5.6/ /usr/local/sonarqube
準備Sonar數據庫 如果沒有數據庫請執行 yum install -y mariadb mariadb-server
[root@linux-node1 ~]# systemctl start mariadb
[root@linux-node1 ~]# systemctl enable mariadb
Created symlink from /etc/systemd/system/multi-user.target.wants/mariadb.service to /usr/lib/systemd/system/mariadb.service.
[root@linux-node1 ~]# mysql_secure_installation
[root@linux-node1 ~]# mysql -uroot -p123456
特別提示:
sonar好像不支持mysql 5.5,所以如果看日誌出現以上error 請安裝mysql5.6 或者更高版本
http://yw666.blog.51cto.com/11977292/1889536
執行sql語句
mysql> CREATE DATABASE sonar CHARACTER SET utf8 COLLATE utf8_general_ci;
mysql> GRANT ALL ON sonar.* TO 'sonar'@'localhost' IDENTIFIED BY 'sonar@pw';
mysql> GRANT ALL ON sonar.* TO 'sonar'@'%' IDENTIFIED BY 'sonar@pw';
mysql> FLUSH PRIVILEGES;
配置Sonar
[root@linux-node1 ~]#  cd /usr/local/sonarqube/conf/
[root@linux-node1 conf]# ls
sonar.properties  wrapper.conf
編寫配置文件,修改數據庫配置
[root@linux-node1 conf]# vim sonar.properties
#我們只需要去配置文件裏面修改數據庫的認證即可
 14 sonar.jdbc.username=sonar            #數據庫用戶
 15 sonar.jdbc.password=sonar@pw     #數據庫密碼
 23 sonar.jdbc.url=jdbc:mysql://localhost:3306/sonar?useUnicode=true&character    Encoding=utf8&rewriteBatchedStatements=true&useConfigs=maxPerformance
配置Java訪問數據庫驅動(可選) 默認情況Sonar有自帶的嵌入的數據庫,那麼你如果使用類是Oracle數據庫,必須手動複製驅動類到${SONAR_HOME}/extensions/jdbc-driver/oracle/目錄下,其它支持的數據庫默認提供了驅動。其它數據庫的配置可以參考官方文檔:
http://docs.sonarqube.org/display/HOME/SonarQube+Platform
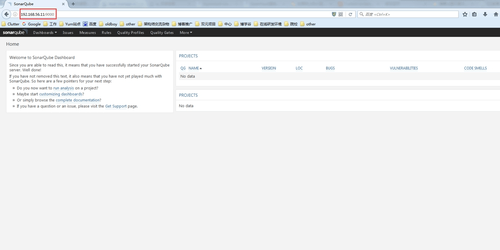
啓動Sonar 你可以在Sonar的配置文件來配置Sonar Web監聽的IP地址和端口,默認是9000端口。
[root@linux-node1 conf]# vim sonar.properties
 99 #sonar.web.host=0.0.0.0
106 #sonar.web.port=9000
啓動命令如下:
[root@linux-node1 ~]# /usr/local/sonarqube/bin/linux-x86-64/sonar.sh start
Starting SonarQube...
Started SonarQube.
如果有什麼問題可以看一下日誌/usr/local/sonarqube/logs/sonar.log
檢查是否有相應的端口
[root@linux-node1 ~]# netstat -lntup
Active Internet connections (only servers)
Proto Recv-Q Send-Q Local Address           Foreign Address         State       PID/Program name
tcp        0      0 127.0.0.1:8080          0.0.0.0:*               LISTEN      2239/unicorn master
tcp        0      0 0.0.0.0:80              0.0.0.0:*               LISTEN      505/nginx: master p
tcp        0      0 0.0.0.0:22              0.0.0.0:*               LISTEN      569/sshd
tcp        0      0 127.0.0.1:25            0.0.0.0:*               LISTEN      971/master
tcp        0      0 127.0.0.1:43163         0.0.0.0:*               LISTEN      5205/java
tcp        0      0 0.0.0.0:8060            0.0.0.0:*               LISTEN      505/nginx: master p
tcp        0      0 127.0.0.1:32000         0.0.0.0:*               LISTEN      4925/java
tcp        0      0 0.0.0.0:43044           0.0.0.0:*               LISTEN      4952/java
tcp        0      0 0.0.0.0:33350           0.0.0.0:*               LISTEN      5205/java
tcp        0      0 0.0.0.0:9000            0.0.0.0:*               LISTEN      5011/java
tcp        0      0 0.0.0.0:33385           0.0.0.0:*               LISTEN      5011/java
tcp        0      0 127.0.0.1:9001          0.0.0.0:*               LISTEN      4952/java
tcp6       0      0 :::3306                 :::*                    LISTEN      4658/mysqld
tcp6       0      0 :::34993                :::*                    LISTEN      2348/java
tcp6       0      0 :::8081                 :::*                    LISTEN      2348/java
tcp6       0      0 :::22                   :::*                    LISTEN      569/sshd
tcp6       0      0 ::1:25                  :::*                    LISTEN      971/master
udp6       0      0 :::33848                :::*                                2348/java
udp6       0      0 :::5353                 :::*                                2348/java
#端口是9000!
提示: sonar跟jenkins類似,也是以插件爲主
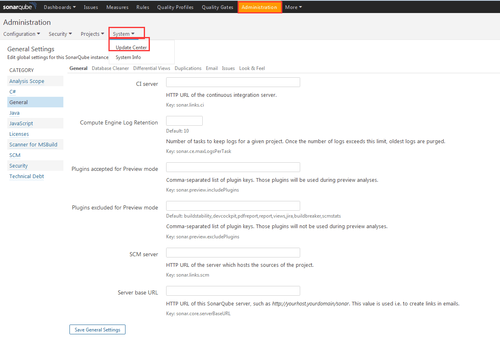
sonar安裝插件有2種方式:第一種將插件下載完存放在sonar的插件目錄,第二種使用web界面來使用安裝
存放插件路徑[/usr/local/sonarqube/extensions/plugins/]
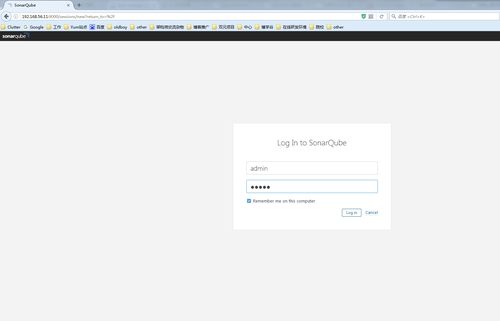
安裝中文插件 登陸:用戶名:admin 密碼:admin
需要重啓纔會生效
我們再安裝一個PHP語言
溫馨提示:如果下載不下來我們直接去github進行下載,因爲我們這個插件都是使用wget進行下載的
我們現在只能使用java的jar包和php,因爲我們只安裝了java和php的語言插件。如果想使用Python的程序,就需要安裝Python的語言插件
Sonar 插件--->語言插件 (分析什麼語言,你就需要安裝什麼語言的插件)
Sonar通過SonarQube Scanner(掃描器)來對代碼進行分析
官方文檔:http://docs.sonarqube.org/display/SCAN/Analyzing+with+SonarQube+Scanner
下載掃描器插件
[root@linux-node1 ~]# wget https://sonarsource.bintray.com/Distribution/sonar-scanner-cli/sonar-scanner-2.8.zip
[root@linux-node1 ~]# unzip sonar-scanner-2.8.zip
[root@linux-node1 ~]# mv sonar-scanner-2.8 /usr/local/
[root@linux-node1 ~]# ln -s /usr/local/sonar-scanner-2.8/ /usr/local/sonar-scanner
我們要將掃描器和sonar關聯起來
[root@linux-node1 ~]# cd /usr/local/sonar-scanner
[root@linux-node1 sonar-scanner]# ls
bin  conf  lib
[root@linux-node1 sonar-scanner]# cd conf/
[root@linux-node1 conf]# ls
sonar-scanner.properties
[root@linux-node1 conf]# vim sonar-scanner.properties
sonar.host.url=http://localhost:9000        #sonar地址
sonar.sourceEncoding=UTF-8                  #字符集
sonar.jdbc.username=sonar                    #數據庫賬號
sonar.jdbc.password=sonar@pw              #數據庫密碼
sonar.jdbc.url=jdbc:mysql://localhost:3306/sonar?useUnicode=true&characterEncoding=utf8    #數據庫連接地址
#打開註釋即可
我們現在需要找一個代碼進行分析。
sonar插件提供了一個代碼的庫
github:https://github.com/SonarSource/sonar-examples
我們下載軟件包:https://github.com/SonarSource/sonar-examples/archive/master.zip
解壓
[root@linux-node1 src]# unzip sonar-examples-master.zip
[root@linux-node1 php]# cd sonar-examples-master/projects/languages/php
[root@linux-node1 php]# cd php-sonar-runner-unit-tests/
[root@linux-node1 php-sonar-runner-unit-tests]# ll
total 8
-rw-r--r-- 1 root root 647 Dec 14 09:57 README.md
drwxr-xr-x 2 root root  51 Dec 14 09:57 reports
-rw-r--r-- 1 root root 346 Dec 14 09:57 sonar-project.properties
drwxr-xr-x 3 root root  31 Dec 14 09:57 src
drwxr-xr-x 2 root root  25 Dec 14 09:57 tests
#這裏就是PHP的目錄
配置文件解釋: 如果你想讓我掃描,就需要在代碼路徑下放一個配置文件
[root@linux-node1 php-sonar-runner-unit-tests]# cat sonar-project.properties
sonar.projectKey=org.sonarqube:php-ut-sq-scanner          #Key
sonar.projectName=PHP :: PHPUnit :: SonarQube Scanner   #這裏的名稱會顯示在一會的web界面上
sonar.projectVersion=1.0                                #版本,這裏的版本一會也會顯示在web界面上
sonar.sources=src                                      #軟件包存放路徑
sonar.tests=tests
sonar.language=php                                       #語言
sonar.sourceEncoding=UTF-8                                 #字體
# Reusing PHPUnit reports
sonar.php.coverage.reportPath=reports/phpunit.coverage.xml
sonar.php.tests.reportPath=reports/phpunit.xml
#也就是說在項目裏面必須有這個配置文件纔可以進行掃描
掃描
#提示:需要在項目文件裏面進行執行
[root@linux-node1 php-sonar-runner-unit-tests]# /usr/local/sonar-scanner/bin/sonar-scanner
INFO: Scanner configuration file: /usr/local/sonar-scanner/conf/sonar-scanner.properties
INFO: Project root configuration file: /usr/local/src/sonar-examples-master/projects/languages/php/php-sonar-runner-unit-tests/sonar-project.properties
INFO: SonarQube Scanner 2.8
INFO: Java 1.8.0_111 Oracle Corporation (64-bit)
INFO: Linux 3.10.0-514.2.2.el7.x86_64 amd64
INFO: User cache: /root/.sonar/cache
INFO: Load global repositories
INFO: Load global repositories (done) | time=211ms
WARN: Property 'sonar.jdbc.url' is not supported any more. It will be ignored. There is no longer any DB connection to the SQ database.
WARN: Property 'sonar.jdbc.username' is not supported any more. It will be ignored. There is no longer any DB connection to the SQ database.
WARN: Property 'sonar.jdbc.password' is not supported any more. It will be ignored. There is no longer any DB connection to the SQ database.
INFO: User cache: /root/.sonar/cache
INFO: Load plugins index
INFO: Load plugins index (done) | time=3ms
INFO: Download sonar-csharp-plugin-5.0.jar
INFO: Download sonar-java-plugin-3.13.1.jar
INFO: Download sonar-l10n-zh-plugin-1.11.jar
INFO: Plugin [l10nzh] defines 'l10nen' as base plugin. This metadata can be removed from manifest of l10n plugins since version 5.2.
INFO: Download sonar-scm-git-plugin-1.2.jar
INFO: Download sonar-php-plugin-2.9.1.1705.jar
INFO: Download sonar-scm-svn-plugin-1.3.jar
INFO: Download sonar-javascript-plugin-2.11.jar
INFO: SonarQube server 5.6
INFO: Default locale: "en_US", source code encoding: "UTF-8"
INFO: Process project properties
INFO: Load project repositories
.................................................
.................................................
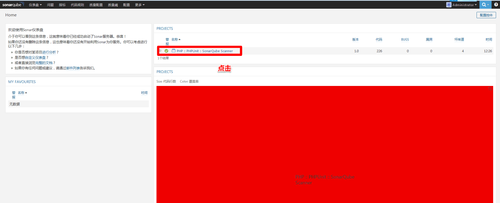
提示:我們什麼都不指定就會在當面目錄下掃描sonar-project.properties文件,根據配置文件進行掃描工作。掃描之後我們在web界面上就可以看到代碼的掃描結果
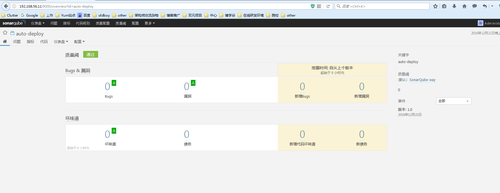
這裏的名字,版本 都是在sonar-project.properties文件中定義的
質量閾幫我們設定好一個閾值,超過相應的閾值就算有bug
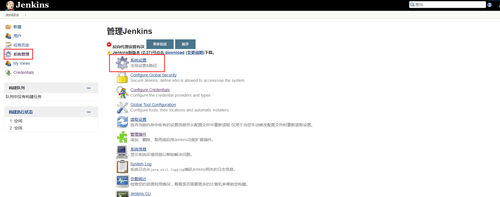
爲了讓jenkins可以在構建項目的時候執行sonar,所以我們需要在jenkins上安裝插件
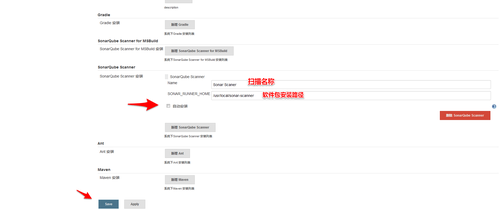
現在就可以進行配置,讓jenkins和sonar結合在一起。這樣我們構建項目的時候就會進行代碼檢測
點擊保存
配置
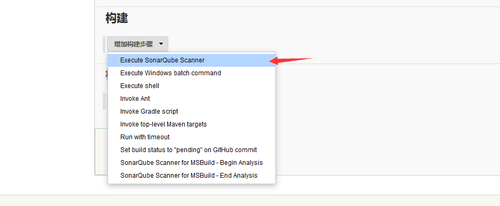
編輯我們的項目,選擇最下方。找到構建
對PHP文件進行復制
[root@linux-node1 php-sonar-runner-unit-tests]# cat /usr/local/src/sonar-examples-master/projects/languages/php/php-sonar-runner-unit-tests/sonar-project.properties
sonar.projectKey=org.sonarqube:php-ut-sq-scanner
sonar.projectName=PHP :: PHPUnit :: SonarQube Scanner
sonar.projectVersion=1.0
sonar.sources=src
sonar.tests=tests
sonar.language=php
sonar.sourceEncoding=UTF-8
# Reusing PHPUnit reports
sonar.php.coverage.reportPath=reports/phpunit.coverage.xml
sonar.php.tests.reportPath=reports/phpunit.xml
Analysis properties 分析的參數
填寫完畢後,我們點擊保存
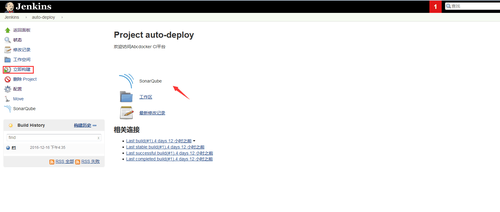
我們選擇立即構建
提示:此時的SonarQube是無法點擊的
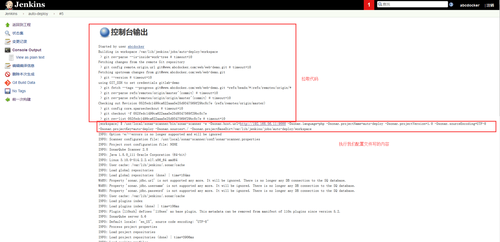
點擊Console Output可以查看構建輸出的內容
#提示:只要沒有error就可以
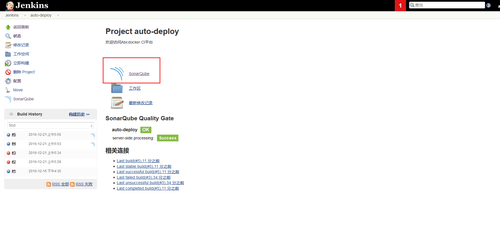
構建完成後,我們發現這裏的SonarQube可以點擊,我們點擊SonarQube就會鏈接到192.168.56.11:9000 就是代碼查看器的地址
現在我們已經做到了可以在git上進行拉取代碼。並進行檢測
我們還可以配置一個構建失敗發送郵箱:
在我們項目裏面設置構建後操作,選擇E-mail Notification
溫馨提示:使用163郵箱發送的通知被163服務器退回了,因此我將設置在jenkins的郵箱改成了QQ郵箱
QQ:郵箱需要設置如下:
1、需要開啓POPE3/SMTP服務
2、在jenkins上配置的密碼我們需要點擊生成授權碼進行使用
QQ郵箱默認會受到如下提示:
當再次構建成功時,郵件內容如下:


![5K]0XQU_]Y$NV19I8`DLD[H.png wKiom1lLZS3g-4cKAAAu8AH9EH4852.png-wh_50](https://s4.51cto.com/wyfs02/M01/99/B3/wKiom1lLZS3g-4cKAAAu8AH9EH4852.png-wh_500x0-wm_3-wmp_4-s_2179098476.png)
![K[B[ZMNA@3MGRJ_8]CS]5AC.png wKiom1lLZTrDqfjOAAA0R3Y5n5Y750.png-wh_50](https://s2.51cto.com/wyfs02/M02/99/B3/wKiom1lLZTrDqfjOAAA0R3Y5n5Y750.png-wh_500x0-wm_3-wmp_4-s_2061731326.png)
![_KH)9[AO0GY39_H(I]7(``C.png wKiom1lLZV3zIv3QAAB-oHNKdKU180.png-wh_50](https://s5.51cto.com/wyfs02/M00/99/B3/wKiom1lLZV3zIv3QAAB-oHNKdKU180.png-wh_500x0-wm_3-wmp_4-s_844092663.png)


![2XG2M2G{]X@U4U%7SIW(L@4.png wKioL1lLZmaxtY9RAABG54xEiPo899.png-wh_50](https://s2.51cto.com/wyfs02/M00/99/B4/wKioL1lLZmaxtY9RAABG54xEiPo899.png-wh_500x0-wm_3-wmp_4-s_1501921842.png)
![5]C`FXC8FJZRITTU7~$8YEN.png wKiom1lLZoDyvkE2AACJIkjMKb8790.png-wh_50](https://s2.51cto.com/wyfs02/M01/99/B3/wKiom1lLZoDyvkE2AACJIkjMKb8790.png-wh_500x0-wm_3-wmp_4-s_1640810914.png)
![%FS$MLEFGE}]%Y~S1A5RLMC.png wKioL1lLZsHxYzWpAAGyhrOoN7Y084.png-wh_50](https://s5.51cto.com/wyfs02/M00/99/B4/wKioL1lLZsHxYzWpAAGyhrOoN7Y084.png-wh_500x0-wm_3-wmp_4-s_641155326.png)
![ZKH]QVX8{P11ZAZ}W9(9{[V.png wKioL1lLZ1Li89VoAAA8N36r1fI962.png-wh_50](https://s4.51cto.com/wyfs02/M01/99/B4/wKioL1lLZ1Li89VoAAA8N36r1fI962.png-wh_500x0-wm_3-wmp_4-s_1624160254.png)
![GL@Q[BORKZ7{]O[GVK3MR`P.png wKiom1lLZ32C5zJIAABZaCh3_7E522.png-wh_50](https://s5.51cto.com/wyfs02/M01/99/B4/wKiom1lLZ32C5zJIAABZaCh3_7E522.png-wh_500x0-wm_3-wmp_4-s_3446243024.png)
![`HZ}TBB2{@8B9NQP]LT`$4K.jpg wKioL1lLZ9HSESb2AADJgkwF2Gw786.jpg-wh_50](https://s3.51cto.com/wyfs02/M02/99/B4/wKioL1lLZ9HSESb2AADJgkwF2Gw786.jpg-wh_500x0-wm_3-wmp_4-s_1209817928.jpg)
![IV)C]H[EQ}CWC3D`5$`J)ZC.png wKiom1lLZ-SyKOI_AAApMA-9TDw825.png-wh_50](https://s1.51cto.com/wyfs02/M00/99/B4/wKiom1lLZ-SyKOI_AAApMA-9TDw825.png-wh_500x0-wm_3-wmp_4-s_2638356270.png)


![HEZHP]6~3}VUUNLSA@`((SE.png wKioL1lLaC3BHqebAAF-jhGz4Is573.png-wh_50](https://s5.51cto.com/wyfs02/M02/99/B4/wKioL1lLaC3BHqebAAF-jhGz4Is573.png-wh_500x0-wm_3-wmp_4-s_758773656.png)
![UYIG]8ZUR$@M@~YC$YTU5_N.png wKioL1lLaErzFGrjAABNuZAFbyE201.png-wh_50](https://s5.51cto.com/wyfs02/M00/99/B4/wKioL1lLaErzFGrjAABNuZAFbyE201.png-wh_500x0-wm_3-wmp_4-s_3054488421.png)