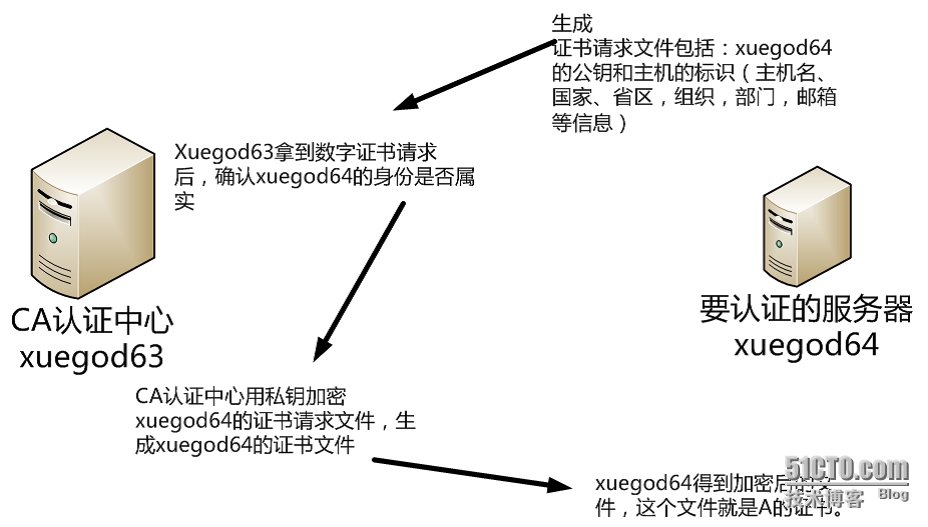
1 2 3 | [root@xuegod63 CA]# vim /etc/pki/tls/openssl.cnf 改: 172 #basicConstraints=CA:FALSE 为:172 basicConstraints=CA:TRUE #让自己成为CA认证中心 |
1 2 3 4 5 6 7 8 9 10 11 12 13 14 15 16 17 18 19 20 21 22 23 24 25 26 27 28 29 30 31 32 33 34 35 36 37 38 39 40 41 42 43 44 45 46 47 48 49 50 51 52 53 54 55 56 57 | [root@xuegod63 CA]# /etc/pki/tls/misc/CA -h #查看帮助usage: /etc/pki/tls/misc/CA -newcert|-newreq|-newreq-nodes|-newca|-sign|-verify[root@xuegod63 ~]# /etc/pki/tls/misc/CA -newca #配置一个新的CA认证中心CA certificate filename (or enter to create) #直接回车 Making CA certificate ... Generating a 2048 bit RSA private key ....................+++ ..........................................................................+++writing new private key to '/etc/pki/CA/private/./cakey.pem' Enter PEM pass phrase:123456 # 输入密码,保护私钥 Verifying - Enter PEM pass phrase:123456 #再次输入密码 ----- You are about to be asked to enter information that will be incorporated into your certificate request. What you are about to enter is what is called a Distinguished Name or aDN. There are quite a few fields but you can leave some blank For some fields there will be a default value, If you enter '.', the field will be left blank. ---- Country Name (2 letter code) [XX]:CN #国家地区State or Province Name (full name) []:beijing #城市Locality Name (eg, city) [Default City]:haidian #当地名称Organization Name (eg, company) [Default Company Ltd]: xuegod #组织名称Organizational Unit Name (eg, section) []:IT #组织部门名称Common Name (eg, your name or your server's hostname) []:xuegod63.cn #通用名称(例如,您的姓名或您的服务器的主机名),随便写Email Address []:[email protected] #邮箱Please enter the following 'extra' attributes to be sent with your certificate request #添加一个“额外”的属性,让客户端发送CA证书,请求文件时,要输入的密 A challenge password []: #直接加车 An optional company name []:#直接加车Using configuration from /etc/pki/tls/openssl.cnf #CA服务器的配置文件。上面修改的内容会添加到这个配置文件中Enter pass phrase for /etc/pki/CA/private/./cakey.pem: 123456 #输入刚才保护CA密钥的密码Check that the request matches the signature Signature ok Certificate Details: Serial Number: c9:16:bb:49:48:20:ed:16 Validity Not Before: Dec 20 12:00:19 2014 GMT Not After : Dec 19 12:00:19 2017 GMT Subject(主题): countryName = CN stateOrProvinceName = beijing organizationName = xuegod organizationalUnitName = IT commonName = shenjianming emailAddress = [email protected] X509v3 extensions:X509v3 Subject Key Identifier:BF:E3:16:CC:EB:42:BD:6D:56:8E:A4:21:70:E6:72:40:0C:77:C0:C0X509v3 Authority Key Identifier:keyid:BF:E3:16:CC:EB:42:BD:6D:56:8E:A4:21:70:E6:72:40:0C:77:C0:C0X509v3 Basic Constraints:CA:TRUECertificate is to be certified until Dec 19 12:00:19 2017 GMT (1095 days)Write out database with 1 new entriesData Base Updated |
1 2 3 4 5 6 7 8 9 10 11 12 13 14 15 16 17 18 | [root@xuegod63 CA]#vim /etc/pki/CA/cacert.pem #存在CA认证下的根证书,这里面包含了根证书的公钥。Certificate: Data: Version: 3 (0x2) Serial Number: c0:1d:ed:ba:fc:7e:b4:40 Signature Algorithm: sha1WithRSAEncryption Issuer:C=CN, ST=beijing, O=xuegod, OU=IT, CN=shenjianming/emailAddress=1@1 63.com #CA 机构信息 Validity Not Before: May 9 11:54:20 2015 GMT Not After : May 8 11:54:20 2018 GMT Subject: C=CN, ST=beijing, O=xuegod, OU=IT,CN=shenjianming/emailAddress=1@ 163.com SubjectPublic Key Info: #CA认证中心公钥信息 Public Key Algorithm: rsaEncryption Public-Key: (2048 bit) Modulus: |
1 2 3 4 5 6 | [root@xuegod63 CA]# vim /etc/pki/CA/private/cakey.pem #存在CA认证下根证书的私钥(cakey.pem)。-----BEGIN ENCRYPTED PRIVATE KEY----- MIIFDjBABgkqhkiG9w0BBQ0wMzAbBgkqhkiG9w0BBQwwDgQI2JxR6+eEWI0CAggA MBQGCCqGSIb3DQMHBAjjVO7+mmTUuwSCBMil6B4xGLDfbskPQd++sEtyMtV8Y62l GztBjiSSNCE0amDVvhi5hG5dZpq9i/ik1Jh31DQ6siet10vm7/EZC4KSqagDsi66 |
1 2 3 4 5 | [root@xuegod64 ~]# yum install httpd [root@xuegod64 ~]# vim /etc/httpd/conf/httpd.conf 改:#ServerName www.example.com:80为:ServerName 192.168.1.64:80[root@xuegod64 ~]# service httpd restart |
1 2 3 4 5 6 7 8 9 10 11 12 13 14 15 16 17 18 19 | [root@xuegod64 ~]# openssl genrsa -h #查看帮助usage:genrsa [args] [numbits] -des encrypt the generated key with DES in cbc mode -des3 encrypt the generated key with DES in ede cbc mode (168 bit key) -idea encrypt the generated key with IDEA in cbc mode -seed encrypt PEM output with cbcseed -aes128, -aes192, -aes256 encrypt PEM output with cbcaes -camellia128, -camellia192, -camellia256 encrypt PEM output with cbccamellia -out file output the key to 'file -passout arg output file pass phrase source -f4 use F4 (0x10001) for the E value -3 use 3 for the E value -engine e use engine e, possibly a hardware device. -rand file:file:... load the file (or the files inthe directory) into the random number generator |
1 2 3 4 5 6 7 8 9 10 11 12 13 14 15 16 17 18 | [root@xuegod64 ~]# openssl genrsa -des3 -out /etc/httpd/conf.d/server.keyGenerating RSA private key, 512 bit long modulus .....++++++++++++ ..............................++++++++++++ e is 65537 (0x10001) Enter pass phrase for /etc/httpd/conf.d/server.key:123456 #输入保护私钥的密码 Verifying - Enter pass phrase for /etc/httpd/conf.d/server.key: 123456 [root@xuegod64 ~]# cat /etc/httpd/conf.d/server.key #查看一下私钥-----BEGIN RSA PRIVATE KEY----- #Proc-Type: 4,ENCRYPTEDDEK-Info: DES-EDE3-CBC,D1CCE8B91BCAD4F4 #进行了二次加密 TlIQpxnrXh9WgLpqfqvKymsCdDDYUjvGyc2C9FOdZtEo+4B2toHGRKjyCyyRcWb7PV9AJU5FsGyMDVDnOvTcBjYy5MPFhSPUpJ7Y5WeQBWZ6cn5Yh5OtVqQh5EyIxhVJj1m6XOrcAVpgRDOfyH68r+mipmse95kiBAjxh2gm5OzLLJt27dFZ5XRmd7oXys0qV1SFftuN7M7DEx6Qzsut/C4teAZ64Bx3kM1RlXjAESixZUmrPyB/l12rVxd/kMQTh2gvHM40mn52iNddaXQu8EeKy9CzJUpou85154v7tlqftJ98Hg9oFxebhIhS/16f: |
1 2 3 4 5 6 7 8 9 10 11 12 13 14 15 16 17 18 19 20 21 | [root@xuegod64 ~]# openssl req -new -key /etc/httpd/conf.d/server.key-out /server.csr #注意后期添加的国家,省,组织等信息要和CA保持一致 Enter pass phrase for /etc/httpd/conf.d/server.key:123456 #输入私钥的密码 You are about to be asked to enter information that will be incorporated into your certificate request. What you are about to enter is what is called a Distinguished Name or aDN. There are quite a few fields but you can leave some blank For some fields there will be a default value, If you enter '.', the field will be left blank. ----- Country Name (2 letter code) [XX]:CN State or Province Name (full name) []:beijing Locality Name (eg, city) [Default City]:haidian Organization Name (eg, company) [Default Company Ltd]:xuegod Organizational Unit Name (eg, section) []:IT Common Name (eg, your name or your server's hostname) []:xuegod64.cn#这里要求输入的CommonName必须不通过浏览器访问您网站的 URL 完全相同,否则用户会发现您服务器证书的通用名不站点的名字丌匹配,用户就会怀疑您的证书的真实性。可以使域名也可以使IP地址。Email Address []:[email protected]Please enter the following 'extra' attributesto be sent with your certificate requestA challenge password []: #不输密码直接回车An optional company name []: |
1 2 3 4 5 6 7 | [root@xuegod64 ~]# scp /server.csr 192.168.1.63:/tmp/The authenticity of host '192.168.1.63 (192.168.1.63)' can't beestablished.RSA key fingerprint is f5:49:15:f3:62:37:05:0c:d5:15:ca:18:ea:c3:df:13.Are you sure you want to continue connecting (yes/no)? yesWarning: Permanently added '192.168.1.63' (RSA) to the list of knownhosts.[email protected]'s password:123456 server.csr 100% 688 0.7KB/s 00:00 |
1 2 3 4 5 6 7 8 9 10 11 12 13 14 15 16 17 18 19 20 21 22 23 24 25 26 27 28 29 30 31 32 33 34 35 | [root@xuegod63 CA]# openssl ca -h #查看CA认证中心的帮助内容[root@xuegod63~]# openssl ca -keyfile /etc/pki/CA/private/cakey.pem -cert /etc/pki/CA/cacert.pem-in /tmp/server.csr -out /server.crt Using configuration from /etc/pki/tls/openssl.cnf Enter pass phrase for /etc/pki/CA/private/cakey.pem:123456 Check that the request matches the signatureSignature ok Certificate Details: Serial Number: ce:60:e0:a3:fe:ee:88:09 Validity Not Before: Dec 21 14:25:53 2014 GMT Not After : Dec 21 14:25:53 2015 GMT Subject: countryName = CN stateOrProvinceName = beijing organizationName = xuegod organizationalUnitName = IT commonName = xuegod64.cn emailAddress = [email protected] X509v3 extensions:X509v3 Basic Constraints:CA:TRUENetscape Comment:OpenSSL Generated CertificateX509v3 Subject Key Identifier:1B:30:0B:28:4A:31:EA:FC:05:7D:54:A3:87:A0:6E:BE:F8:D6:3C:F8X509v3 Authority Key Identifier:keyid:6D:0F:0C:C5:96:32:A8:8B:D3:FF:36:39:5B:14:5B:9B:31:12:4A:C3Certificate is to be certified until Dec 21 14:25:53 2015 GMT (365 days) #证书有效期是365天。证书进行认证,直到12月21日十四时25分53秒格林尼治标准时间2015年(365天)Sign the certificate? [y/n]:y #注册证书1 out of 1 certificate requests certified, commit? [y/n]y #确认Write out database with 1 new entriesData Base Updated将证书复制到xuegod64[root@xuegod63 CA]# scp /server.crt 192.168.1.64:/ |
1 2 3 4 5 6 7 | [root@xuegod63 ~]# scp /server.csr 192.168.1.64:/The authenticity of host '192.168.1.64 (192.168.1.64)' can't beestablished.RSA key fingerprint is f5:49:15:f3:62:37:05:0c:d5:15:ca:18:ea:c3:df:13.Are you sure you want to continue connecting (yes/no)? yesWarning: Permanently added '192.168.1.64' (RSA) to the list of knownhosts.[email protected]'s password: 123456server.csr 100% 688 0.7KB/s 00:00 |
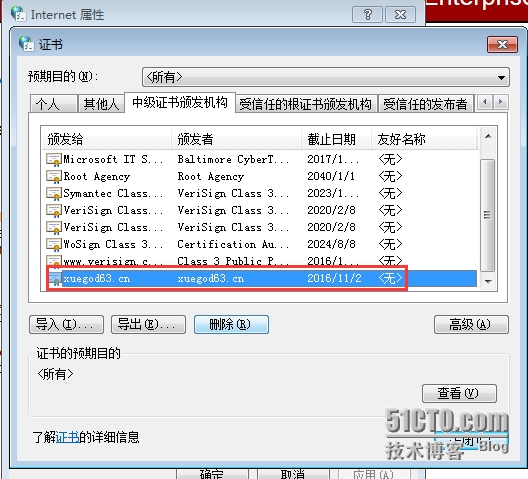
1 2 3 4 5 6 7 8 9 10 11 12 13 14 15 16 17 18 19 20 21 22 23 24 25 26 27 28 29 30 31 32 33 34 35 36 37 38 | [root@xuegod64 ~]# yum install mod_ssl -y 安装:SSL模块[root@xuegod64 ~]# cp /server.crt /etc/httpd/conf.d/ #复制证书 [root@xuegod64 ~]# cat /server.crtertificate: Data: Version: 3 (0x2) Serial Number: 96:db:28:b4:8b:a7:fb:bc Signature Algorithm: sha1WithRSAEncryption Issuer: C=CN, ST=beijing, O=xuegod,OU=IT, 颁发者是63- Validity Not Before: Nov 3 11:12:34 2015 GMT Not After : Nov 2 11:12:34 2016 GMT Subject: C=CN, ST=beijing, O=xuegod,OU=IT, CN=xuegod63.cn/emailAddress[email protected]请求的是64,这里我没有修改 Subject Public Key Info:这里可以看出,证书中用了公钥加密 Public Key Algorithm: rsaEncryption Public-Key: (1024 bit) Modulus:[root@xuegod64 ~]# ls /etc/httpd/conf.d/server.key #查看私钥/etc/httpd/conf.d/server.key[root@xuegod64 ~]# vim /etc/httpd/conf.d/ssl.conf104 # certificate can be generated using the genkey(1) command.改:105 SSLCertificateFile /etc/pki/tls/certs/localhost.crt为:SSLCertificateFile /etc/httpd/conf.d/server.crt106 #SSLCertificateFile /etc/pki/tls/certs/localhost.crt107108 # Server Private Key:109 # If the key is not combined with the certificate, use this110 # directive to point at the key file. Keep in mind that if111 # you've both a RSA and a DSA private key you can configure112 # both in parallel (to also allow the use of DSA ciphers, etc.)改:113 SSLCertificateKeyFile /etc/pki/tls/private/localhost.key为:SSLCertificateKeyFile /etc/httpd/conf.d/server.key114 #SSLCertificateKeyFile /etc/pki/tls/private/localhost.key |
1 2 3 4 5 6 7 8 9 | [root@xuegod64 ~]# service httpd restart Stopping httpd: [ OK ] Starting httpd: Apache/2.2.15 mod_ssl/2.2.15 (Pass Phrase Dialog) Some of your private key files are encrypted for security reasons. In order to read them you have to provide the pass phrases. Server bt-199-034.bta.net.cn:443 (RSA) Enter pass phrase:123456 #保护私钥密码 OK: Pass Phrase Dialog successful. [ OK ] |
1 2 3 4 5 6 7 8 | 查看端口:[root@xuegod64 ~]# netstat -antup | grep 443 #发现找丌到 访问: https://192.168.1.64/ 后 再查看:[root@xuegod64 ~]# netstat -antup | grep 443 tcp 0 0 :::443 :::* LISTEN 5138/httpd 只有调用一下https,才会开启。 像 ftp :20传输数据, 21 监听服务,传输命令。 没有数据传输时,看不到20端口。 修改物理机:C:\Windows\System32\drivers\etc\hosts 添加:192.168.1.64 xuegod64.cn |


