網頁管理數據庫
安裝http
下載phpdomain for linux
安裝php
安裝php-mysql
加cookie
郵件服務器
兩個虛擬機,一個主機名改爲maillcdqqq.lcdqqq.com,在其上配置DNS,設兩個.zone文件,寫好配置文件,把另一個虛擬機主機名改爲mailcddamowang.cddamowang.com,nameserver設爲lcdqqq.com的ip
通過在兩個虛擬機上分別dig -t mx lcdqqq.com檢測
配置兩個虛擬機的/etc/postXXX/main.cfg文件,改75,83,99,113,164行
開始發送郵件
mail [email protected] 給lcdqqq.com的root發郵件
mailq 待發送隊列
mail 查看收件箱
postsuper -d 4B9DE17E849 刪除發送失敗的郵件
postqueue -f 刷新發送狀態
postconf -n 查看當前設置 -n(non-defaults)
postconf -e "inet_interfaces=localhost" 設置 -e(edit)
postconf -d | grep innet 查看默認設置 -d(defaults)
改別名(羣發)
DNS服務器:
vim /etc/aliases
lcdqqq: student
|| ||
別名 真名
more: :include:/etc/moreusers 羣發郵件
vim /etc/moreusers
student
root
postalias /etc/aliases 讓別名生效
systemctl restart postfix.service
出站地址僞裝
DNS服務器
vim /etc/postfix/generic
在最後一行加上
[email protected] [email protected]
postmap generic給generic加密,生成generic.db
postconf -d | grep generic 查看加密使用的參數
postconf -e "smtp_generic_maps=hash:/etc/postfix/generic"
把加密的文件寫入/etc/postfix/main.cf主配置文件
systemctl restart postfix
遠程登陸哦郵件服務器
telnet
yum install telnet -y
telnet 172.25.254.101 25
ehlo hello(打個招呼。。有反應代表鏈接成功)
mail from:[email protected]
rcpt to:[email protected]
data
lalalala
.
quit
通過telnet遠程控制端口來發送郵件
限制遠程用戶使用郵件服務
1.限制客戶端:通過限制IP
服務器:
vim/etc/postfix/access
172.25.254.1 REJECT
postmap access (給access加密)
postconf -d | grep client (查看使用參數)
postconf -e "smtpd_client_restrictions=check_client_access hash:/etc/postfix/access" 寫入配置文件
2.限制客戶端指定用戶發郵件:通過限制用戶全部主機名
服務器
vim/etc/postfix/recip
[email protected] REJECT
postmap recip加密成db文件
postconf -e"smtpd_sender_restrictions =check_sender_access hash:/etc/postfix/recip"
systemctl restart postfix.service
3.限制客戶端指定用戶收郵件
服務器
vim/etc/postfix/recip
[email protected] REJECT
postmap recip
postconf -e"smtpd_recipient_restrictions = check_recipient_accesshash:/etc/postfix/recip"
systemctl restart postfix.service
郵件本地用戶
服務器
常見端口號
pop3 110
pop3S 995
imap 143
imaps 993
cat /etc/services |grep imap 可以查看imap的端口號
yum install dovecot.x86 -y
vim /etc/dovecot/dovecot.conf
24 protocols = imap pop3 lmtp dovecot使用的協議
49 disable_plaintext_auth = no 使用明文認證
50 login_trusted_networks = 0.0.0.0/0 使外網也可以使用dovecot服務
vim /etc/dovecot/conf.d/10-mail
30 mail_location =mbox:~/mail:INBOX=/var/mail/%u
netstat -antlupe |grep dovecot
passwd student
客戶端
yum install mutt -y
mkdir –p /home/mooc/mail/.imap
touch /home/mooc/mail/.imap/INBOX
mutt -f imap://[email protected]
按o,輸入密碼
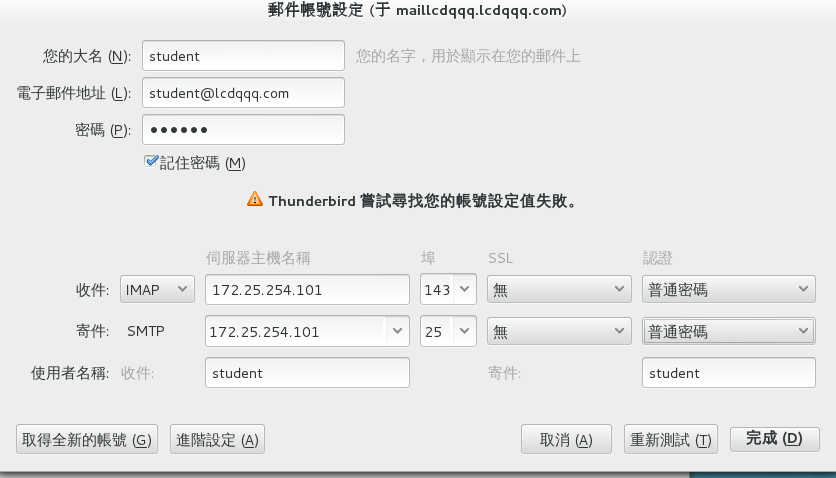
雷鳥
tar -jxf 安裝包 , 把安裝包解壓
然後進入thunderbird目錄,執行./thunderbird
可能會提示錯誤,缺少東西
執行yum whatprovides 缺少的東西
可以查出哪個包提供組件
然後yum install 查出來的包 -y
注意,執行雷鳥的時候,要打開postfix對於外網的25端口
vim /etc/postfix/main.cf
113 打開
116 關閉
每個新用戶都要手動創建/home/mooc/mail/.imap/INBOX,太過麻煩
我們可以直接在骨架文件/etc/skel中創建mail/.imap/INBOX,這樣在系統創建新用戶時,會自動創建/home/newuser/mail/.imap/INBOX
郵件虛擬用戶
建立一個虛擬用戶來管理郵箱數據庫,直接用root風險過大
服務器:
groupadd -g 666 vmail
useradd -g 666 -u 666 -s /sbin/nologin vmail
在數據庫中添加信息
在數據庫中查看
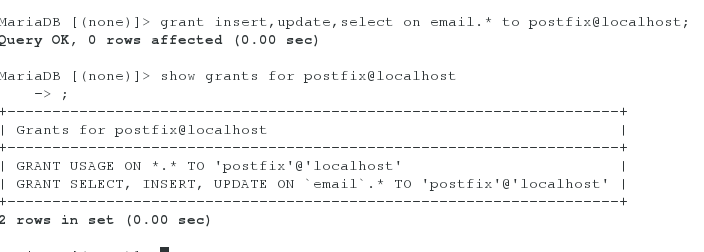
給postfix授權,SELECT
grant select on email.* to postfix@localhost
show grants for postfix@localhost
檢測數據庫是否成功
vim/etc/postfix/mysql-users.cf
hosts = localhost
user = postfix
password = postfix
dbname = email
table = muser
select_field = username
where_field = username
cp-p mysql-users.cf mysql-domain.cf
hosts = localhost
user = postfix
password = postfix
dbname = email
table = muser
select_field = domain
where_field = domain
cp-p mysql-users.cf mysql-maildir.cf
hosts = localhost
user = postfix
password = postfix
dbname = email
table = muser
select_field = maildir
where_field = username
進行檢測:
postmap -q "[email protected]"mysql:/etc/postfix/mysql-users.cf
postmap -q "westos.org"mysql:/etc/postfix/mysql-domain.cf
postmap -q "[email protected]"mysql:/etc/postfix/mysql-maildir.cf
此處有張圖
檢測成功後,將數據寫入配置文件
postconf -d | grep map
postconf -e "virtual_uid_maps =static:666"
postconf -e "virtual_gid_maps =static:666"
postconf -e "virtual_mailbox_base=/home/vmail" 指定郵箱位置
postconf -e"virtual_alias_maps=mysql:/etc/postfix/mysql-users.cf" 本地文件連接數據庫
postconf -e"virtual_mailbox_domains=mysql:/etc/postfix/mysql-domain.cf"
postconf -e"virtual_mailbox_maps=mysql:/etc/postfix/mysql-maildir.cf"
檢測:
mail [email protected]
數據庫和郵箱進行連接
其實本地並沒有org這個域名,org在數據庫中,實現org用戶之間的相互通信
yum install dovecot-mysql -y
vim /etc/dovecot/conf.d/auth-sql.conf.ext 查看模板位置
cp -p /usr/share/doc/dovecot-2.2.10/example-config/dovecot-sql.conf.ext /etc/dovecot
vim /etc/dovecot/dovecot-sql.conf.ext
32driver = mysql 驅動
70connect = host=localhost dbname=email user=postfix password=postfix
使用本地用戶(postfix)連接數據庫email,他通常只擁有select權限(在企業中)
77default_pass_scheme = PLAIN 登陸密碼明文(數據庫)
106 password_query = \
107 SELECT username, domain, password \
108 FROM muser WHERE username = '%u' AND domain = '%d'
%u=entire user@domain
%d=domainpart of user@domian
%n=userpart in user@domian,same as %u if there is no domain
124 user_query = SELECT maildir, 666 AS uid,666 AS gid FROM muser WHERE username = '%u'
vim10-mail.conf
30 mail_location =maildir:/home/vmail/%d/%n 郵箱的位置
168 first_valid_uid = 666 使虛擬用戶和mail有聯繫
175 first_valid_gid = 666
vim 10-auth.conf
122 !include auth-system.conf.ext系統用戶
123 !include auth-sql.conf.ext 數據庫用戶
檢測
首先檢測[email protected]是否能通過172.25.254.101的110端口登陸,能登陸成功則說明配置成功,纔可以使用雷鳥
主要目的:
在雷鳥上實現[email protected]和[email protected]互發郵件
在服務器,客戶端都可以使用雷鳥


