


openstack 安裝步驟:
環境準備:
系統:centos7 x86_64
controller 2c+6g+40g 192.168.147.50 可以nat上網
compute 1c+4g+40g 192.168.147.60 可以nat上網
neutron 1c+2g+20g 192.168.147.70 可以nat上網
關閉selinux:
cat /etc/sysconfig/selinux
SELINUX=disabled
SELINUXTYPE=targeted
配置hostname:
192.168.147.50 openstack-controller openstack-controller.com
192.168.147.60 openstack-compute openstack-compute.com
192.168.147.70 openstack-neutron openstack-neutron.com
關閉防火牆:
systemctl disable firewalld
重啓
reboot
基礎軟件包:
yum install openssl openssl-devel net-tools vim wget -y
時間同步:
控制節點:
yum install chrony -y
配置ntp:
vi /etc/chrony.conf
加入:
server time.windows.com iburst
allow 192.168.147.0/24
啓動服務:
systemctl enable chronyd.service
systemctl start chronyd.service
其他節點:
yum install chrony -y
配置ntp:
vi /etc/chrony.conf
加入:
server time.windows.com iburst
server 192.168.147.50 iburst
啓動服務:
systemctl enable chronyd.service
systemctl start chronyd.service
所有節點:
同步時鐘:
chronyc sources
確保所以的時間都是同步的。
使用timedatectl status查看:
[root@openstack-compute ~]# timedatectl status
Local time: 一 2018-03-12 23:14:13 CST
Universal time: 一 2018-03-12 15:14:13 UTC
RTC time: 一 2018-03-12 15:14:13
Time zone: Asia/Shanghai (CST, +0800)
NTP enabled: yes
NTP synchronized: yes
RTC in local TZ: no
DST active: n/a
所有節點:安裝openstack的yum 源:
yum install centos-release-openstack-queens -y
yum upgrade -y 更新yum源
安裝opentack client的python包:
yum install python-openstackclient -y
如果系統關閉了selinux可以不用安裝這個包:
yum install openstack-selinux -y
控制節點安裝mysql:
yum install mariadb mariadb-server python2-PyMySQL -y
vi /etc/my.cnf
[mysqld]
bind-address = 192.168.147.50
default-storage-engine = innodb
innodb_file_per_table = on
max_connections = 4096
collation-server = utf8_general_ci
character-set-server = utf8
啓動服務:#
systemctl enable mariadb.service
systemctl start mariadb.service
修改密碼:
mysql_secure_installation
安裝rabbitmq:
yum install rabbitmq-server -y
啓動服務:
systemctl enable rabbitmq-server.service
systemctl start rabbitmq-server.service
創建用戶和授權:
rabbitmqctl add_user openstack openstack
rabbitmqctl set_permissions openstack "." "." ".*"
將openstack加入administrator組 要不然web界面無法登陸
rabbitmqctl set_user_tags openstack administrator
啓動web界面插件:
rabbitmq-plugins enable rabbitmq_management
重啓rabbitmq
systemctl restart rabbitmq-server
web界面登陸測試:
http://192.168.147.50:15672 使用openstack登陸即可
安裝memcache:
yum install memcached python-memcached -y
修改memecahe的配置文件 /etc/sysconfig/memcached :
OPTIONS="-l 127.0.0.1,::1,openstack-controller"
啓動:
systemctl enable memcached.service
systemctl start memcached.service
檢查一下memcache端口:
[root@openstack-controller ~]# netstat -anltp|grep memcache
tcp 0 0 192.168.147.50:11211 0.0.0.0: LISTEN 56532/memcached
tcp 0 0 127.0.0.1:11211 0.0.0.0: LISTEN 56532/memcached
tcp6 0 0 ::1:11211 :::* LISTEN 56532/memcached
安裝etcd:
yum install etcd -y
編輯配置文件:
vi /etc/etcd/etcd.conf
#[Member]
ETCD_DATA_DIR="/var/lib/etcd/default.etcd"
ETCD_LISTEN_PEER_URLS="http://192.168.147.50:2380"
ETCD_LISTEN_CLIENT_URLS="http://192.168.147.50:2379"
ETCD_NAME="openstack-controller"
#[Clustering]
#[Clustering]
ETCD_INITIAL_ADVERTISE_PEER_URLS="http://192.168.147.50:2380"
ETCD_ADVERTISE_CLIENT_URLS="http://192.168.147.50:2379"
ETCD_INITIAL_CLUSTER="openstack-controller=http://192.168.147.50:2380"
ETCD_INITIAL_CLUSTER_TOKEN="etcd-cluster-01"
ETCD_INITIAL_CLUSTER_STATE="new"
啓動服務:
systemctl enable etcd
systemctl start etcd
keystone安裝:
創建數據庫:
mysql -uroot -padm123
創建keystone數據庫並授權:
CREATE DATABASE keystone;
GRANT ALL PRIVILEGES ON keystone. TO 'keystone'@'localhost' \
IDENTIFIED BY 'keystone';
GRANT ALL PRIVILEGES ON keystone.* TO 'keystone'@'%' \
IDENTIFIED BY 'keystone';
安裝keystone的包:
yum install openstack-keystone httpd mod_wsgi -y
修改keystone的配置文件 /etc/keystone/keystone.conf:
1.數據庫連接:
[database]
connection = mysql+pymysql://keystone:[email protected]/keystone
2.令牌提供者
[token]
provider = fernet
3.同步數據庫 一定要在keystone用戶下:
su -s /bin/sh -c "keystone-manage db_sync" keystone
4.初始化臨牌倉庫:
keystone-manage fernet_setup --keystone-user keystone --keystone-group keystone
keystone-manage credential_setup --keystone-user keystone --keystone-group keystone
5.定義管理服務:
keystone-manage bootstrap --bootstrap-password keystone \
--bootstrap-admin-url http://192.168.147.50:35357/v3/ \
--bootstrap-internal-url http://192.168.147.50:5000/v3/ \
--bootstrap-public-url http://192.168.147.50:5000/v3/ \
--bootstrap-region-id RegionOne
小插曲:
由於按照官方文檔 http://controller:35357/v3/ 但是我的主機名是openstac-controller,所以會報錯。
這個時候keystone-manage 沒有刪除命令,你修改成正確的命令也不行,需要修改數據庫的endpoint表
use keystone;
update endpoint set url="http://192.168.147.50:5000/v3/" where id="xxx";
update endpoint set url="http://192.168.147.50:35357/v3/" where id="xxx";
6.配置http:
vim /etc/httpd/conf/httpd.conf
ServerName openstack-controller
配置wsgi模塊軟件連接:
ln -s /usr/share/keystone/wsgi-keystone.conf /etc/httpd/conf.d/
啓動httpd服務:
systemctl enable httpd.service
systemctl start httpd.service
創建admin環境變量腳本:
vi adminrc.sh
#!/bin/bash
export OS_USERNAME=admin
export OS_PASSWORD=keystone
export OS_PROJECT_NAME=admin
export OS_USER_DOMAIN_NAME=Default
export OS_PROJECT_DOMAIN_NAME=Default
export OS_AUTH_URL=http://192.168.147.50:35357/v3
export OS_IDENTITY_API_VERSION=3
創建新的域:
openstack domain create --description "An Example Domain" xxx
創建服務項目:
openstack project create --domain default \
--description "Service Project" service
創建demo項目:
openstack project create --domain default \
--description "Demo Project" demo
創建demo用戶:
openstack user create --domain default \
--password-prompt demo
創建user角色:
openstack role create user
將user的角色賦予demo用戶和demo項目
openstack role add --project demo --user demo user
確認以上操作有效:
unset OS_AUTH_URL OS_PASSWORD
admin用戶:
openstack --os-auth-url http://192.168.147.50:35357/v3 \
--os-project-domain-name Default --os-user-domain-name Default \
--os-project-name admin --os-username admin token issue
demo用戶;
openstack --os-auth-url http://192.168.147.50:5000/v3 \
--os-project-domain-name Default --os-user-domain-name Default \
--os-project-name demo --os-username demo token issue
glance安裝:
創建數據庫:
mysql -uroot -padm123
create database glance;
use glance;
GRANT ALL PRIVILEGES ON glance. TO 'glance'@'localhost' \
IDENTIFIED BY 'glance';
GRANT ALL PRIVILEGES ON glance.* TO 'glance'@'%' \
IDENTIFIED BY 'glance';
創建glance用戶:
openstack user create --domain default --password-prompt glance##提示輸入密碼
openstack user create --domain default --password=glance glance##不提示輸入密碼
將glance用戶加入到admin的角色和service
項目
openstack role add --project service --user glance admin
創建glance的服務項目:
openstack service create --name glance \
--description "OpenStack Image" image
創建endpoint:
openstack endpoint create --region RegionOne \
image public http://192.168.147.50:9292
openstack endpoint create --region RegionOne \
image internal http://192.168.147.50:9292
openstack endpoint create --region RegionOne \
image admin http://192.168.147.50:9292
安裝軟件:
yum install openstack-glance -y
修改glance-api配置文件:/etc/glance/glance-api.conf
[database]
connection = mysql://glance:[email protected]/glance
[keystone_authtoken]
...
auth_uri = http://192.168.147.50:5000
auth_url = http://192.168.147.50:35357
memcached_servers = 192.168.147.50:11211
auth_type = password
project_domain_name = default
user_domain_name = default
project_name = service
username = glance
password = glance
[paste_deploy]
...
flavor = keystone
[glance_store]
...
stores = file,http
default_store = file
filesystem_store_datadir = /var/lib/glance/images/
編輯配置文件:/etc/glance/glance-registry.conf
[database]
connection = mysql://glance:[email protected]/glance
[keystone_authtoken]
...
auth_uri = http://192.168.147.50:5000
auth_url = http://192.168.147.50:35357
memcached_servers = 192.168.147.50:11211
auth_type = password
project_domain_name = default
user_domain_name = default
project_name = service
username = glance
password = glance
[paste_deploy]
...
flavor = keystone
同步數據庫:
su -s /bin/sh -c "glance-manage db_sync" glance
啓動服務:
systemctl enable openstack-glance-api.service \
openstack-glance-registry.service
systemctl restart openstack-glance-api.service \
openstack-glance-registry.service
測試:
openstack image list ##不報錯及成功
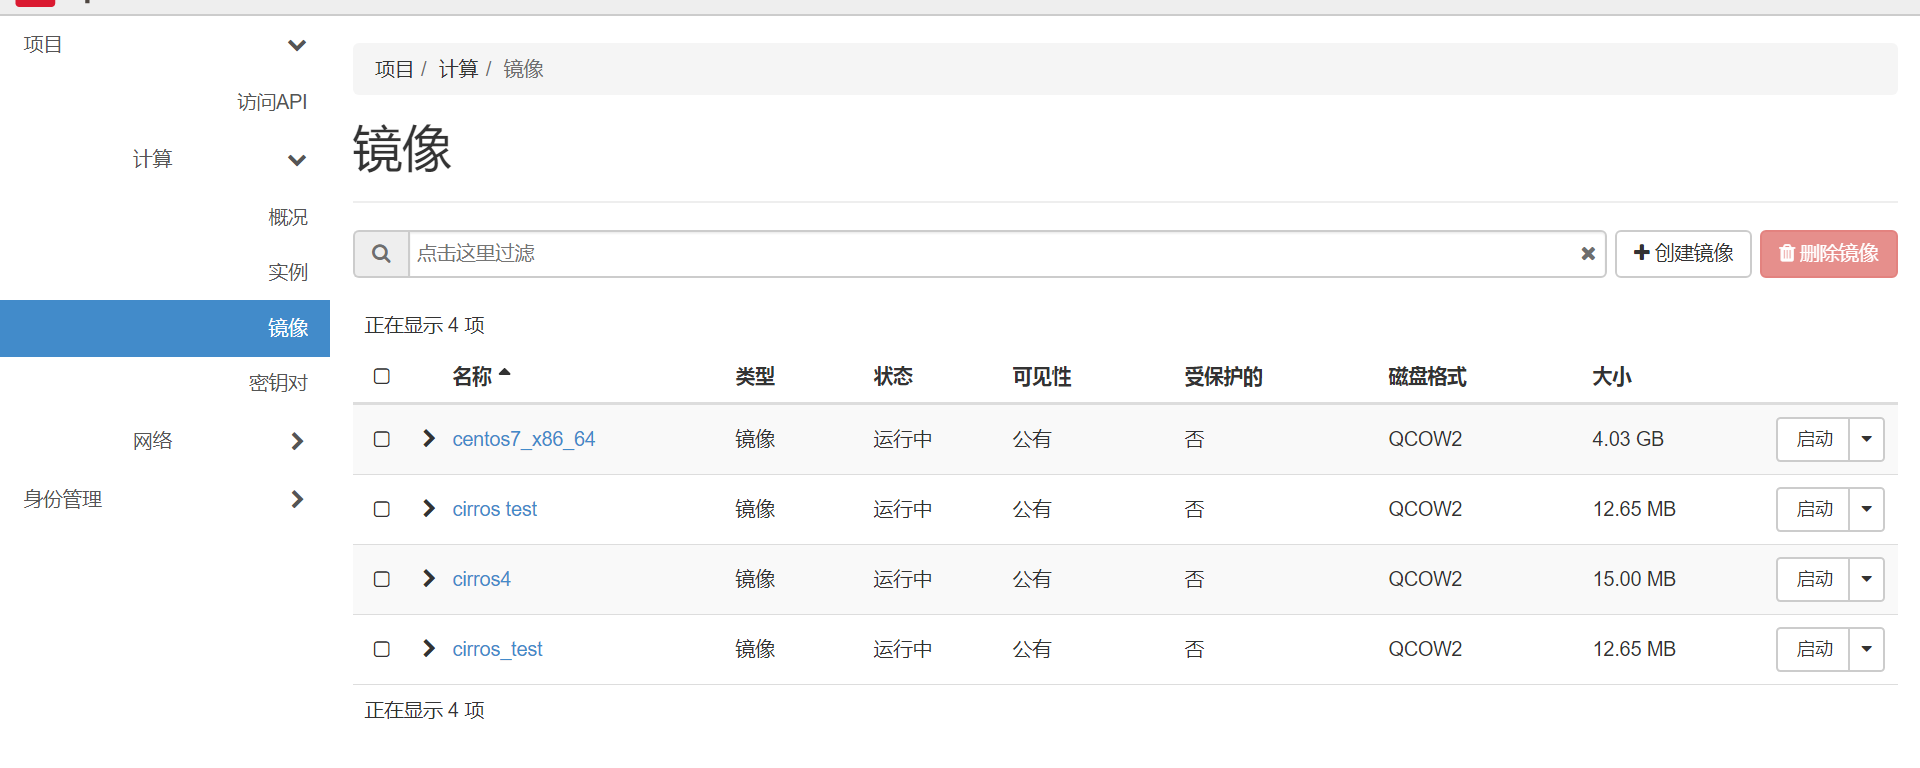
下載鏡像:
wget http://download.cirros-cloud.net/0.3.5/cirros-0.3.5-x86_64-disk.img
上傳鏡像:
openstack image create "cirros_test" \
--file cirros-0.3.5-x86_64-disk.img \
--disk-format qcow2 --container-format bare \
--public
nova 控制節點:
mysql -uroot -padm*123
create database nova_api;
create database nova;
create database nova_cell0;
GRANT ALL PRIVILEGES ON nova_api. TO 'nova_api'@'localhost' IDENTIFIED BY 'nova_api';
GRANT ALL PRIVILEGES ON nova_api. TO 'nova_api'@'%' IDENTIFIED BY 'nova_api';
GRANT ALL PRIVILEGES ON nova. TO 'nova'@'localhost' IDENTIFIED BY 'nova';
GRANT ALL PRIVILEGES ON nova. TO 'nova'@'%' IDENTIFIED BY 'nova';
GRANT ALL PRIVILEGES ON nova_cell0. TO 'nova_cell0'@'localhost' IDENTIFIED BY 'nova_cell0';
GRANT ALL PRIVILEGES ON nova_cell0. TO 'nova_cell0'@'%' IDENTIFIED BY 'nova_cell0';
創建nova用戶:
openstack user create --domain default --password=nova nova
將nova用戶加到admin 角色和service項目組
openstack role add --project service --user nova admin
創建計算項目:
openstack service create --name nova \
--description "OpenStack Compute" compute
創建endpoint:
openstack endpoint create --region RegionOne \
compute public http://192.168.147.50:8774/v2.1
openstack endpoint create --region RegionOne \
compute internal http://192.168.147.50:8774/v2.1
openstack endpoint create --region RegionOne \
compute admin http://192.168.147.50:8774/v2.1
創建placement用戶:
openstack user create --domain default --password=placement placement
加入到service項目和admin組
openstack role add --project service --user placement admin
創建placement的服務目錄:
openstack service create --name placement --description "Placement API" placement
創建endpoint:
openstack endpoint create --region RegionOne placement public http://192.168.147.50:8778
openstack endpoint create --region RegionOne placement internal http://192.168.147.50:8778
openstack endpoint create --region RegionOne placement admin http://192.168.147.50:8778
安裝包:
yum install openstack-nova-api openstack-nova-conductor \
openstack-nova-console openstack-nova-novncproxy \
openstack-nova-scheduler openstack-nova-placement-api -y
編輯配置文件:
/etc/nova/nova.conf
[DEFAULT]
...
enabled_apis = osapi_compute,metadata
[api_database]
...
connection = mysql://nova_api:[email protected]/nova_api
[database]
...
connection = mysql://nova:[email protected]/nova
[DEFAULT]
...
transport_url = rabbit://openstack:[email protected]
[api]
...
auth_strategy = keystone
[keystone_authtoken]
...
auth_uri = http://192.168.147.50:5000
auth_url = http://192.168.147.50:35357
memcached_servers = 192.168.147.50:11211
auth_type = password
project_domain_name = default
user_domain_name = default
project_name = service
username = nova
password = nova
[DEFAULT]
...
my_ip = 192.168.147.50
[DEFAULT]
...
use_neutron = True
firewall_driver = nova.virt.firewall.NoopFirewallDriver
[vnc]
enabled = true
...
server_listen = $my_ip
server_proxyclient_address = $my_ip
[glance]
...
api_servers = http://192.168.147.50:9292
[placement]
...
os_region_name = RegionOne
project_domain_name = Default
project_name = service
auth_type = password
user_domain_name = Default
auth_url = http://192.168.147.50:35357/v3
username = placement
password = placement
/etc/httpd/conf.d/00-nova-placement-api.conf:
<Directory /usr/bin>
<IfVersion >= 2.4>
Require all granted
</IfVersion>
<IfVersion < 2.4>
Order allow,deny
Allow from all
</IfVersion>
</Directory>
重啓httpd服務:
systemctl restart httpd
同步api數據庫:
su -s /bin/sh -c "nova-manage api_db sync" nova
同步cell0數據庫:
su -s /bin/sh -c "nova-manage cell_v2 map_cell0" nova
創建cell1:
su -s /bin/sh -c "nova-manage cell_v2 create_cell --name=cell1 --verbose" nova
同步nova數據庫:
u -s /bin/sh -c "nova-manage db sync" nova
確認cell0和cell1:
nova-manage cell_v2 list_cells
啓動服務:
systemctl enable openstack-nova-api.service \
openstack-nova-consoleauth.service openstack-nova-scheduler.service \
openstack-nova-conductor.service openstack-nova-novncproxy.service
systemctl start openstack-nova-api.service \
openstack-nova-consoleauth.service openstack-nova-scheduler.service \
openstack-nova-conductor.service openstack-nova-novncproxy.service
計算節點:
yum install openstack-nova-compute -y
編輯配置文件:/etc/nova/nova.conf
[DEFAULT]
...
enabled_apis = osapi_compute,metadata
[DEFAULT]
...
transport_url = rabbit://openstack:RABBIT_PASS@controller
[api]
...
auth_strategy = keystone
[keystone_authtoken]
...
auth_uri = http://192.168.147.50:5000
auth_url = http://192.168.147.50:35357
memcached_servers = 192.168.147.50:11211
auth_type = password
project_domain_name = default
user_domain_name = default
project_name = service
username = nova
password = NOVA_PASS
[DEFAULT]
...
my_ip = MANAGEMENT_INTERFACE_IP_ADDRESS
[DEFAULT]
...
use_neutron = True
firewall_driver = nova.virt.firewall.NoopFirewallDriver
[vnc]
...
enabled = True
server_listen = 0.0.0.0
server_proxyclient_address = $my_ip
novncproxy_base_url = http://192.168.147.50:6080/vnc_auto.html
[glance]
...
api_servers = http://192.168.147.50:9292
[oslo_concurrency]
...
lock_path = /var/lib/nova/tmp
[placement]
...
os_region_name = RegionOne
project_domain_name = Default
project_name = service
auth_type = password
user_domain_name = Default
auth_url = http://192.168.147.50:35357/v3
username = placement
password = PLACEMENT_PASS
egrep -c '(vmx|svm)' /proc/cpuinfo
[libvirt]
...
virt_type = kvm
systemctl enable libvirtd.service openstack-nova-compute.service
systemctl start libvirtd.service openstack-nova-compute.service
最後在控制節點執行:
source adminrc.sh
顯示計算節點,已經可以看到compute節點了
openstack compute service list
openstack compute service list --service nova-compute
當您添加新的計算節點時,您必須在控制器節點上運行nova管理cellv2發現主機來註冊這些新的計算節點。或者,您可以在/etc/nov/nova.conf中設置適當的間隔
su -s /bin/sh -c "nova-manage cell_v2 discover_hosts --verbose" nova
或者:
修改nova.conf修改時間間隔:
[scheduler]
discover_hosts_in_cells_interval = 300
網絡節點:
下面是在控制節點執行:
mysql -u root -padm123;
CREATE DATABASE neutron;
GRANT ALL PRIVILEGES ON neutron. TO 'neutron'@'localhost' \
IDENTIFIED BY 'neutron';
GRANT ALL PRIVILEGES ON neutron.* TO 'neutron'@'%' \
IDENTIFIED BY 'neutron';
source adminrc.sh
創建neutron用戶:
openstack user create --domain default --password=neutron neutron
將neutron加入到admin組和service項目
openstack role add --project service --user neutron admin
創建網絡項目:
openstack service create --name neutron \
--description "OpenStack Networking" network
創建endpoint:
openstack endpoint create --region RegionOne \
network public http://192.168.147.70:9696
openstack endpoint create --region RegionOne \
network internal http://192.168.147.70:9696
openstack endpoint create --region RegionOne \
network admin http://192.168.147.70:9696
安裝二層簡單網絡:
選擇網絡安裝選擇1:
在網絡節點執行
安裝包:
yum install openstack-neutron openstack-neutron-ml2 \
openstack-neutron-linuxbridge ebtables -y
編輯配置文件:/etc/neutron/neutron.conf
[database]
...
connection =mysql://neutron:[email protected]/neutron
[DEFAULT]
...
core_plugin = ml2
service_plugins = router
[DEFAULT]
...
transport_url = rabbit://openstack:[email protected]
[DEFAULT]
...
auth_strategy = keystone
[keystone_authtoken]
...
auth_uri = http://192.168.147.50:5000
auth_url = http://192.168.147.50:35357
memcached_servers = 192.168.147.50:11211
auth_type = password
project_domain_name = default
user_domain_name = default
project_name = service
username = neutron
password = neutron
[DEFAULT]
...
notify_nova_on_port_status_changes = true
notify_nova_on_port_data_changes = true
[nova]
...
auth_url = http://192.168.147.50:35357
auth_type = password
project_domain_name = default
user_domain_name = default
region_name = RegionOne
project_name = service
username = nova
password = nova
[oslo_concurrency]
...
lock_path = /var/lib/neutron/tmp
/etc/neutron/plugins/ml2/ml2_conf.ini
[ml2]
...
type_drivers = flat,vlan,gre,vxlan,geneve
##In the [ml2] section, disable self-service networks:
[ml2]
...
tenant_network_types = vlan,gre,vxlan,geneve
[ml2]
...
mechanism_drivers = linuxbridge
[ml2]
...
extension_drivers = port_security
[ml2_type_flat]
...
flat_networks = pyth1##可以自己隨便取
[securitygroup]
...
enable_ipset = true
/etc/neutron/plugins/ml2/linuxbridge_agent.ini:
[linux_bridge]
physical_interface_mappings = pyth1##(自己取得名字):PROVIDER_INTERFACE_NAME
[vxlan]
enable_vxlan = false
[securitygroup]
...
enable_security_group = true
firewall_driver = neutron.agent.linux.iptables_firewall.IptablesFirewallDriver
Ensure your Linux operating system kernel supports network bridge filters by verifying all the following sysctl values are set to 1
將下面參數的值確保爲1:
net.bridge.bridge-nf-call-iptables
net.bridge.bridge-nf-call-ip6tables
vi /usr/lib/sysctl.d/00-system.conf
net.bridge.bridge-nf-call-iptables=1
net.bridge.bridge-nf-call-ip6tables=1
sysctl -p
/etc/neutron/dhcp_agent.ini:
[DEFAULT]
...
interface_driver = linuxbridge
dhcp_driver = neutron.agent.linux.dhcp.Dnsmasq
enable_isolated_metadata = true
/etc/neutron/metadata_agent.ini
[default]
nova_metadata_host = 192.168.147.50
metadata_proxy_shared_secret = neutron
然後在控制節點nova配置neutron:
/etc/nova/nova.conf
[neutron]
...
url = http://192.168.147.70:9696
auth_url = http://192.168.147.50:35357
auth_type = password
project_domain_name = default
user_domain_name = default
region_name = RegionOne
project_name = service
username = neutron
password = neutron
service_metadata_proxy = true
metadata_proxy_shared_secret = neutron
網絡節點執行:
ln -s /etc/neutron/plugins/ml2/ml2_conf.ini /etc/neutron/plugin.ini
su -s /bin/sh -c "neutron-db-manage --config-file /etc/neutron/neutron.conf \
--config-file /etc/neutron/plugins/ml2/ml2_conf.ini upgrade head" neutron
控制節點: systemctl restart openstack-nova-api.service
網絡節點:
systemctl enable neutron-server.service \
neutron-linuxbridge-agent.service neutron-dhcp-agent.service \
neutron-metadata-agent.service
systemctl start neutron-server.service \
neutron-linuxbridge-agent.service neutron-dhcp-agent.service \
neutron-metadata-agent.service
在計算節點:
安裝包:
yum install openstack-neutron-linuxbridge ebtables ipset -y
修改配置文件:
/etc/neutron/neutron.conf
[DEFAULT]
...
transport_url = rabbit://openstack:[email protected]
[DEFAULT]
...
auth_strategy = keystone
[keystone_authtoken]
...
auth_uri = http://192.168.147.50:5000
auth_url = http://192.168.147.50:35357
memcached_servers = 192.168.147.50:11211
auth_type = password
project_domain_name = default
user_domain_name = default
project_name = service
username = neutron
password = neutron
[oslo_concurrency]
...
lock_path = /var/lib/neutron/tmp
/etc/neutron/plugins/ml2/linuxbridge_agent.ini:
[linux_bridge]
physical_interface_mappings = pyth1:eno16777736
[vxlan]
enable_vxlan = false
[securitygroup]
...
enable_security_group = true
firewall_driver = neutron.agent.linux.iptables_firewall.IptablesFirewallDriver
Ensure your Linux operating system kernel supports network bridge filters by verifying all the following sysctl values are set to 1:
net.bridge.bridge-nf-call-iptables
net.bridge.bridge-nf-call-ip6tables
配置nova 使用neutron:
/etc/nova/nova.conf
[neutron]
...
url = http://192.168.147.70:9696
auth_url = http://192.168.147.50:35357
auth_type = password
project_domain_name = default
user_domain_name = default
region_name = RegionOne
project_name = service
username = neutron
password = neutron
重啓服務:
systemctl restart openstack-nova-compute.service
啓動服務:
systemctl enable neutron-linuxbridge-agent.service
systemctl start neutron-linuxbridge-agent.service
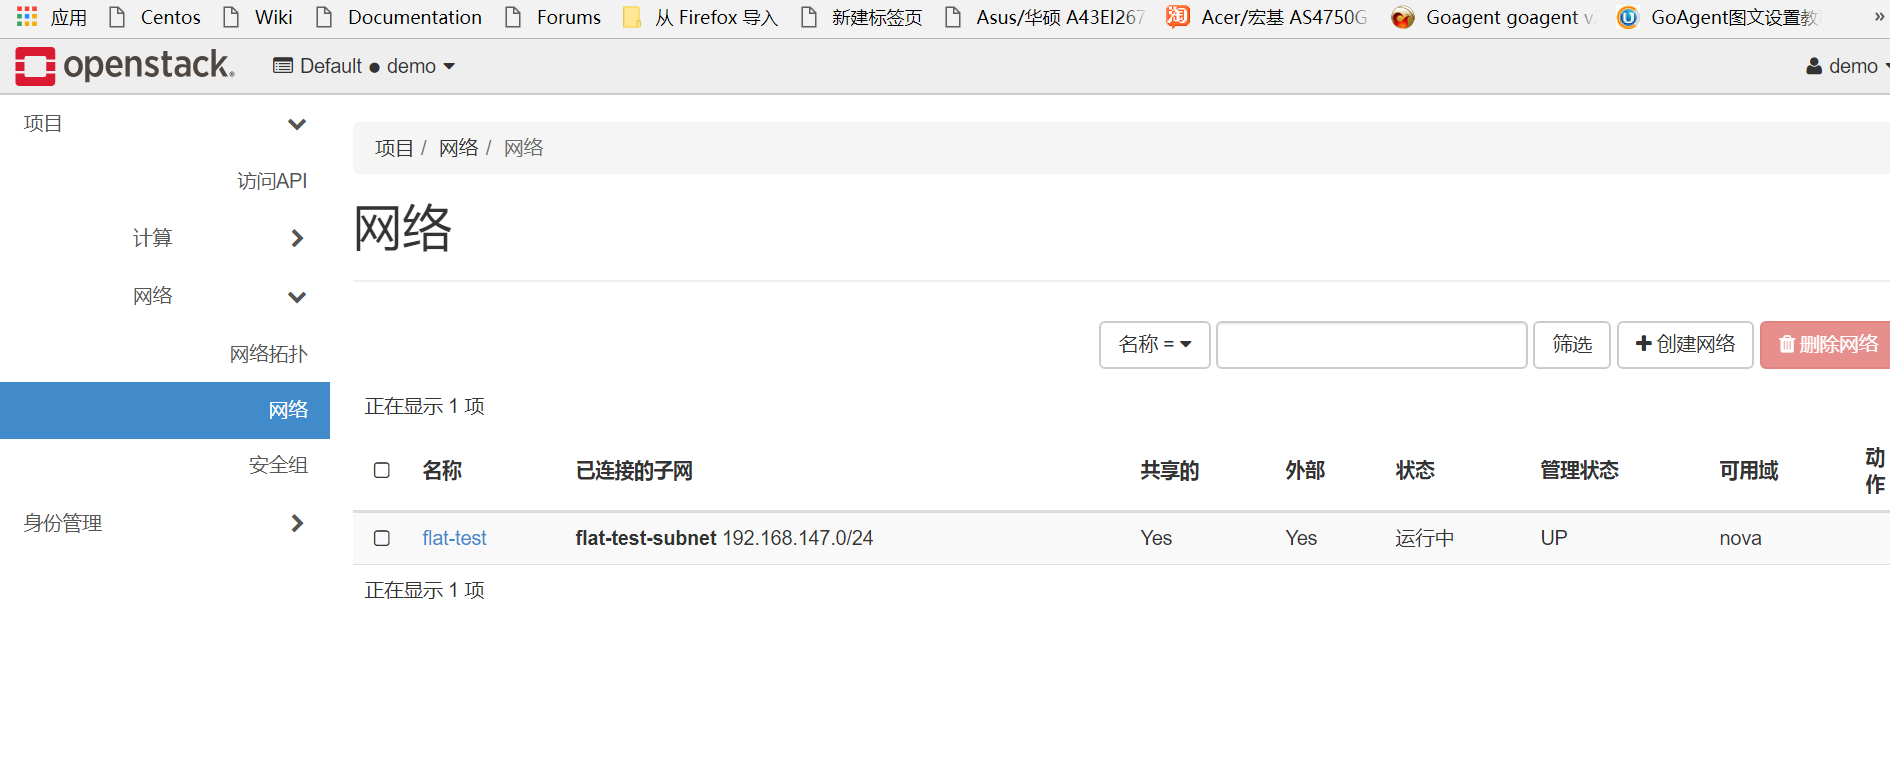
創建一個網絡:
source adminrc.sh
openstack network create --share --external \
--provider-physical-network pyth1 \
--provider-network-type flat flat-test
創建一個子網:
openstack subnet create --network flat-test \
--allocation-pool start=192.168.147.80,end=192.168.147.90 \
--dns-nameserver 192.168.147.2 --gateway 192.168.147.2 \
--subnet-range 192.168.147.0/24 flat-test-subnet
創建虛擬機類型:
openstack flavor create --id 2 --vcpus 1 --ram 1024 --disk 2 m3.nano
demorc.sh
#!/bin/bash
export OS_USERNAME=demo
export OS_PASSWORD=demo
export OS_PROJECT_NAME=demo
export OS_USER_DOMAIN_NAME=Default
export OS_PROJECT_DOMAIN_NAME=Default
export OS_AUTH_URL=http://192.168.147.50:5000/v3
export OS_IDENTITY_API_VERSION=3
source demorc.sh
生產祕鑰對:
ssh-keygen -q -N ""
上傳祕鑰對:
openstack keypair create --public-key ~/.ssh/id_rsa.pub mykey
查看祕鑰對:
openstack keypair list
添加安全組規則ICMP,SSH:
openstack security group rule create --proto icmp default
openstack security group rule create --proto tcp --dst-port 22 default
查看各自id:
openstack flavor list
openstack image list
openstack network list
openstack security group list
openstack server create --flavor m3.nano --image cirros_test --nic net-id='5e75805c-d4cf-4804-bbfa-31dedc56c9ce' --security-group default --key-name mykey queens-instance
查看實例:
openstack server list
查看vnc的url:
openstack console url show provider-instance
還可檢查 :
ping 192.168.147.85
安裝dashboard:
yum install openstack-dashboard -y
/etc/openstack-dashboard/local_settings
OPENSTACK_HOST = "192.168.147.50"
ALLOWED_HOSTS = ['*', ]
Configure the memcached session storage service:
SESSION_ENGINE = 'django.contrib.sessions.backends.cache'
CACHES = {
'default': {
'BACKEND': 'django.core.cache.backends.memcached.MemcachedCache',
'LOCATION': '192.168.147.50:11211',
}
}
OPENSTACK_KEYSTONE_URL = "http://%s:5000/v3" % OPENSTACK_HOST
OPENSTACK_KEYSTONE_MULTIDOMAIN_SUPPORT = True
OPENSTACK_API_VERSIONS = {
"identity": 3,
"image": 2,
"volume": 2,
}
PENSTACK_KEYSTONE_DEFAULT_DOMAIN = "Default"
OPENSTACK_KEYSTONE_DEFAULT_ROLE = "user"
OPENSTACK_NEUTRON_NETWORK = {
...
'enable_router': False,
'enable_quotas': False,
'enable_distributed_router': False,
'enable_ha_router': False,
'enable_lb': False,
'enable_firewall': False,
'enable_***': False,
'enable_fip_topology_check': False,
}
TIME_ZONE = "Asia/Shanghai"
systemctl restart httpd.service memcached.service
確認:
http://192.168.147.50/dashboard
使用admin或者demo登錄
安裝實例的時候注意:
這個坑我用了一下午的時間解決:
centos7.4 會出現你創建虛擬機之後,boot界面,但是可以獲取到ip。不能登錄,不能查看界面,nova的console日誌也是爲空。將libvirt的 virt_type改成qemu也不好使。這個是內核的關係。所以在安裝了openstack的源之後 不要只想yum update 要不然創建了虛擬機使用不了。
更換成centos7.2 可以圓滿解決這個問題
最後附上成功的截圖,勝利的標誌:


參考資料:docs.openstack.org