1. 創建普通用戶
在Linux系統運維工作中應遵循一種權限最小化原則,即儘量以普通用戶而不是root用戶身份進行操作。當不得不使用超級用戶權限執行某些命令時,應當通過sudo的形式授權普通用戶操作。
此時就會產生一個問題,即當需要在系統中批量創建若干普通用戶的時候,如果採用常規的交互方式設置用戶初始密碼,將會導致大量的手工操作。有一個解決辦法是利用passwd命令的--stdin參數結合管道在一條命令中爲用戶設定明文密碼,這樣就可以用腳本爲多個用戶批量創建賬號和設置密碼的操作。但是這種操作會有安全隱患,因爲所執行的命令會被記錄在history當中,其他人也可以看到。如果又不希望禁用history,可以用history的-d參數刪除設定密碼的那一行記錄。下面以創建單個用戶爲例來說明這個流程:
[root@Howden ~]# useradd tynecastle && echo 1234567 | passwd --stdin tynecastle
Changing password for user tynecastle.
passwd: all authentication tokens updated successfully.
[root@Howden ~]# history 5
  295  date
  296  ll /home
  297  tail /etc/passwd
  298  useradd tynecastle && echo 1234567 | passwd --stdin tynecastle
  299  history 5
[root@Howden ~]# history -d $(history | grep 'passwd --stdin tynecastle' | grep -v grep | awk '{print $1}')
[root@Howden ~]# history 5
  296  ll /home
  297  tail /etc/passwd
  298  history 5
  299  history -d $(history | grep 'passwd --stdin tynecastle' | grep -v grep | awk '{print $1}')
  300  history 5
2. 關閉SELinux
百度百科:SELinux(Security-Enhanced Linux) 是美國國家安全局(NSA)對於強制訪問控制(MAC: Mandatory Access Controls)的實現,是 Linux歷史上最傑出的新安全子系統。
先查看SELinux的配置文件內容:
[root@Howden ~]# cat /etc/selinux/config

# This file controls the state of SELinux on the system.
# SELINUX= can take one of these three values:
#     enforcing - SELinux security policy is enforced.
#     permissive - SELinux prints warnings instead of enforcing.
#     disabled - No SELinux policy is loaded.
SELINUX=enforcing
# SELINUXTYPE= can take one of these two values:
#     targeted - Targeted processes are protected,
#     mls - Multi Level Security protection.
SELINUXTYPE=targeted
可以看到默認配置是開啓的,要將它關閉需要把enforcing改成disabled:
[root@Howden ~]# sed -i s#SELINUX=enforcing#SELINUX=disabled# /etc/selinux/config
但是這個改動只有在重啓了操作系統之後纔會生效,可以用getenforce命令看到當前的運行狀態還是enforcing:
[root@Howden ~]# getenforce
Enforcing
如果操作的是線上服務器,不能隨便重啓,可以用如下命令把SELinux的當前狀態改成permissive,這樣就只會有警告,不會阻止用戶的行爲:
[root@Howden ~]# setenforce 0
[root@Howden ~]# getenforce
Permissive
3. 系統運行級別
如果沒有在圖形界面下操作的需求,應當保持系統的默認運行級別爲3,即多用戶文本界面模式:
[root@Howden ~]# cat /etc/inittab
# 省略部分註釋
# Default runlevel. The runlevels used are:
#   0 - halt (Do NOT set initdefault to this)
#   1 - Single user mode
#   2 - Multiuser, without NFS (The same as 3, if you do not have networking)
#   3 - Full multiuser mode
#   4 - unused
#   5 - X11
#   6 - reboot (Do NOT set initdefault to this)
#
id:3:initdefault:
還可以用runlevel命令查看當前的運行級別:
[root@Howden ~]# runlevel
N 3
4. 使用國內的yum源
先備份默認的配置文件:
[root@Howden yum.repos.d]# mv CentOS-Base.repo CentOS-Base.repo.ori
然後下載阿里雲的配置文件:
[root@Howden yum.repos.d]# wget -O CentOS-Base.repo http://mirrors.aliyun.com/repo/Centos-6.repo
最後更新緩存:
[root@Howden yum.repos.d]# yum clean all && yum makecache
5. 安裝必要的工具軟件
如果安裝系統時選擇的是最小化安裝,那麼還需要安裝一些必要的工具軟件:
[root@Howden ~]# yum install tree telnet dos2unix sysstat lrzsz -y
6. 檢查已安裝的軟件包組
我的系統安裝瞭如下軟件包組,其中包括在最初安裝系統時手動選擇的和系統默認安裝的:
[root@Howden ~]# yum grouplist
Loaded plugins: fastestmirror, security
Setting up Group Process
Loading mirror speeds from cached hostfile
Installed Groups:
   Base
   Compatibility libraries
   Debugging Tools
   Development tools
   Dial-up Networking Support
   E-mail server
   Fonts
   General Purpose Desktop
   Graphical Administration Tools
   Hardware monitoring utilities
   Input Methods
   Internet Applications
   Internet Browser
   Legacy UNIX compatibility
   Legacy X Window System compatibility
   NFS file server
   Network file system client
   Networking Tools
   Office Suite and Productivity
   Performance Tools
   Perl Support
   SNMP Support
   Scientific support
   Security Tools
   System administration tools
如果還需要手動安裝某些軟件包組,可以用yum groupinstall命令進行批量安裝:
[root@Howden ~]# yum groupinstall "Compatibility libraries" "Dial-up Networking Support"
7. 禁用不必要的開機自啓動服務
和Windows一樣,Linux也有很多默認開機啓動的系統服務,其中有很多不必要的。這樣的服務開啓得越多,給系統帶來的安全隱患就越多。關於CentOS 6.x都有哪些系統服務,可以參考這個地址:http://www.ha97.com/4815.html
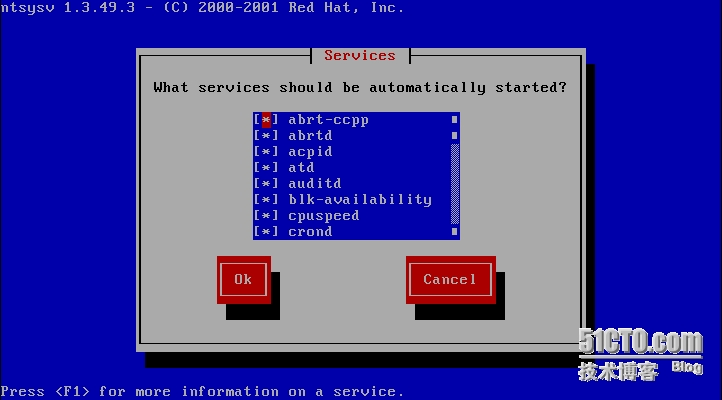
查看本機開啓了哪些系統服務的方法主要有三種。第一種是在命令行使用setup命令,會出現如下界面:
選擇第四行的System services就可以進入系統服務的列表,並且可以開啓或關閉每個服務,如下圖:
第二種方法是在命令行使用ntsysv命令直接調出上面第二圖的界面。
第三種方法是使用chkconfig --list查看所有服務在每個運行級別下的開啓/關閉狀態。假設現在只需啓動crond, network, rsyslog, sshd這四個服務,將其他服務全部關閉,可用如下兩條組合命令來完成:
[root@Howden ~]# for srv in `chkconfig --list | grep 3:on | awk '{print $1}'`; do chkconfig --level 3 $srv off; done
[root@Howden ~]# for srv in crond network rsyslog sshd; do chkconfig --level 3 $srv on; done
或者更簡單地,使用排除法關閉除這四個服務以外的所有服務,可以只用如下一條命令:
[root@Howden ~]# for srv in $(chkconfig --list | grep 3:on | awk '{print $1}' | egrep -v 'crond|network|rsyslog|sshd'); do chkconfig [--level 3] $srv off; done8. 修改SSH默認配置
優化SSH配置、嚴格限制非正常登錄是提高系統安全性的一個簡單有效的方法,具體如下(端口號可以是大於1024的任意端口):
[root@Howden ~]# cat optimise_ssh.sh
#!/bin/bash

\cp -p /etc/ssh/sshd_config /root/sshd_config.`date +"%F"-$RANDOM`
sed -i 's%#Port 22%Port 30022%' /etc/ssh/sshd_config
sed -i 's%#PermitRootLogin yes%PermitRootLogin no%' /etc/ssh/sshd_config
sed -i 's%#PermitEmptyPasswords no%PermitEmptyPasswords no%' /etc/ssh/sshd_config
sed -i 's%GSSAPIAuthentication yes%GSSAPIAuthentication no%' /etc/ssh/sshd_config
sed -i 's%#UseDNS yes%UseDNS no%' /etc/ssh/sshd_config
egrep 'Port|RootLogin|EmptyPass|GSSAPIAuthentication|UseDNS' /etc/ssh/sshd_config | grep -v ^#
[root@Howden ~]# ./optimise_ssh.sh
Port 30022
PermitRootLogin no
PermitEmptyPasswords no
GSSAPIAuthentication no
UseDNS no
[root@Howden ~]# /etc/init.d/sshd reload
Reloading sshd:                                            [  OK  ]
9. 調整文件描述符的數量限制
通過執行命令ulimit -n可以看到,Linux系統默認的單個進程可打開的文件描述符數量的上限爲1024,而在高負載、大併發等應用場景中,這一限制往往遠不能滿足需求。調整這個上限的方法主要有兩種,一種是執行ulimit -SHn:
[root@Howden ~]# ulimit -n
1024
[root@Howden ~]# ulimit -SHn 65535
[root@Howden ~]# ulimit -n
65535
但是這樣只能影響到當前的session,當終端重新連接或當前用戶退出後就會失效。如果想要永久變更就要用另一種方法,即在配置文件中修改:
[root@Howden ~]# echo -e "*\t-\tnofile\t65535" >> /etc/security/limits.conf
[root@Howden ~]# tail -13 /etc/security/limits.conf
#<domain>      <type>  <item>         <value>
#

#*               soft    core            0
#*               hard    rss             10000
#@student        hard    nproc           20
#@faculty        soft    nproc           20
#@faculty        hard    nproc           50
#ftp             hard    nproc           0
#@student        -       maxlogins       4

# End of file
*	-	nofile	65535
10. 內核參數調優
將以下配置添加到內核參數配置文件/etc/sysctl.conf的尾部:
# TCP connections related configurations
net.ipv4.tcp_fin_timeout = 2
net.ipv4.tcp_tw_reuse = 1
net.ipv4.tcp_tw_recycle = 1
net.ipv4.tcp_syncookies = 1
net.ipv4.tcp_keepalive_time =600
net.ipv4.ip_local_port_range = 4000    65000
net.ipv4.tcp_max_syn_backlog = 16384
net.ipv4.tcp_max_tw_buckets = 36000
net.ipv4.route.gc_timeout = 100
net.ipv4.tcp_syn_retries = 1
net.ipv4.tcp_synack_retries = 1
net.core.somaxconn = 16384
net.core.netdev_max_backlog = 16384
net.ipv4.tcp_max_orphans = 16384

# iptables related configurations
net.nf_conntrack_max = 25000000
net.netfilter.nf_conntrack_max = 25000000
net.netfilter.nf_conntrack_tcp_timeout_established = 180
net.netfilter.nf_conntrack_tcp_timeout_time_wait = 120
net.netfilter.nf_conntrack_tcp_timeout_close_wait = 60
net.netfilter.nf_conntrack_tcp_timeout_fin_wait = 120
然後執行sysctl -p使上述添加的配置生效。
11. 鎖定關鍵系統文件
出於系統安全考慮,爲了極大限度地防止******,可以使用chattr +i命令將與用戶登錄相關的幾個關鍵系統文件加以鎖定,禁止對這些文件進行任何修改、更名和刪除操作(包括以root身份),從而防止***創建用戶、篡改root用戶和其他正常用戶的登錄信息:
[root@Howden ~]# chattr +i /etc/passwd /etc/shadow /etc/group /etc/gshadow /etc/inittab
[root@Howden ~]# lsattr /etc/passwd /etc/shadow /etc/group /etc/gshadow /etc/inittab
----i--------e- /etc/passwd
----i--------e- /etc/shadow
----i--------e- /etc/group
----i--------e- /etc/gshadow
----i--------e- /etc/inittab
但是如果***通過非ssh途徑登入系統並獲得root權限,仍然可以通過以下命令解鎖這些文件:
[root@Howden ~]# chattr -i /etc/passwd /etc/shadow /etc/group /etc/gshadow /etc/inittab
[root@Howden ~]# lsattr /etc/passwd /etc/shadow /etc/group /etc/gshadow /etc/inittab
-------------e- /etc/passwd
-------------e- /etc/shadow
-------------e- /etc/group
-------------e- /etc/gshadow
-------------e- /etc/inittab
爲了防止chattr命令被***使用,可以將其改名,讓除了管理員以外的其他任何人找不到該命令:
[root@Howden ~]# mv /usr/bin/chattr /usr/bin/test
這樣就極大地增加了******的難度。
12. 隱藏系統版本
Linux系統在字符界面的用戶登錄屏幕會默認顯示當前系統的發行版本和內核版本,如下圖所示:
這也是一種容易被***利用的重要的系統信息。***可以調查該系統版本存在哪些已知的漏洞,從而找到***的突破口。如果不希望在登錄屏幕顯示系統版本,可以將/etc/issue文件的內容清空,即:
[root@Howden ~]# >/etc/issue
13. 將系統編碼改爲中文
這個只是爲了便於顯示中文,但經常會導致出現亂碼的問題,所以不太建議修改。這裏只介紹修改方法:
[root@Almondvale ~]# sed -i 's#LANG="en_US.UTF-8"#LANG="zh_CN.GB18030"#' /etc/sysconfig/i18n
[root@Almondvale ~]# source /etc/sysconfig/i18n


