一、日誌介紹
日誌:
歷史事件:時間,地點,人物,事件
日誌級別:事件的關鍵性程度,Loglevel系統日誌服務:
sysklogd :CentOS 5之前版本
syslogd: system application 記錄應用日誌
klogd: linux kernel 記錄內核日誌
事件記錄格式:
日期時間 主機 進程[pid] 事件內容
C/S架構:通過TCP或UDP協議的服務完成日誌記錄傳送,將分佈在不同主機的日誌實現集中管理
1、rsyslog
rsyslog特性:CentOS6和7
多線程
UDP, TCP, SSL, TLS, RELP
MySQL, PGSQL, Oracle實現日誌存儲
強大的過濾器,可實現過濾記錄日誌信息中任意部分
自定義輸出格式ELK:elasticsearch, logstash, kibana
非關係型分佈式數據庫
基於apache軟件基金會jakarta項目組的項目lucene
Elasticsearch是個開源分佈式搜索引擎
Logstash對日誌進行收集、分析,並將其存儲供以後使用
kibana 可以提供的日誌分析友好的 Web 界面
[root@Centos6-server~]#rpm -qi rsyslog
Name        : rsyslog                      Relocations: (not relocatable)
Version     : 5.8.10                            Vendor: CentOS
Release     : 10.el6_6                      Build Date: Wed 17 Dec 2014 05:52:43 PM CST
Install Date: Tue 23 Jan 2018 03:21:08 PM CST      Build Host: c6b8.bsys.dev.centos.org
Group       : System Environment/Daemons    Source RPM: rsyslog-5.8.10-10.el6_6.src.rpm
Size        : 2178098                          License: (GPLv3+ and ASL 2.0)
Signature   : RSA/SHA1, Wed 17 Dec 2014 08:12:36 PM CST, Key ID 0946fca2c105b9de
Packager    : CentOS BuildSystem <http://bugs.centos.org>
URL         : http://www.rsyslog.com/
Summary     : Enhanced system logging and kernel message trapping daemons
Description :
Rsyslog is an enhanced, multi-threaded syslog daemon. It supports MySQL,
syslog/TCP, RFC 3195, permitted sender lists, filtering on any message part,
and fine grain output format control. It is compatible with stock sysklogd
and can be used as a drop-in replacement. Rsyslog is simple to set up, with
advanced features suitable for enterprise-class, encryption-protected syslog
relay chains.

#Rsyslog是一個增強的多線程syslog守護進程。 它支持MySQL,syslog / TCP,RFC 3195,
允許的發件人列表,對任何消息部分的過濾以及細粒度輸出格式控制。 它與stock sysklogd兼容,
可以用作替代品。 Rsyslog設置簡單,具有適用於企業級加密保護系統日誌中繼鏈路的高級功能。
2、rsyslog介紹
術語,參見man logger
facility:設施,從功能或程序上對日誌進行歸類
auth(驗證), authpriv(驗證授權), cron(計劃任務), daemon(守護進程), ftp, kern, lpr(打印), mail, news, security(auth)(安全), user(用戶), uucp, local0-local7(自定義), syslog(系統日誌)
Priority 優先級別,從低到高排序
debug(調試), info(重要事件), notice(重要通知), warn(警報), err(錯誤), crit(臨界), alert, emerg(系統不可用)
參看幫助: man 3 syslog程序包:rsyslog
主程序:/usr/sbin/rsyslogd
CentOS 6:service rsyslog {start|stop|restart|status}
CentOS 7:/usr/lib/systemd/system/rsyslog.service
配置文件:/etc/rsyslog.conf,/etc/rsyslog.d/*.conf
庫文件: /lib64/rsyslog/*.so
配置文件格式:由三部分組成
MODULES: 相關模塊配置
GLOBAL DIRECTIVES: 全局配置
RULES: 日誌記錄相關的規則配置RULES配置格式: facility.priority; facility.priority… target
facility(設施):
*: 所有的facility
facility1,facility2,facility3,...:指定的facility列表priority(優先界別):
*: 所有級別
none:沒有級別,即不記錄
PRIORITY:指定級別(含)以上的所有級別
=PRIORITY:僅記錄指定級別的日誌信息target:
文件路徑:通常在/var/log/,文件路徑前的-表示異步寫入
用戶:將日誌事件通知給指定的用戶,* 表示登錄的所有用戶
日誌服務器:@host,把日誌送往至指定的遠程服務器記錄
管道: | COMMAND,轉發給其它命令處理
[root@Centos6-server~]#logger -p local7.info "This is a test log"

[root@Centos6-server~]#cat /var/log/boot.log

Jan 29 14:08:47 Centos6-server root: This is a test log
3、啓用網絡日誌服務
通常的日誌格式:
事件產生的日期時間 主機 進程(pid):事件內容
如: /var/log/messages,cron,secure等配置rsyslog成爲日誌服務器
#### MODULES ####
# Provides UDP syslog reception
$ModLoad imudp
$UDPServerRun 514
# Provides TCP syslog reception
$ModLoad imtcp
$InputTCPServerRun 514
#基於UDP遠程管理日誌
[root@Centos6-server~]#ps aux | grep rsyslog
root       1585  0.0  0.1 255424  1292 ?        Sl   Jan27   0:00 /sbin/rsyslogd -i /var/run/syslogd.pid -c 5
root      56057  0.0  0.0 103336   848 pts/0    S+   14:11   0:00 grep rsyslog

[root@Centos6-server~]#vim /etc/rsyslog.conf
# Provides UDP syslog reception
$ModLoad imudp
$UDPServerRun 514

[root@Centos6-server~]#ss -nul
State      Recv-Q Send-Q           Local Address:Port           Peer Address:Port

[root@Centos6-server~]#service rsyslog restart
Shutting down system logger:                               [  OK  ]
Starting system logger:                                    [  OK  ]

[root@Centos6-server~]#ss -nul
State      Recv-Q Send-Q           Local Address:Port           Peer Address:Port
UNCONN     0      0                            *:514                  *:*
UNCONN     0      0                           :::514                 :::*

[root@centos7mini~]#vim /etc/rsyslog.conf
*.info;mail.none;authpriv.none;cron.none                @192.168.1.100

[root@centos7mini~]#systemctl restart rsyslog

[root@centos7mini~]#logger "This is 2st test log"

[root@Centos6-server~]#tail -f /var/log/messages
Feb  4 19:31:44 centos7mini root: This is 2st test log

#基於TCP協議管理日誌
[root@Centos6-server~]#vim /etc/rsyslog.conf
# Provides TCP syslog reception
$ModLoad imtcp
$InputTCPServerRun 514

[root@Centos6-server~]#service rsyslog restart
Shutting down system logger:                               [  OK  ]
Starting system logger:                                    [  OK  ]

[root@Centos6-server~]#ss -ntl
State      Recv-Q Send-Q           Local Address:Port     Peer Address:Port
LISTEN     0      25                      :::514                  :::*
LISTEN     0      25                       *:514                   *:*

[root@centos7mini~]#vim /etc/rsyslog.conf
*.info;mail.none;authpriv.none;cron.none                 @@192.168.1.100

[root@centos7mini~]#systemctl restart rsyslog

[root@centos7mini~]#logger "This is 3st test log"

[root@Centos6-server~]#tail -f /var/log/messages
Feb  4 19:36:43 centos7mini root: This is 3st test log
4、其它日誌
其它的日誌文件
/var/log/secure(很重要):系統安裝日誌,文本格式,應週期性分析(用戶登錄、su切換等)
/var/log/btmp:當前系統上,用戶的失敗嘗試登錄相關的日誌信息,二進制格式,lastb命令進行查看
/var/log/wtmp:當前系統上,用戶正常登錄系統的相關日誌信息,二進制格式,last命令可以查看
/var/log/lastlog:每一個用戶最近一次的登錄信息,二進制格式,lastlog命令可以查看
/var/log/dmesg:系統引導過程中的日誌信息,文本格式
文本查看工具查看
專用命令dmesg查看/var/log/messages :系統中大部分的信息
/var/log/anaconda : anaconda的日誌
[root@Centos6-server~]#cat /var/log/secure

[root@Centos6-server~]#lastb

[root@Centos6-server~]#uptime                                          #查看開機時間命令
 14:30:03 up 1 day, 19:30,  2 users,  load average: 0.00, 0.00, 0.00

 [root@Centos6-server~]#cat /etc/logrotate.d/syslog                     #查看日誌滾動配置
/var/log/cron
/var/log/maillog
/var/log/messages
/var/log/secure
/var/log/spooler
{
    sharedscripts
    postrotate
        /bin/kill -HUP `cat /var/run/syslogd.pid 2> /dev/null` 2> /dev/null || true
    endscript
}

[root@Centos6-server~]#lastlog
Username         Port     From             Latest
root             pts/1    192.168.1.101    Mon Jan 29 12:58:13 +0800 2018
L                                          **Never logged in**

[root@Centos6-server~]#cat /var/log/dmesg | wc -l
1749

[root@Centos6-server~]#dmesg | wc -l
1838
二、日誌管理journalctl
Systemd 統一管理所有 Unit 的啓動日誌。
帶來的好處就是,可以只用journalctl一個命令,查看所有日誌(內核日誌和應用日誌)。
日誌的配置文件/etc/systemd/journald.conf
journalctl用法
查看所有日誌(默認情況下 ,只保存本次啓動的日誌)
journalctl查看內核日誌(不顯示應用日誌)
journalctl -k查看系統本次啓動的日誌
journalctl -b
journalctl -b -0查看上一次啓動的日誌(需更改設置)
journalctl -b -1查看指定時間的日誌
journalctl --since="2017-10-30 18:10:30"
journalctl --since "20 min ago"
journalctl --since yesterday
journalctl --since "2017-01-10" --until "2017-01-11 03:00"
journalctl --since 09:00 --until "1 hour ago"顯示尾部的最新10行日誌
journalctl -n顯示尾部指定行數的日誌
journalctl -n 20實時滾動顯示最新日誌
journalctl -f查看指定服務的日誌
journalctl /usr/lib/systemd/systemd查看指定進程的日誌
journalctl _PID=1查看某個路徑的腳本的日誌
journalctl /usr/bin/bash查看指定用戶的日誌
journalctl _UID=33 --since today查看某個 Unit 的日誌
journalctl -u nginx.service
journalctl -u nginx.service --since today實時滾動顯示某個 Unit 的最新日誌
journalctl -u nginx.service -f合併顯示多個 Unit 的日誌
journalctl -u nginx.service -u php-fpm.service --since today查看指定優先級(及其以上級別)的日誌,共有8級
0: emerg
1: alert
2: crit
3: err
4: warning
5: notice
6: info
7: debug
journalctl -p err -b日誌默認分頁輸出,--no-pager 改爲正常的標準輸出
journalctl --no-pager以 JSON 格式(單行)輸出
journalctl -b -u nginx.service -o json以 JSON 格式(多行)輸出,可讀性更好
journalctl -b -u nginx.serviceqq -o json-pretty顯示日誌佔據的硬盤空間
journalctl --disk-usage指定日誌文件佔據的最大空間
journalctl --vacuum-size=1G指定日誌文件保存多久
journalctl --vacuum-time=1years
三、rsyslog將日誌記錄於MySQL中
(1) 準備MySQL Server
(2) 在mysql server上授權rsyslog能連接至當前服務器
mysql> GRANT ALL ON Syslog.* TO 'USER'@'HOST' IDENTIFIED BY 'PASSWORD';(3) 在rsyslog服務器上安裝mysql模塊相關的程序包
yum install rsyslog-mysql(4) 爲rsyslog創建數據庫及表;
mysql -uUSERNAME -hHOST -pPASSWORD < /usr/share/doc/rsyslog-7.4.7/mysql-createDB.sql(5) 配置rsyslog將日誌保存到mysql中
#### MODULES ####
$ModLoad ommysql
#### RULES ####
facility.priority :ommysql:DBHOST,DBNAME,DBUSER, PASSWORD
#實驗
[root@Centos6-server~]#yum install rsyslog-mysql.x86_64             #先裝包

[root@Centos6-server~]#rpm -ql rsyslog-mysql
/lib64/rsyslog/ommysql.so
/usr/share/doc/rsyslog-mysql-5.8.10
/usr/share/doc/rsyslog-mysql-5.8.10/createDB.sql

[root@Centos6-server~]#scp /usr/share/doc/rsyslog-mysql-5.8.10/createDB.sql 192.168.1.101:

[root@centos7mini~]#mysql
MariaDB [(none)]> source createDB.sql
Query OK, 1 row affected (0.01 sec)
MariaDB [Syslog]> show databases;
+--------------------+
| Database           |
+--------------------+
| Syslog             |
| blogdb             |
| information_schema |
| mysql              |
| performance_schema |
| test               |
+--------------------+
6 rows in set (0.01 sec)
MariaDB [Syslog]> show tables;
+------------------------+
| Tables_in_Syslog       |
+------------------------+
| SystemEvents           |
| SystemEventsProperties |
+------------------------+
2 rows in set (0.00 sec)
MariaDB [Syslog]> grant all on Syslog.* to syslog@'192.168.1.100' identified by 'centos';
Query OK, 0 rows affected (0.01 sec)

[root@Centos6-server~]#vim /etc/rsyslog.conf
#### MODULES ####
$ModLoad ommysql
*.info;mail.none;authpriv.none;cron.none                :mmysql:92.168.1.101,Syslog,syslog,centos

[root@Centos6-server~]#service rsyslog restart
Shutting down system logger:                               [  OK  ]
Starting system logger:                                    [  OK  ]

MariaDB [Syslog]> select * from SystemEvents\G;
*************************** 9. row ***************************
                ID: 9
        CustomerID: NULL
        ReceivedAt: 2018-02-04 21:18:42
DeviceReportedTime: 2018-02-04 21:18:42
          Facility: 1
          Priority: 5
          FromHost: localhost
          Message:  Hello mysql
四、通過loganalyzer展示數據庫中的日誌
(1) 在rsyslog服務器上準備amp或nmp組合
yum install httpd php php-mysql php-gd(2) 安裝LogAnalyzer
tar xf loganalyzer-4.1.5.tar.gz
cp -a loganalyzer-4.1.5/src /var/www/html/loganalyzer
cd /var/www/html/loganalyzer
touch config.php
chmod 666 config.php(3)配置loganalyzer
systemctl start httpd.service
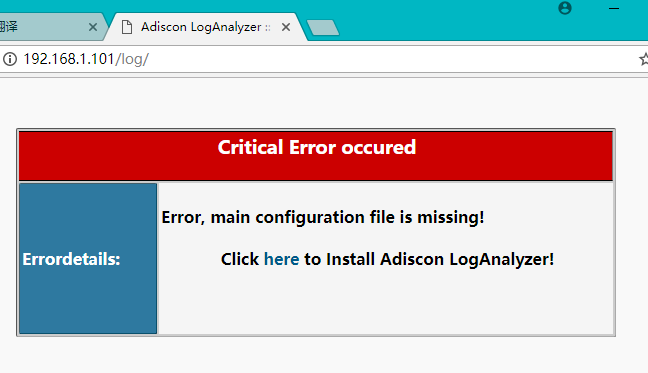
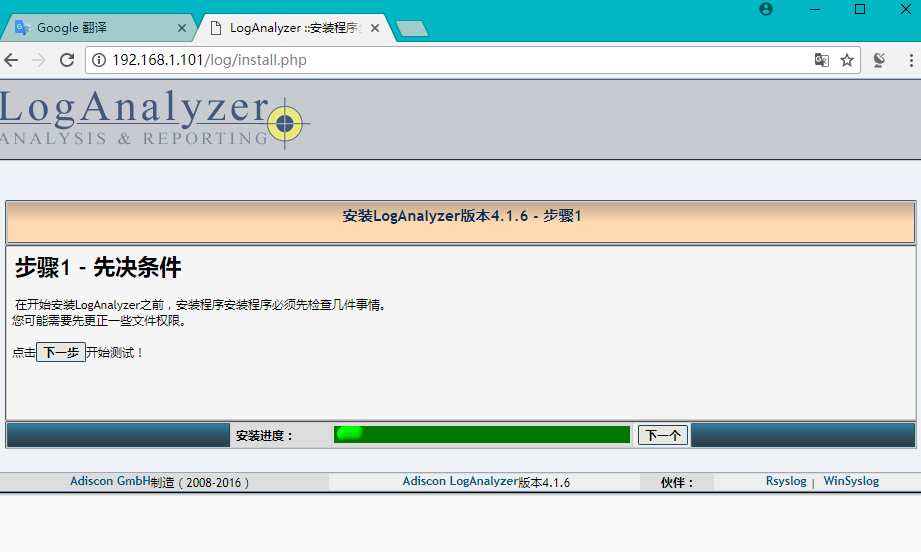
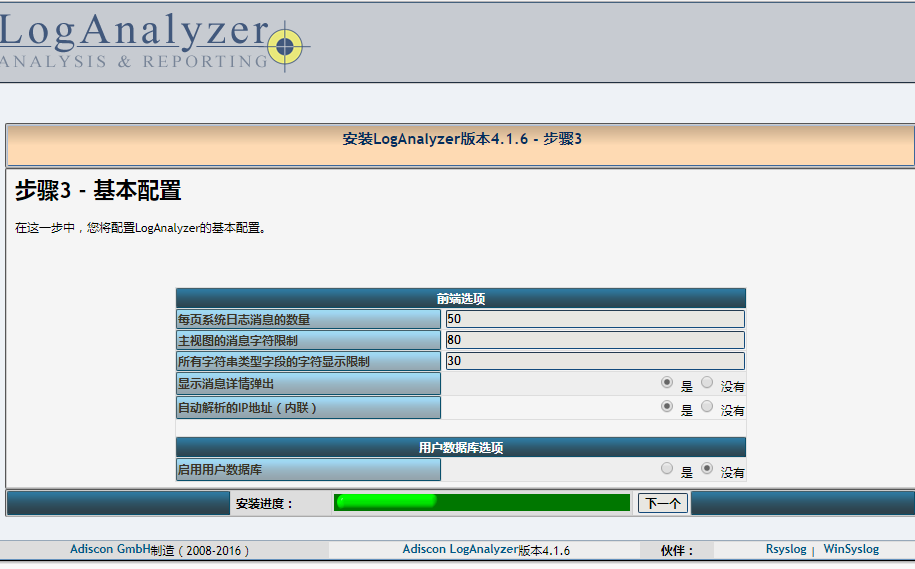
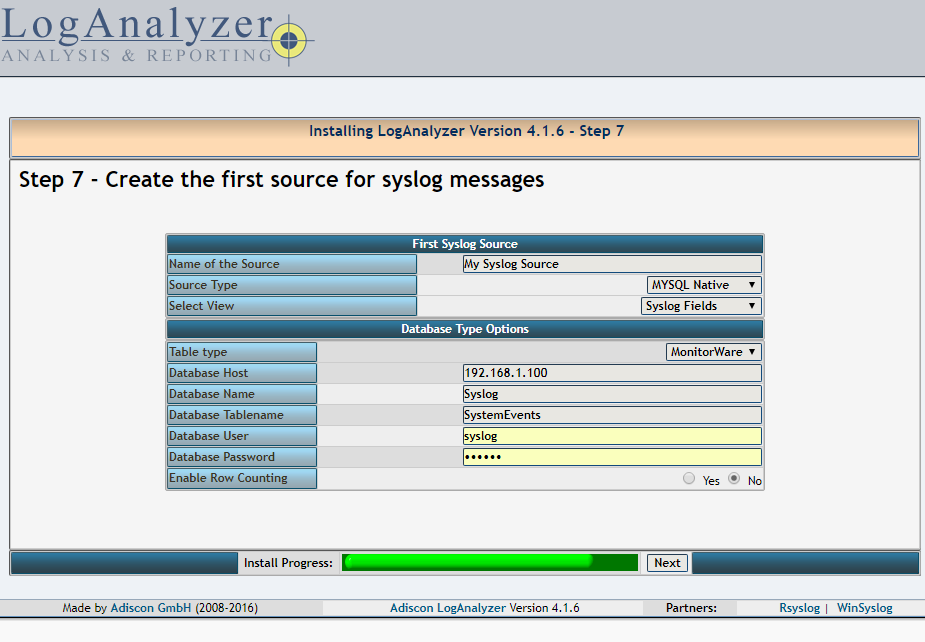
http://HOST/loganalyzer
MySQL Native, Syslog Fields, Monitorware(4) 安全加強
cd /var/www/html/loganalyzer
chmod 644 config.php
#實驗loganalyzer(日誌的分析器)
[root@Centos6-server~]#service mysqld start

[root@Centos6-server~]#ss -ntl
State      Recv-Q Send-Q           Local Address:Port              Peer Address:Port
LISTEN     0      50                   *:3306                             *:*

[root@centos7mini~]#yum install httpd php php-mysql php-gd

[root@centos7minisrc]#tar xvf loganalyzer-4.1.6.tar.gz

[[email protected]]#cp -r src/ /app/httpd24/htdocs/log/

[[email protected]]#cd /app/httpd24/htdocs/log/

[root@centos7minilog]#ls
admin               classes      details.php  include      lang                 search.php      userchange.php
asktheoracle.php    convert.php  export.php   index.php    login.php            statistics.php
BitstreamVeraFonts  cron         favicon.ico  install.php  reportgenerator.php  templates
chartgenerator.php  css          images       js           reports.php          themes

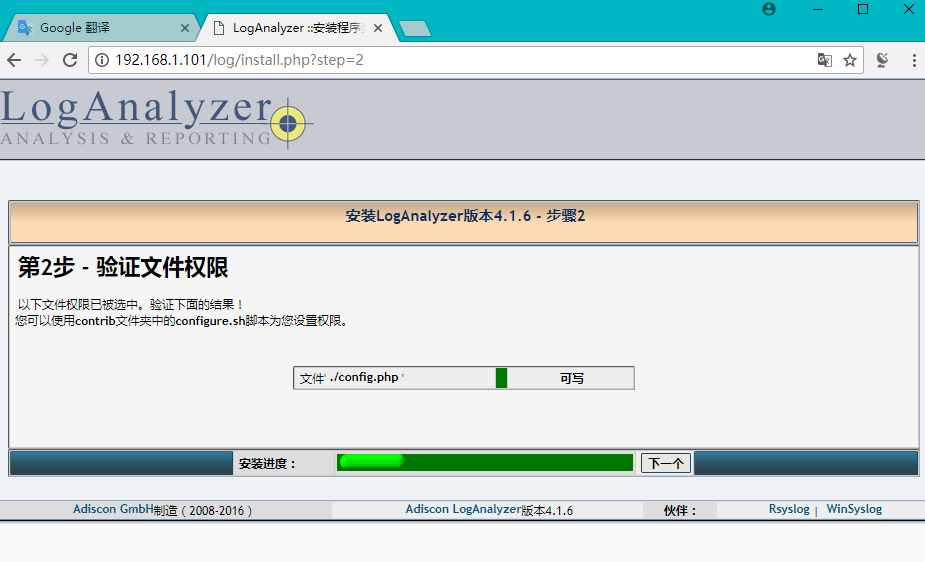
[root@centos7minilog]#cat /app/src/loganalyzer-4.1.6/contrib/configure.sh
#!/bin/sh
touch config.php
chmod 666 config.php

[root@centos7minilog]#cat /app/src/loganalyzer-4.1.6/contrib/secure.sh
#!/bin/sh
chmod 644 config.php

[root@centos7minilog]#cd -

[root@centos7minicontrib]#bash -x configure.sh

[root@centos7minicontrib]#ll
-rw-rw-rw- 1 root root  0 Feb  4 21:44 config.php

[root@centos7minilog]#chmod 644 config.php
五、Logrotate日誌存儲
logrotate 程序是一個日誌文件管理工具。用來把舊的日誌文件刪除,並創建新的日誌文件,稱爲日誌轉儲或滾動。可以根據日誌文件的大小,也可以根據其天數來轉儲,這個過程一般通過 cron 程序來執行
配置文件是 /etc/logrotate.conf
主要參數如下
compress 通過gzip 壓縮轉儲以後的日誌
nocompress 不需要壓縮時,用這個參數
copytruncate 用於還在打開中的日誌文件,把當前日誌備份並截斷
nocopytruncate 備份日誌文件但是不截斷
create mode owner group 轉儲文件,使用指定的文件模式創建新的日誌文件
nocreate 不建立新的日誌文件
delaycompress 和 compress 一起使用時,轉儲的日誌文件到下一次轉儲時才壓縮
nodelaycompress 覆蓋 delaycompress 選項,轉儲並壓縮
errors address 專儲時的錯誤信息發送到指定的Email 地址
ifempty 即使是空文件也轉儲,是缺省選項。
notifempty 如果是空文件的話,不轉儲
mail address 把轉儲的日誌文件發送到指定的E-mail 地址
nomail 轉儲時不發送日誌文件
olddir directory 轉儲後的日誌文件放入指定的目錄,必須和當前日誌文件在同一個文件系統
noolddir 轉儲後的日誌文件和當前日誌文件放在同一個目錄下
prerotate/endscript 在轉儲以前需要執行的命令可以放入這個對,這兩個關鍵字必須單獨成行
postrotate/endscript 在轉儲以後需要執行的命令可以放入這個對,這兩個關鍵字必須單獨成行
daily 指定轉儲週期爲每天
weekly 指定轉儲週期爲每週
monthly 指定轉儲週期爲每月
size 大小 指定日誌超過多大時,就執行日誌轉儲
rotate count 指定日誌文件刪除之前轉儲的次數,0 指沒有備份,5 指保留5 個備份
Missingok 如果日誌不存在,提示錯誤
Nomissingok如果日誌不存在,繼續下一次日誌,不提示錯誤
[root@Centos6-server~]#rpm -qf /usr/sbin/logrotate
logrotate-3.7.8-28.el6.x86_64

[root@Centos6-server~]#rpm -qi logrotate
Name        : logrotate                    Relocations: (not relocatable)
Version     : 3.7.8                             Vendor: CentOS
Release     : 28.el6                        Build Date: Wed 22 Mar 2017 05:11:03 AM CST
Install Date: Tue 23 Jan 2018 03:20:37 PM CST      Build Host: c1bm.rdu2.centos.org
Group       : System Environment/Base       Source RPM: logrotate-3.7.8-28.el6.src.rpm
Size        : 89448                            License: GPL+
Signature   : RSA/SHA1, Thu 23 Mar 2017 11:03:45 PM CST, Key ID 0946fca2c105b9de
Packager    : CentOS BuildSystem <http://bugs.centos.org>
URL         : https://fedorahosted.org/logrotate/
Summary     : Rotates, compresses, removes and mails system log files
Description :
The logrotate utility is designed to simplify the administration of
log files on a system which generates a lot of log files.  Logrotate
allows for the automatic rotation compression, removal and mailing of
log files.  Logrotate can be set to handle a log file daily, weekly,
monthly or when the log file gets to a certain size.  Normally,
logrotate runs as a daily cron job.
Install the logrotate package if you need a utility to deal with the
log files on your system.

#logrotate實用程序旨在簡化對生成大量日誌文件的系統上日誌文件的管理。
Logrotate允許自動旋轉壓縮,刪除和郵寄日誌文件。 Logrotate可以設置爲每天,每週,每月或當日志文件達到一定的大小時處理日誌文件。
通常,logrotate作爲日常的cron作業運行。如果需要一個實用程序來處理日誌文件在您的系統上。

[root@Centos6-server~]#rpm -ql logrotate
/etc/cron.daily/logrotate
/etc/logrotate.conf
/etc/logrotate.d
/usr/sbin/logrotate
/usr/share/doc/logrotate-3.7.8
/usr/share/doc/logrotate-3.7.8/CHANGES
/usr/share/doc/logrotate-3.7.8/COPYING
/usr/share/man/man5/logrotate.conf.5.gz
/usr/share/man/man8/logrotate.8.gz
/var/lib/logrotate.status

[root@Centos6-server~]#cat /etc/cron.daily/logrotate
#!/bin/sh
/usr/sbin/logrotate /etc/logrotate.conf
EXITVALUE=$?
if [ $EXITVALUE != 0 ]; then
    /usr/bin/logger -t logrotate "ALERT exited abnormally with [$EXITVALUE]"
fi
exit 0

[root@Centos6-server~]#cat /etc/logrotate.conf
# see "man logrotate" for details
# rotate log files weekly
weekly
# keep 4 weeks worth of backlogs
rotate 4
# create new (empty) log files after rotating old ones
create
# use date as a suffix of the rotated file
dateext
# uncomment this if you want your log files compressed
#compress
# RPM packages drop log rotation information into this directory
include /etc/logrotate.d
# no packages own wtmp and btmp -- we'll rotate them here
/var/log/wtmp {
    monthly
    create 0664 root utmp
        minsize 1M
    rotate 1
}
/var/log/btmp {
    missingok
    monthly
    create 0600 root utmp
    rotate 1
}
# system-specific logs may be also be configured here.
