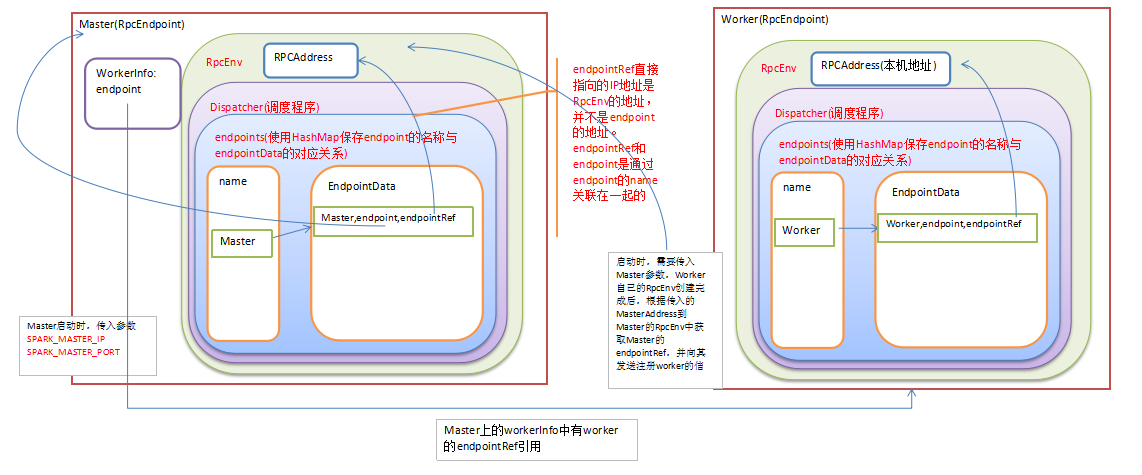
Spark 是分佈式計算框架,多臺機器之間必然存在着通信。Spark在早期版本採用Akka實現。現在在Akka的上層抽象出了一個RpcEnv。RpcEnv負責管理機器之間的通信。
RpcEnv包含了如下三大核心:
RpcEndpoint 消息循環體,負責接收並處理消息。Spark中的Master、Worker都是RpcEndpoint 。
RpcEndpointRef :RpcEndpoint的引用,如果需要和RpcEndpoint通信,就必須獲取它的RpcEndpointRef,通過RpcEndpointRef發送消息。
Dispatcher:消息調度器,負責RPC消息路由到適當的RpcEndpoint。
RpcEnv被創建以後,RpcEndpoint可以註冊到RpcEnv中,被註冊的RpcEndpoint會生成一個相應的RpcEndpointRef來引用它。如果你需要向RpcEndpoint發送消息,必須到RpcEnv中通過RpcEndpoint的名稱來獲取對應的RpcEndpointRef,然後通過RpcEndpointRef向RpcEndpoint發送消息。
RpcEnv負責管理RpcEndpoint的整個生命週期
註冊RpcEndpoint,使用name或者uri
路由發送給RpcEndpoint的消息。
停止RpcEndpoint
注:一個RpcEndpoint只能註冊給一個RpcEnv
RpcAddress:RpcEnv的邏輯地址,使用主機名和端口表示。
RpcEndpointAddress:註冊到RpcEnv上的RpcEndpoint的地址,由RpcAddress和name構成。
由此可見RpcEnv和RpcEndpoint是在相同的機器上(相同的JVM中)。而要想給遠端機器發送消息,是獲取遠端機器的RpcEndpointRef,而並不是遠端的RpcEndpoint註冊到本地的RpcEnv中。
在Spark1.6版本中,默認使用的是netty
private def getRpcEnvFactory(conf: SparkConf): RpcEnvFactory = {
  val rpcEnvNames = Map(
    "akka" -> "org.apache.spark.rpc.akka.AkkaRpcEnvFactory",
    "netty" -> "org.apache.spark.rpc.netty.NettyRpcEnvFactory")
  val rpcEnvName = conf.get("spark.rpc", "netty")
  val rpcEnvFactoryClassName = rpcEnvNames.getOrElse(rpcEnvName.toLowerCase, rpcEnvName)
  Utils.classForName(rpcEnvFactoryClassName).newInstance().asInstanceOf[RpcEnvFactory]
}
RpcEndpoint是一個消息循環體,它的生命週期:
構造(Constructor)->啓動(onStart)->消息接收(receive&receiveAndReply)->停止(onStop)
receive():不斷的運行,處理客戶端發送過來的消息。
receiveAndReply():處理消息,並且迴應對方。
我們看一下Master的代碼:
def main(argStrings: Array[String]) {
  SignalLogger.register(log)
  val conf = new SparkConf
  val args = new MasterArguments(argStrings, conf)
  //指定的主機名必須是start-master.sh腳本運行的本地機器名稱
  val (rpcEnv, _, _) = startRpcEnvAndEndpoint(args.host, args.port, args.webUiPort, conf)
  rpcEnv.awaitTermination()
}

/**
 * Start the Master and return a three tuple of:
 *   (1) The Master RpcEnv
 *   (2) The web UI bound port
 *   (3) The REST server bound port, if any
 */
def startRpcEnvAndEndpoint(
    host: String,
    port: Int,
    webUiPort: Int,
    conf: SparkConf): (RpcEnv, Int, Option[Int]) = {
  val securityMgr = new SecurityManager(conf)
  //創建Rpc環境,主機名和端口就是Standalone集羣的訪問地址。SYSTEM_NAME=sparkMaster
  val rpcEnv = RpcEnv.create(SYSTEM_NAME, host, port, conf, securityMgr)
  // 將Master實例註冊到RpcEnv中
  val masterEndpoint = rpcEnv.setupEndpoint(ENDPOINT_NAME,
    new Master(rpcEnv, rpcEnv.address, webUiPort, securityMgr, conf))
  val portsResponse = masterEndpoint.askWithRetry[BoundPortsResponse](BoundPortsRequest)
  (rpcEnv, portsResponse.webUIPort, portsResponse.restPort)
}
在main方法中創建了RpcEnv,並且實例化Master實例,然後註冊到RpcEnv中。
RpcEndpoint其實是註冊到Dispatcher中的,在netty中的代碼實現如下:
override def setupEndpoint(name: String, endpoint: RpcEndpoint): RpcEndpointRef = {
  dispatcher.registerRpcEndpoint(name, endpoint)
}
注:NettyRpcEnv.scala的第135行
而Dispatcher中使用如下數據結構來存儲RpcEndpoint和RpcEndpointRef
private val endpoints = new ConcurrentHashMap[String, EndpointData]
private val endpointRefs = new ConcurrentHashMap[RpcEndpoint, RpcEndpointRef]
EndpointData爲一個case class:
private class EndpointData(
    val name: String,
    val endpoint: RpcEndpoint,
    val ref: NettyRpcEndpointRef) {
  val inbox = new Inbox(ref, endpoint)
}
在Master中使用數據結構WorkerInfo保存着每個Worker的信息,其中就包括每個Worker的RpcEndpointRef
備註:
1、DT大數據夢工廠微信公衆號DT_Spark
2、IMF晚8點大數據實戰YY直播頻道號:68917580
3、新浪微博: http://www.weibo.com/ilovepains

