一:環境介紹
10.63.13.138 tracker,nginx proxy
10.63.13.143 storage,nginx
二:資源包準備
FastDFS官方論壇:http://www.csource.org
資源下載路徑:http://sourceforge.net/projects/fastdfs/files/
本實驗學習環境使用CENTOS 6.4 X64
需要下載的資源包:
FastDFS源代碼:FastDFS_v5.05.tar.gz
nginx模塊源代碼:fastdfs-nginx-module_v1.15.tar.gz
nginx服務器源代碼:nginx-1.4.7.tar.gz
nginx cache purge插件源代碼:ngx_cache_purge-2.1.tar.gz
三:tracker 安裝
在10.63.13.138上安裝tracker,使用的資源包是:FastDFS_v5.05.tar.gz
在V5版本後,通過查看INSTALL 方式好像不需要libevent資源依賴了,但需要安裝libfastcomm,否則會在make.sh時,提示如下的錯誤:
make: *** [../common/fdfs_global.o] Error 1
1.libfastcomm 包安裝
git clone https://github.com/happyfish100/libfastcommon.git
cd libfastcommon/ && ./make.sh &&./make.sh install
但是FastDFS主程序默認設置的lib目錄是/usr/local/lib
所以需要創建軟鏈接.
ln -s /usr/lib64/libfastcommon.so/usr/local/lib/libfastcommon.so
ln -s /usr/lib64/libfastcommon.so/usr/lib/libfastcommon.so
ln -s /usr/lib64/libfdfsclient.so/usr/local/lib/libfdfsclient.so
ln -s /usr/lib64/libfdfsclient.so/usr/lib/libfdfsclient.so
2.tracker的安裝
cd fastdfs-5.05
./make.sh && ./make.sh install
編輯tracker.conf
一般修改以下幾個參數:
bind_addr=10.63.13.138
port=22122
base_path=/opt/tracker/fastdfs
store_group=group1
http.server_port=8080
3.tracker的啓動方式
fdfs_trackerd /etc/fdfs/tracker.conf start
如果啓動報錯,看詳細的logs,在base_path路徑下/opt/tracker/fastdfs/logs/
設置爲開機啓動:usr/local/bin/fdfs_trackerd/etc/fdfs/tracker.conf restart
四:安裝STORAGE
同樣的方式安裝storage,需先安裝libfastcomm
1.libfastcomm 包安裝
git clone https://github.com/happyfish100/libfastcommon.git
cd libfastcommon/ && ./make.sh &&./make.sh install
但是FastDFS主程序默認設置的lib目錄是/usr/local/lib
所以需要創建軟鏈接.
ln -s /usr/lib64/libfastcommon.so/usr/local/lib/libfastcommon.so
ln -s /usr/lib64/libfastcommon.so/usr/lib/libfastcommon.so
ln -s /usr/lib64/libfdfsclient.so/usr/local/lib/libfdfsclient.so
ln -s /usr/lib64/libfdfsclient.so/usr/lib/libfdfsclient.so
2.storager的安裝
cd fastdfs-5.05
./make.sh && ./make.sh install
base_path=/opt/fdfs/storage安裝完成後,可執行文件在/usr/local/bin
配置文件在/etc/fdfs
3.編輯storage.conf
disabled=false
group_name=group1根據實際的情況配置
bind_addr=10.63.13.14
port=23000
base_path=/opt/fdfs/storage
store_path_count=1#存儲路徑的個數
store_path0=/opt/storage/fdfs
tracker_server=10.63.13.138:22122
4.storage的啓動方式
fdfs_storaged /etc/fdfs/storage.conf start
如果啓動報錯,看詳細的logs,在base_path路徑下/opt/fdfs/storage/logs/
設置爲開機啓動:usr/local/bin/fdfs_storaged /etc/fdfs/storage.confrestart
5.查看storage是否連接到tracker
通過fdfs_monitor /etc/fdfs/storage.conf查看storage的運行狀態,是否爲ACTIVE
之後,再檢查具體的LOG
五:在storage上安裝nginx,在storage上安裝nginx,主要是爲了提供http的訪問服務,同時解決group中storage服務器的同步延遲問題。(需要安裝ngx_cache_purge-2.1.tar.gz)
使用的版本號爲:nginx 1.4.7,fastfdfs module爲V1.15
yum 安裝nginx安裝所需要依賴的rpm包
yum -y install zlib-devel pcre-devel openssl-devel lcmslcms-devel libtiff libtiff-devel freetype freetype-devel jasper jasper-devellibpng libpng-devel libwmf libwmf-devel libSM libSM-devel bzip2 bzip2-develbzip2-libs
2.nginx的安裝,在storage上安裝nginx需要加載fastdfs的nginx模塊
# ./configure --prefix=/usr/local/nginx--with-http_ssl_module --with-http_realip_module --with-http_addition_module--with-http_sub_module --with-http_dav_module --with-http_flv_module--with-http_mp4_module --with-http_gzip_static_module--with-http_random_index_module --with-http_secure_link_module--with-http_stub_status_module --with-mail --with-mail_ssl_module --add-module=../fastdfs-nginx-module/src/
Make時,需要先修改fastdfs-nginx-module/src/config文件,把環境變量修改下
CORE_INCS="$CORE_INCS/usr/include/fastdfs /usr/include/fastcommon/"
否則,會遇到這樣的
In file included from../fastdfs-nginx-module/src//ngx_http_fastdfs_module.c:6:
../fastdfs-nginx-module/src//common.c:43:error: expected specifier-qualifier-list before ‘FDFSStorePaths’
../fastdfs-nginx-module/src//common.c: Infunction ‘fdfs_load_groups_store_paths’:
../fastdfs-nginx-module/src//common.c:123:error: ‘GroupStorePaths’ has no member named ‘store_paths’
Make && make install
安裝通過後,將fastdfs的nginx模塊的配置文件,copy一份到/etc/fdfs下
Cp fastdfs-nginx-module/src/mod_fastdfs.conf/etc/fdfs/
編輯nginx.conf
主要是新增提供通過http方式下載
listen 8080;
location/group1/M00{
root /opt/storage/fdfs/data;
ngx_fastdfs_module;
}
Group1是指定的組名
M00 是指定的目錄名
通過/usr/local/nginx/sbin/nginx–t 檢查nginx的配置語法
編輯mod_fastdfs.conf
base_path=/opt/fdfs/storage 保存日誌目錄
tracker_server=10.63.13.138:22122 tracker的IP和port
group_name=group1 當前服務器的group名
url_have_group_name =true 文件url中是否有group名
store_path_count=1 存儲路徑個數,需要和store_path匹配
store_path0=/opt/storage/fdfs 存儲路徑
http.need_find_content_type=true 從文件擴展名查找文件
group_count = 1 設置的組的個數
[group1]
group_name=group1
storage_server_port=23000
store_path_count=1
store_path0=/opt/storage/fdfs
5.運行nginx
以上配置都沒問題後,就可以啓動nginx,啓動nginx前,你的tracker和storage要在運行狀態
/usr/local/nginx/sbin/nginx 即可啓動
通過error.log 看是否有錯誤
Nginx正常啓動後,應該是這樣的提示:
[2015-10-21 14:05:12] INFO - fastdfs apache/ nginx module v1.15, response_mode=proxy, base_path=/tmp,url_have_group_name=1, group_count=1, connect_timeout=2, network_timeout=30,tracker_server_count=1, if_alias_prefix=, local_host_ip_count=2,need_find_content_type=1, default_content_type=application/octet-stream,anti_steal_token=0, token_ttl=0s, anti_steal_secret_key length=0,token_check_fail content_type=, token_check_fail buff length=0,load_fdfs_parameters_from_tracker=1, storage_sync_file_max_delay=86400s,use_storage_id=0, storage server id count=0, flv_support=1, flv_extension=flv
[2015-10-21 14:05:12] INFO - group 1.group_name=group1, storage_server_port=23000, path_count=1,store_path0=/opt/storage/fdfs
如果遇到這樣的錯誤,解決辦法:
[2015-10-21 13:59:11] ERROR - file:shared_func.c, line: 961, open file /etc/fdfs/mime.types fail, errno: 2, errorinfo: No such file o
r directory
到nginx 的安裝包下,在conf下面的mine.types文件copy到/etc/fdfs下即可
ln -s /home/storage/opt/storage/fdfs/data/M00
也是可以將nginx 加入開機啓動
五:在tracker上安裝nginx
在tracker上安裝nginx,結合ngx_cache主要提供http訪問的反向代理、負責均衡以及緩存服務(在當前的測試環境中,測試反向代理和緩存)
nginx 安裝前的RPM資源依賴包的安裝
yum -y install zlib-devel pcre-devel openssl-devel lcmslcms-devel libtiff libtiff-devel freetype freetype-devel jasper jasper-devellibpng libpng-devel libwmf libwmf-devel libSM libSM-devel bzip2 bzip2-develbzip2-libs
解壓ngx_cache_purge-2.1.tar.gz
./configure--prefix=/usr/local/nginx --with-http_ssl_module --with-http_realip_module--with-http_addition_module --with-http_sub_module --with-http_dav_module--with-http_flv_module --with-http_mp4_module --with-http_gzip_static_module--with-http_random_index_module --with-http_secure_link_module--with-http_stub_status_module --with-mail --with-mail_ssl_module --add-module=../ngx_cache_purge-2.1/
Make && make install
編輯nginx.conf文件
主要增加以下內容:
http {
include mime.types;
default_type application/octet-stream;
#log_format main '$remote_addr - $remote_user[$time_local] "$request" '
# '$status $body_bytes_sent"$http_referer" '
# '"$http_user_agent""$http_x_forwarded_for"';
#access_log logs/access.log main;
sendfile on;
#tcp_nopush on;
server_names_hash_bucket_size 128;
client_header_buffer_size 32k;
large_client_header_buffers 4 32k;
client_max_body_size 300m;
tcp_nopush on;
proxy_redirect off;
proxy_set_header Host $http_host;
proxy_set_header X-Real-IP$remote_addr;
proxy_set_header X-Forwarded-For$proxy_add_x_forwarded_for;
proxy_connect_timeout 90;
proxy_send_timeout 90;
proxy_read_timeout 90;
proxy_buffer_size 16k;
proxy_buffers 4 64k;
proxy_busy_buffers_size 128k;
proxy_temp_file_write_size 128k;
#設置了緩存存儲路徑、存儲方式、分配的內存大小、磁盤最大空間、緩存期限等
proxy_cache_path/var/cache/nginx/proxy_cache levels=1:2 keys_zone=http-cache:500m max_size=10ginactive=30d;
proxy_temp_path/var/cache/nginx/proxy_cache/tmp;
#keepalive_timeout 0;
keepalive_timeout 35;
#gzip on;
upstream fdfs_group1{
server 10.63.13.143:8080weight=1 max_fails=2 fail_timeout=30s;
}
server {
listen 8080;
server_name localhost;
#charset koi8-r;
#access_log logs/host.access.log main;
location / {
root html;
index index.html index.htm;
}
location /group1/M00{
proxy_next_upstreamhttp_502 http_504 error timeout invalid_header;
proxy_cache http-cache;
proxy_cache_valid 200 304 12h;
proxy_cache_key$uri$is_args$args;
proxy_passhttp://fdfs_group1;
expires 30d;
}
location ~ /purge(/.*) {
allow127.0.0.1;
allow10.4.42.99;
deny all;
proxy_cache_purgehttp-cache $1$is_args$args;
}
通過/usr/local/nginx/sbin/nginx –t檢查語法是否有誤
啓動:/usr/local/nginx/sbin/nginx
六:測試文件上傳
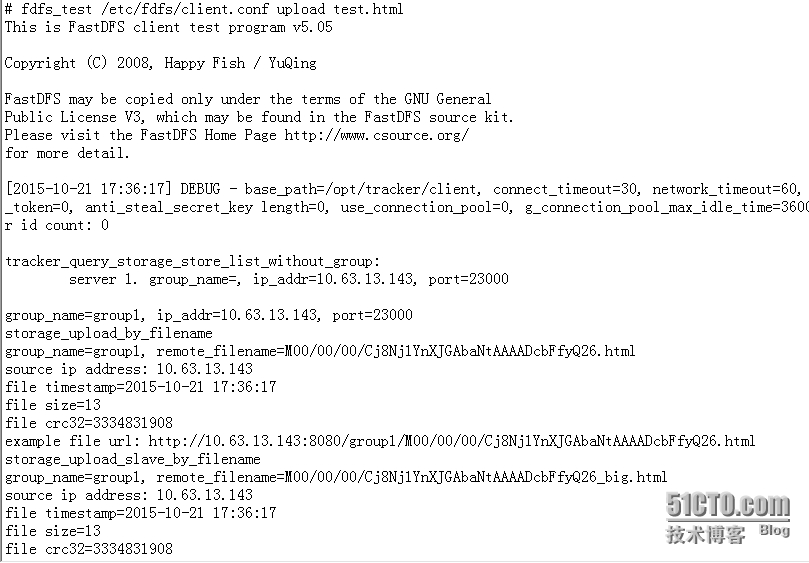
在上傳文件之前,先修改上傳文件的client
Vi /etc/fdfs/client.conf
base_path=/opt/tracker/client
tracker_server=10.63.13.138:22122
http.tracker_server_port=8080
#include http.conf
編輯一個文件 test.html
TestfastDFS
file timestamp=2015-10-21 17:36:17
file size=13
file crc32=3334831908
example file url: http://10.63.13.143:8080/group1/M00/00/00/Cj8Nj1YnXJGAbaNtAAAADcbFfyQ26_big.html
group1 組名 M00磁盤目錄 00/00隨機生成的目錄,後面是文件名
可以根據返回的URL,訪問到我們上上傳的文件
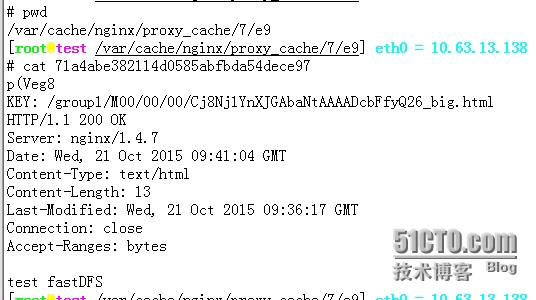
13.143 是storage上的提供http訪問的,看如何通過tracker上的nginx來訪問,需要注意的是,你的文件是直接上傳到storage的
看看是不是有緩存,緩存了這個文件
這個是tracker主要實現的功能
直接上傳文件:
# fdfs_upload_file /etc/fdfs/client.conf1.txt
group1/M00/00/00/Cj8Nj1YnXmqAGR4KAAAAEHzRfgo470.txt
訪問方式:
http://10.63.13.138:8080/group1/M00/00/00/Cj8Nj1YnXmqAGR4KAAAAEHzRfgo470.txt
是直接下載
這樣,一個簡單的fastdfs就搭建OK了,後面將進一步學習多tracker和storage的環境學習


