Nginx ("engine x") 是一個高性能的HTTP和反向代理服務器,也是一個IMAP/POP3/SMTP服務器。Nginx是由Igor Sysoev爲俄羅斯訪問量第二的Rambler.ru站點開發的,第一個公開版本0.1.0發佈於2004年10月4日。其將源代碼以類BSD許可證的形式發佈,因它的穩定性、豐富的功能集、示例配置文件和低系統資源的消耗而聞名。2011年6月1日,nginx 1.0.4發佈。
Nginx是一款輕量級的Web 服務器/反向代理服務器及電子郵件(IMAP/POP3)代理服務器,並在一個BSD-like 協議下發行。由俄羅斯的程序設計師Igor Sysoev所開發,供俄國大型的入口網站及搜索引擎Rambler(俄文:Рамблер)使用。其特點是佔有內存少,併發能力強,事實上nginx的併發能力確實在同類型的網頁服務器中表現較好,中國大陸使用nginx網站用戶有:京東、新浪、網易、騰訊、淘寶等。
一、這裏爲大家演示nginx的源碼安裝過程:
首先是要去網上download安裝所需要的軟件包,這裏默認爲大家yum源已經配好。
1、# download nginx-1.8.1.tar.gz &&tar -zxf nginx-1.8.1.tar.gz #下載並解壓軟件包
2、# cd nginx-1.8.1/src/core/ #修改配置文件,這裏是將版本號進行了自定義
修改配置文件nginx-1.8.1/src/core/nginx.h
#define nginx_version 1008001
#define NGINX_VERSION "1.8.1"
#define NGINX_VER "nginx/" NGINX_VERSION
修改如下所示:
#define nginx_version 1008001
#define NGINX_VERSION "1.8.1"
#define NGINX_VER "nginx/"
3、# cd auto/cc/
修改配置文件:vimauto/cc/gcc的179行文件
178 # debug
179 CFLAGS="$CFLAGS -g"
修改如下所示:
178 # debug
179 #CFLAGS="$CFLAGS -g" #將這一行註釋掉
4、執行configure文件
[root@pt2 nginx-1.8.1]# ./configure--prefix=/usr/local/lnmp/nginx --with-http_ssl_module--with-http_stub_status_module #進行編譯並制定目錄與參數
# ./configure --prefix=/usr/local/lnmp/nginx--with-http_ssl_module --with-http_stub_status_module --add-module=/root/nginx-sticky-module-1.0 #需要sticky時加上這個參數,指向文件存放的位置
5、# make && make install
二、安裝完成好以後,我們進行相關的配置:
1、首先把nginx的啓動腳本路徑加入到環境變量中,
# vim ~/.bash_profile
PATH:/usr/bin:/usr/sbin:/bin:/usr/local/lnmp/nginx/sbin #在這句後面加入nginx的sbin路徑
# source ~/.bash_profile #把更改的文件刷新一遍就可以使用了
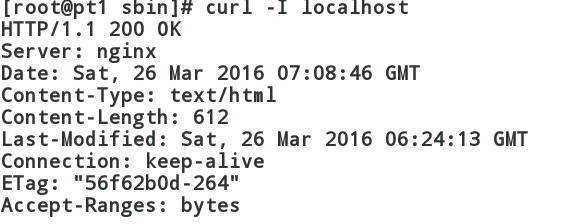
[root@pt1 conf]# nginx #開啓nginx服務,默認端口爲80,注意不要和httpd服務衝突
測試結果可以看到信息:
編輯/etc/security/limits.conf文件,增加條目 如下:
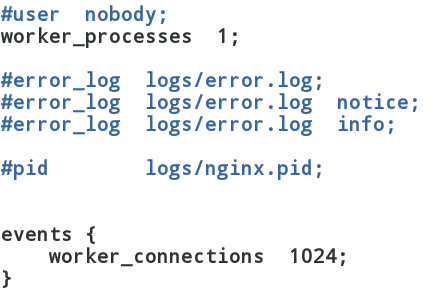
編輯nginx配置文件nginx.conf
查看系統所允許的最大數
下面是壓測結果:
[root@pt1 html]# ab -n 10000 -c 1000http://172.25.9.109/index.html
This is ApacheBench, Version 2.3<$Revision: 655654 $>
Copyright 1996 Adam Twiss, Zeus TechnologyLtd, http://www.zeustech.net/
Licensed to The Apache Software Foundation,http://www.apache.org/
Benchmarking 172.25.9.109 (be patient)
Completed 1000 requests
Completed 2000 requests
Completed 3000 requests
Completed 4000 requests
Completed 5000 requests
Completed 6000 requests
Completed 7000 requests
Completed 8000 requests
Completed 9000 requests
Completed 10000 requests
Finished 10000 requests
Server Software: nginx
Server Hostname: 172.25.9.109
Server Port: 80
Document Path: /index.html
Document Length: 56 bytes
Concurrency Level: 1000
Time taken for tests: 0.961 seconds
Complete requests: 10000
Failed requests: 985
(Connect: 0, Receive: 0, Length: 985, Exceptions: 0)
Write errors: 0
Non-2xx responses: 985
Total transferred: 2878845 bytes
HTML transferred: 691802 bytes
Requests per second: 10405.95 [#/sec] (mean)
Time per request: 96.099 [ms] (mean)
Time per request: 0.096 [ms] (mean, across all concurrentrequests)
Transfer rate: 2925.50 [Kbytes/sec] received
Connection Times (ms)
min mean[+/-sd] median max
Connect: 0 7 7.5 5 36
Processing: 2 11 9.9 8 216
Waiting: 1 9 9.8 6 215
Total: 6 18 15.8 12 229
Percentage of the requests served within acertain time (ms)
50% 12
66% 14
75% 16
80% 17
90% 56
95% 62
98% 63
99% 64
100% 229 (longest request)
編輯配置文件nginx.conf
server {
listen 443 ssl; #監聽端口,這裏爲https的請求
server_name localhost;
ssl_certificate cert.pem; #證書
ssl_certificate_key cert.pem; #鑰匙
ssl_session_cache shared:SSL:1m;
ssl_session_timeout 5m;
ssl_ciphers HIGH:!aNULL:!MD5;
ssl_prefer_server_ciphers on;
location / {
root html;
index index.html index.htm; #默認發佈頁文件
}
生成自定義證書,並把它移動到/usr/local/lnmp/nginx/conf/下:
[root@pt1 conf]# cd /etc/pki/tls/certs/
[root@pt1 certs]# make cert.pem
umask 77 ; \
PEM1=`/bin/mktemp/tmp/openssl.XXXXXX` ; \
PEM2=`/bin/mktemp/tmp/openssl.XXXXXX` ; \
/usr/bin/opensslreq -utf8 -newkey rsa:2048 -keyout $PEM1 -nodes -x509 -days 365 -out $PEM2-set_serial 0 ; \
cat$PEM1 > cert.pem ; \
echo"" >> cert.pem ; \
cat$PEM2 >> cert.pem ; \
rm-f $PEM1 $PEM2
Generating a 2048 bit RSA private key
....+++
..............................+++
writing new private key to'/tmp/openssl.6aOmZy'
-----
You are about to be asked to enterinformation that will be incorporated
into your certificate request.
What you are about to enter is what iscalled a Distinguished Name or a DN.
There are quite a few fields but you canleave some blank
For some fields there will be a defaultvalue,
If you enter '.', the field will be leftblank.
-----
Country Name (2 letter code) [XX]:CN #國家
State or Province Name (full name)[]:Shaanxi #省份
Locality Name (eg, city) [DefaultCity]:xi'an #城市
Organization Name (eg, company) [DefaultCompany Ltd]:server #公司
Organizational Unit Name (eg, section)[]:server1 #組織
Common Name (eg, your name or your server'shostname) []:server1 #個人名字
Email Address []:server@163.com #郵箱
[root@pt1 certs]# ls
ca-bundle.crt cert.pem Makefile
ca-bundle.trust.crt make-dummy-cert renew-dummy-cert
[root@pt1 certs]# mv cert.pem/usr/local/lnmp/nginx/conf/ #將生成的文件移動到nginx的配置文件目錄下
[root@pt1 conf]# nginx -t #檢查nginx配置文件語法是否有錯
nginx: the configuration file/usr/local/lnmp/nginx/conf/nginx.conf syntax is ok
nginx: configuration file/usr/local/lnmp/nginx/conf/nginx.conf test is successful
[root@pt1 conf]# nginx -s reload #重載nginx
編輯配置文件nginx.conf
server {
listen 80; #監聽80端口
server_name wwwNaN.com alias pt.com; #以wwwNaN.com或pt.com來訪問的去下面 /virualhost/wwwNaN.com目錄查找
location / {
root /virualhost/wwwNaN.com;
index index.html index.htm;
}
}
server {
listen 80; #監聽80端口
server_name wwwNaN1.com; #以wwwNaN1.com來訪問的去下面 /virualhost/wwwNaN1.com目錄查找
location / {
root /virualhost/wwwNaN1.com;
index index.html index.htm;
}
}
[root@pt1 conf]# nginx -t #檢查nginx配置文件語法是否有錯
nginx: the configuration file/usr/local/lnmp/nginx/conf/nginx.conf syntax is ok
nginx: configuration file/usr/local/lnmp/nginx/conf/nginx.conf test is successful
[root@pt1 conf]# nginx -s reload #重載nginx
[root@pt1 conf]# mkdir -p/virualhost/wwwNaN.com #創建虛擬主機目錄
[root@pt1 conf]# mkdir -p/virualhost/wwwNaN1.com #創建虛擬主機目錄
[root@pt1 conf]# touch /virualhost/wwwNaN.com/index.html
[root@pt1 conf]# touch /virualhost/wwwNaN1.com/index.html
[root@pt1 conf]# echo wwwNaN.com >/virualhost/wwwNaN.com/index.html #測試頁文件
[root@pt1 conf]# echo wwwNaN1.com >/virualhost/wwwNaN1.com/index.html #測試頁文件


