Zabbix使用fpmmm(mpm)模块实现对Mysql的全面监控
(Performance Monitor for MySQL)
fpmmm is the FromDualPerformance Monitor for MySQL and MariaDB and the counterpart to the MySQL EnterpriseMonitor from Oracle.With fpmmm you can monitor your MySQL/MariaDB databases andalso your database hosts (machines).fpmmm works on Linux and should also workon Mac OSX (and possibly some other *BSD derivatives). Windows support is plannedfor the next major release.fpmmm is the successor of mpm. mpm was renamed tofpmmm because of the naming conflict with the Apache Multi-Processing Modules(MPM).fpmmm needs a Zabbix Server for storing its performance data. There youcan see the graphs, and alerts are sent to you from there.
上话摘自官网,简单来说mpm改名为fpmmm,可配合zabbix监控数据库。用了一段时间后感觉挺好使的。使用fpmmm可以很全面的监控mysql数据库。
被监控主机操作:
1.安装依赖的程序包:
[root@test-master-mysql-42 bin]# yum install php-cli php-process php-mysqli
2.下载fpmmm:
http://down.51cto.com/data/2239742
https://support.fromdual.com/admin/public/download.php?product_id=0
[root@test-app-server-130 install]#
wget https://support.fromdual.com/admin/download/fpmmm-0.10.6.tar.gz
3.解压:
[root@test-app-server-130 install]# tar -xvf fpmmm-0.10.6.tar.gz
4.移动到部署位置:
[root@test-app-server-130 install]# mv fpmmm-0.10.6 /data/server/zabbix_agent/fpmmm/
[root@test-app-server-130 install]# cd /data/server/zabbix_agent/fpmmm/
[root@test-app-server-130 fpmmm]# ls
bin CHANGELOG INSTALL lib tpl
5.mysql创建监控帐号:
mysql> grant PROCESS,REPLICATION CLIENT,REPLICATION SLAVE on *.* to zabbix_fpmmm@'127.0.0.1' identified by '密码';
mysql> grant select on mysql.user to zabbix_fpmmm@'127.0.0.1';
6.创建并修改配置文件:
(注意:事例里配置的目录上一级已存在,自己在搭建时注意目录是否存在,若嫌麻烦和权限问题可以都放在tmp目录)
[root@test-app-server-130 fpmmm]# cp -pr tpl/fpmmm.conf.templatetpl/fpmmm.conf
[root@test-app-server-130 fpmmm]# vim tpl/fpmmm.conf
####################################
1 [default]
5 Type = mysqld
#####修改日志等级,建议在部署时调高些,便于排查问题######
13 LogLevel = 2
#####日志位置,部署时多察看日志,便于排错#####
14 LogFile = /data/logs/zabbix/fpmmm.log
15 # Directory where the cache files shouldbe written to:
#####CacheFileBase会以fpmmm+”.”+”hostname”+”.”cache命名,注意权限,zabbix对这个文件要有读写权限#####
16 CacheFileBase =/data/server/zabbix_agent/fpmmm/fpmmm
17 AgentLockFile =/data/server/zabbix_agent/fpmmm/fpmmm.lock
#####本地被监控mysql的帐号密码等信息,注意创建相应监控帐号#####
25 Username = zabbix_fpmmm
26 Password = 密码
27 MysqlHost = 127.0.0.1
28 MysqlPort = 3306
29
30 # Zabbix Server IP address
#####zabbix服务端的地址#####
31 ZabbixServer = zabbix服务端ip
32
33 # If section is disabled
34 Disabled = false
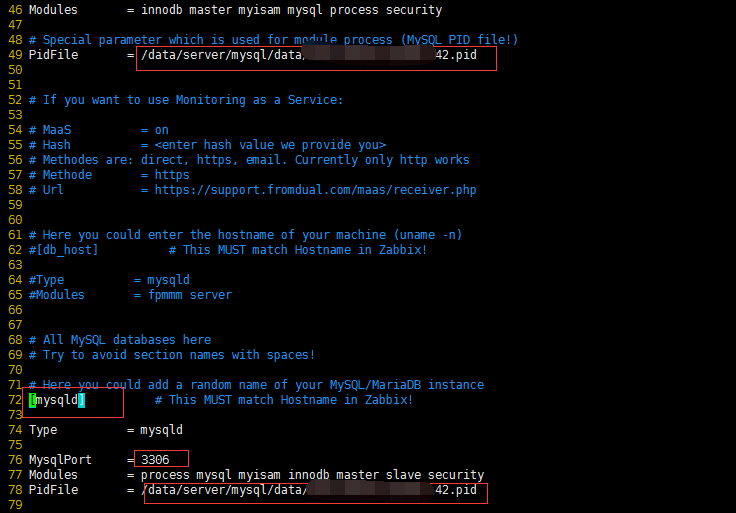
46 Modules = innodb master myisam mysql processsecurity
47
48 # Special parameter which is used formodule process (MySQL PID file!)
#####mysql的pid,可以从my.cnf里查找,未指定 pid文件时,pid 文件默认名为 主机名.pid,存放的路径在默认MySQL的date数据目录######
49 PidFile = /data/server/mysql/data/mysqld.pid
#####只是监控mysql,db_hos注释掉#####
62 #[db_host] # This MUST match Hostname in Zabbix!
63
64 #Type = mysqld
65 #Modules = fpmmm server
#####配置监控主机信息,下面的hostname可以自己随意取名字,但要和zabbix网页上添加主机时的配置主机hostname一致#####
72 [hostname] # This MUST match Hostname in Zabbix!
73
74 Type = mysqld
75
76 MysqlPort = 3306
#####pid跟上面相同#####
77 Modules = process mysql myisam innodb masterslave security
78 PidFile = /data/server/mysql/data/mysqld.pid
#####只监控mysql,memcached注释掉#####
81 #[memcached] # This MUST match Hostname in Zabbix!
82
83 #Type = memcached
84 #Modules = memcached
85
86 #MemcachedHost = 127.0.0.1
87 #MemcachedPort = 11211
#####################################
7.第一次尝试运行:
[root@test-master-mysql-42 bin]#/data/server/zabbix_agent/fpmmm/bin/fpmmm --config=/data/server/zabbix_agent/fpmmm/tpl/fpmmm.conf
PHP Notice: Undefined index: PATH in /data/server/zabbix_agent/fpmmm/bin/fpmmm.phpon line 29
PHP Notice: Undefined index: PATH in /data/server/zabbix_agent/fpmmm/bin/fpmmm.phpon line 29
PHP Warning: gettimeofday(): It is not safe to rely on thesystem's timezone settings. You are *required* to use the date.timezone settingor the date_default_timezone_set() function. In case you used any of those methodsand you are still getting this warning, you most likely misspelled the timezoneidentifier. We selected 'Asia/Chongqing' for 'CST/8.0/no DST' instead in/data/server/zabbix_agent/fpmmm/lib/log.inc on line 103
这里有两个问题:
1).php时区错误。
解决方法:
修改php.ini,在php.ini中找到;date.timezone= 去掉它前面的;号,然后设置data.timezone= "Asia/Shanghai";
[root@test-master-mysql-42~]# vim /etc/php.ini
2).未找到zabbix_sender。
可以再次执行命令的同时监控日志(tail -f /data/logs/zabbix/fpmmm.log)看到报错信息:7887:2016-09-0621:35:11.983 - ERR : which: nozabbix_sender in (/usr/local/sbin:/usr/local/bin:/sbin:/bin:/usr/sbin:/usr/bin:/data/server/mysql/bin:/root/bi)
解决方法:在/usr/local/bin/添加zabbix_sender软链接
[root@test-master-mysql-42 ~]# ln -s /data/server/zabbix_agent/bin/zabbix_sender /usr/local/bin/
同时注释掉/data/server/zabbix_agent/fpmmm/bin/fpmmm.php的第29行。
8. 第二次运行:
[root@test-master-mysql-42 bin]#/data/server/zabbix_agent/fpmmm/bin/fpmmm --config=/data/server/zabbix_agent/fpmmm/tpl/fpmmm.conf
1
没有报错,日志也正常(tail -f /data/logs/zabbix/fpmmm.log)。
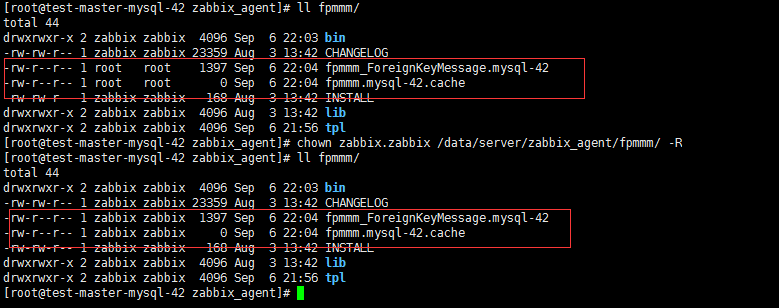
9. 但是,在测试运行后需要修改几个文件的权限和所属者,不然在以后的运行中会报错:
1). 修改新产生的cache文件权限:
[root@test-master-mysql-42 zabbix_agent]# chown zabbix.zabbix /data/server/zabbix_agent/fpmmm/ -R
2). 修改日志权限:
[root@test-master-mysql-42 logs]# chown zabbix.zabbix /data/logs/zabbix/ -R
3).修改mysql的pid权限让zabbix可读(但下次mysql重启后pid权限会改变),或直接把zabbix用户加到mysql组:
[root@test-master-mysql-42 ~]# chmod 664 /data/server/mysql/data/mysql.pid
或
[root@test-master-mysql-42 ~]# usermod -a -G mysql zabbix
注意:在删除日志后需要重新给权限,有问题一定要看日志,根据日志报错来排查。
10.修改zabbix的agent配置文件,在最末尾添加键值:
[root@test-master-mysql-42 fpmmm]# vim
/data/server/zabbix_agent/etc/zabbix_agentd.conf
UserParameter=FromDual.MySQL.check,/data/server/zabbix_agent/fpmmm/bin/fpmmm--config=/data/server/zabbix_agent/fpmmm/tpl/fpmmm.conf
重启zabbix-aget服务。
11.导入模版
模版就在下载的安装包的tpl目录
下载后解压出模板导入
只需要导入需要的就行,可以导入:
Template_FromDual.MySQL.server.xml Template_FromDual.MySQL.innodb.xml Template_FromDual.MySQL.master.xmlTemplate_FromDual.MySQL.mysql.xml Template_FromDual.MySQL.process.xml Template_FromDual.MySQL.server.xml Template_FromDual.MySQL.slave.xml
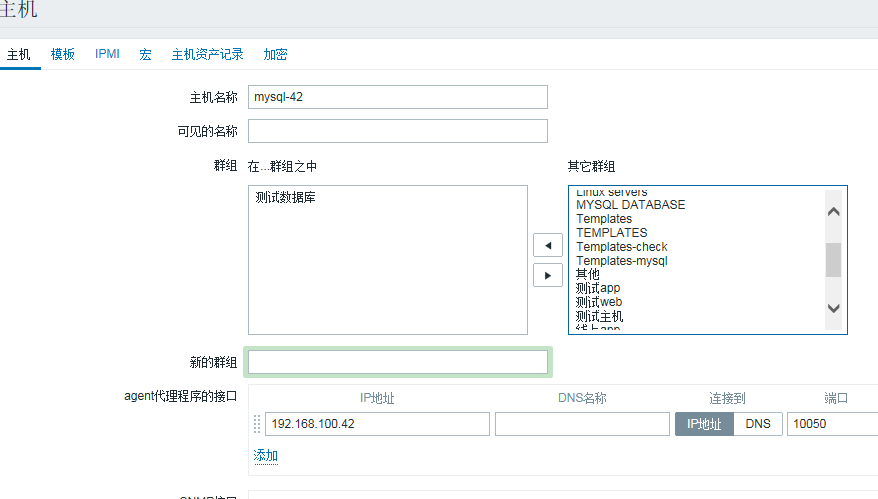
12.添加主机:
添加完毕后,可以去最新数据里看是否收到数据
13.添加到计划任务:
遇到没有数据的情况,将fpmmm加到crontab计划任务发送数据到zabbix_server(需要添加SHELL和PATH),如下:
执行set命令获取PATH:
[root@test-master-mysql-42 fpmmm]# crontab -e
*/2 * * * * SHELL=/bin/bash;PATH=/data/server/java/bin:/usr/local/sbin:/usr/local/bin:/sbin:/bin:/usr/sbin:/usr/bin:/usr/local/curl/bin:/root/bin;/bin/bash /data/server/zabbix_agent/fpmmm/bin/fpmmm --config=/data/server/zabbix_agent/fpmmm/tpl/fpmmm.conf >/dev/null
参考: http://www.fromdual.com/fpmmm-installation-guide


