前言:
各位小夥伴,又到了每週更新文章了時候了,本來是週日能發出來呢,這不是趕上清明節嗎,女王大人發話了,清明節前兩天半陪她玩,只留給我週一下午半天時間寫博客 ,哪裏有女王哪裏就有壓迫呀有木有!好了閒話少說,上一篇博客(Android Metro風格的Launcher開發系列第二篇)說到Launcher主體框架用ViewPager來實現,這一篇博客咱們來說說每一個page的具體實現。
PagerAdapter:
Launcher主體ViewPager實現就引出了PagerAdapter,PagerAdapter是android.support.v4包中的類,它的子類有FragmentPagerAdapter, FragmentStatePagerAdapter,這兩個adapter都是Fragment的適配器,這裏因爲沒有用到Fragment所以這裏不講,我只講PagerAdapter。關於PageAapter的描述,Google官網原文是這樣的:Base class providing the adapter to populate pages inside of a ViewPager. You will most likely want to use a more specific implementation of this, such as FragmentPagerAdapter or FragmentStatePagerAdapter,大致就是說PagerAdapter是ViewPager提供的一個適配器,方便我們對ViewPager的每一個View進行控制。我的PagerAdapter是這樣實現的:
public class LauncherAdapter extends PagerAdapter {
    private ArrayList<PageViewItem> mViews;

    public LauncherAdapter(ArrayList<PageViewItem> views) {
        mViews = views;
    }

    @Override
    public void destroyItem(View arg0, int arg1, Object arg2) {
        ((ViewPager) arg0).removeView(mViews.get(arg1));
    }

    @Override
    public void finishUpdate(View arg0) {
    }

    @Override
    public int getCount() {
        if (mViews != null) {
            return mViews.size();
        }
        return 0;
    }

    public View getCurrentView(int currentID) {
        return mViews.get(currentID);
    }

    @Override
    public Object instantiateItem(View arg0, int arg1) {
        ((ViewPager) arg0).addView(mViews.get(arg1));
        return mViews.get(arg1);
    }

    @Override
    public boolean isViewFromObject(View arg0, Object arg1) {
        return (arg0 == arg1);
    }

    @Override
    public void restoreState(Parcelable arg0, ClassLoader arg1) {
    }

    @Override
    public Parcelable saveState() {
        return null;
    }

}
PageViewItem:
PagerAdapter的getCurrentView方法返回的每一個view都是自定義View,爲什麼要自定義呢?因爲在每一個圖標獲取焦點放大的時候會與旁邊的圖標有重疊部分,ViewPager每一頁view都是一個FrameLayout,在繪製view的時候是按照一定的順序繪製的,就會遇到焦點view放大後顯示的效果是被旁邊的view壓了一部分,如果不改變view繪製順序就不能避免這個問題。
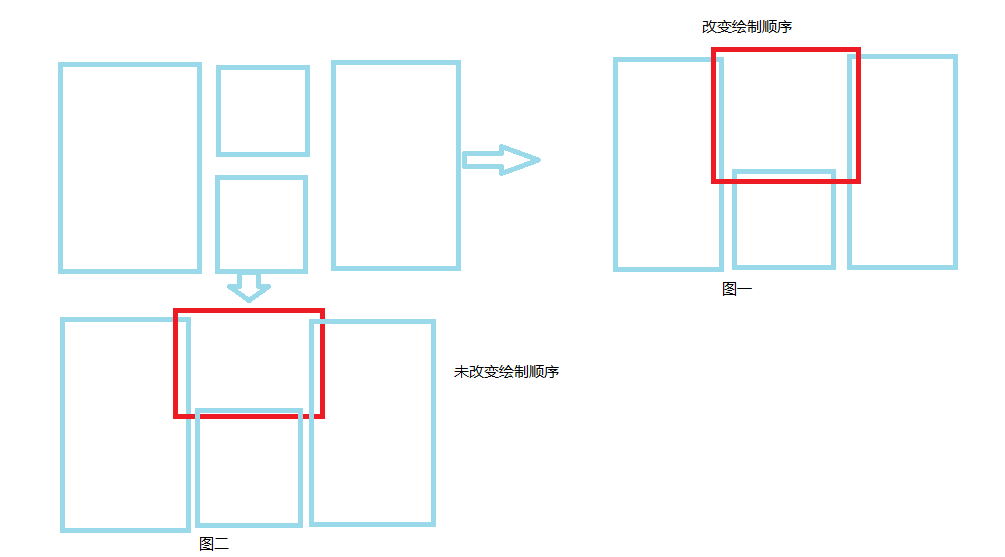
如上圖所示,圖一顯示效果就是焦點view放大,改變繪製順序的實現效果。改變繪製順序其實就是重寫ViewGroup的getChildDrawingOrder(int childCount, int i)方法,每一次繪製時,最後返回focusview所在的viewgroup中的index就行了。
CellView:
如上圖所示,每一個正方形的view我在這裏叫做CellView,它也是一個自定義的view,自定義主要是爲了實現:
1、獲取焦點時放大和丟掉焦點時縮小效果,這裏是應用了屬性動畫,ViewPropertyAnimator可以通過View的animate()方法獲取的,具體動畫實現如下:
 mPropertyAnimator.scaleX((width + mScaleX) / width)
                        .scaleY((height + mScaleY) / height).setDuration(duration)
                        .setInterpolator(new DecelerateInterpolator())
                        .start();
2、在xml文件靈活配置一些CellView的屬性,比如點擊打開的應用,呈現的ICON獲取地址,焦點x、y的放大值等,CellView對應的屬性定義attrs.xml文件如下:
<?xml version="1.0" encoding="utf-8"?>
<resources>

    <declare-styleable name="Launcher_ScaleView">
        <attr name="parentID" format="integer" />
        <attr name="resUrl" format="string" />
        <attr name="resType" format="integer" />
        <attr name="isRightEdge" format="boolean" />
        <attr name="isLeftEdge" format="boolean" />
        <attr name="isTopEdge" format="boolean" />
        <attr name="isBottomEdge" format="boolean" />
        <attr name="scaleX" format="integer" />
        <attr name="scaleY" format="integer" />
        <attr name="packageName" format="string" />
        <attr name="activityName" format="string" />
        <attr name="intentKey" format="string" />
        <attr name="intentValue" format="string" />
        <attr name="focusType" format="integer" />
    </declare-styleable>

</resources>
3、實現在用遙控器移動焦點時不會焦點錯亂,在開發遙控器應用時一個很大的問題就是焦點在移動時焦點錯亂,基本上應用UI bug至少有一半時焦點bug,這個應用我爲了防止焦點錯亂定義了CellView的邊界屬性,上面的xml文件中isXXEdge就是,這樣在焦點移動到邊界時可以進行Page之間的切換和其他處理,防止焦點在進入每一個page時出現錯亂。
下面來看一下實現的具體效果:

總結:以上就是Metro風格Launcher實現,我用了三篇博客來講解這個應用,所有效果的實現都是自己摸索的,應該還有更好的實現方法,大家可以多多交流提出自己的看法,也可以關注我的微信號coder_online,以上謝謝!
第一時間獲得博客更新提醒,以及更多技術信息分享,歡迎關注個人微信公衆平臺:程序員互動聯盟(coder_online),掃一掃下方二維碼或搜索微信號coder_online即可關注,我們可以在線交流。