跨进程调用Service:
有时候我们会用到自己写的应用程序中要调用其他应用程序或系统应用程序中Service的一些方法。那在android中,我们怎么才能做到跨应用(进程)调用Service中的方法呢。
下面就会用到AIDL服务。这里简单对AIDL介绍一下:
AIDL:Android Interface Definition Language,即Android接口定义语言。Android系统中的进程之间不
能共享内存,因此,需要提供一些机制在不同进程之间进行数据通信。为了使其他的应用程序也可以访问本应用程序提供的服务,Android系统采用了远程过程调用(Remote Procedure Call,RPC)方式来实现。与很多其他的基于RPC的解决方案一样,Android使用一种接口定义语言(Interface Definition Language,IDL)来公开服务的接口。我们知道4个Android应用程序组件中的3个(Activity、BroadcastReceiver和ContentProvider)都可以进行跨进程访问,另外一个Android应用程序组件Service同样可以。因此,可以将这种可以跨进程访问的服务称为AIDL(Android Interface Definition Language)服务。
建立AIDL服务要比建立普通的服务复杂一些,具体步骤如下:
(1)在Eclipse Android工程的Java包目录中建立一个扩展名为aidl的文件。该文件的语法类似于Java代码,但会稍有不同。
(2)如果aidl文件的内容是正确的,ADT会自动生成一个Java接口文件(*.java)。
(3)建立一个服务类(Service的子类)。
(4)实现由aidl文件生成的Java接口。
(5)在AndroidManifest.xml文件中配置AIDL服务,尤其要注意的是,<action>标签中android:name的属性值就是客户端要引用该服务的ID,也就是Intent类的参数值。
下面我们通过一个实例来说明怎么跨进程调用Service。
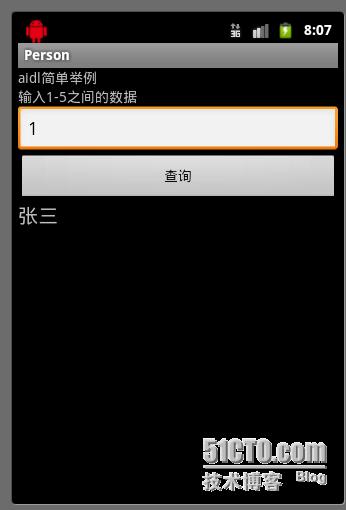
需求:在一个输入框中输入1-5其中一个数字,1:张三,2:李四,3:王五,4:赵六,5:田七一一对应。输入1,点击查询按钮,TextView上就会显示“张三”,以此类推。
效果图:
思路:
1.新建一个android项目,写好布局文件,在activity中找到相应的控件,为各个控件设置相应的点击事件。
2.另新建一个没有主界面的Service项目,也可以有,但是在此就没有设置相应的activity。
3.在Service项目下新建一个接口(没有修饰符),在里面我们可以写自己需要的抽象方法。
package cn.cbd.personservice.adil;
interface PersonServiceAidl
{
String getPersonInfo(int num);
}
4.在工作目录下找到Service项目中的此接口,把后缀名.java改成.aidl 然后返回eclipse(或ADT)刷新项目,我们可以看到在gen目录下自动生成了一个PersonServiceAidl.java文件。
5.把整个cn.cbd.personservice.adil包拷到另一个应用的rec目录下,然后刷新项目。
特别注意:
在清单文件中对远程服务进行配置的时候,一定要加上
<service android:name=".PersonService">
<intent-filter >
<!--远程服务中,必须这样一个action  -->
<action android:name="aaa.bbb.ccc"/>
</intent-filter>
</service>
否则会报错,其中的"<action android:name="aaa.bbb.ccc"/>”是自定义的。
下面是主Acitivity中的一些内容:
package cn.cbd.person;
import android.app.Activity;
import android.content.ComponentName;
import android.content.Context;
import android.content.Intent;
import android.content.ServiceConnection;
import android.os.Bundle;
import android.os.IBinder;
import android.os.RemoteException;
import android.view.View;
import android.view.View.OnClickListener;
import android.widget.Button;
import android.widget.EditText;
import android.widget.TextView;
import cn.cbd.personservice.adil.PersonServiceAidl;
public class PersonActivity extends Activity
{
private EditText et_main;
private Button btn_query;
private TextView tv_showName;
private PersonServiceAidl aidl;
private MyServiceConnection conn;
private Intent service;
// PersonService
public void onCreate(Bundle savedInstanceState)
{
super.onCreate(savedInstanceState);
setContentView(R.layout.main);
et_main = (EditText) findViewById(R.id.et_main);
btn_query = (Button) findViewById(R.id.btn_query);
tv_showName = (TextView) findViewById(R.id.tv_showName);
//新建一个MyServiceConnection对象conn
conn = new MyServiceConnection();
//service = new Intent("aaa.bbb.ccc");
service = new Intent();
service.setClassName("cn.cbd.personservice",
"cn.cbd.personservice.PersonService");
//开启服务
//this.startService(service);
// 绑定服务
this.bindService(service, conn, Context.BIND_AUTO_CREATE);
btn_query.setOnClickListener(new OnClickListener()
{
public void onClick(View v)
{
String num = et_main.getText().toString().trim();
// 调用服务中的方法
try
{
String name = aidl.getPersonInfo(Integer.valueOf(num));
tv_showName.setText(name);
} catch (NumberFormatException e)
{
e.printStackTrace();
} catch (RemoteException e)
{
e.printStackTrace();
}
}
});
}
@Override
protected void onDestroy()
{
this.unbindService(conn);
//this.stopService(service);
super.onDestroy();
}
public class MyServiceConnection implements ServiceConnection
{
public void onServiceConnected(ComponentName name, IBinder service)
{
aidl = PersonServiceAidl.Stub.asInterface(service);
}
public void onServiceDisconnected(ComponentName name)
{
}
}
}
从上面我们可以看到,当我们通过bindService(service,conn,flag)绑定服务绑定成功时,就会执行实现类MyServiceConnection类中的onServiceConnected(ComponentName name, IBinder service)方法。在此方法中我们可以获得操作服务中的方法的对象(aidl = PersonServiceAidl.Stub.asInterface(service);),这个对象我们可以操作服务中的方法。
下面附有项目包源码,大家不理解的可以自己看一下。
解压以后,先部署项目PersonService,然后在部署项目Person。


