


ve的問題:
1.出現錯誤 FATAL EXCEPTION: main
java.lang.NullPointerException
解決:刪除AndroidManifest.xmel中的 <uses-sdk android:minSdkVersion="8"android: targetSdkVersion ="17" />,即可;
2.FATAL EXCEPTION: main java.lang.NoClassDefFoundError: org.ksoap2.serialization.SoapObject
解決:ksoap2包沒有導入好,按照下面說的即可!
——————————————————————————————————————
轉載:http://blog.csdn.net/lyq8479/article/details/6428288 手機號查詢
Android平臺調用Web Service示例
下面將通過一個示例講解如何在Android平臺調用Web Service。既然要調用Web Service,那就要先有Web Service。我們還是選擇使用上篇文章中介紹的查詢手機號碼歸屬地的Web service,它的WSDL爲http://webservice.webxml.com.cn/WebServices/MobileCodeWS.asmx?wsdl。
1)新建Android工程,引入上面下載的ksoap2-android類庫
Android工程的創建就不多說了,主要想說明的是如何向Android工程中添加第三方jar包。當然,添加第3方jar的方式有多種,我個人比較喜歡用下面這種方式,即先將第三方jar包拷貝到工程某個目錄下,再將其加入到工程的Build Path中。
例如,我創建的Android工程名爲WSClient,在工程名上點擊右鍵,新建一個Folder(目錄或文件夾),名爲libs,然後將ksoap2-android類庫拷貝到libs目錄中,如下圖所示: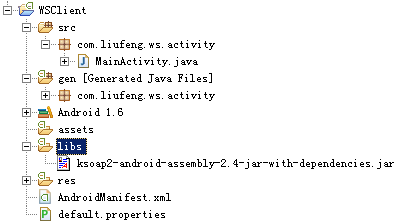
接着,在jar包ksoap2-android-assembly-2.4-jar-with-dependencies.jar上點擊右鍵,依次選擇“Build Path”-“Add to Build Path”。再在工程名上點擊右鍵,依次選擇“Build Path”-“Config Build Path...”,將看到如下所示界面: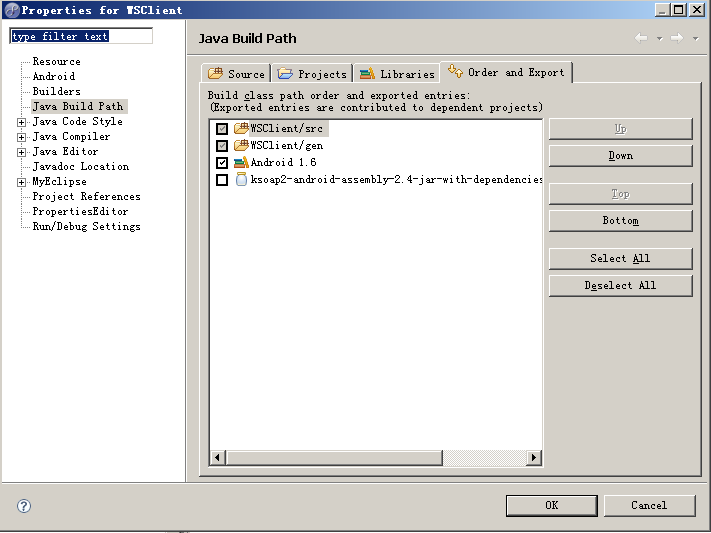
選中ksoap2 jar包前面的選項框,點擊OK,則完成了ksoap2 jar包的添加(說明:在Android工程中,添加其它jar包的方法完全一樣,操作一兩遍後,你會發現其實很簡單的)。
2)編寫佈局文件res/layout/main.xml
<?xmlversion="1.0"encoding="utf-8"?>
<LinearLayoutxmlns:android="http://schemas.android.com/apk/res/android"
android:orientation="vertical"
android:layout_width="fill_parent"
android:layout_height="fill_parent"
android:paddingTop="5dip"
android:paddingLeft="5dip"
android:paddingRight="5dip"
>
<TextView
android:layout_width="fill_parent"
android:layout_height="wrap_content"
android:text="手機號碼(段):"
/>
<EditTextandroid:id="@+id/phone_sec"
android:layout_width="fill_parent"
android:layout_height="wrap_content"
android:inputType="textPhonetic"
android:singleLine="true"
android:hint="例如:1398547"
/>
<Buttonandroid:id="@+id/query_btn"
android:layout_width="wrap_content"
android:layout_height="wrap_content"
android:layout_gravity="right"
android:text="查詢"
/>
<TextViewandroid:id="@+id/result_text"
android:layout_width="wrap_content"
android:layout_height="wrap_content"
android:layout_gravity="center_horizontal|center_vertical"
/>
</LinearLayout>
3)編寫MainActivity類
packagecom.liufeng.ws.activity;
importorg.ksoap2.SoapEnvelope;
importorg.ksoap2.serialization.SoapObject;
importorg.ksoap2.serialization.SoapSerializationEnvelope;
importorg.ksoap2.transport.HttpTransportSE;
importandroid.app.Activity;
importandroid.os.Bundle;
importandroid.view.View;
importandroid.view.View.OnClickListener;
importandroid.widget.Button;
importandroid.widget.EditText;
importandroid.widget.TextView;
publicclassMainActivityextendsActivity {
privateEditText phoneSecEditText;
privateTextView resultView;
privateButton queryButton;
@Override
publicvoidonCreate(Bundle savedInstanceState) {
super.onCreate(savedInstanceState);
setContentView(R.layout.main);
phoneSecEditText = (EditText) findViewById(R.id.phone_sec);
resultView = (TextView) findViewById(R.id.result_text);
queryButton = (Button) findViewById(R.id.query_btn);
queryButton.setOnClickListener(newOnClickListener() {
@Override
publicvoidonClick(View v) {
// 手機號碼(段)
String phoneSec = phoneSecEditText.getText().toString().trim();
// 簡單判斷用戶輸入的手機號碼(段)是否合法
if("".equals(phoneSec) || phoneSec.length() <7) {
// 給出錯誤提示
phoneSecEditText.setError("您輸入的手機號碼(段)有誤!");
phoneSecEditText.requestFocus();
// 將顯示查詢結果的TextView清空
resultView.setText("");
return;
}
// 查詢手機號碼(段)信息
getRemoteInfo(phoneSec);
}
});
}
publicvoidgetRemoteInfo(String phoneSec) {
// 命名空間
String nameSpace = "http://WebXml.com.cn/";
// 調用的方法名稱
String methodName = "getMobileCodeInfo";
// EndPoint
String endPoint = "http://webservice.webxml.com.cn/WebServices/MobileCodeWS.asmx";
// SOAP Action
String soapAction = "http://WebXml.com.cn/getMobileCodeInfo";
// 指定WebService的命名空間和調用的方法名
SoapObject rpc = newSoapObject(nameSpace, methodName);
// 設置需調用WebService接口需要傳入的兩個參數mobileCode、userId
rpc.addProperty("mobileCode", phoneSec);
rpc.addProperty("userId","");
// 生成調用WebService方法的SOAP請求信息,並指定SOAP的版本
SoapSerializationEnvelope envelope = newSoapSerializationEnvelope(SoapEnvelope.VER10);
envelope.bodyOut = rpc;
// 設置是否調用的是dotNet開發的WebService
envelope.dotNet = true;
// 等價於envelope.bodyOut = rpc;
envelope.setOutputSoapObject(rpc);
HttpTransportSE transport = newHttpTransportSE(endPoint);
try{
// 調用WebService
transport.call(soapAction, envelope);
} catch(Exception e) {
e.printStackTrace();
}
// 獲取返回的數據
SoapObject object = (SoapObject) envelope.bodyIn;
// 獲取返回的結果
String result = object.getProperty(0).toString();
// 將WebService返回的結果顯示在TextView中
resultView.setText(result);
}
}
講解:
注意點1:如代碼中的62-69行所示,調用Web Service之前你需要先弄清楚這4個的值分別是什麼:命名空間、調用的方法名稱、EndPoint和SOAP Action。當在瀏覽器中訪問WSDL時,很容易得知命名空間、調用的方法名稱是什麼(不明白的請看上篇文章),至於EndPoint通常是將WSDL地址末尾的"?wsdl"去除後剩餘的部分;而SOAP Action通常爲命名空間 + 調用的方法名稱。
注意點2:75-76行是設置調用WebService接口方法需要傳入的參數。(在WSDL中能夠看到調用方法需要傳入的參數個數及參數名稱,在設置參數時最好指明每一個傳入參數的名稱,如本例中的mobileCode、userId。網上有些資料說在需要傳入多個參數時,只要多個參數的順序與WSDL中參數出現的順序一致即可,名稱並不需要和WSDL中的一致,但實際測試發現,大多數情況下並不可行!)
例如下面圖版上顯示的WSDL片段,調用該Web Service的checkUserInfo方法就需要傳入4個參數,參數名稱分別爲:in0、in1、in2和in3。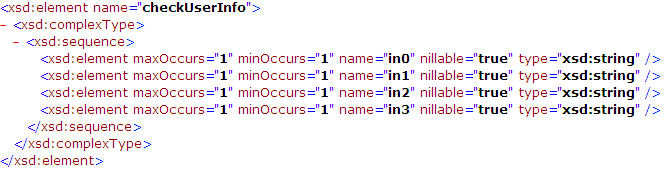
注意點3:也許你會對第100行代碼產生疑惑,爲什麼要用object.getProperty("getMobileCodeInfoResult")來取得調用結果?那是因爲WSDL中明確告訴了返回結果是String數組,它的名稱爲getDatabaseInfoResult,WSDL中的描述如下:
<s:elementminOccurs="0"maxOccurs="1"name="getDatabaseInfoResult"type="tns:ArrayOfString"/>
本例中調用WebService後返回的結果如下所示:
<?xml version="1.0" encoding="utf-8"?>
<stringxmlns="http://WebXml.com.cn/">1398547:貴州貴陽 貴州移動黔中游卡</string>
咦,這裏明明返回的是xml格式的內容,爲什麼我們不需要通過解析xml來獲取我們需要的內容呢?其實如果你仔細看代碼中的96-97行並不難發現:
// 獲取返回的數據
SoapObject object = (SoapObject) envelope.bodyIn;
ksoap2能夠將返回的xml轉換成SoapObject對象,然後我們就可以通過操作對象的方式來獲取需要的數據了。
注意點4:同樣還是第100行代碼。從有些WSDL中我們並不能得知返回結果的名稱(如本例中的getMobileCodeInfoResult),那又該如何調用呢?其實上面已經暗示了這個問題:當通過第97行代碼獲取返回結果並將其轉換成SoapObject對象後,如果你並不知道通過該對象的哪個屬性來取值,你完全可以調用對象的toString()方法來查看返回的內容,例如將本例中的第100行代碼替換成:
// 獲取返回的結果
String result = object.toString();
這樣得到的返回結果爲:
注意看括號{}裏面的內容是一個鍵-值對形式,以等號=分隔,我們正是通過=號左邊的“getMobileCodeInfoResult”來獲取右邊的查詢結果。
其實在不知道返回結果名稱時(如本例的100行,我們並不知道返回結果中有屬性getMobileCodeInfoResult),有一種更爲簡便的方法,直接通過索引下標來獲取屬性值,也就是將第100行代碼替換爲:
String result = object.getProperty(0).toString();
注意點5:本例中只返回了一個值,但有些WebService會返回多個值該怎麼獲取?獲取方法與本例完全一樣,只是需要注意的是如果是返回多個值,通過第100代碼object.getProperty(0);得到的可能仍然是一個SoapObject。不斷地調用getProperty()方法;總能得到你想要的全部結果。
注意點6:在調用某些WebService時,可能會報一些異常,但你又發現除了調用的WebService不同之外,其它地方的寫法和我的完全一樣,這又該如何解決呢?嘗試改變第79代碼中SOAP的版本號,可以分別嘗試使用SoapEnvelope.VER10、SoapEnvelope.VER11、SoapEnvelope.VER12這樣三個值。另外,在調用某些WebService時,可能在第91行代碼中,調用WebService時並不需要傳入soapAction,將其置爲null即可。
4)在AndroidManifest.xml中配置添加訪問網絡的權限(千萬別忘記!!!)
<?xmlversion="1.0"encoding="utf-8"?>
<manifestxmlns:android="http://schemas.android.com/apk/res/android"
package="com.liufeng.ws.activity"
android:versionCode="1"
android:versionName="1.0">
<applicationandroid:icon="@drawable/icon"android:label="@string/app_name">
<activityandroid:name=".MainActivity"android:label="@string/app_name">
<intent-filter>
<actionandroid:name="android.intent.action.MAIN"/>
<categoryandroid:name="android.intent.category.LAUNCHER"/>
</intent-filter>
</activity>
</application>
<uses-sdkandroid:minSdkVersion="4"/>
<!-- 訪問網絡的權限 -->
<uses-permissionandroid:name="android.permission.INTERNET"/>
</manifest>
5)運行結果