一、ansible简介
ansible是2012年出现的自动运维工具,基于python开发,集合了众多工具的优点,可以实现批量系统配置、批量程序部署、批量运行命令、批量配置文件修改等功能。最主要的是ansible是基于多模块工作的,而且ansible是无需客户端安装就可以基于ssh实现管理节点的,是轻量级的自动化运维工具,ansible是个框架,主要包括以下几个组件:
(1)、连接插件connection plugins:负责和被监控端实现通信;
(2)、host inventory:设置管理的节点,可以在一个配置文件中定义;
(3)、各种模块:core modules、customer modules、自定义模块(可自行使用python开发);
(4)、plugins:借助于插件完成记录email、logging、other;
(5)、playbook:剧本执行多个任务时,可以让管理节点一次性运行多个任务,可使用yaml语言编写。
二、ansible基本用法介绍
2.1、介绍基本用法,首选安装ansible程序包,这里介绍ansible-1.9.2版本,yum源要指向epel源
# yum install ansible            //安装ansible
# rpm -ql ansible             //查看ansible安装后生成的所有文件(这里只介绍几个常用的)
/etc/ansible/hosts           //设置要管理的节点
/usr/bin/ansible            //ansible的二进制程序
/usr/bin/ansible-doc           // 可通过它查看ansible支持的模块及对应模块的参数
/usr/bin/ansible-playbook       //剧本(playbook)执行的二进制程序
2.2、基本用法及模块的介绍
2.2.1、首先要配置/etc/ansible/hosts文件来设置要管理的节点
# vim /etc/ansible/hosts     //这里所做的配置,是为下面介绍高可用集群做的准备工作
[ha]                        //类似ini,定义管理节点名
172.16.116.231               //各管理节点的ip地址或主机名
172.16.116.232
172.16.116.233
2.2.2、ansible使用的基本语法
   # man ansible               //查看ansible工具的man文档
   ansible <host-pattern> [-f forks] [-m module_name] [-a args]
 host-pattern: 是指那些在/etc/ansible/hosts中定义的管理节点
 -f forks: 是指ansible一批可以管理的节点数量,默认为5个
 -m module_name : 是指使用ansible工具时使用的模块名称
 -a args : 使用模块对应的参数
2.2.3、ansible常用的模块介绍(这里只介绍几种,其它的靠大家去研究了)
介绍之前先介绍2个命令如下:
# ansible-doc -l      //可以列出ansible支持的所有模块
# ansible-doc -s module_name   //可以查看模块的对应参数
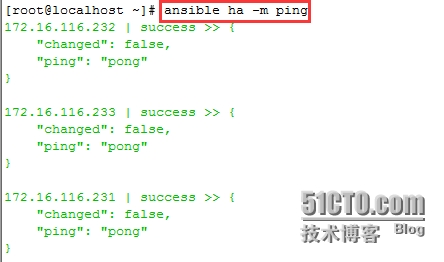
(1)ping ping模块,用法很简单
(2)command 命令模块
(3)shell shell模块
注:command有可能不支持特殊的命令行处理,如管道echo "pass" | passwd --stdin user
我个人理解是:使用command的地方,都可以使用shell来代替,避免出现问题
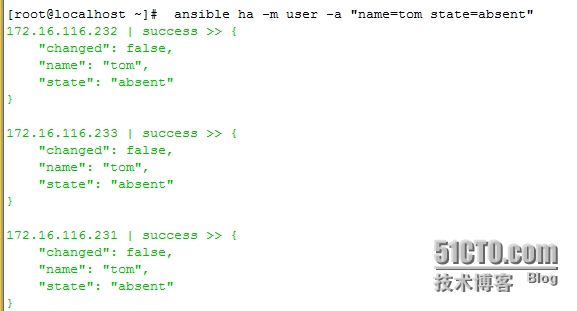
(4)user 用户管理模块
# ansible-doc -s user         //查看user模块支持的参数 介绍几个常用的
comment     //用户描述
group       //用户所属组
home       //用户家目录
name=      //用户名,这个最关键
password    //给用户设置密码,但是写入到/etc/shadow中的密码为明文的,有可能不让登录(别用)
shell        //默认shell
state={present,absent}    //创建,删除用户
system={yes,no}        //是否为系统用户,默认为no
uid            //用户的id号
(5)group 组管理模块
# ansible-doc -s group
gid       //组的id号
name=     //组名
state={present,absent}   //创建,删除
system={yes,no}     //是否为系统组
(6)cron 计划任务模块
# ansible-doc -s cron
minute    //分 (0-59)
hour      //时 (0-23)
day       //日 (1-31)
month      //月   (1-12)
weekday     //周  (0-6 for Sunday-Saturday)
name=       //任务计划的名称
job=       //定义任务计划使用的命令
state={present,absent}     //创建,删除任务计划
user        //给哪个用户的任务计划
例:# ansbile ha -m cron -a  'name="sync time from 172.16.0.1" minute="*/5" job="/usr/sbin/ntpdate 172.16.0.1 &> /dev/null"'      //同步时间的计划任务,每5分钟执行一次

[root@node1 ~]# crontab -l            //查看管理节点上的计划任务
#Ansible: sync time from 172.16.0.1
*/5 * * * * /usr/sbin/ntpdate 172.16.0.1 &> /dev/null
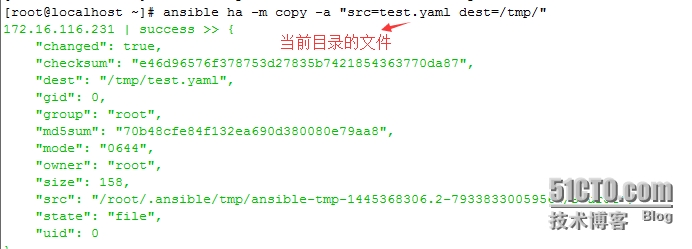
(7)copy 复制模块
# ansible-doc -s copy
dest=        //目标目录,要使用绝对路径
src          //源文件
mode          //文件的权限
owner        //文件的属主
group        //文件的属组
force=yes       //是否强制覆盖
(8)file 文件管理模块
# ansible-doc -s file
group          //属组
mode          //权限
owner        //属主
path=       //目标路径;管理节点的对应文件路径
src       //源文件
state={directory,link,present,absent}   //目录,链接,创建,删除
(9)yum 安装软件包模块
# ansible-doc -s yum
 name=                      //要安装的软件包名
 state={present,latest,absent}         //安装,最新的,删除
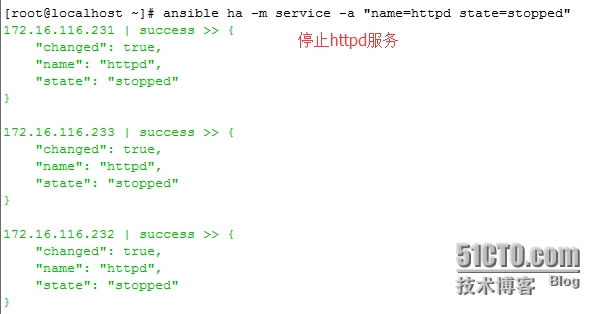
(10)service 服务管理模块
# ansible-doc -s service
 name=                                       //服务名
 state={started,stopped,restarted,reloaded}       //启动,停止,重启,重载
 enabled={yes,no}                           //是否开启启动,默认为no
 runlevel                                   //运行级别
(11)script 脚本模块
# ansible-doc -s script //没有参数,直接在-a "脚本名(不用设置x权限)"
[root@localhost ~]# vim hello.sh
#!/bin/bash
echo "$(hostname):hello,ansible"
至此,几种常用模块的使用方法介绍完毕!
2.3、playbook简单介绍
playbook是由一个或多个“play”组成的列表。play的主要功能在于将事先归并为一组的主机装扮成事先通过ansible中的tasks定义好的角色。
- hosts: all              //管理节点,可以为多个
  remote_user: root       //执行操作的用户
  tasks:               //定义的任务
    - name: ensure apache latest version     //安装httpd软件包
      yum: state=latest name=httpd
    - name: apache configure file     //复制httpd的配置文件到管理的节点
      copy: src=/root/httpd.conf dest=/etc/httpd/conf/httpd.conf force=yes
      notify:              //如果配置文件改变,执行httpd重启
        - restart httpd
  handlers:                  //定义处理器
    - name: restart httpd        //重启httpd服务
      service: name=httpd state=restarted
三、corosync
corosync是集群管理套件的一部分,它可以监控和传递集群各节点的心跳信息及集群事务信息,工作在高可用集群的messaging layer层,是从OpenAIS中分离出来的组件
四、pacemaker
pacemaker是高可用集群的资源管理器(CRM),利用集群基础构件(OpenAIS或heartbeat)提供的消息和管理能力来探测并从节点或资源级别的故障中恢复,以实现群集服务(亦称资源)的最大可用性。可结合corosync来实现高可用服务。
五、使用ansible自动化,基于pcs实现httpd的高可用
测试环境:centos 7 ,使用pcs/pcsd来完成corosync+pacemaker对http服务的高可用
规划:定义3个roles
(1)initial:要管理节点的初始化工作,同步时间,主机名解析
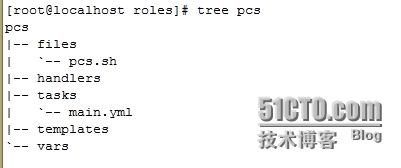
(2)pcs:相关的设置工作,如安装corosync+pacemaker,定义集群的资源
(3)httpd:安装httpd服务,定义不同节点的index.html,为测试使用,生产环境不需要
(1)先看initial角色的设置
其中tasks/main.yml内容:
- name: install ntpdate packages         //安装ntpdate包
  yum: name=ntpdate state=present
- name: cron sync time from 172.16.0.1
  cron: name="sync time from 172.16.0.1" minute="*/5" job="/usr/sbin/ntpdate 172.16.0.1 &> /dev/null"      //设置计划任务
- name: copy /initial/template/hosts to node1 node2 node3
  template: src=hosts dest=/etc/hosts        //使用模板,主机名解析

templates/hosts内容:
172.16.116.231 node1
172.16.116.232 node2
172.16.116.233 node3
(2)pcs角色设置
查看files/pcs.sh 的内容,是个脚本,在创建完高可用集群后执行定义资源的操作

#!/bin/bash

# set stonith_enabled=false
pcs property set stonith-enabled=false            //不使用stonith设备

# define webip resource
pcs resource create webip ocf:heartbeat:IPaddr ip="172.16.16.40" op monitor interval=20s timeout=10s                               //定义webip资源
# define webserver resource              //定义httpd资源
pcs resource create webserver systemd:httpd op monitor interval=20s timeout=20s
# define group resource
pcs resource group add webservice webip webserver     //将webip和httpd定义为同一个组资源
#define constraint
#pcs constraint colocation add webserver with webip //定义排列约束,如果不定义组,可以使用
pcs constraint order start webip then webserver    //定义顺序约束,webip先启动


#define constraint
pcs constraint order webip then webserver //定义顺序约束


查看tasks/main.yml内容

- name: install pcs | pacemaker | corosync | packages      //安装pcs
  yum: name=pcs state=present
- name: service pcsd start
  service: name=pcsd state=started enabled=yes              //开机自动启动pcsd
- name: passwd hacluster
  shell: echo 'hapassword' | passwd --stdin hacluster       //给hacluster设置密码
- name: delete corosync configure file
  shell: rm -rf /etc/corosync/corosync.conf
- name: delete pacemaker cib.xml file
  shell: rm -rf /var/lib/pacemaker/cib/cib.xml
- name: auth corosync
  shell: pcs cluster auth node1 node2 node3 -u hacluster -p hapassword    //集群节点认证
- name: create a ha_cluster
  shell: pcs cluster setup --name hac node1 node2 node3     //将node[1:3]创建为高可用集群
- name: start cluster
  shell: pcs cluster start --all                //启动集群
- name: define cluster resources        //使用上面的脚本定义集群资源
  script: pcs.sh
  when: ansible_hostname == "node1"    //当主机名为node1的时候执行pcs.sh脚本
  tags: resource                //设定标签,如果资源改变,只需执行这步
(3)httpd角色相关设置;定义的还是比较简单的,比如httpd配置文件的模板应该提供等,大家在这个基础上做相应的完善即可
- name: install httpd package        //安装httpd软件包
  yum: name=httpd state=present
- name: define node1 index.html    //给不同节点设置不同主页,以方便测试使用
  shell: echo {{ ansible_hostname }} > /var/www/html/index.html
  when: ansible_hostname == "node1"
- name: define node2 index.html
  shell: echo {{ ansible_hostname }} > /var/www/html/index.html
  when: ansible_hostname == "node2"
- name: define node3 index.html
  shell: echo {{ ansible_hostname }} > /var/www/html/index.html
  when: ansible_hostname == "node3"
- name: enabled service httpd            //不启动httpd,只是将httpd设置为开机自启
  service: name=httpd enabled=yes      //centos7只能这样操作,否则找不到systemd.httpd
(4) roles设置完成,最后定义playbook
- hosts: ha                //执行此操作的节点
  remote_user: root        //执行的用户,当然可以使用具有管理员权限的sudo用户
  roles:                  //上面的3个roles
    - initial
    - httpd
    - pcs
(5)执行playbook并测试
[root@localhost corosync]# ansible-playbook corosync1.yml

PLAY [ha] *********************************************************************

GATHERING FACTS ***************************************************************
ok: [172.16.116.231]
ok: [172.16.116.232]
ok: [172.16.116.233]

TASK: [initial | install ntpdate packages] ************************************
ok: [172.16.116.232]
ok: [172.16.116.231]
ok: [172.16.116.233]

TASK: [initial | cron sync time from 172.16.0.1] ******************************
ok: [172.16.116.231]
ok: [172.16.116.232]
ok: [172.16.116.233]

TASK: [initial | copy /initial/template/hosts to node1 node2 node3] ***********
ok: [172.16.116.232]
ok: [172.16.116.231]
ok: [172.16.116.233]

TASK: [httpd | install httpd package] *****************************************
ok: [172.16.116.231]
ok: [172.16.116.233]
ok: [172.16.116.232]

TASK: [httpd | define node1 index.html] ***************************************
skipping: [172.16.116.232]
skipping: [172.16.116.233]
changed: [172.16.116.231]

TASK: [httpd | define node2 index.html] ***************************************
skipping: [172.16.116.231]
skipping: [172.16.116.233]
changed: [172.16.116.232]

TASK: [httpd | define node3 index.html] ***************************************
skipping: [172.16.116.231]
skipping: [172.16.116.232]
changed: [172.16.116.233]

TASK: [httpd | enabled service httpd] *****************************************
ok: [172.16.116.231]
ok: [172.16.116.232]
ok: [172.16.116.233]

TASK: [pcs | install pcs | pacemaker | corosync | packages] *******************
ok: [172.16.116.231]
ok: [172.16.116.233]
ok: [172.16.116.232]

TASK: [pcs | service pcsd start] **********************************************
ok: [172.16.116.232]
ok: [172.16.116.231]
ok: [172.16.116.233]

TASK: [pcs | passwd hacluster] ************************************************
changed: [172.16.116.232]
changed: [172.16.116.231]
changed: [172.16.116.233]

TASK: [pcs | delete corosync configure file] **********************************
changed: [172.16.116.232]
changed: [172.16.116.231]
changed: [172.16.116.233]

TASK: [pcs | delete pacemaker cib.xml file] ***********************************
changed: [172.16.116.231]
changed: [172.16.116.233]
changed: [172.16.116.232]

TASK: [pcs | auth corosync] ***************************************************
changed: [172.16.116.233]
changed: [172.16.116.231]
changed: [172.16.116.232]

TASK: [pcs | create a ha_cluster] *********************************************
changed: [172.16.116.231]
changed: [172.16.116.232]
changed: [172.16.116.233]

TASK: [pcs | start cluster] ***************************************************
changed: [172.16.116.231]
changed: [172.16.116.232]
changed: [172.16.116.233]

TASK: [pcs | define cluster resources] ****************************************
skipping: [172.16.116.232]
skipping: [172.16.116.233]
changed: [172.16.116.231]

PLAY RECAP ********************************************************************
172.16.116.231             : ok=16   changed=8    unreachable=0    failed=0
172.16.116.232             : ok=15   changed=7    unreachable=0    failed=0
172.16.116.233             : ok=15   changed=7    unreachable=0    failed=0
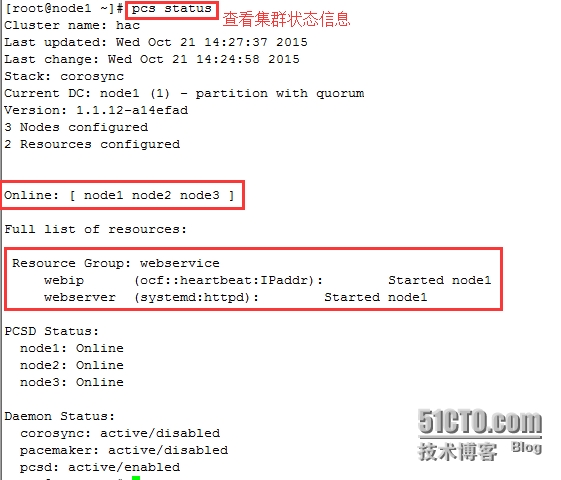
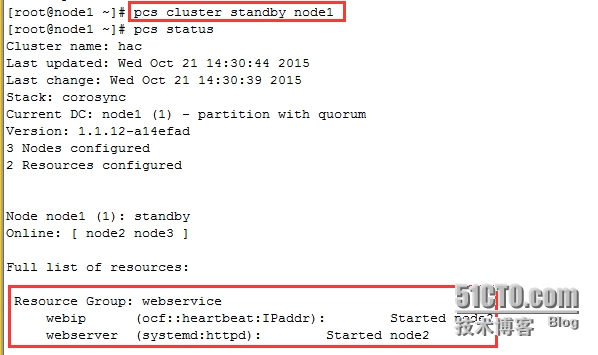
#将node1节点设置为备用,查看集群服务是否可用
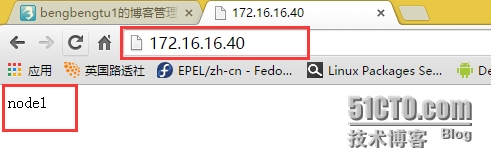
可以看到服务还可以正常访问,至此基于ansible自动化使用pcs/pcsd配置corosync+pacemaker实现httpd的过程演示完成!
下面的是自动生成的corosync的配置文件
[root@node1 ~]# vim /etc/corosync/corosync.conf

totem {
version: 2           //版本
secauth: off            //
cluster_name: hac      //集群名
transport: udpu       //使用udpu协议
}

nodelist {             //集群节点列表,3个
  node {
        ring0_addr: node1
        nodeid: 1
       }
  node {
        ring0_addr: node2
        nodeid: 2
       }
  node {
        ring0_addr: node3
        nodeid: 3
       }
}

quorum {               //投票系统
provider: corosync_votequorum

}

logging {             //日志
to_syslog: yes
}
ok!!介绍完毕!O(∩_∩)O谢谢~~

