#===========================安裝 Nagios ========================================
groupadd nagios
groupadd nagios
useradd nagios -g nagios -d /usr/local/nagios
chown nagios.nagios /usr/local/nagios/
chmod 755 /usr/local/nagios
wget http://osdn.dl.sourceforge.net/sourceforge/nagios/nagios-3.0.2.tar.gz
tar -zxvf nagios-3.0.2.tar.gz
cd nagios-3.0.2
./configure --with-command-group=nagcmd
make all
make install
make install-init
make install-config
make install-commandmode
groupadd nagios
groupadd nagios
useradd nagios -g nagios -d /usr/local/nagios
chown nagios.nagios /usr/local/nagios/
chmod 755 /usr/local/nagios
wget http://osdn.dl.sourceforge.net/sourceforge/nagios/nagios-3.0.2.tar.gz
tar -zxvf nagios-3.0.2.tar.gz
cd nagios-3.0.2
./configure --with-command-group=nagcmd
make all
make install
make install-init
make install-config
make install-commandmode
創建一個web頁面登陸用戶,在htppasswd.users裏面可以看到用戶名。
/usr/local/apache2/bin/htpasswd -c /usr/local/nagios/etc/htpasswd.users nagiosadmin
#編輯httpd.conf配置文件
ScriptAlias /nagios/cgi-bin "/usr/local/nagios/sbin"
#編輯httpd.conf配置文件
ScriptAlias /nagios/cgi-bin "/usr/local/nagios/sbin"
<Directory "/usr/local/nagios/sbin">
# SSLRequireSSL
Options ExecCGI
AllowOverride None
Order allow,deny
Allow from all
# Order deny,allow
# Deny from all
# Allow from 127.0.0.1
AuthName "Nagios Access"
AuthType Basic
AuthUserFile /usr/local/nagios/etc/htpasswd.users
Require valid-user
</Directory>
# SSLRequireSSL
Options ExecCGI
AllowOverride None
Order allow,deny
Allow from all
# Order deny,allow
# Deny from all
# Allow from 127.0.0.1
AuthName "Nagios Access"
AuthType Basic
AuthUserFile /usr/local/nagios/etc/htpasswd.users
Require valid-user
</Directory>
Alias /nagios "/usr/local/nagios/share"
<Directory "/usr/local/nagios/share">
# SSLRequireSSL
Options None
AllowOverride None
Order allow,deny
Allow from all
# Order deny,allow
# Deny from all
# Allow from 127.0.0.1
AuthName "Nagios Access"
AuthType Basic
AuthUserFile /usr/local/nagios/etc/htpasswd.users
Require valid-user
</Directory>
# SSLRequireSSL
Options None
AllowOverride None
Order allow,deny
Allow from all
# Order deny,allow
# Deny from all
# Allow from 127.0.0.1
AuthName "Nagios Access"
AuthType Basic
AuthUserFile /usr/local/nagios/etc/htpasswd.users
Require valid-user
</Directory>
#重啓apache
killall httpd
killall httpd
#============================安裝nagios plugins=========================
wget plugins下載。
tar -zxvf nagios-plugins-1.4.11.tar.gz
cd nagios-plugins-1.4.11
./configure --prefix=/usr/local/nagios --with-nagios-user=nagios --with-nagios-gourp=nagios --with-mysql=/usr/local/mysql5/ --enable-perl-modules
make
make install
wget plugins下載。
tar -zxvf nagios-plugins-1.4.11.tar.gz
cd nagios-plugins-1.4.11
./configure --prefix=/usr/local/nagios --with-nagios-user=nagios --with-nagios-gourp=nagios --with-mysql=/usr/local/mysql5/ --enable-perl-modules
make
make install
#配置和啓動nagios
/usr/local/nagios/bin/nagios -v /usr/local/nagios/etc/nagios.cfg
/usr/local/nagios/bin/nagios -v /usr/local/nagios/etc/nagios.cfg
#如果提示“Whoops! Error: Could not read object configuration data! ”,這是因爲沒有啓動nagios後臺進程,執行以下命令
/usr/local/nagios/bin/nagios -d /usr/local/nagios/etc/nagios.cfg
/usr/local/nagios/bin/nagios -d /usr/local/nagios/etc/nagios.cfg
#=============================安裝nrpe 插件==============================
#對遠程一臺linux主機進行監控
#監控服務器上安裝nrpe
wget http://www.mirrors.wiretapped.net/security/network-monitoring/nagios/nrpe-2.8.1.tar.gz
#監控主機上安裝方法
tar -zxvf nrpe-2.8.1.tar.gz
cd nrpe-2.8.1
./configure
make all
make install
make install-plugin ---監控機需要安裝check_nrpe這個插件,被監控機並不需要
##########################################################################
#被監控主機上安裝方法
useradd nagios -d /usr/local/nagios
chown nagios.nagios /usr/local/nagios/
tar -zxvf nagios-plugins-1.4.11.tar.gz
cd nagios-plugins-1.4.11
./configure --enable-perl-modules --with-ping-command=ping
make
make install
cd /opt
tar -zxvf nrpe-2.8.1.tar.gz
cd nrpe-2.8.1
./configure
make all
make install
make install-plugin
make install-daemon
make install-daemon-config
tar -zxvf nrpe-2.8.1.tar.gz
cd nrpe-2.8.1
./configure
make all
make install
make install-plugin
make install-daemon
make install-daemon-config
vi /usr/local/nagios/etc/nrpe.conf
allowed_hosts=192.168.8.150
#爲了監控swap在nrpe.cfg中添加
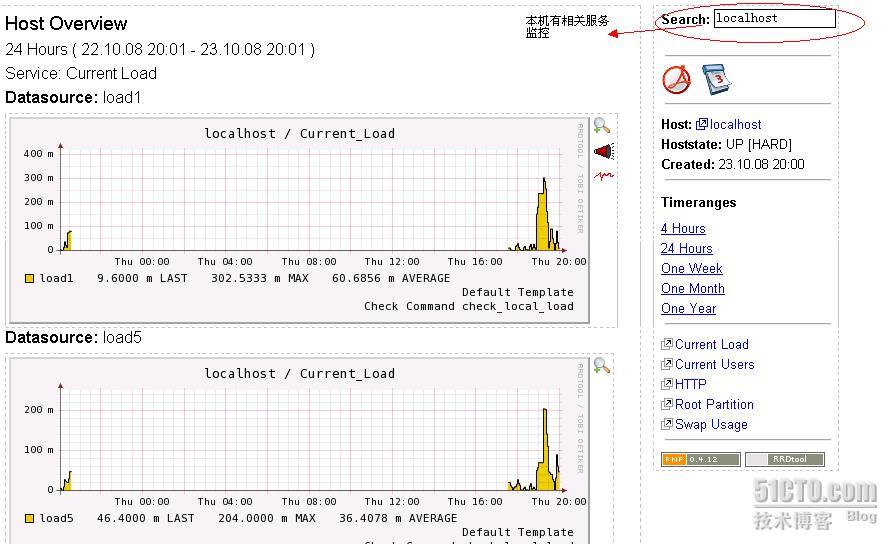
command[check_swap]=/usr/local/nagios/libexec/check_swap -w 20% -c 10%
command[check_sda1]=/usr/local/nagios/libexec/check_disk -w 20 -c 10 -p /dev/sda1
#sdb1可根椐實際情況更改,我這裏的硬盤類型是scsi
vi /etc/services
#增加nrpe
nrpe 5666/tcp # nrpe
#啓動nrpe
/usr/local/nagios/bin/nrpe -c /usr/local/nagios/etc/nrpe.cfg -d
#增加nrpe
nrpe 5666/tcp # nrpe
#啓動nrpe
/usr/local/nagios/bin/nrpe -c /usr/local/nagios/etc/nrpe.cfg -d
netstat -at|grep nrpe
netstat -an|grep 5666
netstat -an|grep 5666
#############################################################################
#再對監控服務器進行設置
#添加nrpe的定義
vi /usr/local/nagios/etc/objects/commands.cfg
# 'check_nrpe ' command definition
define command{
command_name check_nrpe
command_line $USER1$/check_nrpe -H $HOSTADDRESS$ -c $ARG1$
}
#再對監控服務器進行設置
#添加nrpe的定義
vi /usr/local/nagios/etc/objects/commands.cfg
# 'check_nrpe ' command definition
define command{
command_name check_nrpe
command_line $USER1$/check_nrpe -H $HOSTADDRESS$ -c $ARG1$
}
vi /usr/local/nagios/etc/cgi.cfg
把use_authentication=1修改爲use_authentication=0如果出現頁面無法顯示之類的
authorized_for_system_commands=nagiosadmin,kerry --kerry爲http訪問授權用戶
authorized_for_all_services=nagiosadmin,kerry
authorized_for_all_hosts=nagiosadmin,kerry
authorized_for_all_service_commands=nagiosadmin,kerry
authorized_for_all_host_commands=nagiosadmin,kerry
#測試NRPE是否則正常工作
/usr/local/nagios/libexec/check_nrpe -H localhost
/usr/local/nagios/libexec/check_nrpe -H localhost
killall nagios
/usr/local/nagios/bin/nagios -d /usr/local/nagios/etc/nagios.cfg
/usr/local/nagios/bin/nagios -d /usr/local/nagios/etc/nagios.cfg
echo "/usr/local/nagios/bin/nrpe -c /usr/local/nagios/etc/nrpe.cfg –d" >> /etc/rc.local
ehco "/usr/local/nagios/bin/nagios -d /usr/local/nagios/etc/nagios.cfg" >>/etc/rc.local
ehco "/usr/local/nagios/bin/nagios -d /usr/local/nagios/etc/nagios.cfg" >>/etc/rc.local
#問題:notifications for this service have been disabled
#解決辦法:enable notifications for this service
#解決辦法:enable notifications for this service
#問題:Status Map頁面無法顯示
#解決方法:ln -s /usr/local/lib/libgd.so.2 /usr/lib/libgd.so.2
#解決方法:ln -s /usr/local/lib/libgd.so.2 /usr/lib/libgd.so.2
vi /usr/local/nagios/etc/nagios.cfg
#添加
cfg_file=/usr/local/nagios/etc/objects/emos-mailserver.cfg
#emos-mailserver.cfg這個文件名可以自定義
#添加
cfg_file=/usr/local/nagios/etc/objects/emos-mailserver.cfg
#emos-mailserver.cfg這個文件名可以自定義
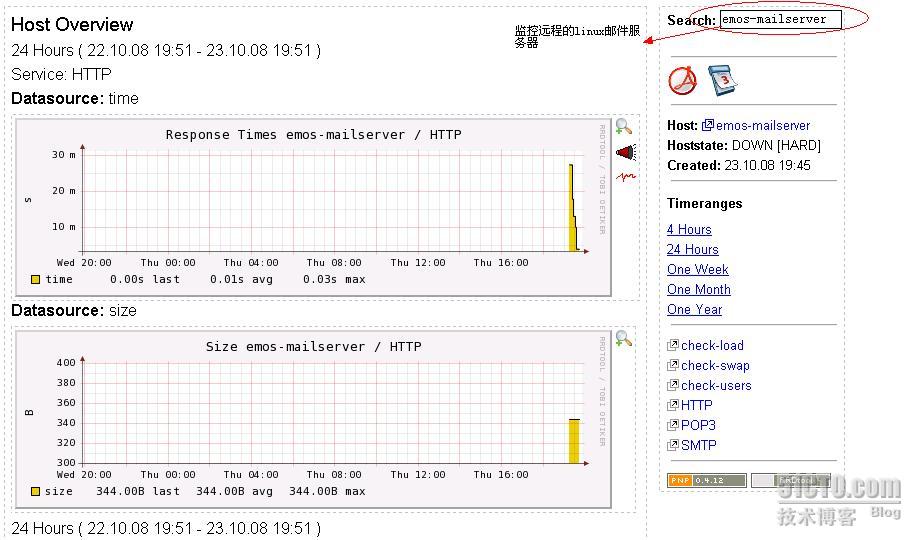
#對剛定義的emos-mailserver.cfg文件進行配置
vi /usr/local/nagios/etc/objects/emos-mailserver.cfg
define host{
use linux-server
host_name emos-mailserver
alias emos-mailserver
address 192.168.8.151
}
define service{
use generic-service
host_name emos-mailserver
service_description HTTP
check_command check_http
}
define service{
use generic-service
host_name emos-mailserver
service_description SSH
check_command check_ssh
}
define service{
use generic-service
host_name emos-mailserver
service_description SMTP
check_command check_smtp
}
use generic-service
host_name emos-mailserver
service_description SMTP
check_command check_smtp
}
define service{
use generic-service
host_name emos-mailserver
service_description POP3
check_command check_pop
}
#define service{
# use generic-service
# host_name emos-mailserver
# service_description mysql
# check_command check_mysql
# }
define service{
use generic-service
host_name emos-mailserver
service_description check-swap
check_command check_nrpe!check_swap
}
define service{
use generic-service
host_name emos-mailserver
service_description check-load
check_command check_nrpe!check_load
use generic-service
host_name emos-mailserver
service_description POP3
check_command check_pop
}
#define service{
# use generic-service
# host_name emos-mailserver
# service_description mysql
# check_command check_mysql
# }
define service{
use generic-service
host_name emos-mailserver
service_description check-swap
check_command check_nrpe!check_swap
}
define service{
use generic-service
host_name emos-mailserver
service_description check-load
check_command check_nrpe!check_load
}
define service{
use generic-service
host_name emos-mailserver
service_description check-disk
check_command check_nrpe!check_sda1
}
use generic-service
host_name emos-mailserver
service_description check-disk
check_command check_nrpe!check_sda1
}
define service{
use generic-service
host_name emos-mailserver
service_description zombie_procs
check_command check_nrpe!check_zombie_procs
}
use generic-service
host_name emos-mailserver
service_description zombie_procs
check_command check_nrpe!check_zombie_procs
}
define service{
use generic-service
host_name emos-mailserver
service_description check-users
check_command check_nrpe!check_users
}
use generic-service
host_name emos-mailserver
service_description check-users
check_command check_nrpe!check_users
}
define service{
use generic-service
host_name emos-mailserver
service_description total_procs
check_command check_nrpe!check_total_procs
#配置完後,重啓nagios
killall nagios
service nagios start
pstree |grep nagios
use generic-service
host_name emos-mailserver
service_description total_procs
check_command check_nrpe!check_total_procs
#配置完後,重啓nagios
killall nagios
service nagios start
pstree |grep nagios


#=============================安裝 pnp===============================================
cd /opt
tar zxvf pnp-0.4.12.tar.gz
cd pnp-0.4.12
./configure --with-nagios-user=nagios \
--with-nagios-group-nagios \
--with-rrdtool=/usr/local/rrdtool/bin/rrdtool \
--with-perfdata-dir=/usr/local/nagios/share/perfdata
make
make all
make install
make install-config
make install-init
cd /opt
tar zxvf pnp-0.4.12.tar.gz
cd pnp-0.4.12
./configure --with-nagios-user=nagios \
--with-nagios-group-nagios \
--with-rrdtool=/usr/local/rrdtool/bin/rrdtool \
--with-perfdata-dir=/usr/local/nagios/share/perfdata
make
make all
make install
make install-config
make install-init
#錯誤提示:RRDs Perl Modules: *** NOT FOUND ***
#解決方法:ln -sv /usr/local/rrdtool/lib/perl/5.8.8/i386-linux-thread-multi/auto/RRDs/RRDs.so /usr/lib/perl5/5.8.8/i386-linux-thread-multi/
#解決方法:ln -sv /usr/local/rrdtool/lib/perl/5.8.8/i386-linux-thread-multi/auto/RRDs/RRDs.so /usr/lib/perl5/5.8.8/i386-linux-thread-multi/
#要產生圖形數據還需在commands.cfg中重定義命令:
define command{
command_name process-service-perfdata
command_line /usr/local/nagios/libexec/process_perfdata.pl
}
define command{
command_name process-service-perfdata
command_line /usr/local/nagios/libexec/process_perfdata.pl
}
#產生圖形數據還要設定nagios.cfg文件:
process_performance_data=1
service_perfdata_command=process-service-perfdata
process_performance_data=1
service_perfdata_command=process-service-perfdata
#==========================監控遠程windows主機==================================
#監控windows服務器
wget [url]http://nchc.dl.sourceforge.net/sourceforge/nscplus/NSClient++-Win32-0.3.5.zip[/url]
解壓nsclient++0.3.3.zip到c盤根目錄
#監控windows服務器
wget [url]http://nchc.dl.sourceforge.net/sourceforge/nscplus/NSClient++-Win32-0.3.5.zip[/url]
解壓nsclient++0.3.3.zip到c盤根目錄
解壓爲C:\NSClient++
#在nagios監控服務器上
vi /usr/local/nagios/etc/nagios.cfg
cfg_file=/usr/local/nagios/etc/objects/windows.cfg 去掉這句話的註釋
vi /usr/local/nagios/etc/nagios.cfg
cfg_file=/usr/local/nagios/etc/objects/windows.cfg 去掉這句話的註釋
#到win服務器上,打開命令窗口,cd到剛纔解壓的目錄
#在命令行界面執行 nsclient++ /install

#然後 nsclient++ SysTray 如果出錯不用管!

#此時在“服務”裏面已經有了nsclient的服務
雙擊打開,點"登錄"標籤,在"允許服務與桌面交互"前打勾

#編輯NES.ini,在 [modules] 選項裏,去掉所有的註釋符號; 除了
CheckWMI.dll和RemoteConfiguration.dll
CheckWMI.dll和RemoteConfiguration.dll
#the [Settings] 選項裏
修改allowd_host=192.168.8.150(nagios服務器的ip)
#[NSClient] 裏面,去掉port=12489的註釋!他靠端口12489偵聽,所以防火牆要打開這個端口!
#[NSClient] 裏面,去掉port=12489的註釋!他靠端口12489偵聽,所以防火牆要打開這個端口!
在[Settings]部分設置'password'選項來設置密碼,作用是在nagios連接過來時要求提供密碼.這一步是可選的,我這裏方便起見跳過它,不要密碼.
#然後啓動nsclient
nsclient++ /start
nsclient++ /start
#接下來我們開始配置nagios服務器裏面的內容
vi /usr/local/nagios/etc/objects/windows.cfg
define host{
use windows-server
host_name winserver alias
My Windows Server
address 192.168.8.151 --windows服務器的IP地址
}
#修改hostname和address,很重要!!
#重新啓動監控服務器上的nagios
killall nagios
service nagios start
vi /usr/local/nagios/etc/objects/windows.cfg
define host{
use windows-server
host_name winserver alias
My Windows Server
address 192.168.8.151 --windows服務器的IP地址
}
#修改hostname和address,很重要!!
#重新啓動監控服務器上的nagios
killall nagios
service nagios start
#==============================安裝 sengEmail ==================================
#使用sendEmail發送報警郵件
cd /opt
wget [url]http://caspian.dotconf.net/menu/Software/SendEmail/sendEmail-v1.55.tar.gz[/url]
tar -zxvf sendEmail-v1.55.tar.gz
cd sendEmail-v1.55
cp sendEmail /usr/local/bin
chmod +x /usr/local/bin/sendEmail
#sendEmail使用方法
/usr/local/bin/sendEmail –f [email protected] –t [email protected] –s mail.3aaa.com –u “from nagios” –xu [email protected] –xp 11111 –m happy
#解釋:-f 表示發送者的郵箱
-t 表示接收者的郵箱
-s 表示SMTP服務器的域名或者ip
-u 表示郵件的主題
-xu 表示SMTP驗證的用戶名
-xp 表示SMTP驗證的密碼(注意,這個密碼貌似有限制,例如我用d!5neyland就不能被正確識別)
-m 表示郵件的內容如果你不帶-m參數的話,就會提示你自行輸入
#編輯配置文件,nagios使用sendEmail來發警告郵件
vi /usr/local/nagios/etc/objects/commands.cfg
# 'notify-host-by-email' command definition
define command{
command_name notify-host-by-email
command_line /usr/bin/printf "%b" "***** Nagios *****\n\nNotification Type: $NOTIFICATIONTYPE$\nHost: $HOSTNAME$\nState: $HOSTSTATE$\nAddress: $HOSTADDRESS$\nInfo: $HOSTOUTPUT$\n\nDate/Time: $LONGDATETIME$\n" | /usr/local/bin/sendEmail –f [email protected] –t $CONTACTEMAIL$ –s mail.3aaa.com –u "** $NOTIFICATIONTYPE$ Host Alert: $HOSTNAME$ is $HOSTSTATE$ **" –xu[email protected] –xp 11111
}
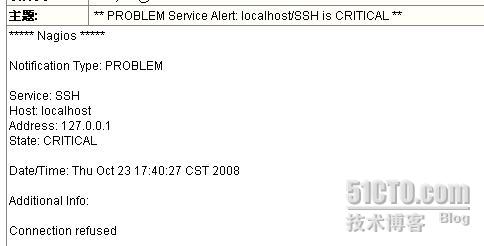
# 'notify-service-by-email' command definition
define command{
command_name notify-service-by-email
command_line /usr/bin/printf "%b" "***** Nagios *****\n\nNotification Type: $NOTIFICATIONTYPE$\n\nService: $SERVICEDESC$\nHost: $HOSTALIAS$\nAddress: $HOSTADDRESS$\nState: $SERVICESTATE$\n\nDate/Time: $LONGDATETIME$\n\nAdditional Info:\n\n$SERVICEOUTPUT$" | /usr/local/bin/sendEmail –f [email protected] –t $CONTACTEMAIL$ –s mail.3aaa.com –u "** $NOTIFICATIONTYPE$ Service Alert: $HOSTALIAS$/$SERVICEDESC$ is $SERVICESTATE$ **" –xu[email protected] –xp 111111
}
#注:在使用sendEmail的過程中無法發送報警郵件,不知是什麼原因,只好改用系統自帶的sendmail發郵件!!