簡介:
Squid反向代理: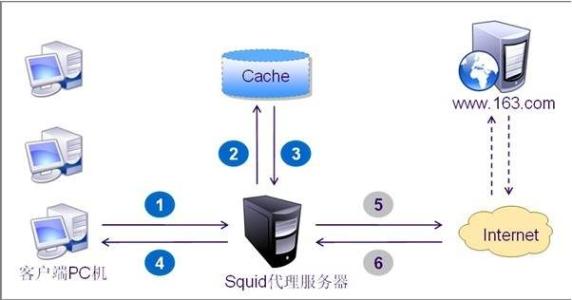
通過squid反向代理可以加速網站的訪問速度,可以將不同的URL請求分發到後臺不同的Web服務器上,同時互聯網用戶只能看到反向代理服務器的地址,加強了網站的訪問安全。
反向代理原理:
Web 服務器加速(反向代理)是針對Web 服務器提供加速功能的。它作爲代理Cache ,但並不針對瀏覽器用戶,而針對一臺或多臺特定Web 服務器(這也是反向代理名稱的由來)。實施反向代理,只要將Reverse Proxy Cache 設備放置在一臺或多臺Web 服務器前端即可。當互聯網用戶訪問某個WEB 服務器時,通過DNS 服務器解析後的IP 地址是Reverse Proxy Server 的IP 地址, 而非原始Web 服務器的IP 地址, 這時Reverse Proxy Server 設備充當Web 服務器,瀏覽器可以與它連接,無需再直接與Web 服務器相連。因此,大量Web 服務工作量被卸載到反向代理服務上。不但能夠防止外部網主機直接和web 服務器直接通信帶來的安全隱患,而且能夠很大程度上減輕web 服務器的負擔,提高訪問速度。
工作原理:
反向代理服務器位於本地WEB 服務器和Internet 之間,當用戶瀏覽器發出一個HTTP 請求時,通過域名解析將請求定向到反向代理服務器(如果要實現多個WEB 服務器的反向代理,需要將多個WEB 服務器的域名都指向反向代理服務器)。由反向代理服務器處理器請求。反向代理一般只緩存可緩衝的數據(比如html 網頁和圖片等),而一些CGI 腳本程序或者ASP 之類的程序不緩存。它根據從WEB 服務器返回的HTTP 頭標記來緩衝靜態頁面。有四個最重要HTTP 頭標記:
#Last-Modified: 告訴反向代理頁面什麼時間被修改
#Expires: 告訴反向代理頁面什麼時間應該從緩衝區中刪除
#Cache-Control: 告訴反向代理頁面是否應該被緩衝
#Pragma: 告訴反向代理頁面是否應該被緩衝
具體實驗步驟:
-------------------------手工編譯安裝squid-------------------------------------
[root@localhost ~]#mkdir /abc
[root@localhost ~]#mount.cifs //192.168.100.10/rhel7 /abc
[root@localhost ~]#cd /abc/Y2C7/
[root@localhost Y2C]#tar zxvf squid-3.5.23.tar.gz -C /opt/
[root@localhost Y2C]#cd /opt/
[root@localhost opt]# yum install gcc gcc-c++ make -y
----------------------------配置-------------------------------------------------
[root@localhost opt]# cd squid-3.5.23/
[root@localhost squid-3.5.23]# ./configure --prefix=/usr/local/squid \
--sysconfdir=/etc \
--enable-arp-acl \
--enable-linux-netfilter \
--enable-linux-tproxy \
--enable-async-io=100 \
--enable-err-language="Simplify_Chinese" \
--enable-underscore \
--enable-poll \
--enable-gnuregex
[root@localhost squid-3.5.23]# make && make install
[root@localhost squid-3.5.23]# ln -s /usr/local/squid/sbin/* /usr/local/sbin/
[root@localhost squid-3.5.23]# useradd -M -s /sbin/nologin squid
[root@localhost squid-3.5.23]# chown -R squid.squid /usr/local/squid/var/
[root@localhost squid-3.5.23]# vim /etc/squid.conf
#56行
http_access allow all #在http_access deny all上面插入
#61行
cache_effective_user squid #添加 指定程序用戶
#62行
cache_effective_group squid #添加 指定賬號基本組
[root@localhost squid-3.5.23]# squid -z #初始化緩存目錄
[root@localhost squid-3.5.23]# squid #啓動服務
[root@localhost squid-3.5.23]# netstat -ntap | grep 3128 #查看端口
tcp6 0 0 :::3128 :::* LISTEN 45271/(squid-1)
[root@localhost squid-3.5.23]# cd /etc/init.d/
[root@localhost init.d]# vim squid
#!/bin/bash
#chkconfig: 2345 90 25
PID="/usr/local/squid/var/run/squid.pid"
CONF="/etc/squid.conf"
CMD="/usr/local/squid/sbin/squid"
case "$1" in
start)
netstat -natp | grep squid &> /dev/null
if [ $? -eq 0 ]
then
echo "squid is running"
else
echo "正在啓動 squid..."
$CMD
fi
;;
stop)
$CMD -k kill &> /dev/null
rm -rf $PID &> /dev/null
;;
status)
[ -f $PID ] &> /dev/null
if [ $? -eq 0 ]
then
netstat -natp | grep squid
else
echo "squid is not running"
fi
;;
restart)
$0 stop &> /dev/null
echo "正在關閉 squid..."
$0 start &> /dev/null
echo "正在啓動 squid..."
;;
reload)
$CMD -k reconfigure
;;
check)
$CMD -k parse
;;
*)
echo "用法: $0{start|stop|status|reload|check|restart}"
;;
esac
------------------------傳統代理-------------------------------------------------
[root@localhost init.d]# chmod +x squid
[root@localhost init.d]# chkconfig --add squid
[root@localhost init.d]# chkconfig --level 35 squid on #開機自啓動
[root@localhost init.d]# service squid stop #關閉
[root@localhost init.d]# service squid start #開啓
[root@localhost init.d]# service squid check #檢查語法
[root@localhost init.d]# vim /etc/squid.conf
61 cache_mem 64 MB #指定緩存功能所使用的內存空間大小,便於保持訪問比較頻繁的WEB
對象,容量最好爲4的倍數,單位爲MB,建議設爲物理內存的1/4
62 reply_body_max_size 10 MB #允許用戶下載的最大文件大小(默認爲0,不進行限制)
63 maximum_object_size 4096 KB #允許保存到緩存空間的最大對象大小,以KB爲單位,超過
大小限制的文件將不被緩存,而是直接轉發給用戶
[root@localhost init.d]# service squid restart
正在關閉 squid...
正在啓動 squid...
[root@localhost init.d]# iptables -F
[root@localhost init.d]# setenforce 0
[root@localhost init.d]# iptables -I INPUT -p tcp --dport 3128 -j ACCEPT
----------------------------------------在第Web上操作-----------------------------------------------
[root@localhost ~]# systemctl stop firewalld.service
[root@localhost ~]# setenforce 0
[root@localhost ~]# yum install httpd -y
[root@localhost ~]# systemctl start httpd
------------------------------ACL訪問控制--------------------------------
[root@localhost init.d]# vim /etc/squid.conf
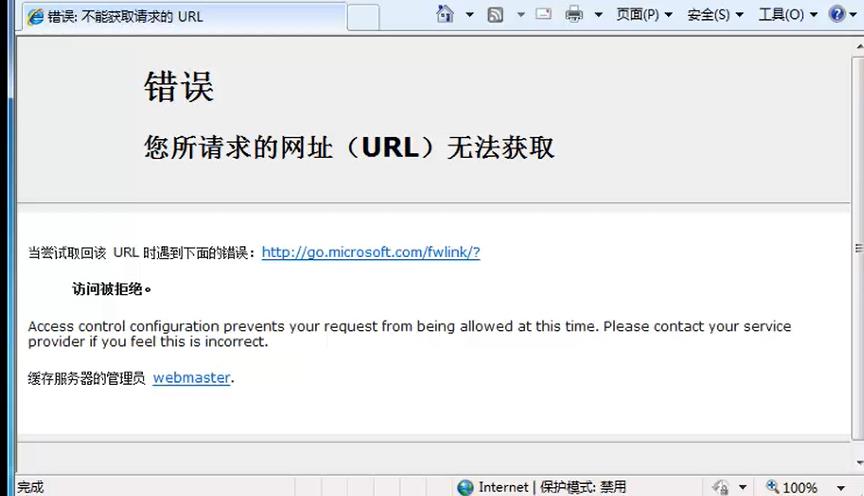
第8行 acl hostlocal src 192.168.120.128/32
第38行 http_access deny hostlocal
[root@localhost init.d]# service squid stop
[root@localhost init.d]# service squid start
正在啓動 squid...
[root@localhost init.d]# netstat -ntap | grep 3128
tcp6 0 0 :::3128 :::* LISTEN 45734/(squid-1)
----------------------------------Squid日誌分析------------------------------------
[root@localhost logs]# yum install gd gd-devel httpd -y
[root@localhost logs]# cd /abc/Y2C7/
[root@localhost Y2C7]# tar zxvf sarg-2.3.7.tar.gz -C /opt/
[root@localhost Y2C7]# cd /opt/
[root@localhost opt]# cd sarg-2.3.7/
[root@localhost sarg-2.3.7]# ./configure \
--prefix=/usr/local/sarg \
--sysconfdir=/etc/sarg \
--enable-extraprotection #額外安全防護
#參數詳解
prefix #指定配置文件安裝路徑
sysconfdir #配置文件目錄
enable-extraprotection #安全保護功能
[root@localhost sarg-2.3.7]# make && make install
修改sarg配置文件,添加要監控的squid的日誌信息等
[root@localhost sarg-2.3.7]# vim /etc/sarg/sarg.conf
#修改以下參數
access_log /usr/local/squid/var/logs/access.log #約第7行, 打開squid訪問日誌
title "Squid User Access Reports" #約第25行, 打開網頁標題
output_dir /var/www/html/squid-reports #約第120行,sarg報告輸出目錄
user_ip no #約第178行,使用用戶名顯示,no代表禁用
exclude_hosts /usr/local/sarg/noreport #約第206行,指定不計入排序的站點列表文件
topuser_sort_field BYTES reverse #約第184行,在top排序中,指定連接次數、訪問字節數,reverse代表降序
user_sort_field BYTES reverse #約第190行,對於用戶訪問記錄,連接次數按降序排列
overwrite_report no #約第257行,當日期報告已經存在,是否覆蓋報告
mail_utility mailx #約第289行,發送郵件報告的命令
charset UTF-8 #約第434行,使用字符集,utf-8
weekdays 0-6 #約第518行,指定top排序時的星期週期,0爲週日
hours 7-12,14,16,18-20 #約第523行,指定top排序時的時間週期
www_document_root /var/www/html #約第633行,網頁根目錄
#添加不計入站點文件,添加的域名將不被顯示在排序中
[root@localhost sarg-2.3.7]# touch /usr/local/sarg/noreport
#啓動sarg並對觀察squid的訪問日誌
[root@localhost sarg-2.3.7]# ln -s /usr/local/sarg/bin/sarg /usr/local/bin/
[root@localhost sarg-2.3.7]# sarg
SARG: 紀錄在文件: 90, reading: 100.00%
SARG: 成功的生成報告在 /var/www/html/squid-reports/2018Sep19-2018Sep19
[root@localhost html]# systemctl start httpd.service
[root@localhost html]# netstat -ntap | grep 80
tcp6 0 0 :::80 :::* LISTEN 49164/httpd
[root@localhost ~]# iptables -F
[root@localhost ~]# iptables -t nat -F
#客戶機上訪問squid服務器
http://192.168.120.135/squid-reports/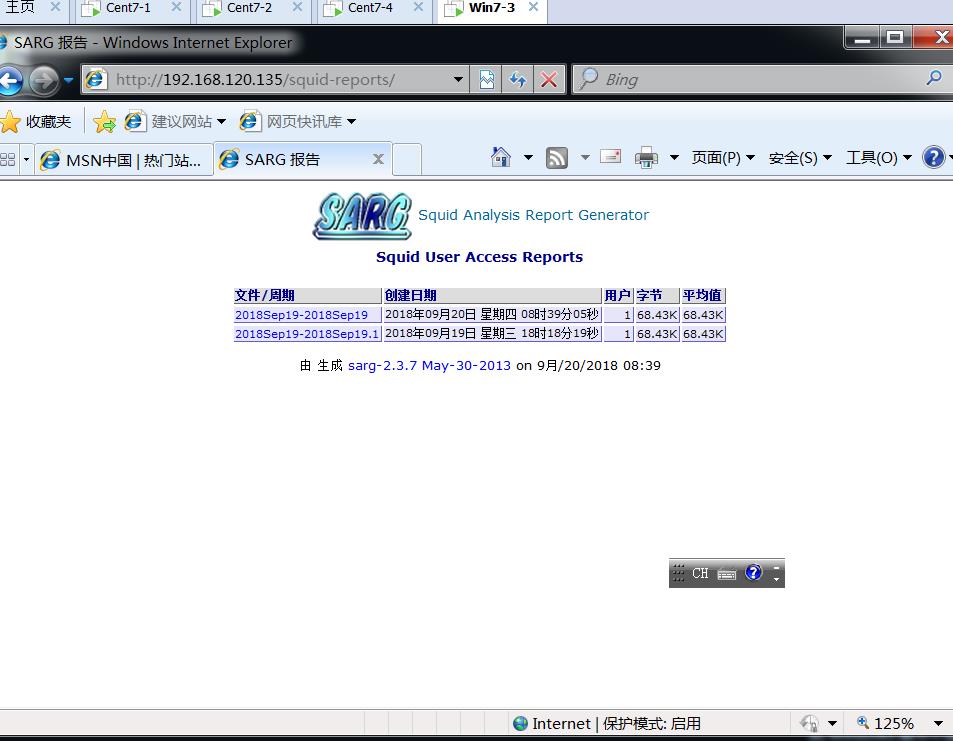
#週期性計劃任務執行每天生成報告
[root@localhost ~]# sarg -l /usr/local/squid/var/logs/access.log -o /var/www/html/squid-reports/ -z -d $(date -d "1 day ago" +%d/%m/%Y)-$(date +%d/%m/%Y)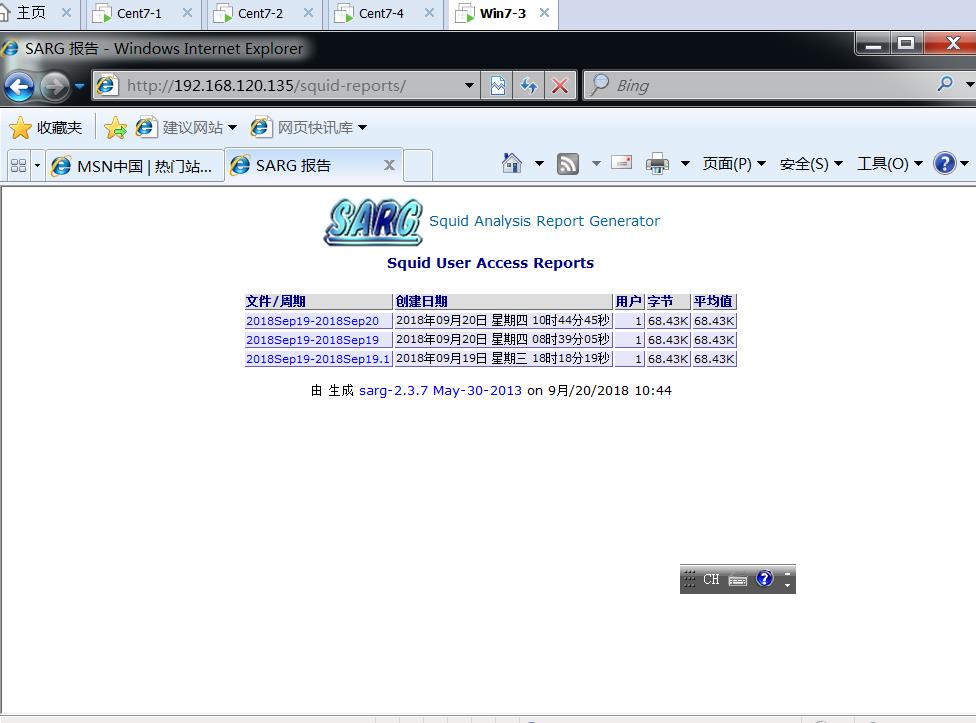
---------------------------------------反向代理-----------------------------------------------------
squid 192.168.120.135
web1 accp 192.168.120.128
web2 benet 192.168.120.131
client 192.168.120.129
web1上
[root@localhost ~]# systemctl stop firewalld.service
[root@localhost ~]# setenforce 0
[root@localhost ~]# cd /var/www/html/
[root@localhost html]# echo "this is accp" > index.html
[root@localhost html]# systemctl start httpd
web2上
[root@localhost ~]# systemctl stop firewalld.service
[root@localhost ~]# setenforce 0
[root@localhost ~]# yum install httpd -y
[root@localhost ~]# systemctl start httpd
[root@localhost ~]# cd /var/www/html/
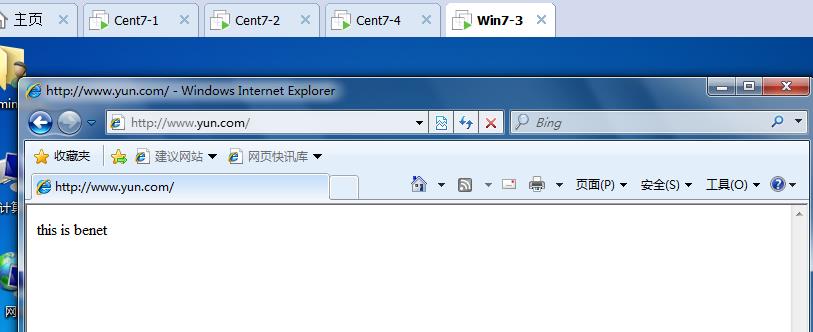
[root@localhost html]# echo "this is benet" > index.html
squid上
[root@localhost ~]# vim /etc/squid.conf
#第60行
http_port 192.168.120.135:80 accel vhost vport
#第61行
cache_peer 192.168.120.128 parent 80 0 no-query originserver round-robin max_conn=30 weight=1 name=web1
#第62行
cache_peer 192.168.120.131 parent 80 0 no-query originserver round-robin max_conn=30 weight=1 name=web2
#第63行
cache_peer_domain web1 web2 www.yun.com
[root@localhost ~]# service squid stop
[root@localhost ~]# netstat -ntap | grep 80
tcp6 0 0 :::80 ::: LISTEN 2534/httpd
[root@localhost ~]# systemctl stop httpd.service
[root@localhost ~]# service squid start
正在啓動 squid...
[root@localhost ~]# netstat -ntap | grep 80
tcp 0 0 192.168.120.135:80 0.0.0.0: LISTEN 54412/(squid-1)
#客戶機上訪問
切換到管理員建立本地解析C:\Windows\System32\drivers\etc
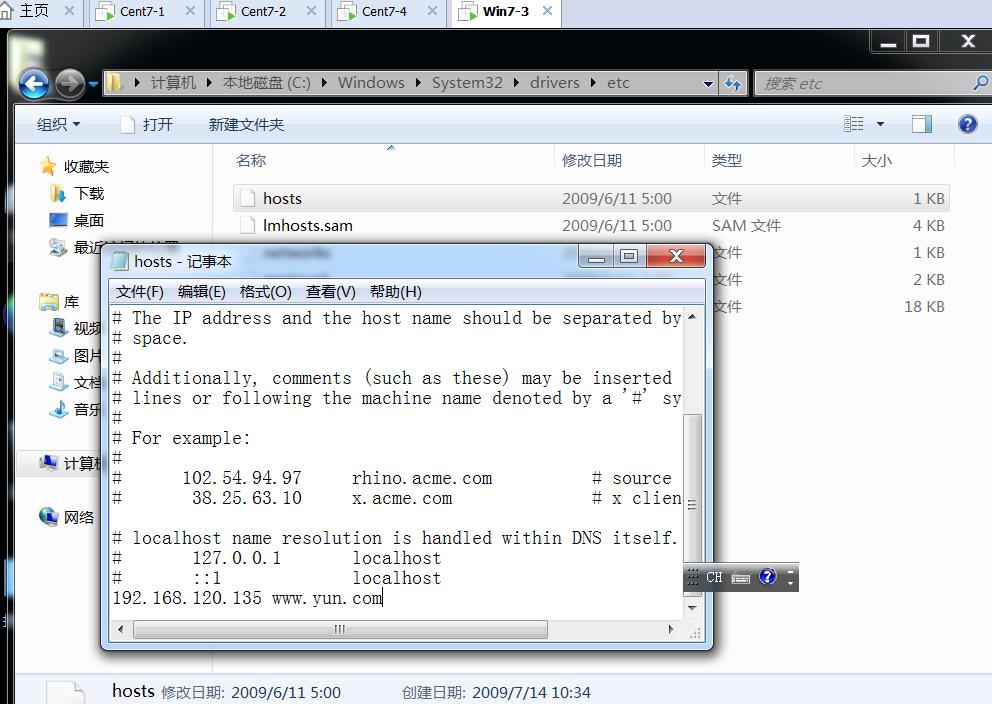
http://www.yun.com