分享一篇文章,來自馬哥教育學員阿龍。
總項目流程圖,詳見Linux運維企業架構實戰系列 - 阿龍along - 博客園
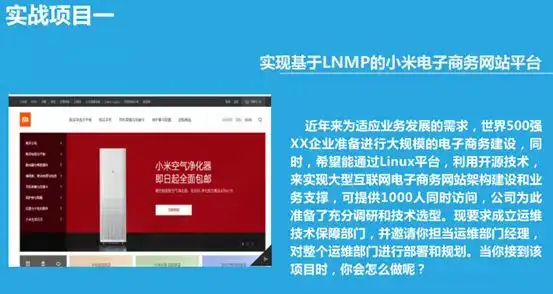
實戰一:搭建lnmp及類小米等商業網站的實現
環境:關閉防火牆,selinux
1、安裝包,開啓服務
yum -y install nginx mariadb-server php-fpm php-mysql

systemctl start nginx

systemctl start mariadb

systemctl start php-fpm
2、修改nginx的配置文件
(1)cp /etc/nginx/nginx.conf.default /etc/nginx/nginx.conf 有個模板例子覆蓋了配置文件
vim /etc/nginx/nginx.conf 修改下面幾類
① user  nobody;   使用用戶
error_log  /var/log/nginx/error.log  info;   錯誤日誌

② events {
   worker_connections  65535;
}

③ tcp_nopush     on;     tcp優化
tcp_nodelay    on;
gzip  on;

④ server {
       listen       80;
       server_name  xiaomi.along.com;   根據自己順便寫
       root    /data/web;   主站點的目錄根
location / {
           index  index.php index.html index.htm;
       }

⑤ location ~ \.php$ {      開啓.php,配置文件有例子,只需去掉註釋,修改一行即可
           fastcgi_pass   127.0.0.1:9000;
           fastcgi_index  index.php;
           fastcgi_param  SCRIPT_FILENAME  $document_root$fastcgi_script_name;
           include        fastcgi_params;
       }
(2)修改完,可以nginx -t 查看
systemctl restart nginx 重啓服務,發現有warn
(3)ulimit -n 查看linux系統裏打開文件描述符的最大值,一般缺省值是1024,對一臺繁忙的服務器來說,這個值偏小,所以有必要重新設置linux系統裏打開文件描述符的最大值
ulimit -n 65535 修改內核參數
3、修改php-fpm的配置文件
① vim /etc/php.ini 改兩行
date.timezone = Asia/Shanghai   時區

short_open_tag = On    允許短標籤
② vim /etc/php-fpm.d/www.conf 改兩行
user = nobody

group = nobody
③ systemctl restart php-fpm
4、運行mysql ,創建一會網頁需要的庫
create database xiaomi;
5、把事先找好的小米網站傳進來 rz
小米網站的源碼資源我已經上傳到網盤了http://pan.baidu.com/s/1kUUFp6B ,需要的私密我
mkdir /data/web -p 創建一個目錄專門放小米的網頁配置

unzip -d /data/web/ xiaomi.zip 解壓到目錄

cd /data/web/

chown -R nobody.nobody * 爲了安全,遞歸把所有文件的所屬人和所屬組改爲權限有限的nobody
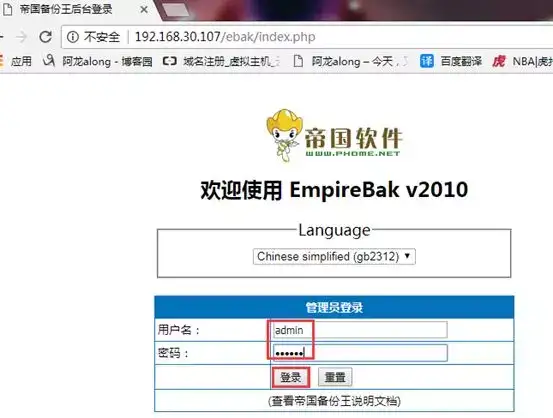
6、網頁登錄
① 用戶:admin
密碼:123456
② 參數設置:就是連接上自己的數據庫
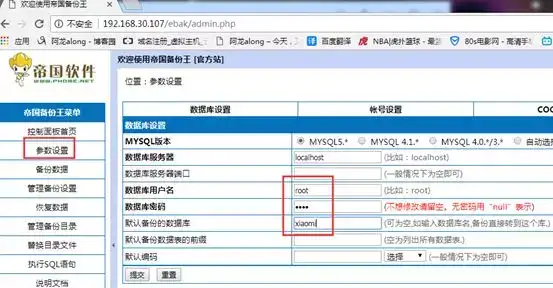
也可以在命令行連上自己的數據庫:
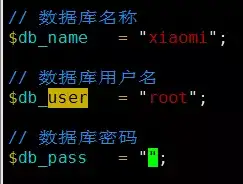
vim /data/web/data/config.php
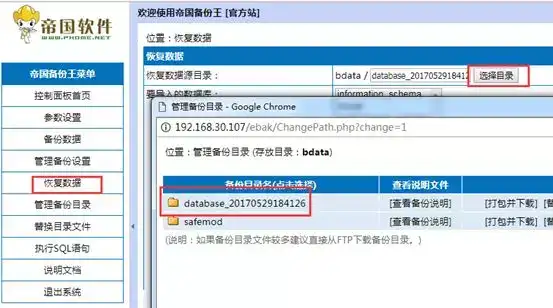
③ 把數據寫到數據庫中,恢復數據
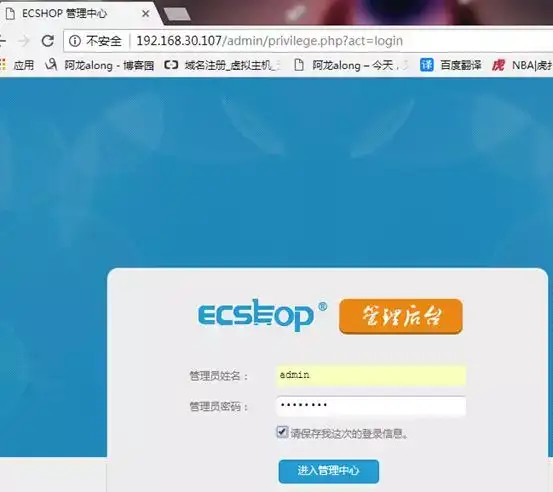
7、實驗成功,登錄查看

後臺登錄,可以自己隨便修改
8、ab 可以壓力測試
ab -c 100 -n 1000 http://192.168.30.107/
實驗二:實現ssl 加密
(1)一個物理服務器設置一個https
1、創建存放證書的目錄
mkdir /etc/nginx/ssl
2、自簽名證書
cd /etc/pki/tls/certs/

make nginx.crt
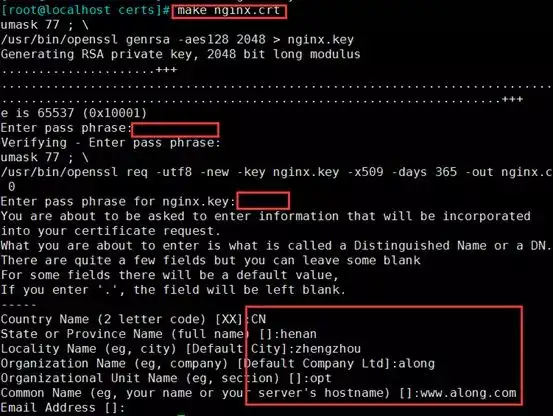
openssl rsa -in nginx.key -out nginx2.key 因爲剛私鑰被加密了,爲了後邊方便,解密
3、把證書和私鑰cp 到nginx存放證書目錄
cp nginx.crt nginx2.key /etc/nginx/ssl/

cd /etc/nginx/ssl/

mv nginx2.key nginx.key 把名字改回來
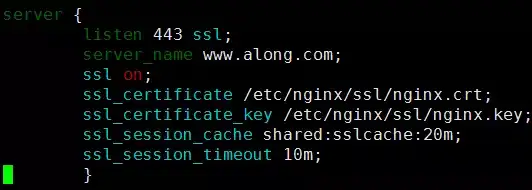
4、修改配置文件,加一段server
server {
  listen 443 ssl;
  server_name www.along.com;
  ssl on;
  ssl_certificate /etc/nginx/ssl/nginx.crt;
  ssl_certificate_key /etc/nginx/ssl/nginx.key;
  ssl_session_cache shared:sslcache:20m;
  ssl_session_timeout 10m;
}
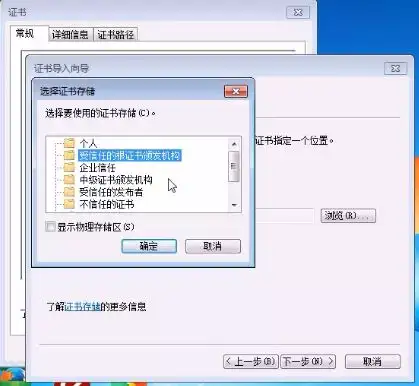
5、測試,網頁打開 https://192.168.30.7/
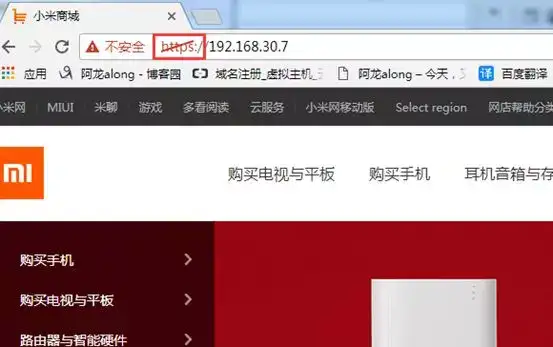
windows 信任證書
(2)因爲nginx 強大,可以實現多個虛擬主機基於不同的FQDN 實現ssl加密,httpd不能實現
一個物理服務器設置多個https
1、生成3個證書和私鑰
make nginx.crt

make nginx2.crt

make nginx3.crt
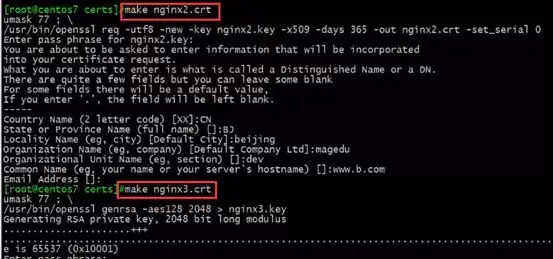
2、把證書和私鑰cp 到nginx存放證書目錄,並解開私鑰的加密
cp nginx{1,2,3}* /etc/nginx/ssl/

openssl rsa -in nginx.key -out nginx.key

openssl rsa -in nginx2.key -out nginx2.key

openssl rsa -in nginx3.key -out nginx3.key
3、創建各自對應的訪問網頁
mkdir /app/website{1,2,3}

echo website1 > /app/website1/index.html

echo website1 > /app/website2/index.html

echo website1 > /app/website3/index.html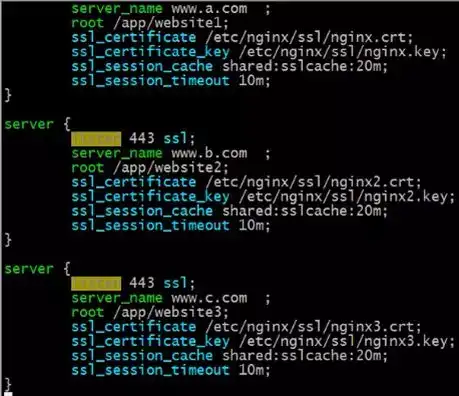
4、測試訪問,成功
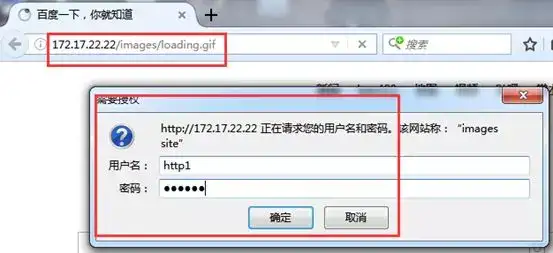
實戰三:實現身份驗證
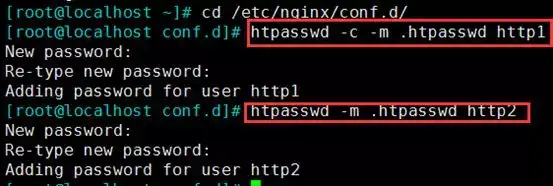
1、生成密碼賬戶文件
cd /etc/nginx/conf.d

htpasswd -c -m .htpasswd http1

htpasswd -m .htpasswd http2
2、在配置文件中修改
vim /etc/nginx/nginx.conf 在location段中指向賬戶密碼文件
location /images {
  auth_basic "images site"; "提示字"  auth_basic_user_file /etc/nginx/conf.d/.htpasswd;
}
3、網頁查看驗證 http://172.17.22.22/images/loading.gif