


OpenStack介紹:
OpenStack是一個由NASA(美國國家航空航天局)和Rackspace合作研發併發起的,以Apache許可證授權的自由軟件和開放源代碼項目。
OpenStack是一個開源的雲計算管理平臺項目,由幾個主要的組件組合起來完成具體工作。OpenStack支持幾乎所有類型的雲環境,項目目標是提供實施簡單、可大規模擴展、豐富、標準統一的雲計算管理平臺。OpenStack通過各種互補的服務提供了基礎設施即服務(IaaS)的解決方案,每個服務提供API以進行集成。
OpenStack是一個旨在爲公共及私有云的建設與管理提供軟件的開源項目。它的社區擁有超過130家企業及1350位開發者,這些機構與個人都將OpenStack作爲基礎設施即服務(IaaS)資源的通用前端。OpenStack項目的首要任務是簡化雲的部署過程併爲其帶來良好的可擴展性。本文希望通過提供必要的指導信息,幫助大家利用OpenStack前端來設置及管理自己的公共雲或私有云。
OpenStack雲計算平臺,幫助服務商和企業內部實現類似於 Amazon EC2 和 S3 的雲基礎架構服務(Infrastructure as a Service, IaaS)。OpenStack 包含兩個主要模塊:Nova 和 Swift,前者是 NASA 開發的虛擬服務器部署和業務計算模塊;後者是 Rackspace開發的分佈式雲存儲模塊,兩者可以一起用,也可以分開單獨用。OpenStack除了有 Rackspace 和 NASA 的大力支持外,還有包括 Dell、Citrix、 Cisco、 Canonical等重量級公司的貢獻和支持,發展速度非常快,有取代另一個業界領先開源雲平臺 Eucalyptus 的態勢。
OpenStack架構1:
OpenStack架構2: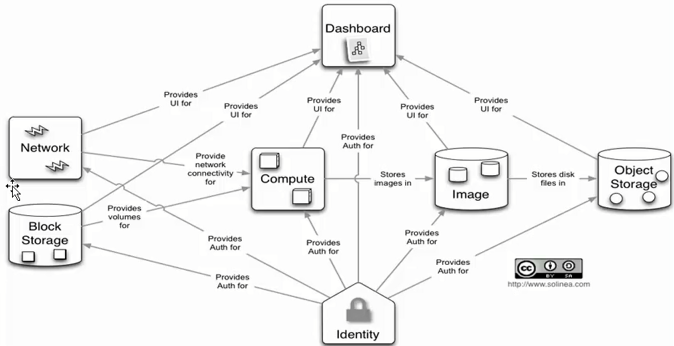
OpenStack版本: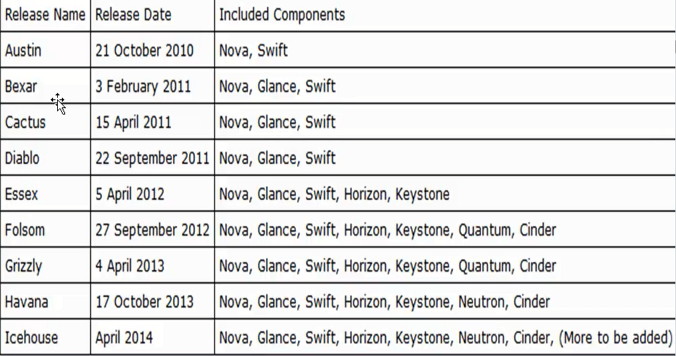
OpenStack官網:
http://www.openstack.org/
OpenStack Services: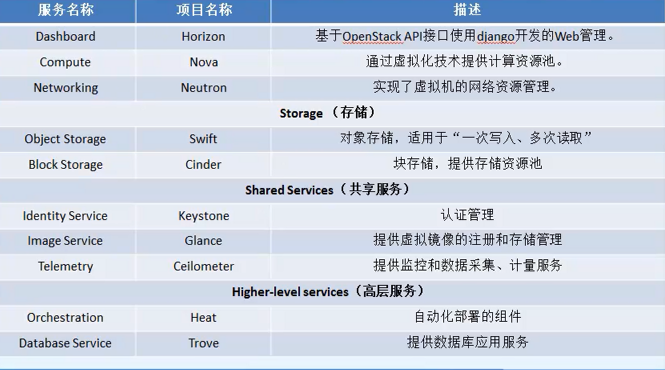
實驗架構:
環境:
操作系統:
CentOS-7-x86_64-Minimal-1611
linux-node1.smoke.com: 192.168.56.11 控制節點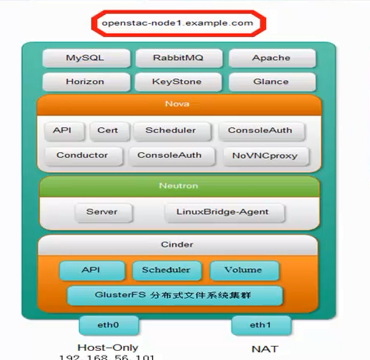
linux-node2.smoke.com: 192.168.56.12 計算節點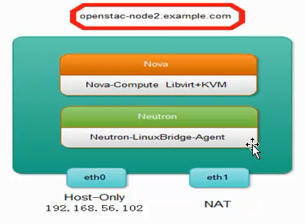
node1:
修改主機名:注意:修改主機名,以後不能更改。
[root@localhost ~]# hostname linux-node1.smoke.com`
[root@localhost ~]# vim /etc/hostname
hostname linux-node1.smoke.com
網卡配置:
[root@linux-node1 ~]# ifconfig
ens33: flags=4163<UP,BROADCAST,RUNNING,MULTICAST>  mtu 1500
        inet 192.168.56.11  netmask 255.255.255.0  broadcast 192.168.56.255
        inet6 fe80::20c:29ff:fe81:308f  prefixlen 64  scopeid 0x20<link>
        ether 00:0c:29:81:30:8f  txqueuelen 1000  (Ethernet)
        RX packets 1198  bytes 105479 (103.0 KiB)
        RX errors 0  dropped 0  overruns 0  frame 0
        TX packets 1079  bytes 228271 (222.9 KiB)
        TX errors 0  dropped 0 overruns 0  carrier 0  collisions 0

ens37: flags=4163<UP,BROADCAST,RUNNING,MULTICAST>  mtu 1500
        inet 192.168.47.136  netmask 255.255.255.0  broadcast 192.168.47.255
        inet6 fe80::20c:29ff:fe81:3099  prefixlen 64  scopeid 0x20<link>
        ether 00:0c:29:81:30:99  txqueuelen 1000  (Ethernet)
        RX packets 20266  bytes 29152833 (27.8 MiB)
        RX errors 0  dropped 0  overruns 0  frame 0
        TX packets 4139  bytes 258109 (252.0 KiB)
        TX errors 0  dropped 0 overruns 0  carrier 0  collisions 0

lo: flags=73<UP,LOOPBACK,RUNNING>  mtu 65536
        inet 127.0.0.1  netmask 255.0.0.0
        inet6 ::1  prefixlen 128  scopeid 0x10<host>
        loop  txqueuelen 1000  (Local Loopback)
        RX packets 0  bytes 0 (0.0 B)
        RX errors 0  dropped 0  overruns 0  frame 0
        TX packets 0  bytes 0 (0.0 B)
        TX errors 0  dropped 0 overruns 0  carrier 0  collisions 0
添加hosts文件:
[root@linux-node1 ~]# vim /etc/hosts
127.0.0.1   localhost localhost.localdomain localhost4 localhost4.localdomain4
::1         localhost localhost.localdomain localhost6 localhost6.localdomain6
192.168.56.11   linux-node1 linux-node1.smoke.com
192.168.56.12   linux-node2 linux-node2.smoke.com
時間同步:會影響OpenStack正常運行。
[root@linux-node1 ~]# yum -y install chrony
[root@linux-node1 ~]# vim /etc/chrony.conf
allow 192.168.0.0/16
[root@linux-node1 ~]# systemctl enable chronyd.service
[root@linux-node1 ~]# systemctl start chronyd.service設置時區:[root@linux-node1 ~]# timedatectl set-timezone Asia/Shanghai
[root@linux-node1 ~]# date
2018年 09月 30日 星期日 22:33:31 CST
安裝MySQL:
[root@linux-node1 ~]# yum -y install mariadb mriadb-server MySQL-python

[root@linux-node1 ~]# cp /usr/share/mariadb/my-medium.cnf /etc/my.cnf
cp:是否覆蓋"/etc/my.cnf"? y
[root@linux-node1 ~]# vim /etc/my.cnf
[mysqld]
default-storage-engine = innodb
innodb_file_per_table
collation-server = utf8_general_ci
init-connect = 'SET NAMES utf8'
character-set-server = utf8
[root@linux-node1 ~]# systemctl enable mariadb.service
Created symlink from /etc/systemd/system/multi-user.target.wants/mariadb.service to /usr/lib/systemd/system/mariadb.service.
[root@linux-node1 ~]# systemctl start mariadb.service[root@linux-node1 ~]# mysql_secure_installation
NOTE: RUNNING ALL PARTS OF THIS SCRIPT IS RECOMMENDED FOR ALL MariaDB
SERVERS IN PRODUCTION USE! PLEASE READ EACH STEP CAREFULLY!
In order to log into MariaDB to secure it, we'll need the current
password for the root user. If you've just installed MariaDB, and
you haven't set the root password yet, the password will be blank,
so you should just press enter here.
Enter current password for root (enter for none):
OK, successfully used password, moving on...
Setting the root password ensures that nobody can log into the MariaDB
root user without the proper authorisation.
Set root password? [Y/n] Y
New password:
Re-enter new password:
Password updated successfully!
Reloading privilege tables..
... Success!
By default, a MariaDB installation has an anonymous user, allowing anyone
to log into MariaDB without having to have a user account created for
them. This is intended only for testing, and to make the installation
go a bit smoother. You should remove them before moving into a
production environment.
Remove anonymous users? [Y/n] Y
... Success!
Normally, root should only be allowed to connect from 'localhost'. This
ensures that someone cannot guess at the root password from the network.
Disallow root login remotely? [Y/n] Y
... Success!
By default, MariaDB comes with a database named 'test' that anyone can
access. This is also intended only for testing, and should be removed
before moving into a production environment.
Remove test database and access to it? [Y/n] Y
- Dropping test database...
... Success!
- Removing privileges on test database...
... Success!
Reloading the privilege tables will ensure that all changes made so far
will take effect immediately.
Reload privilege tables now? [Y/n] Y
... Success!
Cleaning up...
All done! If you've completed all of the above steps, your MariaDB
installation should now be secure.
Thanks for using MariaDB![root@linux-node1 ~]# mysql -uroot -psmoke520
Welcome to the MariaDB monitor. Commands end with ; or \g.
Your MariaDB connection id is 11
Server version: 10.1.20-MariaDB MariaDB Server
Copyright (c) 2000, 2016, Oracle, MariaDB Corporation Ab and others.
Type 'help;' or '\h' for help. Type '\c' to clear the current input statement.
MariaDB [(none)]> show databases;
+--------------------+
| Database |
+--------------------+
| information_schema |
| mysql |
| performance_schema |
+--------------------+
3 rows in set (0.01 sec)
MariaDB [(none)]> use mysql;
Database changed
MariaDB [mysql]> show tables;
+---------------------------+
| Tables_in_mysql |
+---------------------------+
| column_stats |
| columns_priv |
| db |
| event |
| func |
| general_log |
| gtid_slave_pos |
| help_category |
| help_keyword |
| help_relation |
| help_topic |
| host |
| index_stats |
| innodb_index_stats |
| innodb_table_stats |
| plugin |
| proc |
| procs_priv |
| proxies_priv |
| roles_mapping |
| servers |
| slow_log |
| table_stats |
| tables_priv |
| time_zone |
| time_zone_leap_second |
| time_zone_name |
| time_zone_transition |
| time_zone_transition_type |
| user |
+---------------------------+
30 rows in set (0.01 sec)
MariaDB [mysql]> exit;
ByeKeystone數據庫:
[root@linux-node1 ~]# mysql -uroot -psmoke520 -e "CREATE DATABASE keystone;"
[root@linux-node1 ~]# mysql -uroot -psmoke520 -e "GRANT ALL PRIVILEGES ON keystone.* TO 'keystone'@'localhost' IDENTIFIED BY 'keystone';"
[root@linux-node1 ~]# mysql -uroot -psmoke520 -e "GRANT ALL PRIVILEGES ON keystone.* TO 'keystone'@'%' IDENTIFIED BY 'keystone';"
Glance數據庫:
[root@linux-node1 ~]# mysql -uroot -psmoke520 -e "CREATE DATABASE glance;"
[root@linux-node1 ~]# mysql -uroot -psmoke520 -e "GRANT ALL PRIVILEGES ON glance.* TO 'glance'@'localhost' IDENTIFIED BY 'glance';"
[root@linux-node1 ~]# mysql -uroot -psmoke520 -e "GRANT ALL PRIVILEGES ON glance.* TO 'glance'@'%' IDENTIFIED BY 'glance';"
Nove數據庫:
[root@linux-node1 ~]# mysql -uroot -psmoke520 -e "CREATE DATABASE nova;"
[root@linux-node1 ~]# mysql -uroot -psmoke520 -e "GRANT ALL PRIVILEGES ON nova.* TO 'nova'@'localhost' IDENTIFIED BY 'nova';"
[root@linux-node1 ~]# mysql -uroot -psmoke520 -e "GRANT ALL PRIVILEGES ON nova.* TO 'nova'@'%' IDENTIFIED BY 'nova';"
Neutron數據庫:
[root@linux-node1 ~]# mysql -uroot -psmoke520 -e "CREATE DATABASE neutron;"
[root@linux-node1 ~]# mysql -uroot -psmoke520 -e "GRANT ALL PRIVILEGES ON neutron.* TO 'neutron'@'localhost' IDENTIFIED BY 'neutron';"
[root@linux-node1 ~]# mysql -uroot -psmoke520 -e "GRANT ALL PRIVILEGES ON neutron.* TO 'neutron'@'%' IDENTIFIED BY 'neutron';"
Cinder數據庫:
[root@linux-node1 ~]# mysql -uroot -psmoke520 -e "CREATE DATABASE cinder;"
[root@linux-node1 ~]# mysql -uroot -psmoke520 -e "GRANT ALL PRIVILEGES ON cinder.* TO 'cinder'@'localhost' IDENTIFIED BY 'cinder';"
[root@linux-node1 ~]# mysql -uroot -psmoke520 -e "GRANT ALL PRIVILEGES ON cinder.* TO 'cinder'@'%' IDENTIFIED BY 'cinder';"
[root@linux-node1 ~]# mysql -uroot -psmoke520
Welcome to the MariaDB monitor. Commands end with ; or \g.
Your MariaDB connection id is 30
Server version: 10.1.20-MariaDB MariaDB Server
Copyright (c) 2000, 2016, Oracle, MariaDB Corporation Ab and others.
Type 'help;' or '\h' for help. Type '\c' to clear the current input statement.
MariaDB [(none)]> show databases;
+--------------------+
| Database |
+--------------------+
| cinder |
| glance |
| information_schema |
| keystone |
| mysql |
| neutron |
| nova |
| performance_schema |
+--------------------+
8 rows in set (0.00 sec)
MariaDB [(none)]> exit;
ByeSOA(面向服務的架構) :
面向服務架構,它可以根據需求通過網絡對鬆散耦合的粗粒度應用組件進行分佈式部署、組合和使用。服務層是SOA的基礎,可以直接被應用調用,從而有效控制系統中與軟件代理交互的人爲依賴性。
SOA是一種粗粒度、鬆耦合服務架構,服務之間通過簡單、精確定義接口進行通訊,不涉及底層編程接口和通訊模型。SOA可以看作是B/S模型、XML(標準通用標記語言的子集)/Web Service技術之後的自然延伸。
SOA將能夠幫助軟件工程師們站在一個新的高度理解企業級架構中的各種組件的開發、部署形式,它將幫助企業系統架構者以更迅速、更可靠、更具重用性架構整個業務系統。較之以往,以SOA架構的系統能夠更加從容地面對業務的急劇變化。
體系結構:
鬆耦合的系統
基本特徵:
可從企業外部訪問
隨時可用
粗粒度的服務接口分級
鬆散耦合
可重用的服務
服務接口設計管理
標準化的服務接口
支持各種消息模式
精確定義的服務契約
SOA 服務用消息進行通信,該消息通常使用XML Schema來定義(也叫做XSD, XML Schema Definition)。消費者和提供者或消費者和服務之間的通信多見於不知道提供者的環境中。服務間的通訊也可以看作企業內部處理的關鍵商業文檔。
SOA服務通過一個扮演目錄列表(directory listing)角色的登記處(Registry)來進行維護。應用程序在登記處(Registry)尋找並調用某項服務。統一描述,定義和集成(UDDI, Universal Description, Definition, and Integration)是服務登記的標準。
安裝Message queue(消息隊列):
OpenStack支持RabbitMQ,Qpid,ZeroMQ消息隊列。[root@linux-node1 ~]# yum -y install rabbitmq-server
如果yum無法安裝,可以到官網下載最新包安裝,https://github.com/rabbitmq/rabbitmq-server/releases/tag/v3.7.8
rabbitmq-server依賴Erlang:
[root@linux-node1 ~]# vim /etc/yum.repos.d/rabbitmq-erlang.repo
[rabbitmq-erlang]
name=rabbitmq-rlang
baseurl=https://dl.bintray.com/rabbitmq/rpm/erlang/20/el/7
gpgcheck=1
gpgkey=https://dl.bintray.com/rabbitmq/Keys/rabbitmq-release-signing-key.asc
repo_gpgcheck=0
enabled=1
[root@linux-node1 ~]# yum clean all
[root@linux-node1 ~]# yum makecache
[root@linux-node1 ~]# ll
總用量 9340
-rw-------. 1 root root 1245 7月 18 19:48 anaconda-ks.cfg
-rw-r--r-- 1 root root 9557762 10月 1 01:08 rabbitmq-server-3.7.8-1.el7.noarch.rpm
[root@linux-node1 ~]# yum -y install rabbitmq-server-3.7.8-1.el7.noarch.rpm
[root@linux-node1 ~]# systemctl enable rabbitmq-server.service
Created symlink from /etc/systemd/system/multi-user.target.wants/rabbitmq-server.service to /usr/lib/systemd/system/rabbitmq-server.service.
[root@linux-node1 ~]# systemctl start rabbitmq-server.service
rabbitmq端口5672:
[root@linux-node1 ~]# netstat -tnlp
Active Internet connections (only servers)
Proto Recv-Q Send-Q Local Address Foreign Address State PID/Program name
tcp 0 0 0.0.0.0:25672 0.0.0.0: LISTEN 83984/beam.smp
tcp 0 0 0.0.0.0:4369 0.0.0.0: LISTEN 84140/epmd
tcp 0 0 0.0.0.0:22 0.0.0.0: LISTEN 899/sshd
tcp6 0 0 :::5672 ::: LISTEN 83984/beam.smp
tcp6 0 0 :::3306 ::: LISTEN 11484/mysqld
tcp6 0 0 :::4369 ::: LISTEN 84140/epmd
tcp6 0 0 :::22 :::* LISTEN 899/sshd
添加用戶:
[root@linux-node1 ~]# rabbitmqctl add_user openstack openstack
Adding user "openstack" ...
授權用戶:
[root@linux-node1 ~]# rabbitmqctl set_permissions openstack "." "." ".*"
Setting permissions for user "openstack" in vhost "/" ...
設置guest用戶可以遠程登錄:
找到{loopback_users, [<<"guest">>]},修改爲{loopback_users,[guest]},
[root@linux-node1 ~]# vim /usr/lib/rabbitmq/lib/rabbitmq_server-3.7.8/ebin/rabbit.app
{loopback_users, [guest]},
安裝rabbitmq web插件:
[root@linux-node1 ~]# rabbitmq-plugins list
Configured: E = explicitly enabled; e = implicitly enabled
| Status: * = running on rabbit@linux-node1
|/
[ ] rabbitmq_amqp1_0 3.7.8
[ ] rabbitmq_auth_backend_cache 3.7.8
[ ] rabbitmq_auth_backend_http 3.7.8
[ ] rabbitmq_auth_backend_ldap 3.7.8
[ ] rabbitmq_auth_mechanism_ssl 3.7.8
[ ] rabbitmq_consistent_hash_exchange 3.7.8
[ ] rabbitmq_event_exchange 3.7.8
[ ] rabbitmq_federation 3.7.8
[ ] rabbitmq_federation_management 3.7.8
[ ] rabbitmq_jms_topic_exchange 3.7.8
[ ] rabbitmq_management 3.7.8
[ ] rabbitmq_management_agent 3.7.8
[ ] rabbitmq_mqtt 3.7.8
[ ] rabbitmq_peer_discovery_aws 3.7.8
[ ] rabbitmq_peer_discovery_common 3.7.8
[ ] rabbitmq_peer_discovery_consul 3.7.8
[ ] rabbitmq_peer_discovery_etcd 3.7.8
[ ] rabbitmq_peer_discovery_k8s 3.7.8
[ ] rabbitmq_random_exchange 3.7.8
[ ] rabbitmq_recent_history_exchange 3.7.8
[ ] rabbitmq_sharding 3.7.8
[ ] rabbitmq_shovel 3.7.8
[ ] rabbitmq_shovel_management 3.7.8
[ ] rabbitmq_stomp 3.7.8
[ ] rabbitmq_top 3.7.8
[ ] rabbitmq_tracing 3.7.8
[ ] rabbitmq_trust_store 3.7.8
[ ] rabbitmq_web_dispatch 3.7.8
[ ] rabbitmq_web_mqtt 3.7.8
[ ] rabbitmq_web_mqtt_examples 3.7.8
[ ] rabbitmq_web_stomp 3.7.8
[ ] rabbitmq_web_stomp_examples 3.7.8
[root@linux-node1 ~]# rabbitmq-plugins enable rabbitmq_management
[root@linux-node1 ~]# systemctl restart rabbitmq-server.service
查看rabbitmq web監聽端口15672:
[root@linux-node1 ~]# netstat -tnlp
Active Internet connections (only servers)
Proto Recv-Q Send-Q Local Address Foreign Address State PID/Program name
tcp 0 0 0.0.0.0:25672 0.0.0.0: LISTEN 86563/beam.smp
tcp 0 0 0.0.0.0:4369 0.0.0.0: LISTEN 86759/epmd
tcp 0 0 0.0.0.0:22 0.0.0.0: LISTEN 899/sshd
tcp 0 0 0.0.0.0:15672 0.0.0.0: LISTEN 86563/beam.smp
tcp6 0 0 :::5672 ::: LISTEN 86563/beam.smp
tcp6 0 0 :::3306 ::: LISTEN 11484/mysqld
tcp6 0 0 :::4369 ::: LISTEN 86759/epmd
tcp6 0 0 :::22 ::: LISTEN 899/sshd
通過web登錄rabbitmq:默認賬號guest,密碼guest;
登錄成功:
設置openstack用戶登錄,擊Admin;
點擊openstack用戶名--Update this user,password填寫openstack,Tags輸入框填寫administrator,填寫完成點擊update user;
保存完成,退出該賬戶;
使用openstack賬戶,密碼openstack登錄;
Ksystone服務:
用戶與認證:用戶權限與用戶行爲跟蹤;
服務目錄:提供一個服務目錄,包括所有服務項與相關Api的端點
Glance鏡像服務:
用戶認證:
User:用戶
Tenant:租戶 項目
Token:令牌
Role:角色
服務目錄:
Service:服務
Endpoint:端點
安裝Keystone:
這是使用阿里yum源進行安裝:
[root@linux-node1 ~]# vim /etc/yum.repos.d/openstack_alibaba.repo
[openstack-ocata]
name=openstack-ocata
baseurl=https://mirrors.aliyun.com/centos/7.5.1804/cloud/x86_64/openstack-ocata/
gpgcheck=1
gpgkey=http://mirrors.aliyun.com/centos/RPM-GPG-KEY-CentOS-7
repo_gpgcheck=0
enabled=1
[openstack-pike]
name=openstack-pike
baseurl=https://mirrors.aliyun.com/centos/7.5.1804/cloud/x86_64/openstack-pike/
gpgcheck=1
gpgkey=http://mirrors.aliyun.com/centos/RPM-GPG-KEY-CentOS-7
repo_gpgcheck=0
enabled=1
[openstack-queens]
name=openstack-queens
baseurl=https://mirrors.aliyun.com/centos/7.5.1804/cloud/x86_64/openstack-queens/
gpgcheck=1
gpgkey=http://mirrors.aliyun.com/centos/RPM-GPG-KEY-CentOS-7
repo_gpgcheck=0
enabled=1
[openstack-rocky]
name=openstack-rocky
baseurl=https://mirrors.aliyun.com/centos/7.5.1804/cloud/x86_64/openstack-rocky/
gpgcheck=1
gpgkey=http://mirrors.aliyun.com/centos/RPM-GPG-KEY-CentOS-7
repo_gpgcheck=0
enabled=1
[root@linux-node1 ~]# yum clean all
[root@linux-node1 ~]# yum makecache
[root@linux-node1 ~]# yum -y install -y openstack-keystone httpd mod_wsgi memcached python-memcached
生成隨機碼:
[root@linux-node1 wxWidgets-3.1.1]# openssl rand -hex 10
863d35676a5632e846d9
[root@linux-node1 ~]# vim /etc/keystone/keystone.conf
[DEFAULT]
admin_token = 863d35676a5632e846d9
[database]
connection = mysql://keystone:[email protected]/keystone
同步數據庫:
[root@linux-node1 ~]# su -s /bin/sh -c "keystone-manage db_sync" keystone
同步後會生成keystone.log文件;
[root@linux-node1 ~]# cd /var/log/keystone/
[root@linux-node1 keystone]# ls
keystone.log
[root@linux-node1 keystone]# ll
總用量 48
-rw-rw---- 1 root keystone 47578 10月 1 15:30 keystone.log
[root@linux-node1 ~]# mysql -ukeystone -pkeystone -h192.168.56.11
Welcome to the MariaDB monitor. Commands end with ; or \g.
Your MariaDB connection id is 56
Server version: 10.1.20-MariaDB MariaDB Server
Copyright (c) 2000, 2016, Oracle, MariaDB Corporation Ab and others.
Type 'help;' or '\h' for help. Type '\c' to clear the current input statement.
MariaDB [(none)]> show databases;
+--------------------+
| Database |
+--------------------+
| information_schema |
| keystone |
+--------------------+
2 rows in set (0.00 sec)
MariaDB [(none)]> use keystone
Database changed
MariaDB [keystone]> show tables;
+-----------------------------+
| Tables_in_keystone |
+-----------------------------+
| access_token |
| application_credential |
| application_credential_role |
| assignment |
| config_register |
| consumer |
| credential |
| endpoint |
| endpoint_group |
| federated_user |
| federation_protocol |
| group |
| id_mapping |
| identity_provider |
| idp_remote_ids |
| implied_role |
| limit |
| local_user |
| mapping |
| migrate_version |
| nonlocal_user |
| password |
| policy |
| policy_association |
| project |
| project_endpoint |
| project_endpoint_group |
| project_tag |
| region |
| registered_limit |
| request_token |
| revocation_event |
| role |
| sensitive_config |
| service |
| service_provider |
| system_assignment |
| token |
| trust |
| trust_role |
| user |
| user_group_membership |
| user_option |
| whitelisted_config |
+-----------------------------+
44 rows in set (0.00 sec)
MariaDB [keystone]> exit;
Bye
[root@linux-node1 keystone]# ls
default_catalog.templates keystone.conf keystone-paste.ini logging.conf policy.json sso_callback_template.html
[root@linux-node1 keystone]# vim keystone.conf
[memcache]
servers = 192.168.56.11:11211
[token]
provider = uuid
driver = memcache
[revoke]
driver = sql
[root@linux-node1 keystone]# grep '^[a-z]' keystone.conf
admin_token = 863d35676a5632e846d9
connection = mysql://keystone:[email protected]/keystone
servers = 192.168.56.11:11211
driver = sql
provider = fernet
driver = memcache
開啓debug開關:
[root@linux-node1 keystone]# vim keystone.conf
[DEFAULT]
verbose = true
啓動memcache:
[root@linux-node1 ~]# systemctl start memcached.service
配置apache:
[root@linux-node1 ~]# vim /etc/httpd/conf.d/wsgi-keystone.conf
Listen 5000
Listen 35357
<VirtualHost *:5000>
WSGIDaemonProcess keystone-public processes=5 threads=1 user=keystone group=keystone display-name=%{GROUP}
WSGIProcessGroup keystone-public
WSGIScriptAlias / /usr/bin/keystone-wsgi-public
WSGIApplicationGroup %{GLOBAL}
WSGIPassAuthorization On
ErrorLogFormat "%{cu}t %M"
ErrorLog /var/log/httpd/keystone-error.log
CustomLog /var/log/httpd/keystone-access.log combined
<Directory /usr/bin>
    Require all granted
</Directory>
</VirtualHost>
<VirtualHost *:35357>
WSGIDaemonProcess keystone-admin processes=5 threads=1 user=keystone group=keystone display-name=%{GROUP}
WSGIProcessGroup keystone-admin
WSGIScriptAlias / /usr/bin/keystone-wsgi-admin
WSGIApplicationGroup %{GLOBAL}
WSGIPassAuthorization On
ErrorLogFormat "%{cu}t %M"
ErrorLog /var/log/httpd/keystone-error.log
CustomLog /var/log/httpd/keystone-access.log combined
<Directory /usr/bin>
    Require all granted
</Directory>
</VirtualHost>
[root@linux-node1 ~]# vim /etc/httpd/conf/httpd.conf
ServerName 192.168.56.11:80
啓動apache:
[root@linux-node1 ~]# systemctl enable httpd
Created symlink from /etc/systemd/system/multi-user.target.wants/httpd.service to /usr/lib/systemd/system/httpd.service.
[root@linux-node1 ~]# systemctl start httpd
[root@linux-node1 ~]# systemctl start httpd
[root@linux-node1 ~]# netstat -tnlp | grep httpd
tcp6 0 0 :::35357 ::: LISTEN 120896/httpd
tcp6 0 0 :::5000 ::: LISTEN 120896/httpd
tcp6 0 0 :::80 :::* LISTEN 120896/httpd
設置Keystone環境變量:
[root@linux-node1 ~]# export OS_TOKEN=863d35676a5632e846d9
[root@linux-node1 ~]# export OS_URL=http://192.168.56.11:35357/v3
[root@linux-node1 ~]# export OS_IDENTITY_API_VERSION=3
創建域:
[root@linux-node1 ~]# openstack domain create --description "Default Domain" default
+-------------+----------------------------------+
| Field | Value |
+-------------+----------------------------------+
| description |Default Domain |
| enabled | True |
| id | 1be6f6eb0b494adea06365ddfb4ce4b2 |
| name | default |
| tags | [] |
+-------------+----------------------------------+
創建admin項目:
[root@linux-node1 ~]# openstack project create --domain default --description "Admin Project" admin
+-------------+----------------------------------+
| Field | Value |
+-------------+----------------------------------+
| description | Admin Project |
| domain_id | 1be6f6eb0b494adea06365ddfb4ce4b2 |
| enabled | True |
| id | 828bfe0e6bb64a228f8713ceb23b019b |
| is_domain | False |
| name | admin |
| parent_id | 1be6f6eb0b494adea06365ddfb4ce4b2 |
| tags | [] |
+-------------+----------------------------------+
創建admin用戶,密碼admin;
[root@linux-node1 ~]# openstack user create --domain default --password-prompt admin
User Password:
Repeat User Password:
+---------------------+----------------------------------+
| Field | Value |
+---------------------+----------------------------------+
| domain_id | 1be6f6eb0b494adea06365ddfb4ce4b2 |
| enabled | True |
| id | e85eaaf92be0457b9e03dd4e818c48c7 |
| name | admin |
| options | {} |
| password_expires_at | None |
+---------------------+----------------------------------+
創建admin角色:
[root@linux-node1 ~]# openstack role create admin
+-----------+----------------------------------+
| Field | Value |
+-----------+----------------------------------+
| domain_id | None |
| id | da65dafe73c94c64b4969605912c65aa |
| name | admin |
+-----------+----------------------------------+
把admin用戶加入admin項目賦予admin角色;
[root@linux-node1 ~]# openstack role add --project admin --user admin admin
創建demo項目:
[root@linux-node1 ~]# openstack project create --domain default --description "Demo Project" demo
+-------------+----------------------------------+
| Field | Value |
+-------------+----------------------------------+
| description | Demo Project |
| domain_id | 1be6f6eb0b494adea06365ddfb4ce4b2 |
| enabled | True |
| id | ddc7060500f144fbacc750866547310d |
| is_domain | False |
| name | demo |
| parent_id | 1be6f6eb0b494adea06365ddfb4ce4b2 |
| tags | [] |
+-------------+----------------------------------+
創建demo密碼:
[root@linux-node1 ~]# openstack user create --domain default --password=demo demo
+---------------------+----------------------------------+
| Field | Value |
+---------------------+----------------------------------+
| domain_id | 1be6f6eb0b494adea06365ddfb4ce4b2 |
| enabled | True |
| id | 87f56ed906624ef698e645d706b5c510 |
| name | demo |
| options | {} |
| password_expires_at | None |
+---------------------+----------------------------------+
創建角色:
[root@linux-node1 ~]# openstack role create user
+-----------+----------------------------------+
| Field | Value |
+-----------+----------------------------------+
| domain_id | None |
| id | a8011236e49f47f98bd794a6609434cc |
| name | user |
+-----------+----------------------------------+
把demo用戶加入demo項目,賦予user角色;
[root@linux-node1 ~]# openstack role add --project demo --user demo user
創建service項目:
[root@linux-node1 ~]# openstack project create --domain default --description "Service Project" service
驗證創建項目、角色、用戶;
[root@linux-node1 ~]# openstack user list
+----------------------------------+-------+
| ID | Name |
+----------------------------------+-------+
| 87f56ed906624ef698e645d706b5c510 | demo |
| e85eaaf92be0457b9e03dd4e818c48c7 | admin |
+----------------------------------+-------+
[root@linux-node1 ~]# openstack role list
+----------------------------------+-------+
| ID | Name |
+----------------------------------+-------+
| a8011236e49f47f98bd794a6609434cc | user |
| da65dafe73c94c64b4969605912c65aa | admin |
+----------------------------------+-------+
[root@linux-node1 ~]# openstack project list
+----------------------------------+---------+
| ID | Name |
+----------------------------------+---------+
| 1802deb5576d494b95526e5514ce9a1b | service |
| 828bfe0e6bb64a228f8713ceb23b019b | admin |
| ddc7060500f144fbacc750866547310d | demo |
+----------------------------------+---------+
創建服務:
[root@linux-node1 ~]# openstack service create --name keystone --description "OpenStack Identity" identity
+-------------+----------------------------------+
| Field | Value |
+-------------+----------------------------------+
| description | OpenStack Identity |
| enabled | True |
| id | 33da762025d4405f847ee74412f5ed3e |
| name | keystone |
| type | identity |
+-------------+----------------------------------+
註冊endpoint:
公網:
[root@linux-node1 ~]# openstack endpoint create --region RegionOne identity public http://192.168.56.11:5000/v2.0
+--------------+----------------------------------+
| Field | Value |
+--------------+----------------------------------+
| enabled | True |
| id | 93c727100dce4d2d8b803640444d7558 |
| interface | public |
| region | RegionOne |
| region_id | RegionOne |
| service_id | 33da762025d4405f847ee74412f5ed3e |
| service_name | keystone |
| service_type | identity |
| url | http://192.168.56.11:5000/v2.0 |
+--------------+----------------------------------+
私網:
[root@linux-node1 ~]# openstack endpoint create --region RegionOne identity internal http://192.168.56.11:5000/v2.0
+--------------+----------------------------------+
| Field | Value |
+--------------+----------------------------------+
| enabled | True |
| id | 6ec65d3bef114ab7833a9e14c05c9b74 |
| interface | internal |
| region | RegionOne |
| region_id | RegionOne |
| service_id | 33da762025d4405f847ee74412f5ed3e |
| service_name | keystone |
| service_type | identity |
| url | http://192.168.56.11:5000/v2.0 |
+--------------+----------------------------------+
管理:
[root@linux-node1 ~]# openstack endpoint create --region RegionOne identity admin http://192.168.56.11:35357/v2.0
+--------------+----------------------------------+
| Field | Value |
+--------------+----------------------------------+
| enabled | True |
| id | f95feb01e98a478dbd513fcaa71b29ae |
| interface | admin |
| region | RegionOne |
| region_id | RegionOne |
| service_id | 33da762025d4405f847ee74412f5ed3e |
| service_name | keystone |
| service_type | identity |
| url | http://192.168.56.11:35357/v2.0 |
+--------------+----------------------------------+
[root@linux-node1 ~]# openstack endpoint list
+----------------------------------+-----------+--------------+--------------+---------+-----------+---------------------------------+
| ID | Region | Service Name | Service Type | Enabled | Interface | URL |
+----------------------------------+-----------+--------------+--------------+---------+-----------+---------------------------------+
| 6ec65d3bef114ab7833a9e14c05c9b74 | RegionOne | keystone | identity | True | internal | http://192.168.56.11:5000/v2.0 |
| 93c727100dce4d2d8b803640444d7558 | RegionOne | keystone | identity | True | public | http://192.168.56.11:5000/v2.0 |
| f95feb01e98a478dbd513fcaa71b29ae | RegionOne | keystone | identity | True | admin | http://192.168.56.11:35357/v2.0 |
+----------------------------------+-----------+--------------+--------------+---------+-----------+---------------------------------+
清楚掉環境變量:
[root@linux-node1 ~]# unset OS_TOKEN
[root@linux-node1 ~]# unset OS_URL
The request you have made requires authentication. (HTTP 401) (Request-ID: req-6db56b33-7bd1-44a2-9c48-773a4caf4e04)
[root@linux-node1 ~]# openstack --os-auth-url http://192.168.56.11:35357/v3 \
--os-project-domain-id default --os-user-domain-id default \
--os-project-name admin --os-username admin --os-auth-type password \
token issue
node2:[root@localhost ~]# hostname linux-node2.smoke.com
[root@cloud ~]# vim /etc/hostname
hostname linux-node2.smoke.com
[root@localhost ~]# ifconfig
ens33: flags=4163<UP,BROADCAST,RUNNING,MULTICAST> mtu 1500
inet 192.168.56.12 netmask 255.255.255.0 broadcast 192.168.56.255
inet6 fe80::9752:504d:ee43:64f5 prefixlen 64 scopeid 0x20<link>
ether 00:0c:29:b2:dc:b3 txqueuelen 1000 (Ethernet)
RX packets 23651 bytes 33698486 (32.1 MiB)
RX errors 0 dropped 0 overruns 0 frame 0
TX packets 6118 bytes 455955 (445.2 KiB)
TX errors 0 dropped 0 overruns 0 carrier 0 collisions 0
ens37: flags=4163<UP,BROADCAST,RUNNING,MULTICAST> mtu 1500
inet 192.168.47.135 netmask 255.255.255.0 broadcast 192.168.47.255
inet6 fe80::c33f:7c14:d42c:bc06 prefixlen 64 scopeid 0x20<link>
ether 00:0c:29:b2:dc:bd txqueuelen 1000 (Ethernet)
RX packets 684 bytes 49408 (48.2 KiB)
RX errors 0 dropped 0 overruns 0 frame 0
TX packets 108 bytes 10149 (9.9 KiB)
TX errors 0 dropped 0 overruns 0 carrier 0 collisions 0
lo: flags=73<UP,LOOPBACK,RUNNING> mtu 65536
inet 127.0.0.1 netmask 255.0.0.0
inet6 ::1 prefixlen 128 scopeid 0x10<host>
loop txqueuelen 1 (Local Loopback)
RX packets 20 bytes 1708 (1.6 KiB)
RX errors 0 dropped 0 overruns 0 frame 0
TX packets 20 bytes 1708 (1.6 KiB)
TX errors 0 dropped 0 overruns 0 carrier 0 collisions 0[root@linux-node2 ~]# vim /etc/hosts
127.0.0.1 localhost localhost.localdomain localhost4 localhost4.localdomain4
::1 localhost localhost.localdomain localhost6 localhost6.localdomain6
192.168.56.11 linux-node1 linux-node1.smoke.com
192.168.56.12 linux-node2 linux-node2.smoke.com[root@linux-node2 ~]# yum -y install chrony`
allow 192.168.0.0/16
[root@linux-node2 ~]# systemctl enable chronyd.service[root@linux-node2 ~]# systemctl start chronyd.service
[root@linux-node2 ~]# timedatectl set-timezone Asia/Shanghai
[root@linux-node2 ~]# date
2018年 09月 30日 星期日 22:33:55 CST