安裝nexus
- 安裝docker
``·bash
yum install docker-ce - 拉取鏡
docker pull registry.docker-cn.com/sonatype/nexus3:3.13.0 - 創建數據持久化目錄
mkdir -p /opt/share/files/nexus-data/ chow 200 /opt/share/files/nexus-data/ - 啓動容器
docker run -d -p 80:8081 --name nexus -v /opt/share/files/nexus-data:/nexus-data sonatype/nexus3:3.13.0創建倉庫
- 在瀏覽器打開htttp://your_ip,可以打開nexus
- 點擊右上角的Sign in,登錄nexus,默認用戶名密碼爲admin/admin123
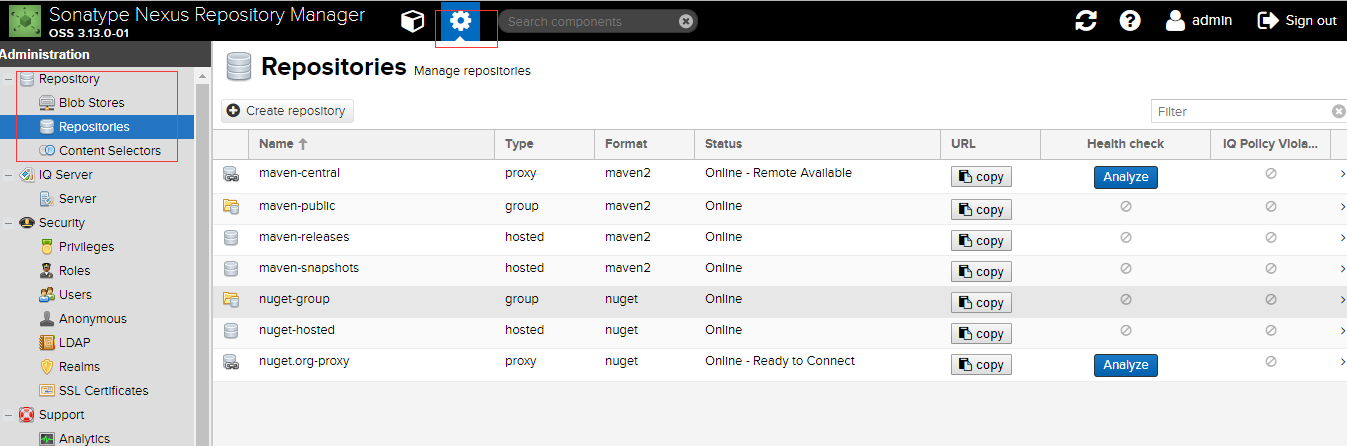
- 選擇Repository - repositories,點擊create repository
![通過Nexus搭建maven私有倉庫,並通過gradle上傳jar]()
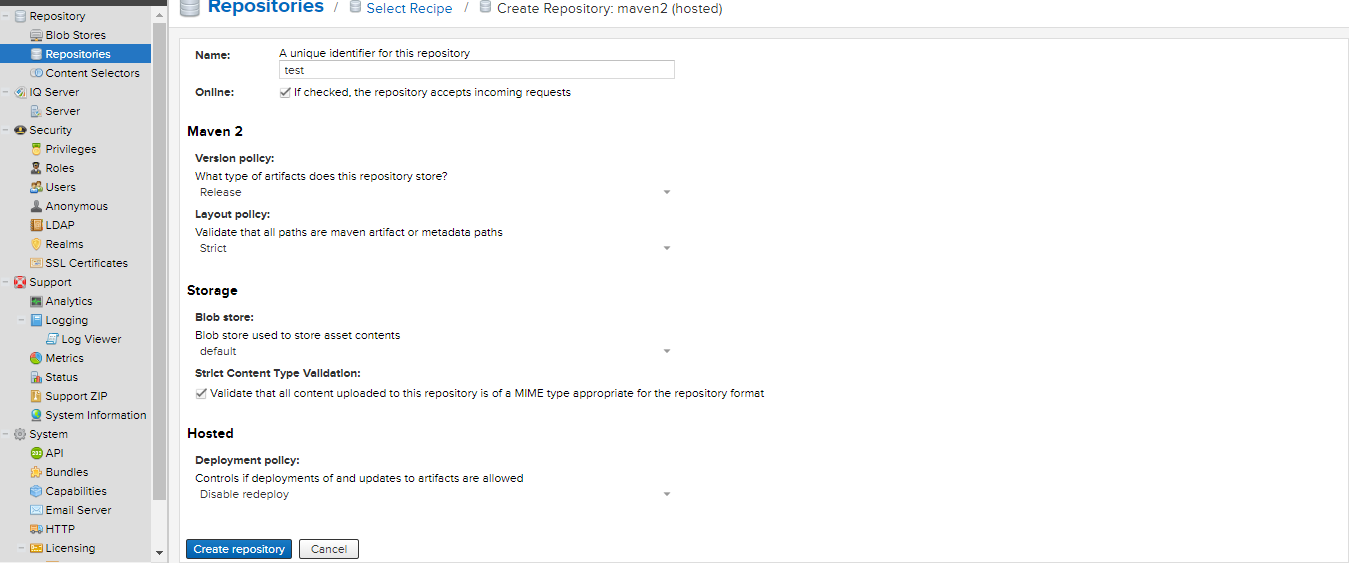
- 選擇maven2(hosted),hosted是本地倉庫,上傳到maven2(hosted)的jar將保存在私有倉庫中,maven2(proxy)是代理倉庫,如果配置gradle使用maven2(proxy),在拉取jar時,maven2(proxy)有相應的jar則直接返回給gradle,如果沒有相應的jar,測nexus從遠程倉庫中拉取jar並緩存在本地,並將jar返回到gradle,這裏選擇maven2(hosted)
![通過Nexus搭建maven私有倉庫,並通過gradle上傳jar]()
- 填寫倉庫配置,release的deployment policy設置爲Disable redeploy,將不允許對已經上傳的jar進行覆蓋
![通過Nexus搭建maven私有倉庫,並通過gradle上傳jar]()
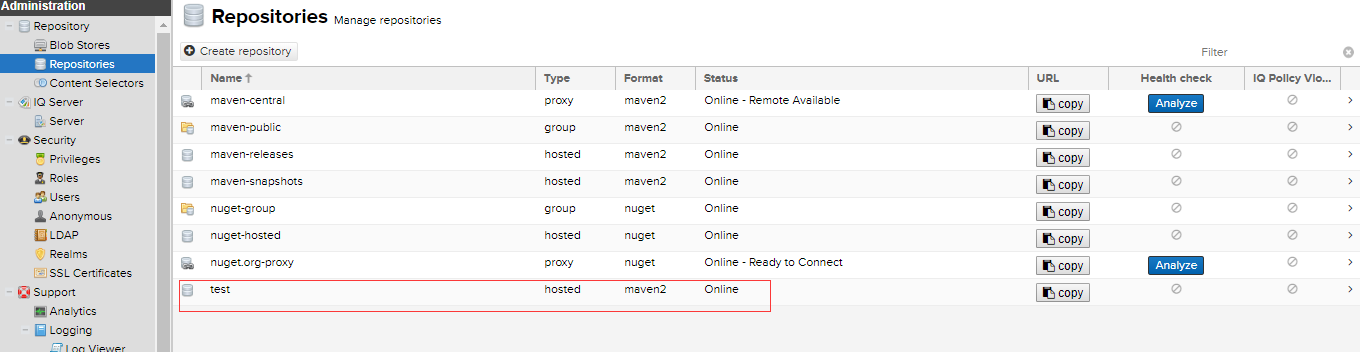
- 創建好的倉庫
![通過Nexus搭建maven私有倉庫,並通過gradle上傳jar]()
在idea中配置gradle上傳jar
-
編輯build.gradle
plugins { id 'java' id 'org.jetbrains.kotlin.jvm' version '1.2.71' id 'maven-publish' //添加這個plugin } group 'org.test' //version '1.0-SNAPSHOT' version '1.0' sourceCompatibility = 1.8 repositories { mavenCentral() } dependencies { compile "org.jetbrains.kotlin:kotlin-stdlib-jdk8" testCompile group: 'junit', name: 'junit', version: '4.12' compile 'org.jodd:jodd-core:5.0.4' } compileKotlin { kotlinOptions.jvmTarget = "1.8" } compileTestKotlin { kotlinOptions.jvmTarget = "1.8" } //打包源碼 task sourceJar(type: Jar) { from sourceSets.main.allSource } publishing { publications { maven(MavenPublication) { //指定group/artifact/version信息,可以不填。默認使用項目group/name/version作爲groupId/artifactId/version groupId project.group artifactId project.name version project.version //如果是war包填寫components.web,如果是jar包填寫components.java from components.java //配置上傳源碼 artifact sourceJar { classifier "sources" } } } repositories { maven { //指定要上傳的maven私服倉庫 url = "http://localhost/repository/test/" //認證用戶和密碼 credentials { username 'admin' password 'admin123' } } } } - 上傳jar
點擊gradle面板上的publishing->publish上傳jar在gradle使用私有倉庫
- 編輯build.gradle
repositories {
//    mavenCentral()
maven{//禁用默認的maven庫,從nexus默認的proxy倉庫拉取jar
    url "http://localhost/repository/maven-central/"
//        credentials {//如果沒有開啓匿名訪問需要添加認證
//            username "admin"
//            password "admin123"
//        }
}
        maven{//引用test倉庫
    url "http://localhost/repository/test/"
//        credentials {
//            username "admin"
//            password "admin123"
//        }
}
}
參考鏈接:
https://blog.csdn.net/KingBoyWorld/article/details/79135219
https://www.jianshu.com/p/9740778b154f