1、安裝elasticsearch
1.)關閉防火牆及SELinux
service iptables stop
chkconfig iptables off
chkconfig iptables --list
vim /etc/sysconfig/selinux
SELinux=disabled
setenforce 0
2.)配置jdk環境
vim /etc/profile.d/java.sh
export JAVA_HOME=/home/admin/jdk1.8.0_172/
export CLASSPATH=.:$JAVA_HOME/lib.tools.jar
export PATH=$JAVA_HOME/bin:$PATH
source /etc/profile.d/java.sh
3.)安裝ElasticSearch6.x
wget https://artifacts.elastic.co/downloads/elasticsearch/elasticsearch-6.2.4.tar.gz
tar -zxvf elasticsearch-6.2.4.tar.gz -C /home/admin/project/elk
cd /home/admin/project/elkelasticsearch-6.2.4
vim config/elasticsearch.yml
cluster.name: elasticsearch
node.name: node-1
network.host: 10.2.151.203
http.port: 9200
bootstrap.memory_lock: false
bootstrap.system_call_filter: false
http.cors.enabled: true
http.cors.allow-origin: "*"
4.)啓動elasticsearch
useradd elk
chown –R elk.elk /home/admin/project/elk/elasticsearch-6.2.4
./bin/elasticsearch –d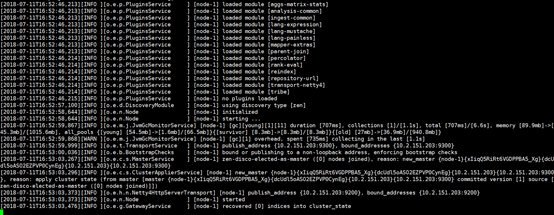
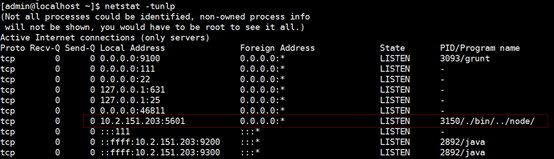
netstat –luntp #查看監聽端口9200 9300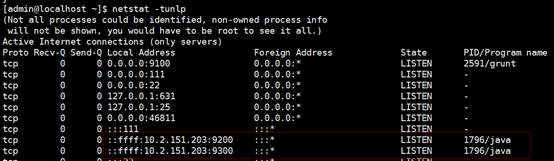
curl 10.2.151.203:9200 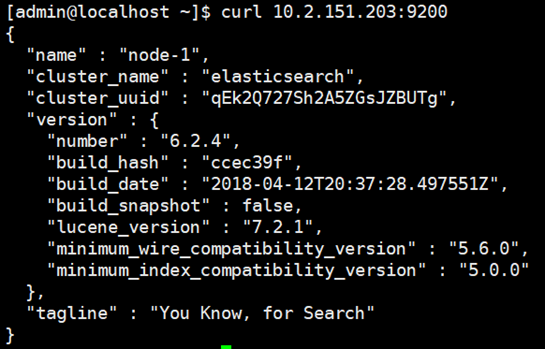
5.)啓動常見錯誤
uncaught exception in thread [main]
org.elasticsearch.bootstrap.StartupException: java.lang.RuntimeException: can not run elasticsearch as root
問題原因:不能使用root用戶啓動
解決方法:切換要其他用戶啓動
unable to install syscall filter:
java.lang.UnsupportedOperationException: seccomp unavailable:
問題原因:其實只是一個警告,主要是因爲你Linux版本過低造成的
解決方法:警告不影響使用,可以忽略
ERROR: bootstrap checks failed
memory locking requested for elasticsearch process but memory is not locked
問題原因:鎖定內存失敗
解決方法:切換到root用戶,編輯limits.conf配置文件
vim /etc/security/limits.conf
- hard nproc 65536
- soft nproc 65536
- hard nofile 65536
- soft nofile 65536
max number of threads [1024] for user [es] is too low, increase to at least [2048]
原因:無法創建本地線程問題,用戶最大可創建線程數太小
解決方案:切換到root用戶,進入limits.d目錄下,修改90-nproc.conf 配置文件
vim /etc/security/limits.d/90-nproc.conf
- soft nofile 65536
- soft nproc 65536
- soft nproc 2048
max virtual memory areas vm.max_map_count [65530] is too low, increase to at least [262144]
原因:最大虛擬內存太小
解決方案:切換到root用戶下,修改配置文件sysctl.conf
vim /etc/sysctl.conf
vm.max_map_count=655360
sysctl -p
system call filters failed to install; check the logs and fix your configuration or disable system call filters at your own risk
問題原因:因爲Centos6不支持SecComp
解決方法:在elasticsearch.yml中配置bootstrap.system_call_filter爲false,注意要在Memory下面:
bootstrap.memory_lock: false
bootstrap.system_call_filter: false
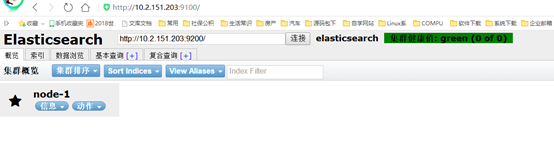
2、elasticsearch-head插件安裝
通過web界面來查看elasticsearch集羣狀態信息
1.)下載安裝nodejs
wget https://nodejs.org/dist/v8.11.3/node-v8.11.3-linux-x64.tar.xz
tar -zxvf node-v8.11.3-linux-x64.tar.gz -C /home/admin/project/elk/
cd /home/admin/project/elk/
mv node-v8.11.3-linux-x64/ node-v8.11.3
#配置nodejs環境變量
vim /etc/profile.d/node.sh
export NODE_HOME=/home/admin/project/elk/node-v8.11.3
export PATH=$NODE_HOME/bin:$PATH
export NODE_PATH=$NODE_HOME/lib/node_modules
source /etc/profile.d/node.sh
#查看nodejs是否生效
[admin@localhost node-v8.11.3]$ node -v
v8.11.3
[admin@localhost node-v8.11.3]$ npm -v
5.6.0
2.)安裝grunt
npm config set registry https://registry.npm.taobao.org
vim ~/.npmrc
registry=https://registry.npm.taobao.org
strict-ssl = false
npm install -g grunt-cli
#將grunt加入系統文件
ln -s /home/admin/project/elk/node-v8.11.3/lib/node_modules/grunt-cli/bin/grunt /usr/bin/grunt
3.)下載head二進制包
wget https://codeload.github.com/mobz/elasticsearch-head/zip/master
unzip elasticsearch-head-master.zip
cd elasticsearch-head-master
npm install
#如果速度較慢或安裝失敗,建議使用國內鏡像
npm install --ignore-scripts -g cnpm --registry=https://registry.npm.taobao.org
4.)修改elasticserach配置文件
vi ./config/elasticsearch.yml
#增加新的參數,這樣head插件可以訪問es
http.cors.enabled: true
http.cors.allow-origin: "*"
5.)修改Gruntfile.js配置
vim Gruntfile.js
#port: 9100上面增加hostname地址
hostname: "0.0.0.0",
6.)修改_site/app.js配置
vim _site/app.js
#localhost替換爲IP地址
this.base_uri = this.config.base_uri || this.prefs.get("app-base_uri") || "http://10.2.151.203:9200";
7.) 啓動grunt
grunt server
#如果啓動成功,則可以直接使用後臺運行,命令行可繼續輸入(但是如果想退出,則需要自己kill進程)
grunt server &
nohup grunt server & exit #後臺啓動
#啓動提示模塊未找到
> Local Npm module "grunt-contrib-jasmine" not found. Is it installed?
npm install grunt-contrib-jasmine #安裝模塊![elk6+filebeat+kafka安裝配置]()

3、安裝kibana
1.)下載安裝
wget https://artifacts.elastic.co/downloads/kibana/kibana-6.2.4-linux-x86_64.tar.gz
tar -zxvf kibana-6.2.4-linux-x86_64.tar.gz -C /home/admin/project/elk/
cd /ho me/admin/project/elk/ kibana-6.2.4-linux-x86_64
2.)修改配置
vim config/kibana.yml
server.port: 5601
server.host: “IP"
elasticsearch.url: http://IP:9200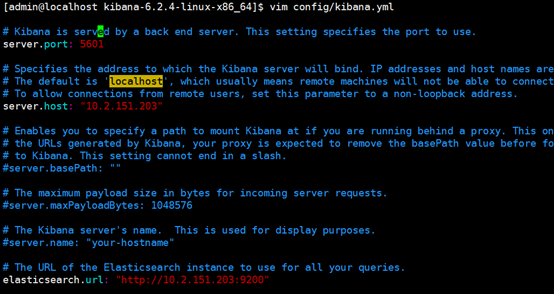
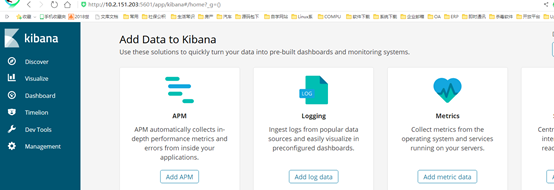
3.)啓動kibana
./bin/kibana
4、安裝logstash
1.)下載安裝
wget https://artifacts.elastic.co/downloads/logstash/logstash-6.2.4.tar.gz
tar -zxvf logstash-6.2.4.tar.gz -C /home/admin/project/elk/
cd /home/admin/project/elk/logstash-6.2.4
2.)新建模板
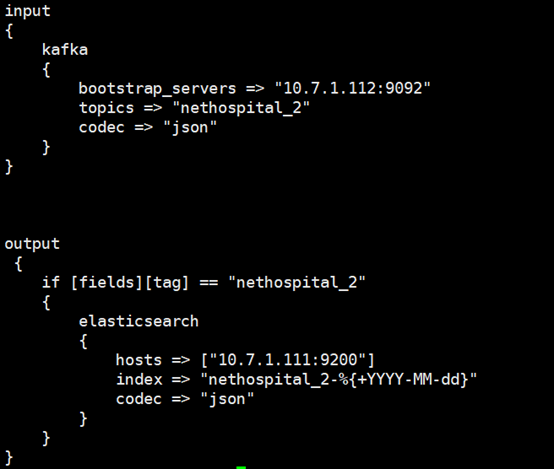
vim config/test.conf
input
{
kafka
{
bootstrap_servers => "10.7.1.112:9092"
topics => "nethospital_2"
codec => "json"
}
}
output
{
if [fields][tag] == "nethospital_2"
{
elasticsearch
{
hosts => ["10.7.1.111:9200"]
index => "nethospital_2-%{+YYYY-MM-dd}"
codec => "json"
}
}
}
3.)啓動logstash
nohup ./bin/logstash –f config/test.conf & # -f 指定配置文件
5、安裝kafka
1.)下載安裝
wget https://archive.apache.org/dist/kafka/1.0.0/kafka_2.11-1.0.0.tgz
wget http://mirrors.hust.edu.cn/apache/zookeeper/zookeeper-3.4.12/zookeeper-3.4.12.tar.gz
tar -zxvf kafka_2.11-1.0.0.tgz -C /home/admin/project/elk/
tar -zxvf zookeeper-3.4.12.tar.gz -C /home/admin/project/elk/
cd /home/admin/project/elk/kafka_2.11-1.0.0/
2.)修改kafka參數及啓動
vim config/zookeeper.properties
dataDir=/tmp/zookeeper/data # 數據持久化路徑
clientPort=2181 # 連接端口
maxClientCnxns=100 # 最大連接數
dataLogDir=/tmp/zookeeper/logs #日誌存放路徑
tickTime=2000 # Zookeeper服務器心跳時間,單位毫秒
initLimit=10 # 投票選舉新leader的初始化時間。
#啓動zookeeper
./bin/zookeeper-server-start.sh config/zookeeper.properties
#後臺啓動
nohup ./bin/zookeeper-server-start.sh config/zookeeper.properties &
3.)修改kafka參數及啓動
vim config/server.properties
broker.id=0
port=9092
host.name=10.2.151.203
num.network.threads=3
num.io.threads=8
socket.send.buffer.bytes=102400
socket.receive.buffer.bytes=102400
socket.request.max.bytes=104857600
log.dirs=/data/logs/kafka
num.partitions=2
num.recovery.threads.per.data.dir=1
log.retention.check.interval.ms=300000
zookeeper.connect=localhost:2181
zookeeper.connection.timeout.ms=6000
#啓動zookeeper
./bin/kafka-server-start.sh config/server.properties
#後臺啓動
nohup bin/kafka-server-start.sh config/server.properties &
4.)測試kafka
#創建topic (test)
bin/kafka-topics.sh --create --zookeeper 10.2.151.203:2181 --replication-factor 1 --partitions 1 --topic test
#查看topic
bin/kafka-topics.sh --list --zookeeper 10.2.151.203:2181
#啓動生產進程測試
bin/kafka-console-producer.sh --broker-list 10.2.151.203:9092 --topic test
#啓動啓動消費者進程
bin/kafka-console-consumer.sh --zookeeper 10.2.151.203:2181 --topic test --from-beginning
6、安裝filebeat
1.)下載安裝
wget https://artifacts.elastic.co/downloads/beats/filebeat/filebeat-6.2.4-linux-x86_64.tar.gz
tar –zxvf filebeat-6.2.4-linux-x86_64.tar.gz –C /home/admin/project/elk
cd /home/admin/project/elk/ filebeat-6.2.4-linux-x86_64
2.)配置filebeat
vim filebeat.yml
- input_type: log
#Paths that should be crawled and fetched. Glob based paths.
paths: - /home/admin/project/other_project/nh-interface/nh-interface.log
fields:
tag: nh-interface
multiline:
pattern: '^[0-9]{4}-[0-9]{2}.*'
negate: true
match: after
output.kafka:
enabled: true
hosts: ["AppElk1:9092","AppElk2:9092","AppElk3:9092"]
topic: 'hospital'
compression: gzip
max_message_bytes: 100000000
3)啓動filebeat
nohup ./filebeat -e -c filebeat.yml &
查看集羣狀態
curl -XGET 'http://10.2.151.203:9200/_cat/nodes'
curl -XGET 'http://10.2.151.203:9200/_cat/nodes?v'
curl -XGET 'http://10.2.151.203:9200/_cluster/state/nodes?pretty'
查看集羣master
curl -XGET 'http://10.2.151.203:9200/_cluster/state/master_node?pretty'
或curl -XGET 'http://10.2.151.203:9200/_cat/master?v'
查詢集羣的健康狀態
curl -XGET 'http://10.2.151.203:9200/_cluster/health?pretty'
或
curl -XGET 'http://10.2.151.203:9200/_cat/health?v'
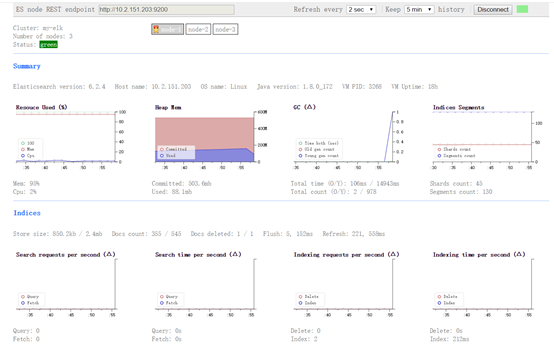
7、安裝cerebro插件
cerebo是kopf在es5上的替代者,通過web界面來管理和監控elasticsearch集羣狀態信息
1.)下載安裝
#wget https://github.com/lmenezes/cerebro/releases/download/v0.8.1/cerebro-0.8.1.tgz
#tar –zxvf cerebro-0.8.1.tgz /home/admin/project/elk
#cd /home/admin/project/elk/cerebro-0.8.1
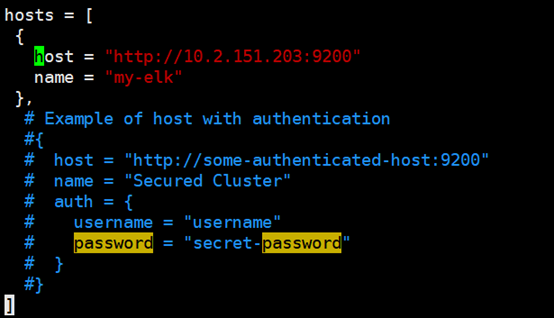
##vim conf/application.conf
#hosts = [****
{
host = "http://10.2.151.203:9200"
name = "my-elk"
},
]
2.)啓動/訪問
nohup ./bin/cerebro & #後臺運行
http://10.2.151.203:9000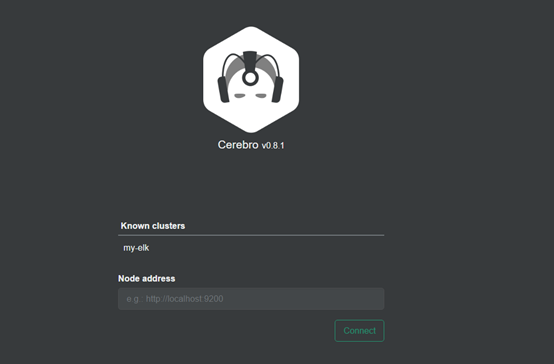
8、安裝bigdesk插件
bigdesk 統計分析和圖表化elasticsearch集羣狀態信息
1.)下載安裝
#wget https://codeload.github.com/hlstudio/bigdesk/zip/master
unzip bigdesk-master.zip
#mv bigdesk-master /home/admin/project/elk/elasticsearch-6.2.4/plugins/
#cd /home/admin/project/elk/elasticsearch-6.2.4/plugins/bigdesk-master/_site**
2.)使用 python -m SimpleHTTPServer 快速搭建http服務
指定端口8000
nohup python -m SimpleHTTPServer 8000 & #後臺運行