Zabbix批量導入主機
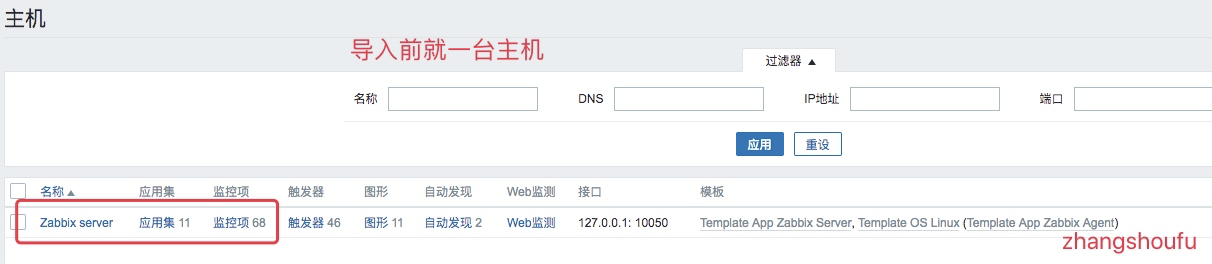
在實際工作環境中我們一個集羣裏面可能有十幾上百臺一摸一樣的主機,需要監控的內容也是一摸一樣的,這個時候我們就可以使用下面的方式批量導入主機了
1,我們先在Zabbix-web裏面配置好一臺主機,然後把配置的結果導出來,我們通過腳本批量替換一下就行
<?xml version="1.0" encoding="UTF-8"?>
<zabbix_export>
    <version>3.4</version>
    <date>2018-10-11T09:54:14Z</date>
    <groups>
        <group>
            <name>Web_Server</name>
        </group>
    </groups>
    <hosts>
        <host>
            //配置裏面的主機名稱
            <host>web01-7</host>
            //配置裏面的可見的名稱
            <name>web01-7</name>
            //描述信息
            <description>這是一個動態的web服務器</description>
            <proxy/>
            <status>0</status>
            <ipmi_authtype>-1</ipmi_authtype>
            <ipmi_privilege>2</ipmi_privilege>
            <ipmi_username/>
            <ipmi_password/>
            <tls_connect>1</tls_connect>
            <tls_accept>1</tls_accept>
            <tls_issuer/>
            <tls_subject/>
            <tls_psk_identity/>
            <tls_psk/>
            <templates>
                //引用的模版,我們需要提前給模版定義好
                <template>
                    <name>TCP Status</name>
                </template>
                //每一個模版是一個</template>標籤
                <template>
                    <name>Template OS Linux</name>
                </template>
            </templates>
            <groups>
                <group>
                    //屬於的那個羣組
                    <name>Web_Server</name>
                </group>
            </groups>
            <interfaces>
                <interface>
                    <default>1</default>
                    <type>1</type>
                    <useip>1</useip>
                    //agent端的IP地址
                    <ip>172.16.1.7</ip>
                    <dns/>
                    //agent端的端口
                    <port>10050</port>
                    <bulk>1</bulk>
                    <interface_ref>if1</interface_ref>
                </interface>
            </interfaces>
            <applications/>
            <items/>
            <discovery_rules/>
            <httptests/>
            <macros/>
            <inventory/>
        </host>
    </hosts>
</zabbix_export>
2,但是我們如何更改的。
其實我們只需要更改<host>標籤裏面的值即可,編寫一個腳本
[root@zabbix tmp]# cat test_zbx_host.sh
#!/bin/bash
export PATH=$PATH
cat >> zbx_host_medium.xml <<EOF
        <host>
            <host>$1</host>
            <name>$1</name>
            <description>$3</description>
            <proxy/>
            <status>0</status>
            <ipmi_authtype>-1</ipmi_authtype>
            <ipmi_privilege>2</ipmi_privilege>
            <ipmi_username/>
            <ipmi_password/>
            <tls_connect>1</tls_connect>
            <tls_accept>1</tls_accept>
            <tls_issuer/>
            <tls_subject/>
            <tls_psk_identity/>
            <tls_psk/>
            <templates>
                <template>
                    <name>TCP Status</name>
                </template>
                <template>
                    <name>Template OS Linux</name>
                </template>
            </templates>
            <groups>
                <group>
                    <name>Web_Server</name>
                </group>
            </groups>
            <interfaces>
                <interface>
                    <default>1</default>
                    <type>1</type>
                    <useip>1</useip>
                    <ip>$2</ip>
                    <dns/>
                    <port>10050</port>
                    <bulk>1</bulk>
                    <interface_ref>if1</interface_ref>
                </interface>
            </interfaces>
            <applications/>
            <items/>
            <discovery_rules/>
            <httptests/>
            <macros/>
            <inventory/>
        </host>
EOF
//腳本執行說明:
// sh test_zbx_host.sh Name Agent_ip comment
// 前兩個參數必須有。後面說明信息可以沒有
我們只需要把這些host主體追加到一個新的文件裏面,然後再給這個文件加上頭和尾導入就行
3,如果我們一條一條的執行命令還是很累,我們寫一個批量執行的命令,先生存一個需要管理的agent端,和名稱
[root@zabbix tmp]# cat host_ip.txt
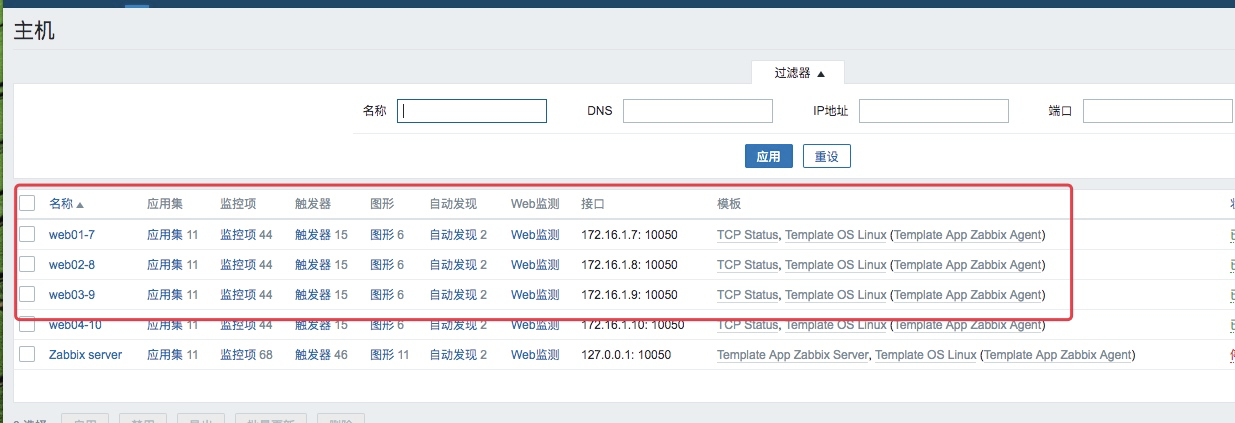
web01-7 172.16.1.7 這是第一個動態web服務器
web02-8 172.16.1.8 這是第二個動態web服務器
web03-9 172.16.1.9 這是第一個靜態web服務器
web04-10 172.16.1.10 這是二個靜態web服務器4,然後命令拼接一下
[root@zabbix tmp]# awk '{print "sh test_zbx_host.sh "$1,$2,$3}' host_ip.txt
sh test_zbx_host.sh web01-7 172.16.1.7 這是第一個動態web服務器
sh test_zbx_host.sh web02-8 172.16.1.8 這是第二個動態web服務器
sh test_zbx_host.sh web03-9 172.16.1.9 這是第一個靜態web服務器
sh test_zbx_host.sh web04-10 172.16.1.10 這是二個靜態web服務器
5,真正的執行,然後拼接頭部尾部
[root@zabbix tmp]# awk '{print "sh test_zbx_host.sh "$1,$2,$3}' host_ip.txt | bash
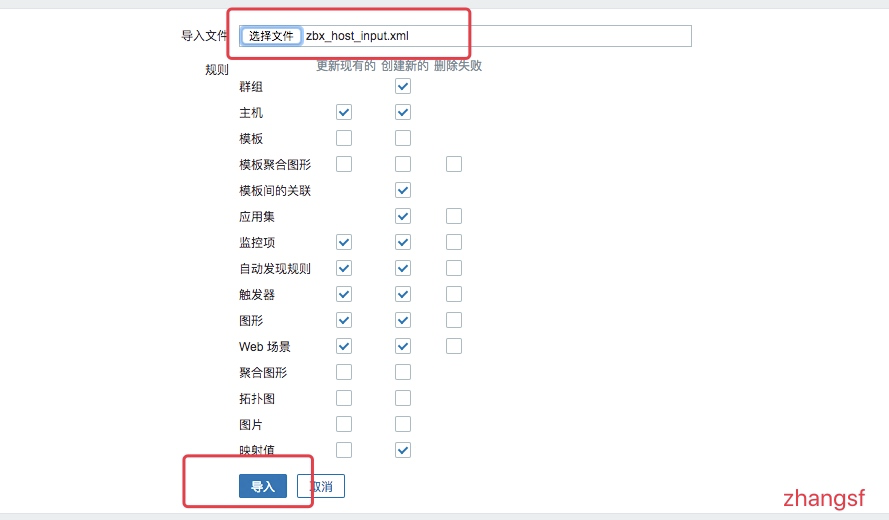
[root@zabbix tmp]# cat zbx_host_head.xml zbx_host_medium.xml zbx_host_tail.xml >> zbx_host_input.xml
//然後把文件導入到客戶機上