


講師的博客:https://www.cnblogs.com/wupeiqi/articles/6283017.html
建立本地緩存
用下面的命令,就可以把一個頁面爬取下來。不過再繼續其他操作之前先把爬取的內容在本地建立緩存:
import requests
r = requests.get('http://www.autohome.com.cn/news')  # 爬取頁面
print(r.text)  # 打印響應的內容
下面會試很多的方法,還是要避免每次都去爬一次相同的頁面。主要爬的太頻繁,不知道會不會被封。所以爬取過一次之後,在本地建立緩存,之後的各種分析就不用再去爬一遍了。
要緩存的就是 r = requests.get('http://www.autohome.com.cn/news') 這個,也就是這裏的r這個對象。不緩存的話,r是保存在內存中的,程序一旦退出就沒有了。這裏要做的就是對r這個對象進行序列化,把它保存爲本地的文件。由於r是一個python對象,無法使用JSON序列化,這裏可以用pickle,保存爲一個二進制文件。
序列化與反序列化
首先是把對象序列化,保存爲本地的二進制文件:
import pickle
with open('test.pk', 'wb') as f:
    pickle.dump(r, f)
只有再用的時候,就不需要再通過requests.get再去爬一遍了,直接從本地文件中取出內容反序列生成r對象:
import pickle
with open('test.pk', 'rb') as f:
    r = pickle.load(f)
封裝個模塊
然後,每次自己都要想一下之前有沒有緩存過也很麻煩,所以在封裝一下,自動判斷有沒有緩存過。如果沒有就去爬網頁,然後生成緩存。如果有就去緩存的文件裏讀。
創建一個文件夾“pk”專門存放緩存的文件。假設測試的python文件是 s1.py 那麼就生成一個 pk/s1.pk 的緩存文件,只要判斷是否存在該文件,就可以知道是否緩存過了:
import os
import pickle
import requests

def get_pk_name(path):
    basedir = os.path.dirname(path)
    fullname = os.path.basename(path)
    name = os.path.splitext(fullname)[0]
    pk_name = '%s/pk/%s.%s' % (basedir, name, 'pk')
    return pk_name

pk_name = get_pk_name(__file__)
response = None
if os.path.exists(pk_name):
    print("已經爬取過了,獲取緩存的內容...")
    with open(pk_name, 'rb') as f:
        response = pickle.load(f)

# 只有在沒有緩存過頁面的時候才進行爬取
if not response:
    print("開始爬取頁面...")
    response = requests.get('http://www.autohome.com.cn/news')
    # 爬完之後記得保存,下次就不用再去爬取了
    with open(pk_name, 'wb') as f:
        pickle.dump(response, f)

# 從這裏開始寫真正的代碼
print(response.text)
Requests
中文官方文檔:http://cn.python-requests.org/zh_CN/latest/user/quickstart.html
安裝模塊:
pip install requests發送請求
r = requests.get('http://www.autohome.com.cn/news')讀取響應內容
print(r.text)文本編碼
上面可能會有亂碼,那就是編碼不對,可以查看當前的編碼,也可以改變它。默認的編碼就是 'ISO-8859-1' :
print(r.encoding)
r.encoding = 'ISO-8859-1'
另外還可以自動獲取頁面的編碼,解決亂碼問題:
r.encoding = r.apparent_encoding
print(r.text)
二進制響應內容
如果要自己找編碼,應該也是在這裏面找
print(r.content)在下載的時候,就要用到二進制的響應內容了
響應狀態碼
print(r.status_code)正常返回的狀態碼是200
Cookie
cookie_obj = r.cookies
cookie_dict = r.cookies.get_dict()
r.cookies 是一個對象,這個對象的的行爲和字典類似,也可以像對象那樣使用。這裏還可以用 get_dict() 方法轉成原生的字典。
Beautiful Soup
中文官方文檔:https://beautifulsoup.readthedocs.io/
安裝模塊:
pip install beautifulsoup4這裏繼續對上面爬取到的內容進行分析,把爬取到的內容先把編碼轉正確了,然後這裏要分析的是 r.text 文本的響應內容:
import requests
from bs4 import BeautifulSoup

r = requests.get('http://www.autohome.com.cn/news')
r.encoding = r.apparent_encoding
soup = BeautifulSoup(r.text, features='html.parser')
features 參數是指定一個處理引擎,這裏用的是默認的,效率一般,但是不用額外的安裝。如果是生產環境,還有更高效的處理引擎。
這裏最後拿到了一個 soup 對象,之後又一系列的方法,可以提取出各種內容。
查找方法
soup.find方法,可以找到第一個符合條件的對象。可以找標籤,也可以找id等,還可以多條件組合使用:
soup.find("div")
soup.find(id="link3")
soup.find("div", id="link3")
soup.find_all方法,和find的用法一樣,實際上find方法的實現也是調用find_all方法。find_all方法會返回所有符合條件的對象,返回的對象是在一個列表裏的。
打印對象和對象的文本
直接打印對象會打印整個html標籤,如果只需要標籤中的文本,可以通過對象的text屬性:
soup = BeautifulSoup(r.text, features='html.parser')
target = soup.find('div', {'class': "article-bar"})
print(type(target), target, target.text)
獲取對象的所有屬性
對象的attrs屬性裏是這個html標籤的所有的屬性:
target = soup.find(id='auto-channel-lazyload-article')
print(target.attrs)
實戰
僅憑上面這點知識點就可以開始下面的實戰了
爬取汽車之家新網諮詢
下面是代碼,找到了沒一條新聞諮詢的a連接的地址,以及標題,最後還把對應的圖片下載到了本地(先建一個img文件夾):
# check_cache.py
"""用來檢查是否有本地緩存的小模塊"""

import os

def get_pk_name(path):
    basedir = os.path.dirname(path)
    fullname = os.path.basename(path)
    name = os.path.splitext(fullname)[0]
    pk_name = '%s/pk/%s.%s' % (basedir, name, 'pk')
    return pk_name

# s1.py
"""爬取汽車之家新網諮詢"""

import os
import pickle
import requests
from bs4 import BeautifulSoup

from check_cache import get_pk_name

pk_name = get_pk_name(__file__)
response = None
if os.path.exists(pk_name):
    print("已經爬取過了,獲取緩存的內容...")
    with open(pk_name, 'rb') as f:
        response = pickle.load(f)

# 只有在沒有緩存過頁面的時候才進行爬取
if not response:
    print("開始爬取頁面...")
    response = requests.get('http://www.autohome.com.cn/news')
    # 爬完之後記得保存,下次就不用再去爬取了
    with open(pk_name, 'wb') as f:
        pickle.dump(response, f)

response.encoding = response.apparent_encoding  # 獲取頁面的編碼,解決亂碼問題
# print(response.text)

soup = BeautifulSoup(response.text, features='html.parser')
target = soup.find(id='auto-channel-lazyload-article')
# print(target)
# obj = target.find('li')
# print(obj)
li_list = target.find_all('li')
# print(li_list)
for i in li_list:
    a = i.find('a')
    # print(a)
    # print(a.attrs)  # 有些li標籤裏沒有a標籤,所以可能會報錯
    if a:  # 這樣判斷一下就好了
        # print(a.attrs)  # 這是一個字典
        print(a.attrs.get('href'))  # 那就用操作字典的方法來獲取值
        # tittle = a.find('h3')  # 這個類型是對象
        tittle = a.find('h3').text  # 這樣拿到的纔是文本
        print(tittle, type(tittle))  # 不過打印出來差不多,都會變成字符串,差別就是h3這個標籤
        img_url = a.find('img').attrs.get('src')
        print(img_url)
        # 上面獲取到了圖片的url,現在可以下載到本地了
        img_response = requests.get("http:%s" % img_url)
        if '/' in tittle:
            file_name = "img/%s%s" % (tittle.replace('/', '_'), os.path.splitext(img_url)[1])
        else:
            file_name = "img/%s%s" % (tittle, os.path.splitext(img_url)[1])
        with open(file_name, 'wb') as f:
            f.write(img_response.content)
登錄抽屜
這裏要解決一個登錄的問題。
登錄有2種,一種是Form表單驗證,還有一種是AJAX請求。這是一個使用AJAX做登錄請求的網站。
下面是幾張瀏覽器調試工具的截圖,主要是要找一下,登錄請求需要提交到哪裏,提交哪些信息,以及最後會返回的內容。
登錄的AJAX請求: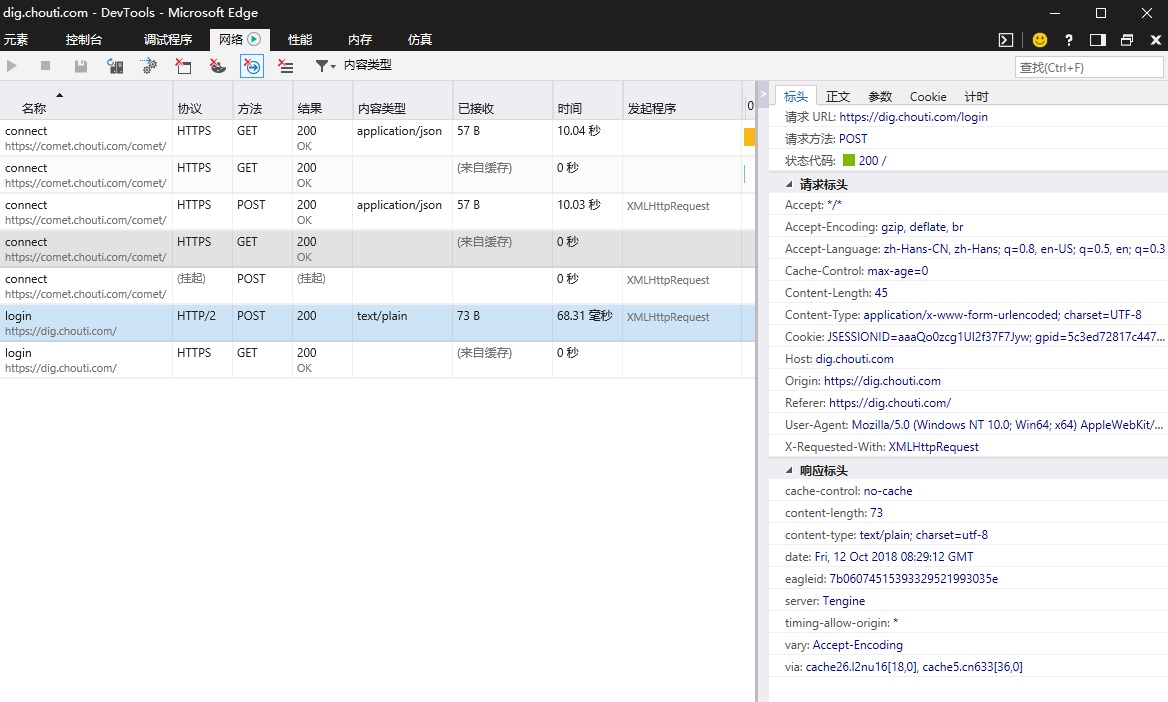
請求正文: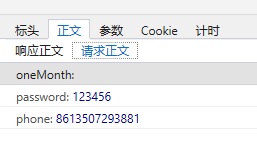
響應正文:
登錄請求的代碼如下:
import requests

post_dict = {
    'phone': '8613507293881',  # 從請求正文裏發現,會在手機號前加上86
    'password': '123456',
}

# 所有的請求頭可以從請求標頭裏找到,不過不是必須的
headers = {
    'User-Agent': '',  # 這個網站要驗證這個請求頭,不過只要有就可以通過
}

# 從標頭裏可以得知,請求的url和請求的方法
response = requests.post(
    url='https://dig.chouti.com/login',
    data=post_dict,
    headers=headers,
)

print(response.text)
# 這裏還有返回的cookies信息,登錄成功關鍵是要拿到成功的cookie
cookie_dict = response.cookies.get_dict()
print(cookie_dict)
登錄的套路
上面使用了錯誤的用戶名和密碼,在繼續登錄驗證之前,看了解下登錄的機制。
登錄肯定是要提交驗證信息的,一般就用戶名和密碼。然後請求驗證之後,服務端會記錄一個session,然後會返回給客戶端一個cookie。之後用戶每次請求都帶着這個cookie,服務端收到請求後就知道這個請求是那個用戶提交的了。
不過這個網站有一點不一樣,用戶在提交驗證信息的時候,不但要提交用戶名和密碼,還要提交一個gpsd。然後服務端驗證通過後,會把這次收到的gpsd記錄下來。用戶之後的cookie裏就是要帶着這個gpsd就能驗證通過。驗證請求的gpsd可以從第一次發送get請求的返回的cookie裏獲取到。另外用戶驗證通過後,服務端會返回一個cookie,這個cookie裏也有一個gpsd,但是是一個新的gpsd,並且是沒有用的,這裏就會混淆我們,在進行驗證這不的時候造成一些困擾。
具體如何應對這類特殊情況,只能用瀏覽器,打開調試工具,然後一點一點試了。
登錄並點贊
下面就是登錄驗證,獲取到第一條諮詢的標題和id,發送post請求點贊:
import requests
from bs4 import BeautifulSoup

headers = {
    'User-Agent': '',  # 這個網站要驗證這個請求頭,不過只要有就可以通過
}

r1 = requests.get('https://dig.chouti.com', headers=headers)
r1_cookies = r1.cookies  # 這裏有個gpsd,登錄驗證的時候要一併提交
print(r1_cookies.get_dict())

# 不能把密碼上傳啊
with open('password/s2.txt') as f:
    auth = f.read()
    auth = auth.split('\n')

post_dict = {
    'phone': '86%s' % auth[0],  # 從請求正文裏發現,會在手機號前加上86
    'password': auth[1],
}

# 這個網站的登錄機制是,發送驗證信息和cookies裏的gpsd,成功後給你的gpsd授權
# 之後的請求只有cookies裏有這個授權過的gpsd就能認證通過
r2 = requests.post(
    url='https://dig.chouti.com/login',
    data=post_dict,
    headers=headers,
    cookies={'gpsd': r1_cookies['gpsd']}
)

print(r2.text)
r2_cookies = r2.cookies  # 這裏也會返回一個新的gpsd,但是無用。
print(r2_cookies.get_dict())

# 獲取諮詢,然後點贊
r3 = requests.get(
    url='https://dig.chouti.com',
    headers=headers,
    cookies={'gpsd': r1_cookies['gpsd']},
)
r3.encoding = r3.apparent_encoding
soup = BeautifulSoup(r3.text, features='html.parser')
target = soup.find(id='content-list')
item = target.find('div', {'class': 'item'})  # 就只給第一條點贊吧
news = item.find('a', {'class': 'show-content'}).text
linksId = item.find('div', {'class': 'part2'}).attrs['share-linkid']
print('news:', news.strip())

# 點贊
r = requests.post(
    url='https://dig.chouti.com/link/vote?linksId=%s' % linksId,
    headers=headers,
    cookies={
        'gpsd': r1_cookies['gpsd'],
    }
)

print(r.text)
Requests 模塊詳細
找到requests.get()方法的源碼,在 requests/api.py 這個文件裏,有如下這些方法:
- requests.get()
- requests.options()
- requests.head()
- requests.post()
- requests.put()
- requests.patch()
- requests.delete()
另外還有一個 requests.request() 方法。上面這些方法裏最終調用的都是這個request方法。下面就來看下這些方法裏都提供了寫什麼參數。
參數
在 requests.request() 方法裏所有的參數如下:
- method : 提交方式。request方法裏的參數,其他方法裏在調用request方法時,都會填好。
- url : 提交地址
- params : 在url中傳遞的參數。也就是get方式的參數
- data : 在請求體裏傳遞的參數。
- json : 在請求體裏傳遞的參數。和data不一樣,會把json對象序列化後,把整個字符串發出去。
- headers : 請求頭。有幾個重要的請求頭信息,下面會列出
- cookies : 這個就是Cookies。它是放在請求頭的Cookie裏發送給服務端的。
- files : 上傳文件。下面有使用示例
- auth : 設置 HTTP Auth 的認證信息。下面有展開
- timeout : 超時時間。單位是秒,類型是float。也可以是個元祖(connect timeout, read timeout)
- allow_redirects : 是否允許重定向。默認是True。
- proxies : 使用代理。具體怎麼用這裏沒記
- verify : 對於https的請求,如果設爲Flase,會忽略證書。
- stream : 下載時的參數,如果是False,則先一次全部下載到內存。如果內容太大,下面有展開。
- cert : 提交請求如果需要附帶證書文件,則要設置cert。
data 和 json 參數
這兩個參數都是在請求體力傳遞的參數。但是格式不同,在網絡上最終傳遞的一定都是序列化的字符串。不同的類型會生成一個不同的請求頭。在 requests/models.py 文件裏可以找到如下的代碼:
if not data and json is not None:
    content_type = 'application/json'

if data:
    if isinstance(data, basestring) or hasattr(data, 'read'):
        content_type = None
    else:
        content_type = 'application/x-www-form-urlencoded'
也就是不同的格式,會設置不同的 Content-Type 請求頭:
data 請求頭:'application/x-www-form-urlencoded'
json 請求頭:'application/json'
而後端收到請求後,也就可以先查找請求頭裏的 Content-Type ,然後再解析請求體裏的數據。
爲什麼要用兩種格式?
Form表單提交的是data數據,並且Form只能提交字符串或列表,是沒有字典的。也就是data這個字典裏的value的值只能是字符串或列表,不能是字典。(data字典裏不能套字典)
如果就是需要向後端提交一個字典的話,那麼只能使用josn了。
請求頭
- Referer : 上一次請求的url
- User-Agent : 客戶端使用的瀏覽器
發送文件
這是最基本的用法,字典的key f1,就是Form表單的name。這裏實例用了request方法來提交請求,之後的例子只有file_dict不同:
file_dict = {
    'f1': open('test1.txt', rb)
}
requests.request(
    method='POST',
    url='http://127.0.0.1:8000/test/',
    files=file_dict
)
定製文件名:
file_dict = {
    'f2': ('mytest.txt', open('test2.txt', rb))
}
定製文件內容(沒有文件對象了,文件名當然也得自己定了):
file_dict = {
    'f3': ('test3.txt', "自己寫內容,或者從文件裏讀取到的內容")
}
HTTP Auth
HTTP Auth是一種基本連接認證。比如家裏用的路由器、ap,用web登錄時會彈框(基本登錄框,這個不是模態對話框),就是這種認證方式。它會把用戶名和密碼通過base64加密後放在請求頭的 Authorization 裏發送出去。
使用的示例代碼:
import requests

def param_auth():
    from requests.auth import HTTPBasicAuth

    ret = requests.get('https://api.github.com/user', auth=HTTPBasicAuth('wupeiqi', 'sdfasdfasdf'))
    print(ret.text)
在 requests.auth 裏看到了幾個類,應該是不同的加密或者認證方式,但是本質都是把認證信息加密後放在請求頭裏發送。這裏就用 HTTPBasicAuth 舉例了。下面是 HTTPBasicAuth 的源碼:
class HTTPBasicAuth(AuthBase):
    """Attaches HTTP Basic Authentication to the given Request object."""

    def __init__(self, username, password):
        self.username = username
        self.password = password

    def __eq__(self, other):
        return all([
            self.username == getattr(other, 'username', None),
            self.password == getattr(other, 'password', None)
        ])

    def __ne__(self, other):
        return not self == other

    def __call__(self, r):
        r.headers['Authorization'] = _basic_auth_str(self.username, self.password)
        return r
上面的過程很簡單,把用戶名和密碼通過 _basic_auth_str 方法加密後,加到請求頭的 'Authorization' 裏。
這種認證方式比較簡單,發佈到公網上的網站不會用這種認證方式。
stream 下載
發送完請求,不立即下載全部內容(一次把完整的內容全部下載到內存)。而是通過迭代的方式,一點一點進行下載:
import requests

def param_stream():
    from contextlib import closing
    with closing(requests.get('http://httpbin.org/get', stream=True)) as r:
        # 在此處理響應。
        for i in r.iter_content():
            print(i)  # 這裏用二進制打開個文件寫,應該就好了
Session
多次請求的時候,使用 requests.Session() 會自動幫我們管理好Cookie,另外還會設置好一些默認信息,比如請求頭等等。
用法如下:
import requests

session = requests.Session()  # 生成一個session實例
# 之後的requests請求,使用session替代requests,比如get請求如下
r1 = session.get('https://dig.chouti.com')
不如看下源碼:
class Session(SessionRedirectMixin):
    """A Requests session.

    Provides cookie persistence, connection-pooling, and configuration.

    Basic Usage::

      >>> import requests
      >>> s = requests.Session()
      >>> s.get('http://httpbin.org/get')
      <Response [200]>

    Or as a context manager::

      >>> with requests.Session() as s:
      >>>     s.get('http://httpbin.org/get')
      <Response [200]>
    """

    __attrs__ = [
        'headers', 'cookies', 'auth', 'proxies', 'hooks', 'params', 'verify',
        'cert', 'prefetch', 'adapters', 'stream', 'trust_env',
        'max_redirects',
    ]
除了實例化後使用,還可以像文件操作一樣用with的方法使用。
attrs 列表裏的值,就是session會自動幫我們設置的所有的屬性。
比如headers,它會默認在每次發送的時候添加如下的請求頭:
def default_headers():
    """
    :rtype: requests.structures.CaseInsensitiveDict
    """
    return CaseInsensitiveDict({
        'User-Agent': default_user_agent(),
        'Accept-Encoding': ', '.join(('gzip', 'deflate')),
        'Accept': '*/*',
        'Connection': 'keep-alive',
    })

# User-Agent 的值是這樣的,"python-requests/2.19.1" 後面是requests模塊的軟件版本,會變。
# 可以方便的改掉
s = requests.Session()
s.headers['User-Agent'] = ""
學到這裏,之後再發送請求,尤其是要和網站進行多次交互的。就新把Session設置好,然後用Session來請求。所有的設置都會保存在Session的實例裏,重複使用,自動管理。
優化登錄點贊
之前自動登錄點讚的例子,如果使用session改一下就簡單多了,完全不用管cookie:
import requests
from bs4 import BeautifulSoup

session = requests.Session()

# 默認的 User-Agent 的值是 "python-requests/2.19.1" 會被反爬,需要改一下
session.headers['User-Agent'] = ""
session.get('https://dig.chouti.com')

# 不能把密碼上傳啊
with open('password/s2.txt') as f:
    auth = f.read()
    auth = auth.split('\n')

post_dict = {
    'phone': '86%s' % auth[0],  # 從請求正文裏發現,會在手機號前加上86
    'password': auth[1],
}
session.post('https://dig.chouti.com/login', data=post_dict)

# 獲取諮詢,然後點贊
r3 = session.get('https://dig.chouti.com')
r3.encoding = r3.apparent_encoding
soup = BeautifulSoup(r3.text, features='html.parser')
target = soup.find(id='content-list')
item = target.find('div', {'class': 'item'})
news = item.find('a', {'class': 'show-content'}).text
linksId = item.find('div', {'class': 'part2'}).attrs['share-linkid']
print('news:', news.strip())

# 點贊
r = session.post('https://dig.chouti.com/link/vote?linksId=%s' % linksId)
print(r.text)