一、通信加密和解密技術概述
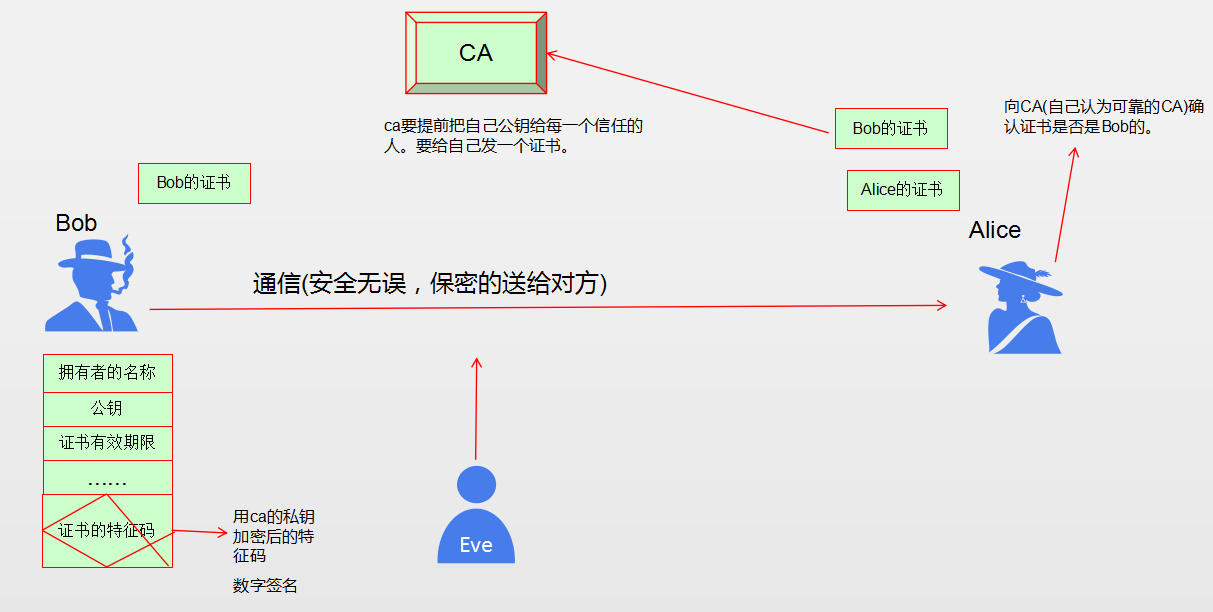
1.1、Bob和Alice的愛情故事
早些年間,戀人們之間的交往以書信溝通較爲頻繁,在那個年代,這種戀愛的人叫筆友。假設Bob和Alice正是處於這一時代,Bob和Alice戀愛了,他們兩個好不容易走到一起,可是Eve也喜歡Alice,他妒忌他們兩個人。於是想方設法的想竊取他們之間的書信聯繫。某天,Bob和Alice由於一些觀念的不統一,鬧矛盾了,於是Bob想寫一封信向Alice道歉,併合好,信的內容大概是:
對不起,Alice,是我太狹隘,這次我是做錯了。希望你能原諒我,我們合好吧。我還是喜歡你。她們(Bob和Alice)的溝通方式大概圖解如下(如果不加密的情況下):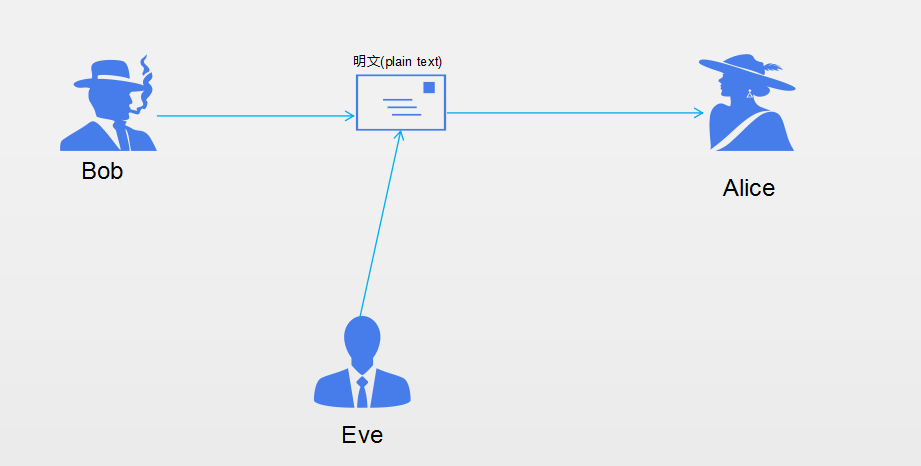
Eve作爲第三方竊聽者,他可以看到Bob發給Alice的信箋的內容,這樣他就可以瞭解Bob和Alice之間的進展情況。他甚至可以通過一些特殊的手段來修改Bob發給Alice的信箋的內容,更改原來的意思。比如他把信箋的內容修改爲以下部分:
Alice,我們分手吧,我們不適合,我不再喜歡你了。 這樣Bob和Alice之間就這樣因爲Eve的干預可能導致最終Alice心灰意冷,最終和Bob走向一個不好的結局。現在,我們假設,Bob對書信的內容進行加密,然後發送給Alice。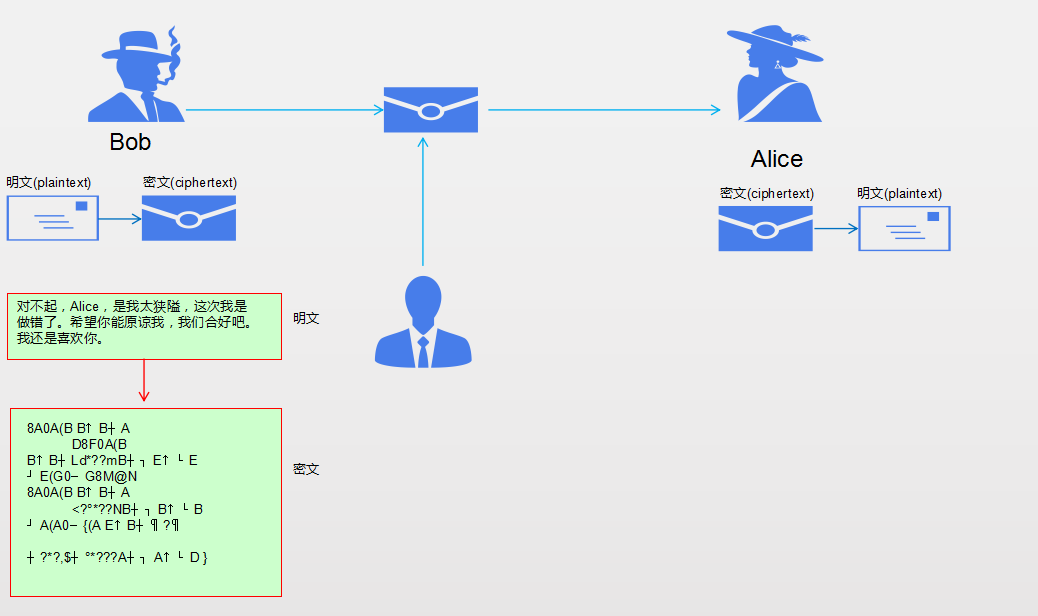
以上簡單通過Bob與Alice的書信往來簡單的說明了一下通信過程中加密與不加密的區別,實際情況遠比這要複雜的多。我們先來看看常見的一些術語名詞。
1.2、常見術語
明文(plaintext):沒有加密過的原始內容;
密文(ciphertext):對原始內容經過特殊處理過的內容;
加密(encrypt):對明文經過特殊處理後,可以實現隱藏原始含義的操作;
解密(decrypt):對密文進行處理後,可以看到原始內容含義,是加密的反向過程;
僞裝(spoofing):假設自己是某某某,去完成一些不可告人的事情;
否認(repudiation):對自己答應過的事情表示否認;
密碼破譯(cryptanalysis):簡稱爲破譯,有時候叫密碼分析,就是可以對加密的數據進行破解;
破譯者(cryptanalyst):實現密碼破譯的人或者機器;
密碼算法,簡稱算法(algorithm):加密和解密過程中用到的規則;
加密算法:從明文生成密文的步驟,表示加密的步驟,加密過程中要用到加密算法;
解密算法:從密文生成明文的步驟,表示解密的步驟,解密過程中要用到解密算法;
密碼算法:加密和解密的算法合在一起統稱爲"密碼算法";
密鑰(key):密碼算法中需要密鑰(key);
中間人(man-in-the-middle attack):假設自己是各種身份,與其他人進行僞裝通信;假設A和B通信,中間人爲C,C對A宣稱自己就是B,對B宣稱自己就是A;
暴力***(brute-force attack):也叫窮舉搜索(exhaustive search),一種用於破解的方式;
單向加密(one way encryption):一種特殊加密方式,可以提取原始數據的特徵碼或者消息摘要碼;
單向散列函數(one-way hash function):單向加密過程中用到的加密函數;
對稱密碼(symmetric cryptography):對稱密碼也叫對稱加密(symmetric encryption),解密過程和解密過程使用同一個密鑰的方式;
非對稱密碼(asymmetric cryptography):非對稱密碼也叫非對稱加密(asymmetric encryption)或者叫公鑰加密(public-key encryption);
密鑰對(key pair):公鑰加密體系中成對密鑰(公鑰和私鑰);
公鑰(public key):可以公開示人的密鑰;
私鑰(private key):不可以公開示人,要自己好好保留的密鑰;
公鑰加密算法:公鑰加密過程中要用到的算法;
常用的公鑰加密算法:RSA,DSA等;
對稱加密算法:對稱加密過程中要用到的算法;
常用的對稱加密算法:DES,3DES,AES,IDEA,CAST5等;
公鑰基礎設施(Public-key Infrastructure,PKI):與證書頒發,吊銷,申請註冊等相關的一個龐大體系;
認證(簽證)機構(Certification Authority,CA):PKI中的一部分,與證書籤署有關的;
註冊機構(Registration Authority,RA):對申請者的身份經過驗證,並註冊公鑰成證書的一個機構,是PKI中的一部分;
證書吊銷列表(Certificate Revocation List):與證書吊銷有關係的,屬於PKI中的一部分;
倉庫(repository),證書存儲庫:保存證書的數據庫;
證書(certificate):申請人向CA提交申請後,CA向申請人頒發的一種用於驗證身份的東西,證書中包含了對應申請人的公鑰以及其他相關信息;
數字簽名(digital signature):
混合密碼系統(hybrid cryptosystem):將對稱加密體系和公鑰加密體系結合起來的方式;
1.3、安全的目標以及常見***類型和解決方案
1、安全的目標有以下幾點
- 保密性(confidentiality)
- 完整性(integrity)
- 可用性(availability)
2、現實生活中,常見的***類型
(1) 威脅到保密性的
- 竊聽
- 通信量分析
(2) 威脅到完整性的
- 更改
- 僞裝
- 重放
- 否認
(3) 威脅到可用性的
- 拒絕服務器(Dos)
3、解決方案
(1) 通過技術來實現
解密和解密。解密和解密可以分爲兩大類:
- 傳統加密方法(替代加密方法、置換加密方法等)
- 現代加密方法(現代塊加密方法)
(2) 通過服務來實現
用於抵禦***的服務,也即是爲了上述安全目標而特地設計的安全服務。
- 認證機制
- 訪問控制機制
4、密鑰算法和協議
- 對稱加密
- 公鑰加密(非對稱加密)
- 單向加密
- 認證協議
二、對稱加密、非對稱加密、單向加密以及密鑰交換
2.1、對稱加密
對稱加密就是加密和解密使用同一個密鑰。常見的對稱加密算法有:
DES:Data Encryption Standard,數據加密標準,已經被破解;
3DES:Triple DES,三重DES,有些場景中也在用,不過DES能被破解,3DES也能被破解;
AES:Advanced Encryption Standard,高級加密標準,比較推薦。
根據密鑰長度,它有128bits,192bits,256bits以及384bits的;
還有其他的:
Blowfish,Twofish,IDEA,RC6,CAST5等.
對稱加密特點
- 加密和解密使用同一個密鑰;
- 將原始數據分割爲多個固定大小的塊(多個分組),逐個進行加密;
對稱加密缺點:
- 密鑰過多;
- 密鑰分發困難;
對稱加密請看下面圖解: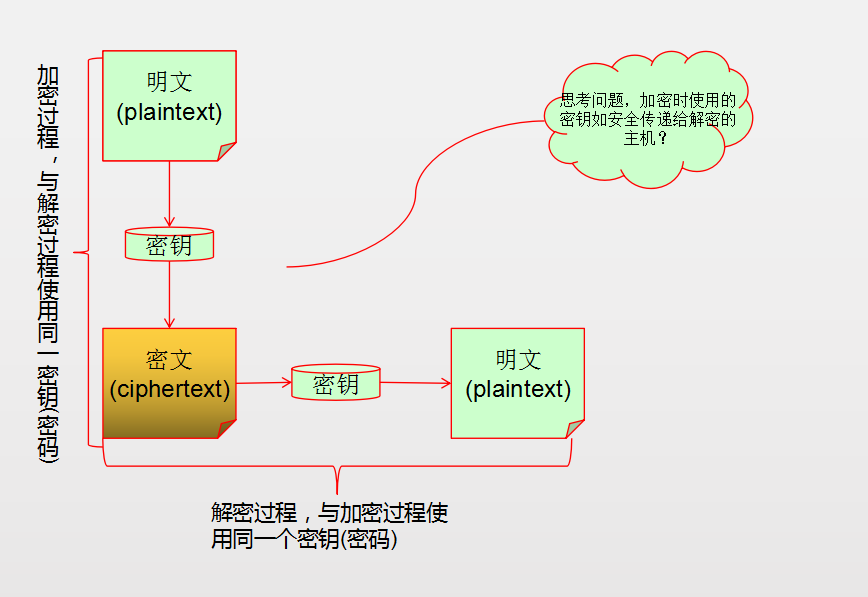
2.2、非對稱加密
非對稱加密又稱爲公鑰加密,它的密鑰有公鑰和私鑰兩種,是成對出現的,俗稱密鑰對兒。
- 公鑰:從私鑰中提取產生,可公開給所有人;
- 私鑰:通過工具創建,使用者自己留存,必須保證其私密性;
公鑰加密特點:
用公鑰加密的數據,只能用與之對應的私鑰才能解密;用私鑰加密的數據,只能用與之對應的公鑰才能解密。
公鑰加密用途:
- 數字簽名(主要在於讓接受方確認發送方的身份);
- 密鑰交換(發送方用對方的公鑰加密一個用於對稱加密的密鑰,併發送給對方);
- 數據加密(這裏的數據指的是比較大的數據,有公鑰加密效率較低,雖然安全,對於生活中的模型,加密大數據還是用對稱加密的方式);
公鑰加密常見的算法有:
RSA,DSA,ELGamal
RSA: Digital Signature Standard,數據簽名標準;
DSA:Digital Signature Algorithm,數據簽名算法
公鑰加密圖解如下: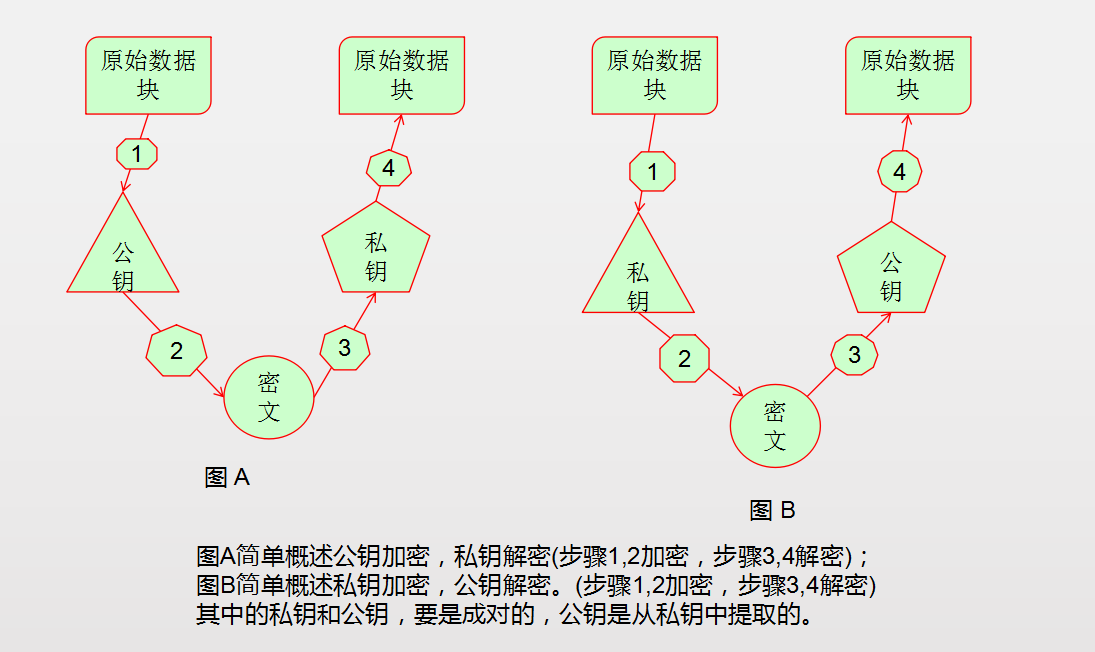
2.3、單向加密
單向加密,即提取數據指紋信息,只能加密,不能解密;(一種計算特徵碼的方式)
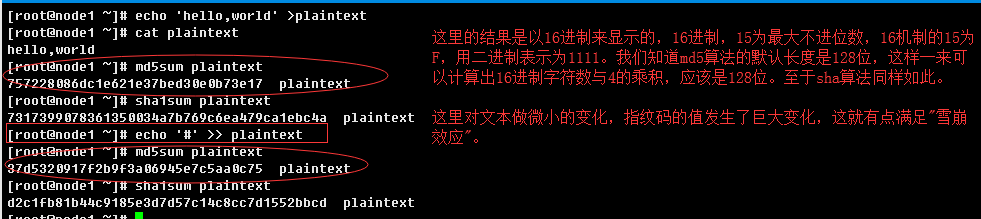
特點:定長輸出(不管要加密的數據量有多大),雪崩效應(原始數據微小的改變會導致整個結果徹底發生變化)
主要用途:用於保證數據的完整性(完整性校驗);
常見算法有:
md5:Message Digest 5,128bits;
sha家族:
sha1:Secure Hash Algorithm 1,160bits
sha224,224bits
sha384,384bits
sha512,512bits
簡單的消息摘要計算如下: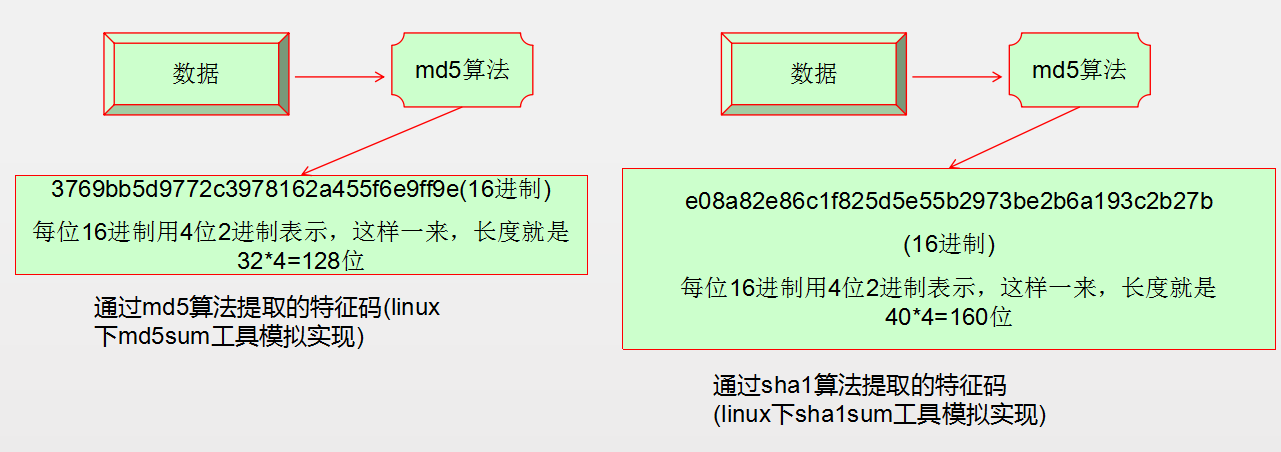
2.4、密鑰交換
常見用於實現密鑰交換的有:
DH(Deffie-Hellman)
公鑰加密
三、基於openssl來實現通信加解密
3.1、基於TLS和SSL協議的開源實現程序以及基本概述
比較有名的開源實現方案:
GnuPG和OpenSSL
GnuPG官網:https://www.gnupg.org/
OpenSSL官網:https://www.openssl.org/
這裏我們只介紹OpenSSL。OpenSSL是爲了傳輸層安全協議(TLS)和安全套接字層(SSL)協議開發的一個開源組件。
功能非常強大,集成了很多密碼庫。大概包含以下幾個部分:
libcrypto,libssl這兩個是庫;
openssl是多用途命令行工具(也是介紹的重點)。
linux實際上有兩個軟件包,分別爲上面兩類應用提供。分別是:
[root@node1 ~]# rpm -qa|grep openssl
openssl-1.0.2k-12.el7.x86_64
openssl-libs-1.0.2k-12.el7.x86_64
[root@node1 ~]# rpm -qi openssl
Name        : openssl
Epoch       : 1
Version     : 1.0.2k
Release     : 12.el7
Architecture: x86_64
Install Date: Tue 16 Oct 2018 07:54:33 PM CST
Group       : System Environment/Libraries
Size        : 833707
License     : OpenSSL
Signature   : RSA/SHA256, Wed 25 Apr 2018 07:32:58 PM CST, Key ID 24c6a8a7f4a80eb5
Source RPM  : openssl-1.0.2k-12.el7.src.rpm
Build Date  : Wed 11 Apr 2018 12:59:27 PM CST
Build Host  : x86-01.bsys.centos.org
Relocations : (not relocatable)
Packager    : CentOS BuildSystem <http://bugs.centos.org>
Vendor      : CentOS
URL         : http://www.openssl.org/
Summary     : Utilities from the general purpose cryptography library with TLS implementation
Description :
The OpenSSL toolkit provides support for secure communications between
machines. OpenSSL includes a certificate management tool and shared
libraries which provide various cryptographic algorithms and
protocols.

[root@node1 ~]# rpm -qi openssl-libs
Name        : openssl-libs
Epoch       : 1
Version     : 1.0.2k
Release     : 12.el7
Architecture: x86_64
Install Date: Tue 16 Oct 2018 07:53:33 PM CST
Group       : System Environment/Libraries
Size        : 3200172
License     : OpenSSL
Signature   : RSA/SHA256, Wed 25 Apr 2018 07:33:03 PM CST, Key ID 24c6a8a7f4a80eb5
Source RPM  : openssl-1.0.2k-12.el7.src.rpm
Build Date  : Wed 11 Apr 2018 12:59:27 PM CST
Build Host  : x86-01.bsys.centos.org
Relocations : (not relocatable)
Packager    : CentOS BuildSystem <http://bugs.centos.org>
Vendor      : CentOS
URL         : http://www.openssl.org/
Summary     : A general purpose cryptography library with TLS implementation
Description :
OpenSSL is a toolkit for supporting cryptography. The openssl-libs
package contains the libraries that are used by various applications which
support cryptographic algorithms and protocols.
其中openssl-libs是分包,它主要是提供基於TLS實現的通用密碼庫;
openssl主要是提供了與加密,通信安全相關的一些組件,它是一個比較全面的工具包。
它提供的工具包提供了對不同主機時間通信安全的支持,包括證書管理工具以及提供
應用於各種加密算法和協議的共享庫。
[root@node1 ~]# rpm -ql openssl-libs
/etc/pki/tls
/etc/pki/tls/certs
/etc/pki/tls/misc
/etc/pki/tls/openssl.cnf
/etc/pki/tls/private
/usr/lib64/.libcrypto.so.1.0.2k.hmac
/usr/lib64/.libcrypto.so.10.hmac
/usr/lib64/.libssl.so.1.0.2k.hmac
/usr/lib64/.libssl.so.10.hmac
/usr/lib64/libcrypto.so.1.0.2k
/usr/lib64/libcrypto.so.10
/usr/lib64/libssl.so.1.0.2k
/usr/lib64/libssl.so.10
/usr/lib64/openssl
/usr/lib64/openssl/engines
/usr/lib64/openssl/engines/lib4758cca.so
/usr/lib64/openssl/engines/libaep.so
/usr/lib64/openssl/engines/libatalla.so
/usr/lib64/openssl/engines/libcapi.so
/usr/lib64/openssl/engines/libchil.so
/usr/lib64/openssl/engines/libcswift.so
/usr/lib64/openssl/engines/libgmp.so
/usr/lib64/openssl/engines/libnuron.so
/usr/lib64/openssl/engines/libpadlock.so
/usr/lib64/openssl/engines/libsureware.so
/usr/lib64/openssl/engines/libubsec.so
/usr/share/licenses/openssl-libs-1.0.2k
/usr/share/licenses/openssl-libs-1.0.2k/LICENSE
[root@node1 ~]# ls -l /usr/lib64/libcrypto.so.10
lrwxrwxrwx 1 root root 19 Oct 16 19:53 /usr/lib64/libcrypto.so.10 -> libcrypto.so.1.0.2k
[root@node1 ~]# ls -l /usr/lib64/libcrypto.so.1.0.2k
-rwxr-xr-x 1 root root 2512832 Apr 11  2018 /usr/lib64/libcrypto.so.1.0.2k
[root@node1 ~]# ls -l /usr/lib64/libssl
libssl3.so        libssl.so.10      libssl.so.1.0.2k
[root@node1 ~]# ls -l /usr/lib64/libssl.so.10
lrwxrwxrwx 1 root root 16 Oct 16 19:53 /usr/lib64/libssl.so.10 -> libssl.so.1.0.2k
[root@node1 ~]# ls -l /usr/lib64/libssl.so.1.0.2k
-rwxr-xr-x 1 root root 470360 Apr 11  2018 /usr/lib64/libssl.so.1.0.2k
除此之外,還有一個不是由OpenSSL提供的另外一個與安全相關的包,叫nss:
[root@node1 ~]# rpm -qi nss
Name        : nss
Version     : 3.16.2.3
Release     : 5.el7
Architecture: x86_64
Install Date: Tue 16 Oct 2018 07:05:15 PM CST
Group       : System Environment/Libraries
Size        : 2544424
License     : MPLv2.0
Signature   : RSA/SHA256, Sat 14 Mar 2015 04:20:21 PM CST, Key ID 24c6a8a7f4a80eb5
Source RPM  : nss-3.16.2.3-5.el7.src.rpm
Build Date  : Fri 06 Mar 2015 12:48:15 PM CST
Build Host  : worker1.bsys.centos.org
Relocations : (not relocatable)
Packager    : CentOS BuildSystem <http://bugs.centos.org>
Vendor      : CentOS
URL         : http://www.mozilla.org/projects/security/pki/nss/
Summary     : Network Security Services
Description :
Network Security Services (NSS) is a set of libraries designed to
support cross-platform development of security-enabled client and
server applications. Applications built with NSS can support SSL v2
and v3, TLS, PKCS #5, PKCS #7, PKCS #11, PKCS #12, S/MIME, X.509
v3 certificates, and other security standards.

[root@node1 ~]# rpm -ql nss
/etc/pki/nssdb
/etc/pki/nssdb/cert8.db
/etc/pki/nssdb/cert9.db
/etc/pki/nssdb/key3.db
/etc/pki/nssdb/key4.db
/etc/pki/nssdb/pkcs11.txt
/etc/pki/nssdb/secmod.db
/usr/lib64/libnss3.so
/usr/lib64/libnssckbi.so
/usr/lib64/libnsspem.so
/usr/lib64/libsmime3.so
/usr/lib64/libssl3.so
/usr/lib64/nss/libnssckbi.so
/usr/share/man/man5/cert8.db.5.gz
/usr/share/man/man5/cert9.db.5.gz
/usr/share/man/man5/key3.db.5.gz
/usr/share/man/man5/key4.db.5.gz
/usr/share/man/man5/pkcs11.txt.5.gz
/usr/share/man/man5/secmod.db.5.gz
3.2、openssl命令行工具
man手冊的翻譯配合自己的理解:
語法結構:
openssl command [ command_opts ] [ command_args ]
說明:
command表示openssl工具支持的命令;
command_opts表示openssl支持的命令所用到的選項;
command_args是openssl支持命令的參數;

語法結構:
openssl [ list-standard-commands | list-message-digest-commands | list-cipher-commands | list-cipher-
algorithms | list-message-digest-algorithms | list-public-key-algorithms]
說明:
這部分是openssl的僞命令,可以查看可用的命令或算法。

openssl支持的命令分類:
(1) 標準命令(可以通過執行openssl list-standard-commands查看支持的標準命令)
(2) 消息摘要命令(可以通過執行openssl list-message-digest-commands 查看支持的消息摘要命令)
(3) 加密命令(可以通過執行openssl list-cipher-commands 查看支持的加密命令)
(4) 加密算法(可以通過執行openssl list-cipher-algorithms 查看支持的加密算法)
(5) 消息摘要算法(可以通過執行openssl list-message-digest-algorithms 查看支持的消息摘要算法)
(6) 公鑰算法(可以通過執行openssl list-public-key-algorithms 查看支持的公鑰算法)

OpenSSL是實現安全套接字層(SSL v2/v3)和傳輸層安全(TLS v1)網絡協議及其所需的相關加密標準的加密工具包。
而openssl這個程序是一個可以調用OpenSSL中加密庫提供的各種加密函數的命令行工具,它可以做以下事情:
(1) Creation and management of private keys, public keys and parameters
創建和管理私鑰、公鑰和與之相關的各種參數;
(2) Public key cryptographic operations
公鑰加密操作(非對稱加密);
(3) Creation of X.509 certificates, CSRs and CRLs
創建標準格式(X.509格式)證書,生成簽署請求(CSR格式)以及吊銷證書列表(CRL)維護等。
(4) Calculation of Message Digests
計算消息摘要碼
(5) Encryption and Decryption with Ciphers
使用密鑰加密和解密(對稱加解密);
(6) SSL/TLS Client and Server Tests
模擬基於SSL或TLS協議的客戶端和服務端進行測試;
(7) Handling of S/MIME signed or encrypted mail
處理基於S/MIME的簽名和加密郵件等;
(8) Time Stamp requests, generation and verification
時間戳的請求、生成和驗證。

特別說明:查看openssl用法,還可以直接openssl 加一個類似於help或者?等不被openssl不識別的命令
[root@node1 ~]# openssl help
openssl:Error: 'help' is an invalid command.

Standard commands
asn1parse         ca                ciphers           cms
crl               crl2pkcs7         dgst              dh
dhparam           dsa               dsaparam          ec
ecparam           enc               engine            errstr
gendh             gendsa            genpkey           genrsa
nseq              ocsp              passwd            pkcs12
pkcs7             pkcs8             pkey              pkeyparam
pkeyutl           prime             rand              req
rsa               rsautl            s_client          s_server
s_time            sess_id           smime             speed
spkac             ts                verify            version
x509

Message Digest commands (see the `dgst' command for more details)
md2               md4               md5               rmd160
sha               sha1

Cipher commands (see the `enc' command for more details)
aes-128-cbc       aes-128-ecb       aes-192-cbc       aes-192-ecb
aes-256-cbc       aes-256-ecb       base64            bf
bf-cbc            bf-cfb            bf-ecb            bf-ofb
camellia-128-cbc  camellia-128-ecb  camellia-192-cbc  camellia-192-ecb
camellia-256-cbc  camellia-256-ecb  cast              cast-cbc
cast5-cbc         cast5-cfb         cast5-ecb         cast5-ofb
des               des-cbc           des-cfb           des-ecb
des-ede           des-ede-cbc       des-ede-cfb       des-ede-ofb
des-ede3          des-ede3-cbc      des-ede3-cfb      des-ede3-ofb
des-ofb           des3              desx              idea
idea-cbc          idea-cfb          idea-ecb          idea-ofb
rc2               rc2-40-cbc        rc2-64-cbc        rc2-cbc
rc2-cfb           rc2-ecb           rc2-ofb           rc4
rc4-40            rc5               rc5-cbc           rc5-cfb
rc5-ecb           rc5-ofb           seed              seed-cbc
seed-cfb          seed-ecb          seed-ofb          zlib

第一部分是標準命令,第二部分是消息摘要命令,第三部分是(對稱)加密命令;
3.2.1、openssl支持的標準命令
可以執行以下命令查看支持的標準命令有哪些:
openssl list-standard-commands
如果要查看這些標準命令用法,可以執行:
whatis COMMAND
看看在man手冊的信息後對應查看man手冊。
這些標準命令的概述如下:
(1) 命令asn1parse
asn1parse  Parse an ASN.1 sequence.
解析ASN.1序列。
(2)命令ca
Certificate Authority (CA) Management.
證書頒發管理機構。
(3)命令ciphers
Cipher Suite Description Determination.
加密套件描述換算。
請參考:https://blog.csdn.net/as3luyuan123/article/details/13609819
(4)命令cms
CMS (Cryptographic Message Syntax) utility
密碼消息語法組件。
The cms command handles S/MIME v3.1 mail. It can encrypt, decrypt, sign and verify, compress and uncompress S/MIME messages.
加密,解密,簽名,驗證,壓縮,解壓 S/MIME消息。
關於S/MIME請參考:https://baike.baidu.com/item/%E5%A4%9A%E7%94%A8%E9%80%94%E7%BD%91%E9%99%85%E9%82%AE%E4%BB%B6%E6%89%A9%E5%85%85%E5%8D%8F%E8%AE%AE/266397?fr=aladdin&fromid=8866895&fromtitle=S%2FMIME
(5)命令crl
Certificate Revocation List (CRL) Management.
證書吊銷列表管理。
(6)命令crl2pkcs7
CRL to PKCS#7 Conversion.
通過CRL和1個或多個證書,把它們轉換成PKCS#7格式。
(7)命令dgst
Message Digest Calculation.
消息摘要(特性碼)計算。
(8)命令dh
Diffie-Hellman Parameter Management.  Obsoleted by dhparam.
DH參數管理。建議用dhparam替代它,
(9)命令dhparam
Generation and Management of Diffie-Hellman Parameters. Superseded by genpkey and pkeyparam
生成和管理DH參數,已經被genpkey和pkeyparam所替換。
(10)命令dsa
DSA Data Management.
DSA數據管理。
(11)命令dsaparam
DSA Parameter Generation and Management. Superseded by genpkey and pkeyparam
DSA參數產生和管理。已經被genpkey和pkeyparam所替代。
(12)命令ec
EC (Elliptic curve) key processing
橢圓曲線鍵處理。
(13)命令ecparam
EC parameter manipulation and generation
橢圓曲線維護和生產。
(14)命令enc
Encoding with Ciphers.
通過密碼編碼(加密相關)
(15)命令engine
Engine (loadble module) information and manipulation.
(16)命令errstr
Error Number to Error String Conversion.
通過錯誤編碼查找錯誤的描述。
(17)命令gendh
Generation of Diffie-Hellman Parameters.  Obsoleted by dhparam.
(18)命令gendsa
Generation of DSA Private Key from Parameters. Superseded by genpkey and pkey
從參數文件中生成一個DSA的私鑰。被genpkey和pkey所替代。
(19)命令genpkey
Generation of Private Key or Parameters.
產生一個私鑰或者一個參數文件。
(20)命令genrsa
Generation of RSA Private Key. Superceded by genpkey.
生成RSA私鑰,被genpkey所替代。
(21)命令nseq
Create or examine a netscape certificate sequence
創建或檢查一個網景證書序列號。
(22)命令ocsp
Online Certificate Status Protocol utility.
在線證書狀態協議組件。
(23)命令passwd
Generation of hashed passwords.
產生一個哈希的密碼。
(24)命令pkcs12
 PKCS#12 Data Management.
 PKCS#12 數據管理。
(25)命令pkcs7
PKCS#7 Data Management.
The pkcs7 command processes PKCS#7 files in DER or PEM format.
(26)命令pkcs8
PKCS#8 format private key conversion tool
(27)命令pkey
Public and private key management.
公鑰和私鑰管理。
示例:
To remove the pass phrase on an RSA private key:(移除RSA私鑰的使用密碼)
openssl pkey -in key.pem -out keyout.pem
To encrypt a private key using triple DES:(使用3重DES加密一個私鑰)
openssl pkey -in key.pem -des3 -out keyout.pem
To convert a private key from PEM to DER format:(把私鑰從PEM格式轉換成DER格式)
openssl pkey -in key.pem -outform DER -out keyout.der
To print out the components of a private key to standard output:(查看私鑰的組成信息)
openssl pkey -in key.pem -text -noout
To print out the public components of a private key to standard output:(查看私鑰中關於公鑰的組成信息)
openssl pkey -in key.pem -text_pub -noout
To just output the public part of a private key:(提取私鑰中的公鑰)
openssl pkey -in key.pem -pubout -out pubkey.pem

(28)命令pkeyparam
Public key algorithm parameter management.
公鑰算法參數管理。
(29)命令pkeyutl
Public key algorithm cryptographic operation utility.
(30)命令rand
Generate pseudo-random bytes.
生成僞隨機字節。
(31)命令req
PKCS#10 X.509 Certificate Signing Request (CSR) Management.
PKCS#10 X.509格式證書的簽署請求管理。
(32)命令rsa
RSA key management.
RSA密鑰管理。
(33)命令rsautl
RSA utility for signing, verification, encryption, and decryption. Superseded by  pkeyutl
用於RSA算法的簽名,驗證,加密,解密的組建。
(34)命令s_client
基於SSL/TLS實現的一個用於測試的客戶端。要與s_server一起配合使用;
(35)命令s_server
基於SSL/TLS實現的一個用於測試的服務端。要與s_client一起配合使用;
(36)命令s_time
SSL Connection Timer.
SSL連接定時器。
(37)命令sess_id
SSL Session Data Management.
SSL會話數據管理。
(38)命令smime
S/MIME mail processing.
(39)命令speed
 Algorithm Speed Measurement.
算法測速。用於測試加密算法的性能。
(40)命令spkac
SPKAC printing and generating utility
(41)命令ts
 Time Stamping Authority tool (client/server)
 時間戳授權工具。
(42)命令verify
X.509 Certificate Verification.
X.509格式證書的驗證。
(43)命令version
查看openssl的版本信息。
(44)命令x509
X.509 Certificate Data Management.
X.509格式證書數據管理。
3.2.2、openssl支持的消息摘要命令
可以執行以下命令查看支持的消息摘要命令有哪些:
openssl list-message-digest-commands
如果要查看這些消息摘要命令用法,可以執行:
whatis COMMAND
看看在man手冊的信息後對應查看man手冊。
支持的消息摘要命令有以下這些:
md2    MD2 Digest
md4    MD4 Digest
md5    MD5 Digest
rmd160  RMD-160 Digest
sha     SHA Digest
sha1   SHA-1 Digest
sha224    SHA-224 Digest
sha256    SHA-256 Digest
sha384    SHA-384 Digest
sha512    SHA-512 Digest
3.2.3、openssl支持的對稱加密命令
可以執行以下命令查看支持的對稱加密命令有哪些:
openssl list-cipher-commands
如果要查看這些消息摘要命令用法,可以執行:
whatis COMMAND
看看在man手冊的信息後對應查看man手冊。
支持的加密命令有:
aes-128-cbc
aes-128-ecb
aes-192-cbc
aes-192-ecb
aes-256-cbc
aes-256-ecb
##上面這些是基於AES的

base64      Base64 Encoding

bf
bf-cbc
bf-cfb
bf-ecb
bf-ofb
上面這些是基於Blowfish的

camellia-128-cbc
camellia-128-ecb
camellia-192-cbc
camellia-192-ecb
camellia-256-cbc
camellia-256-ecb
上面這些是基於camellia的

cast
cast-cbc
上面這些是基於CAST的

cast5-cbc
cast5-cfb
cast5-ecb
cast5-ofb
上面這些是基於CAST5的

des
des-cbc
des-cfb
des-ecb
des-ede
des-ede-cbc
des-ede-cfb
des-ede-ofb
des-ofb
上面這些是基於DES的

des3
des-ede3
des-ede3-cbc
des-ede3-cfb
des-ede3-ofb
上面這些是基於Triple-DES的

desx

idea
idea-cbc
idea-cfb
idea-ecb
idea-ofb
上面是這些是基於IDEA的

rc2
rc2-40-cbc
rc2-64-cbc
rc2-cbc
rc2-cfb
rc2-ecb
rc2-ofb
上面這些是基於RC2的

rc4
rc4-40
上面這些是基於RC4的

rc5
rc5-cbc
rc5-cfb
rc5-ecb
rc5-ofb
上面這些是基於RC5的

seed
seed-cbc
seed-cfb
seed-ecb
seed-ofb
上面這寫是基於seed的
zlib
3.2.4、openssl支持的對稱加密算法
可以執行以下命令查看支持的對稱加密算法有哪些:
openssl list-cipher-algorithms算法大概有:
AES-128-CBC
AES-128-CBC-HMAC-SHA1
AES-128-CBC-HMAC-SHA256
AES-128-CFB
AES-128-CFB1
AES-128-CFB8
AES-128-CTR
AES-128-ECB
AES-128-OFB
AES-128-XTS
AES-192-CBC
AES-192-CFB
AES-192-CFB1
AES-192-CFB8
AES-192-CTR
AES-192-ECB
AES-192-OFB
AES-256-CBC
AES-256-CBC-HMAC-SHA1
AES-256-CBC-HMAC-SHA256
AES-256-CFB
AES-256-CFB1
AES-256-CFB8
AES-256-CTR
AES-256-ECB
AES-256-OFB
AES-256-XTS
AES128 => AES-128-CBC
AES192 => AES-192-CBC
AES256 => AES-256-CBC
BF => BF-CBC
BF-CBC
BF-CFB
BF-ECB
BF-OFB
CAMELLIA-128-CBC
CAMELLIA-128-CFB
CAMELLIA-128-CFB1
CAMELLIA-128-CFB8
CAMELLIA-128-ECB
CAMELLIA-128-OFB
CAMELLIA-192-CBC
CAMELLIA-192-CFB
CAMELLIA-192-CFB1
CAMELLIA-192-CFB8
CAMELLIA-192-ECB
CAMELLIA-192-OFB
CAMELLIA-256-CBC
CAMELLIA-256-CFB
CAMELLIA-256-CFB1
CAMELLIA-256-CFB8
CAMELLIA-256-ECB
CAMELLIA-256-OFB
CAMELLIA128 => CAMELLIA-128-CBC
CAMELLIA192 => CAMELLIA-192-CBC
CAMELLIA256 => CAMELLIA-256-CBC
CAST => CAST5-CBC
CAST-cbc => CAST5-CBC
CAST5-CBC
CAST5-CFB
CAST5-ECB
CAST5-OFB
DES => DES-CBC
DES-CBC
DES-CFB
DES-CFB1
DES-CFB8
DES-ECB
DES-EDE
DES-EDE-CBC
DES-EDE-CFB
DES-EDE-OFB
DES-EDE3
DES-EDE3-CBC
DES-EDE3-CFB
DES-EDE3-CFB1
DES-EDE3-CFB8
DES-EDE3-OFB
DES-OFB
DES3 => DES-EDE3-CBC
DESX => DESX-CBC
DESX-CBC
IDEA => IDEA-CBC
IDEA-CBC
IDEA-CFB
IDEA-ECB
IDEA-OFB
RC2 => RC2-CBC
RC2-40-CBC
RC2-64-CBC
RC2-CBC
RC2-CFB
RC2-ECB
RC2-OFB
RC4
RC4-40
RC4-HMAC-MD5
RC5 => RC5-CBC
RC5-CBC
RC5-CFB
RC5-ECB
RC5-OFB
SEED => SEED-CBC
SEED-CBC
SEED-CFB
SEED-ECB
SEED-OFB
AES-128-CBC
AES-128-CBC-HMAC-SHA1
AES-128-CBC-HMAC-SHA256
id-aes128-CCM
AES-128-CFB
AES-128-CFB1
AES-128-CFB8
AES-128-CTR
AES-128-ECB
id-aes128-GCM
AES-128-OFB
AES-128-XTS
AES-192-CBC
id-aes192-CCM
AES-192-CFB
AES-192-CFB1
AES-192-CFB8
AES-192-CTR
AES-192-ECB
id-aes192-GCM
AES-192-OFB
AES-256-CBC
AES-256-CBC-HMAC-SHA1
AES-256-CBC-HMAC-SHA256
id-aes256-CCM
AES-256-CFB
AES-256-CFB1
AES-256-CFB8
AES-256-CTR
AES-256-ECB
id-aes256-GCM
AES-256-OFB
AES-256-XTS
aes128 => AES-128-CBC
aes192 => AES-192-CBC
aes256 => AES-256-CBC
bf => BF-CBC
BF-CBC
BF-CFB
BF-ECB
BF-OFB
blowfish => BF-CBC
CAMELLIA-128-CBC
CAMELLIA-128-CFB
CAMELLIA-128-CFB1
CAMELLIA-128-CFB8
CAMELLIA-128-ECB
CAMELLIA-128-OFB
CAMELLIA-192-CBC
CAMELLIA-192-CFB
CAMELLIA-192-CFB1
CAMELLIA-192-CFB8
CAMELLIA-192-ECB
CAMELLIA-192-OFB
CAMELLIA-256-CBC
CAMELLIA-256-CFB
CAMELLIA-256-CFB1
CAMELLIA-256-CFB8
CAMELLIA-256-ECB
CAMELLIA-256-OFB
camellia128 => CAMELLIA-128-CBC
camellia192 => CAMELLIA-192-CBC
camellia256 => CAMELLIA-256-CBC
cast => CAST5-CBC
cast-cbc => CAST5-CBC
CAST5-CBC
CAST5-CFB
CAST5-ECB
CAST5-OFB
des => DES-CBC
DES-CBC
DES-CFB
DES-CFB1
DES-CFB8
DES-ECB
DES-EDE
DES-EDE-CBC
DES-EDE-CFB
DES-EDE-OFB
DES-EDE3
DES-EDE3-CBC
DES-EDE3-CFB
DES-EDE3-CFB1
DES-EDE3-CFB8
DES-EDE3-OFB
DES-OFB
des3 => DES-EDE3-CBC
desx => DESX-CBC
DESX-CBC
id-aes128-CCM
id-aes128-GCM
id-aes128-wrap
id-aes128-wrap-pad
id-aes192-CCM
id-aes192-GCM
id-aes192-wrap
id-aes192-wrap-pad
id-aes256-CCM
id-aes256-GCM
id-aes256-wrap
id-aes256-wrap-pad
id-smime-alg-CMS3DESwrap
idea => IDEA-CBC
IDEA-CBC
IDEA-CFB
IDEA-ECB
IDEA-OFB
rc2 => RC2-CBC
RC2-40-CBC
RC2-64-CBC
RC2-CBC
RC2-CFB
RC2-ECB
RC2-OFB
RC4
RC4-40
RC4-HMAC-MD5
rc5 => RC5-CBC
RC5-CBC
RC5-CFB
RC5-ECB
RC5-OFB
seed => SEED-CBC
SEED-CBC
SEED-CFB
SEED-ECB
SEED-OFB
上面的加密算法大概有AES,DES,Blowfish,CAST,IDEA,RC2,RC5等這些都是分組加密算法;
RC4是流加密算法。分組加密算法都支持密碼本模式(ECB),加密分組鏈接模式(CBC),加密反饋模式(CFB),
以及輸出返回模式(OFB).其中DES,CAST等都有其演變版本,比如3重DES,CAST5等。具體使用請參照
對稱加密算法配合對稱加密命令使用。上邊出現的這種形式“from => to”表示別名的含義,例如:
rc5 => RC5-CBC
表示rc5實際上用的是RC5-CBC
3.2.5、openssl支持的消息摘要算法
可以執行以下命令查看支持的消息摘要算法有哪些:
openssl list-message-digest-commands
如果要查看這些消息摘要算法用法,可以執行:
whatis COMMAND
看看在man手冊的信息後對應查看man手冊。
支持的消息摘要算法:
DSA
DSA-SHA
DSA-SHA1 => DSA
DSA-SHA1-old => DSA-SHA1
DSS1 => DSA-SHA1
MD4
MD5
RIPEMD160
RSA-MD4 => MD4
RSA-MD5 => MD5
RSA-RIPEMD160 => RIPEMD160
RSA-SHA => SHA
RSA-SHA1 => SHA1
RSA-SHA1-2 => RSA-SHA1
RSA-SHA224 => SHA224
RSA-SHA256 => SHA256
RSA-SHA384 => SHA384
RSA-SHA512 => SHA512
SHA
SHA1
SHA224
SHA256
SHA384
SHA512
DSA
DSA-SHA
dsaWithSHA1 => DSA
dss1 => DSA-SHA1
ecdsa-with-SHA1
MD4
md4WithRSAEncryption => MD4
MD5
md5WithRSAEncryption => MD5
ripemd => RIPEMD160
RIPEMD160
ripemd160WithRSA => RIPEMD160
rmd160 => RIPEMD160
SHA
SHA1
sha1WithRSAEncryption => SHA1
SHA224
sha224WithRSAEncryption => SHA224
SHA256
sha256WithRSAEncryption => SHA256
SHA384
sha384WithRSAEncryption => SHA384
SHA512
sha512WithRSAEncryption => SHA512
shaWithRSAEncryption => SHA
ssl2-md5 => MD5
ssl3-md5 => MD5
ssl3-sha1 => SHA1
whirlpool
3.2.6、openssl支持的公鑰加密算法
可以執行以下命令查看支持的公鑰加密算法有哪些:
openssl list-public-key-algorithms公鑰加密算法有:
Name: OpenSSL RSA method
    Type: Builtin Algorithm
    OID: rsaEncryption
    PEM string: RSA
Name: rsa
    Type: Alias to rsaEncryption
Name: OpenSSL PKCS#3 DH method
    Type: Builtin Algorithm
    OID: dhKeyAgreement
    PEM string: DH
Name: dsaWithSHA
    Type: Alias to dsaEncryption
Name: dsaEncryption-old
    Type: Alias to dsaEncryption
Name: dsaWithSHA1-old
    Type: Alias to dsaEncryption
Name: dsaWithSHA1
    Type: Alias to dsaEncryption
Name: OpenSSL DSA method
    Type: Builtin Algorithm
    OID: dsaEncryption
    PEM string: DSA
Name: OpenSSL EC algorithm
    Type: Builtin Algorithm
    OID: id-ecPublicKey
    PEM string: EC
Name: OpenSSL HMAC method
    Type: Builtin Algorithm
    OID: hmac
    PEM string: HMAC
Name: OpenSSL CMAC method
    Type: Builtin Algorithm
    OID: cmac
    PEM string: CMAC
Name: OpenSSL X9.42 DH method
    Type: Builtin Algorithm
    OID: X9.42 DH
    PEM string: X9.42 DH
3.3、openssl 命令,算法等綜合介紹
關於openssl常見的問題解答(英):
https://www.openssl.org/docs/faq.html
在線閱讀官網推薦閱讀書籍(英):
https://www.feistyduck.com/library/openssl-cookbook/online/
各版本的變更:
https://github.com/openssl/openssl/blob/master/CHANGES
3.3.1、標準命令version
查看OpenSSL版本信息的命令;
openssl version 爲常用形式。簡單查看版本信息,可以配置的選項有:
-a 查看所有信息;
-v 查看當前的OpenSSL的版本(默認);
-b 查看當前版本的OpenSSL編譯的日期;
-o 查看庫被編譯時候的各種選項設置信息;
-p 查看平臺設置信息;
-d 查看OPENSSLDIR設置,即openssl的配置文件路徑;
openssl version -a
openssl version -v
openssl version -b

CentOS  6.x版本:
OpenSSL 1.0.1e-fips

CentOS 7.x版本:
OpenSSL 1.0.2k-fips
3.3.2、標準命令enc
enc - symmetric cipher routines
enc - 對稱加密列程

既然是對稱加密,自然要知道對稱加密的算法,在前邊的部分,與加密相關的命令都可以使用該標準命令。
openssl enc -ciphername [-in filename] [-out filename] [-e] [-d] [-a/-base64] [-A] [-k password] [-kfile filename]
[-K key] [-iv IV] [-S salt] [-salt] [-nosalt]
這裏的-ciphername 表明要指明的對稱加密算法或者叫對應加密命令。對應關係表:
下邊的第一列表示openssl可選的ciphername值,後邊對可選值進行來註解
================================================================
base64             Base 64
bf-cbc             Blowfish in CBC mode
bf                 Alias for bf-cbc
bf-cfb             Blowfish in CFB mode
bf-ecb             Blowfish in ECB mode
bf-ofb             Blowfish in OFB mode
cast-cbc           CAST in CBC mode
cast               Alias for cast-cbc
cast5-cbc          CAST5 in CBC mode
cast5-cfb          CAST5 in CFB mode
cast5-ecb          CAST5 in ECB mode
cast5-ofb          CAST5 in OFB mode
des-cbc            DES in CBC mode
des                Alias for des-cbc
des-cfb            DES in CBC mode
des-ofb            DES in OFB mode
des-ecb            DES in ECB mode
des-ede-cbc        Two key triple DES EDE in CBC mode
des-ede            Two key triple DES EDE in ECB mode
des-ede-cfb        Two key triple DES EDE in CFB mode
des-ede-ofb        Two key triple DES EDE in OFB mode
des-ede3-cbc       Three key triple DES EDE in CBC mode
des-ede3           Three key triple DES EDE in ECB mode
des3               Alias for des-ede3-cbc
des-ede3-cfb       Three key triple DES EDE CFB mode
des-ede3-ofb       Three key triple DES EDE in OFB mode
desx               DESX algorithm.
gost89             GOST 28147-89 in CFB mode (provided by ccgost engine)
gost89-cnt        `GOST 28147-89 in CNT mode (provided by ccgost engine)
idea-cbc           IDEA algorithm in CBC mode
idea               same as idea-cbc
idea-cfb           IDEA in CFB mode
idea-ecb           IDEA in ECB mode
idea-ofb           IDEA in OFB mode
rc2-cbc            128 bit RC2 in CBC mode
rc2                Alias for rc2-cbc
rc2-cfb            128 bit RC2 in CFB mode
rc2-ecb            128 bit RC2 in ECB mode
rc2-ofb            128 bit RC2 in OFB mode
rc2-64-cbc         64 bit RC2 in CBC mode
rc2-40-cbc         40 bit RC2 in CBC mode
rc4                128 bit RC4
rc4-64             64 bit RC4
rc4-40             40 bit RC4
rc5-cbc            RC5 cipher in CBC mode
rc5                Alias for rc5-cbc
rc5-cfb            RC5 cipher in CFB mode
rc5-ecb            RC5 cipher in ECB mode
rc5-ofb            RC5 cipher in OFB mode
aes-[128|192|256]-cbc  128/192/256 bit AES in CBC mode
aes-[128|192|256]      Alias for aes-[128|192|256]-cbc
aes-[128|192|256]-cfb  128/192/256 bit AES in 128 bit CFB mode
aes-[128|192|256]-cfb1 128/192/256 bit AES in 1 bit CFB mode
aes-[128|192|256]-cfb8 128/192/256 bit AES in 8 bit CFB mode
aes-[128|192|256]-ecb  128/192/256 bit AES in ECB mode
aes-[128|192|256]-ofb  128/192/256 bit AES in OFB mode
========================================================================
有兩種方式,如果要顯示指明enc命令,後邊的加密算法要以短破折號的形式給出(openssl enc -ciphername);例如openssl enc -des3 .....
另外一種方式就是省略enc命令,然後算法不能以段破折號的形式給出(openssl ciphername),例如openssl des3 .....
推薦使用第一種方式(openssl enc -ciphername)

選項:
-in filename
指明要加密的文件,默認是標準輸入;
-out filename
指明加密後的文件,默認是標準輸出;
-pass arg
指明獲取密碼的方式。有以下幾種:
(1) pass:password
password表示要設置的密碼。
(2) env:var
密碼爲環境變量var的值;(記得要用export把變量導出)
(3) file:pathname
文件pathname中的第一行爲密碼;
(4) fd:number
從文件描述符number中讀取密碼;
(5) stdin
從標準輸入中請求密碼。

-salt
加點鹽/雜質,更加安全。在密鑰推導過程中加點雜質。
默認選項,不指明也會使用。
-nosalt
不加鹽或雜質,不建議使用。除非爲了兼容或測試。
-S salt
用戶自己指定要加的鹽或雜質的串。用戶指明的鹽值必須是16進制的字符串。
指定的雜質16進制的字符個數長度最大爲16(可以使用openssl rand -hex 8 來產生最大長度)
生成隨機16進制指定長度(這裏以2字節爲例,2字節爲二進制的16位,每4位二進制可以由一位16進製表示,
那麼一共結果有4位16進制數)的字符串如下:
openssl rand -hex 2   #後邊會講解rand的標準命令用法
-e
表明本次過程是加密輸入數據。默認選項,默認就是加密。
-d
表明本次過程是解密輸入數據。
-a或-base64
表明加密使用base64編碼。如果加密的時候有指定,解密的時候也要指定(如果有人爲轉編碼格式另說)。
默認不指定使用base64編碼,加密的文件是二進制格式的,如果使用base64編碼後,格式是ASCII文本格式的。
-A
如果指定來base64位編碼,那麼將會在在一行處理base64位數據。
有個問題,-A選項配合大文件加解密的時候會有問題,所以建議使用-a或者--base64
-k password
命令行指定對稱加密過程中用到的密碼。這是一個兼容選項,建議使用-pass
-kfile filename
從filename中讀取第一行作爲密碼。這是一個兼容選項,建議使用-pass

示例:
(1)
Just base64 encode a binary file:(使用base64編碼一個二進制文件)
openssl base64 -in file.bin -out file.b64       #file.bin是存在的一個二進制文件,file.b64是編碼後ASCII格式的文本
文件。-e是默認選項,所以可以省略。
Decode the same file (從base64編碼文件中解碼出二進制格式文件)
openssl base64 -d -in file.b64 -out file.bin
(2)
Encrypt a file using triple DES in CBC mode using a prompted password: 使用CBC模式的3DES對稱加密算法
加密文件file.txt,並且密鑰(密碼)通過交互式給出。
openssl des3 -salt -in file.txt -out file.des3
Decrypt a file using a supplied password:(加密文件時顯式的指明密碼)
openssl des3 -d -salt -in file.des3 -out file.txt -k mypassword   #-k顯式指定密碼
(3)
Encrypt a file then base64 encode it (so it can be sent via mail for example) using Blowfish in CBC mode:
使用CBC模式的Blowfish算法,配合base64編碼加密文件
openssl bf -a -salt -in file.txt -out file.bf
Base64 decode a file then decrypt it:(使用base64解碼然後解密文件)
openssl bf -d -salt -a -in file.bf -out file.txt
3.3.3、標準命令rand
產生隨機字節。
openssl rand [-out file] [-base64] [-hex] num

選項:
-out file 把產生的隨機數寫入到文件而非標準輸出;
-base64 以base64位編碼
-hex 16進制字符串

openssl rand -out text.txt -hex 8  8字節長度,16進制隨機字符串輸出到text.txt文件中;
openssl rand -hex 8   #8字節長度,16進制隨機字符串輸出到標準輸出
openssl rand -base64 12 #base64編碼格式字符串,12字節長度的隨機字符串,輸出到標準輸出。

[root@node1 ~]# openssl rand -hex 8
94244cbc281ac399
輸出結果有16個16進制的字符,每個16進制字符轉換成二進制可以由4位二進制數表示。
指定的長度爲8字節,所以有64位二進制數字(1字節對應8位)。
16*4=64剛好符合給定的長度。
3.3.4、標準命令passwd
計算密碼哈希值
openssl passwd [-crypt] [-1] [-apr1] [-salt string] [-in file] [-stdin] [-noverify] [-quiet] {password}

選項:

-crypt UNIX標準加密算法(默認值),表示生成標準的unix口令密文。 (如果加鹽(-salt)算密碼,只取鹽的前2位,2位後面的所有字符都忽略,而且密碼的長度位數不能超過8位)
-1  基於BSD的MD5算法
-apr1 apache的md5密文口令,不能與-1共同使用,實質還是md5
-salt string  指定要加的鹽的字符串
-in file 從文件中讀取密碼
-noverify 不驗證從終端讀取的密碼
-quiet 當給定密碼長度過長而被截斷的時候,不會打印警告信息

openssl passwd -1 -salt abcd yanhui.com
3.3.5、標準命令genrsa(重點)
產生一個RSA私鑰;
openssl genrsa [-out filename] [-passout arg] [-des] [-des3] [-idea] [-f4] [-3] [-rand file(s)] [-engine id] [numbits]
選項:
-out filename
將輸出結果寫到指定文件中,默認是直接打印到標準輸出。
-passout arg
指明獲取密碼的方式。有以下幾種:
(1) pass:password
password表示要設置的密碼。
(2) env:var
密碼爲環境變量var的值;(記得要用export把變量導出)
(3) file:pathname
文件pathname中的第一行爲密碼;
(4) fd:number
從文件描述符number中讀取密碼;
(5) stdin
從標準輸入中請求密碼。

-des|-des3|-idea
生成的私鑰使用des方式進行加密;
生成的私鑰使用3des方式進行加密;
生成的祕鑰使用idea方式進行加密;
-F4|-3
選擇實現過程中使用的指數的值,可以選擇的值爲65537(-F4)或3(-3)
默認值爲65537
-rand file(s)
產生隨機數的種子文件。使用的比較少。
-engine id
指定三方的加密庫或硬件。
numbits
以bit爲單位表示生成的私鑰的大小。該值必須寫在最後。
默認是512bit

示例1:
openssl genrsa -out mykey1.key -passout pass:123456 512
echo -e "654321\n234561" >>/tmp/pass.txt
export mypass="yanhui.com"
openssl genrsa -out mykey2.key -passout file:/tmp/pass.txt 512
openssl genrsa -out mykey3.key -passout env:mypass 512

示例2:
openssl genrsa -out mykey.key -idea -F4 1024    #交互式提示輸入用戶輸入密碼,可以爲空。(有密碼,每次
使用私鑰文件要鍵入密碼。)
示例3:
openssl genrsa -out mykey.key -des3 -passout pass:yanhui.com 2048
示例4:
openssl genrsa -out mykey.key -des -passout stdin 1024  #阻塞等待用戶鍵入密碼,沒有交互式提示
示例5(私鑰一般權限要控制爲600,或者400。可以配合umask在子shell中執行)
[root@node1 ~]# (umask 077;openssl genrsa -out yanhui.pem 2048)
Generating RSA private key, 2048 bit long modulus
..............................................................................+++
..........................................+++
e is 65537 (0x10001)
[root@node1 ~]# ls -l yanhui.pem
-rw------- 1 root root 1675 Nov  9 16:39 yanhui.pem
3.3.6、標準命令dsaparam
生成、處理DSA密鑰參數,
也可以直接生成DSA密鑰;
用gendsa之前要先了解dsaparam,因爲需要先用dsaparam生成需要的密鑰參數。
openssl dsaparam [-inform DER|PEM] [-outform DER|PEM] [-in filename] [-out filename] [-noout] [-text] [-C] [-genkey] [numbits]
選項:
-inform DER|PEM
輸入格式,DER或PEM。DER格式以.der爲後綴的格式,PEM格式以.pem爲後綴的格式;
-outform DER|PEM
輸出格式,DER或PEM。指定格式der或pem 書寫格式忽略字符大小寫。
關於DER和PEM格式:
der類型的不用在編碼解碼,直接就是二進制的數據可以直接使用;
pem類型的數據要根據base64編碼解碼後,得到的數據需要進行增加或裁剪
特殊字符-、\n、\r、begin信息、end信息等。

-in filename
指明要讀參數的來源,默認是從標準輸入中獲取,指定該參數表示從文件中讀取。
如果顯式指定了numbits,該參數會被忽略。
-out filename
指定輸出的文件。默認是標準輸出。
-noout
禁止編碼版本的參數的輸出。
查看的文件不能是DER格式的。
-text
易讀的方式打印DSA參數。關於私鑰中的P,Q,G參數值,請參考:
https://baike.baidu.com/item/DSA%E7%AE%97%E6%B3%95/10856660?fr=aladdin
涉及到了數學知識。
查看的文件不能是DER格式的。

-C
把參數(P,Q,G)轉換成C代碼。
P,Q,G參數部分會轉換成C代碼。
-genkey
產生一個DSA私鑰。

numbits
長度。必須是最後一個參數。

參考:
示例1:生成1024位的密鑰參數
openssl dsaparam -out mydsaparam.pem 1024
明文查看密鑰參數的值:
openssl dsaparam -in mydsaparam.pem -text -noout
示例2:密鑰參數格式間的轉換
(1) PEM格式的密鑰參數轉爲DER格式
openssl dsaparam -inform PEM -outform DER -in mydsaparam.pem -out mydsaparam.der
(2) DER格式的密鑰參數轉爲PEM格式
openssl dsaparam -in mydsaparam.der -inform DER -outform PEM -out mydsaparam.pem
示例3:生成DSA私鑰
openssl dsaparam -genkey -out mykey.pem 1024
3.3.7、標準命令gendsa
從DSA參數文件中生成一個DSA私鑰。
openssl gendsa [-out filename] [-des] [-des3] [-idea] [paramfile]

選項:

-des|-des3|-idea
指定私鑰的加密方式。建議使用後兩種(des3,idea),如果不指定這裏的選項,不會加密私鑰。
貌似指定三者之一後,表示加密,而且必須要提供一個至少4個且至多1024個字符作爲密碼。

paramfile
指明生成dsa私鑰時候使用的dsa參數文件(openssl dsaparam可以產生),參數文件中有定義
dsa私鑰的長度。dsa參數文件格式要是PEM格式的,如果是DSA格式的DSA參數文件,先要對其
做格式轉換。

示例1:配合參數文件生成DSA私鑰
[root@node1 ~]# openssl dsaparam -out mydsaparam.pem 1024
Generating DSA parameters, 1024 bit long prime
This could take some time
.......+........+...+.....+......+..............+..........+.+..+..+....+++++++++++++++++++++++++++++++++++++++++++++++++++++++++++++++++*
....+.......+...............+........+..+.......+.............................+.....................+......+...........+..............+.................+........+.......................+.+..........................+..........+....+..+...+..........+..............+.+........+................+...+......+.+...........+...........+.............+...........+..........+....+.........................+.......+.........+........+................+.........................+...+..+...+.....+.............+........+...+..............+.........+...+..+.+.....+........+.......+...+................+....+....................+.+...........+.+.+.+.....+.......+..............+.......+.............+..........+.................+....+......+..........+............+.+...............+.........+................+........+.+......+......+.....+..........+.....+.........+.....+........+..+.................+..+......................+.....+.......+.....+......+...+.....+.........+...+........+..........................+........+...+......+.............+.........+...+....+.........................+...+....+....+.....+.......+..........................+.+.......+.+........+.........+.+.............+...........+++++++++++++++++++++++++++++++++++++++++++++++++++++++++++++++++*
[root@node1 ~]# ls -l mydsaparam.pem
-rw-r--r-- 1 root root 455 Nov  9 16:44 mydsaparam.pem
[root@node1 ~]# openssl gendsa -out yanhuidsa.pem mydsaparam.pem
Generating DSA key, 1024 bits
[root@node1 ~]# ls -l yanhuidsa.pem
-rw-r--r-- 1 root root 668 Nov  9 16:44 yanhuidsa.pem
[root@node1 ~]# (umask 077;openssl gendsa -out new_yanhuidsa.pem mydsaparam.pem)
Generating DSA key, 1024 bits
[root@node1 ~]# ls -l new_yanhuidsa.pem
-rw------- 1 root root 668 Nov  9 16:45 new_yanhuidsa.pem
3.3.8、標準命令rsa(重點)
RSA密鑰處理工具。
openssl rsa [-inform PEM|NET|DER] [-outform PEM|NET|DER] [-in filename] [-passin arg] [-out filename] [-passout arg] [-sgckey]
[-des] [-des3] [-idea] [-text] [-noout] [-modulus] [-check] [-pubin] [-pubout] [-engine id]

選項:
-inform DER|NET|PEM  輸入格式爲DER或NET或PEM,格式轉換時候的一個常用選項)
-outform DER|NET|PEM (輸出格式爲DER或NET或PEM,格式轉換時候的一個常用選項)
-in filename 指定輸入文件(私鑰文件)。

-passin arg
the input file password source.
輸入文件的密碼來源;
用在爲私鑰增加使用密碼的時候,指明密碼來源的方式。
指明獲取密碼的方式。有以下幾種:
(1) pass:password
password表示要設置的密碼。
(2) env:var
密碼爲環境變量var的值;(記得要用export把變量導出)
(3) file:pathname
文件pathname中的第一行爲密碼;
(4) fd:number
從文件描述符number中讀取密碼;
(5) stdin
從標準輸入中請求密碼。
-passout password
the output file password source.
輸出文件的密碼來源。用來去掉密碼過程中,原先的私鑰使用要輸入密碼,去掉密碼。
可以指定這個參數指定原先的密碼。

指明獲取密碼的方式。有以下幾種:
(1) pass:password
password表示要設置的密碼。
(2) env:var
密碼爲環境變量var的值;(記得要用export把變量導出)
(3) file:pathname
文件pathname中的第一行爲密碼;
(4) fd:number
從文件描述符number中讀取密碼;
(5) stdin
從標準輸入中請求密碼。

-out filename
指定生成的私鑰保存的文件名,默認輸出到標準輸出。
注意產生私鑰文件的權限,用戶屬組,其他者不能有權限,而且擁有者不能帶有執行權限。
建議設置成600。
-sgckey
指定SGC編碼格式,兼容老版本,不應再使用
-des|-des3|-idea|-seed|-aes128
使用des,des3,idea,seed或加密輸出的文件。
-text
除了編碼的信息之外,以文本形式輸出各種公鑰或私鑰的組件信息。
可以理解爲參數。
-noout
禁止私鑰的編碼後的字符串的輸出。
-modulus
輸出私鑰的計算過程中的臨時指數值。
-check
檢查RSA私鑰的一致性。
-pubin
默認情況,會從文件中讀取私鑰,指定該選項後,會從文件中讀取公鑰。
-pubout
默認情況,私鑰輸出。指定該選項,表示輸出公鑰。如果讀入的文件就是一個公鑰,
這個選項自動被指定。

示例:
先生成一個不加密的私鑰文件:
(umask 077;openssl genrsa -out mykey.pem 1024)
查看私鑰中的各個參數:
openssl rsa -in mykey.pem -text -noout
爲私鑰增加使用密碼:
openssl rsa -in mykey.pem -des3 -passout pass:yanhui.com -out e_myrsa.pem
可以把剛纔的查看私鑰的參數信息命令再執行一遍,這時候會提示使用密碼。
刪除私鑰的使用密碼:
openssl rsa -in e_myrsa.pem -passin pass:yanhui.com -out p_myrsa.pem
可以用同樣的方法驗證p_myrsa.pem私鑰。或者比較p_myrsa.pem和mykey.pem的md5值是否相同。
生成一個指定算法加密且有使用密碼的私鑰文件yanhui.pem(算法用3des,密碼就是123456):
openssl genrsa -des3 -passout pass:123456 -out yanhui.pem
修改指定算法爲aes128,口令爲654321:
openssl rsa -in yanhui.pem -passin pass:123456 -aes128 -passout pass:654321 -out new_yanhui.pem
提取私鑰中的公鑰並且查看提取公鑰的相關信息
openssl rsa -in new_yanhui.pem -passin pass:654321 -pubout
openssl rsa -in new_yanhui.pem -passin pass:654321 -pubout -out newyanhuipub.pem
openssl rsa -in newyanhuipub.pem -pubin -modulus -noout
轉換私鑰格式:
(1) 把PEM格式轉換成DER格式
openssl rsa -in new_yanhui.pem -passin pass:654321 -aes128 -passout pass:123456 -outform DER -out new_yanhui.der
(2) 把DER格式轉換成PEM格式
openssl rsa -in new_yanhui.der -inform DER -passin pass:123456 -des3 -passout pass:yanhui.com -out new_yanhui_rsa.pem
3.3.9、標準命令dsa
openssl dsa [-inform PEM|DER] [-outform PEM|DER] [-in filename] [-passin arg] [-out filename] [-passout arg]
[-aes128] [-aes192] [-aes256] [-camellia128] [-camellia192] [-camellia256] [-des] [-des3] [-idea] [-text]
[-noout] [-pubin] [-pubout]

選項:
-inform DER|PEM
-outform DER|PEM
-in filename
-passin arg
-out filename
-passout arg
-aes128|-aes192|-aes256|-camellia128|-camellia192|-camellia256|-des|-des3|-idea
-text
-noout
-pubout
-pubin

上邊選項和rsa一樣,這裏不一 一說明。

示例:
先生成一個不加密的dsa私鑰文件:(要提前生成一個dsa的參數文件)
openssl dsaparam -out mydsaparam_file1 1024
(umask 077;openssl gendsa -out mydsa.pem mydsaparam_file1)

查看私鑰中的各個參數:
openssl dsa -in mydsa.pem -text -noout
爲私鑰增加使用密碼:
openssl dsa -in mydsa.pem -aes128 -passout pass:yanhui.com -out e_mydsa.pem
可以把剛纔的查看私鑰的參數信息再執行一遍,這時候會提示使用密碼。
刪除私鑰的使用密碼:
openssl dsa -in e_mydsa.pem -passin pass:yanhui.com -out p_mydsa.pem
可以用同樣的方法驗證p_myrsa.pem私鑰。或者比較p_mydsa.pem和mydsa.pem的md5值是否相同。
生成一個指定算法加密且有使用密碼的私鑰文件yanhui.pem(算法用3des,密碼就是123456):
openssl dsaparam -out yanhuidsaparam1 1024
(umask 077;openssl gendsa -des3 -passout pass:123456 -out yanhui.pem yanhuidsaparam1)
修改指定算法爲aes128,口令爲654321:
openssl dsa -in yanhui.pem -passin pass:123456 -aes128 -passout pass:654321 -out new_yanhui.pem
提取私鑰中的公鑰並且查看提取公鑰的相關信息
openssl dsa -in new_yanhui.pem -passin pass:654321 -pubout
openssl dsa -in new_yanhui.pem -passin pass:654321 -pubout -out newyanhuipub.pem
openssl dsa -in newyanhuipub.pem -pubin -modulus -noout

轉換私鑰格式:
(1) 把PEM格式轉換成DER格式
openssl dsa -in new_yanhui.pem -passin pass:654321 -aes128 -passout pass:123456 -outform DER -out new_yanhui.der
(2) 把DER格式轉換成PEM格式
openssl dsa -in new_yanhui.der -inform DER -passin pass:123456 -des3 -passout pass:yanhui.com -out new_yanhui_dsa.pem
3.3.10、標準命令dgst(重點)
sha, sha1, ripemd160, sha224, sha256, sha384, sha512, md4, md5, dss1 - message digests(常見消息摘要算法)

openssl dgst [-sha|-sha1|-mdc2|-ripemd160|-sha224|-sha256|-sha384|-sha512|-md2|-md4|-md5|-dss1] [-c] [-d]
[-hex] [-binary] [-r] [-non-fips-allow] [-out filename] [-sign filename] [-keyform arg] [-passin arg] [-verify
filename] [-prverify filename] [-signature filename] [file...]

openssl [digest] [...]
有兩種形式,第一種是指定dgst命令後邊通過短破折號介紹可選的散列函數;第二種是指不需要加dgst命令,直接指定散列函數名(不能加上短破折號)
openssl dgst -md5 file...
openssl md5 file...
例如:
[root@node1 ~]# openssl md5 smartmontools-6.6.tar.gz uncompyle2-master.zip
MD5(smartmontools-6.6.tar.gz)= 9ae2c6e7131cd2813edcc65cbe5f223f
MD5(uncompyle2-master.zip)= 12d956d3efcd7c7086966d9f7ab5bcc9
[root@node1 ~]# openssl dgst -md5 smartmontools-6.6.tar.gz uncompyle2-master.zip
MD5(smartmontools-6.6.tar.gz)= 9ae2c6e7131cd2813edcc65cbe5f223f
MD5(uncompyle2-master.zip)= 12d956d3efcd7c7086966d9f7ab5bcc9

-c  輸出的摘要信息以分號分隔,和-hex同時使用(默認選項),可以每兩位16進制以符號":"來分隔;
-d  輸出BIO調試信息;
-hex 以16進制輸出摘要信息;
-binary  以二進制形式輸出摘要或者簽名信息;
-r  以特定格式輸出(不包含算法名字了,默認包含算法名)
-non-fips-allow  在FIPS模式下,允許使用不符合fips標準的摘要算法。如果不是在FIPS模式,選項無用;
enable use of non-FIPS algorithms such as MD5 even in FIPS mode.
-out filename 把輸出結果寫入指定文件。文件名不存在可以創建,如果涉及多層目錄不存在,則不行。
-sign filename
使用私鑰文件來對文件進行數字簽名。這裏的filename是一個私鑰文件。
-keyform arg
指定簽名時候使用的私鑰的格式,支持DER,PEM,P12以及ENGINE格式。
-sigopt nm:v
指定簽名的參數。
-verify filename
使用包含公鑰的文件來驗證簽名,輸出結果只能是"Verification OK"表示驗證通過或者"Verification Failure"表示驗證不通過;
-prverify filename
使用包含私鑰的文件來驗證簽名;
-signature filename
指定實際要驗證的簽名文件;(驗證簽名的時候要用)
file...
指定的文件參數,可以有一個或多個。要作爲命令的最後部分顯示,不然配合有些特定選型會有問題。
參考:https://www.cnblogs.com/274914765qq/p/5005378.html

功能一:提取指定文件特徵碼或者叫消息摘要值;
功能二:實現數字簽名

數字簽名大概是這樣,比如想發送一段敏感數據,比如A發送數據給B,防止別人篡改。假設B知道A的
公鑰(公鑰是公開,通常都應該知道),而且100%確認(如果展開說明,就不屬於數字簽名的知識部分了,
所以就假設一下)就是A的公鑰。A向B發送一段數據,A先通過協商的消息摘要計算算法對整個數據做一消息
摘要計算,把計算出來的特徵碼或者叫消息摘要值附加在要發送的數據的結尾,不過附加的是加密的數據,
是用A自己的私鑰對這段特徵碼進行加密,加密後的數據即爲我們常說的數字簽名。一當B收到數據後,
會用A的公鑰進行尾部的數字簽名進行解密。如果能解密,說明數字簽名是A的,而且可以確認A的身份無誤。
然後使用實現商量的消息摘要計算算法對數據進行計算,然後比較計算的值與解密後數字簽名提取的特徵碼,
如果一致,說明數據沒有被篡改或者傳輸沒有損壞。

示例:
1、準備一個rsa的私鑰,並利用這個私鑰對指定文件進行數字簽名。
(umask 077;openssl genrsa -out yanhui.pem 1024)
#產生一個PEM格式的長度爲1024位的沒有使用密碼的私鑰yanhui.pem
openssl rsa -inform PEM -in yanhui.pem -outform DER -out yanhui.der
#把PEM格式的私鑰轉換一份DER格式的留存

openssl dgst -sign yanhui.pem -keyform PEM -out sign1.txt uncompyle2-master.zip
#如果指定的私鑰是DEM格式的,可以省略-keyform
openssl dgst -sign yanhui.der -keyform DER -out sign2.txt uncompyle2-master.zip
#如果指定的私鑰是DER格式的,不能省略-keyform
openssl dgst -sign yanhui.pem -out sign_sha256.txt uncompyle2-master.zip
#使用特定散列函數sha256進行簽名

2、利用私鑰驗證上面簽名是否正確
openssl dgst -prverify yanhui.pem -signature sign1.txt uncompyle2-master.zip
openssl dgst -prverify yanhui.pem -sha256 -signature sign_sha256.txt uncompyle2-master.zip
#建議驗證的時候也指定簽名時候使用到的散列函數

3、利用公鑰驗證上面的簽名是否正確
openssl rsa -in yanhui.pem -out yanhui.pub -pubout  #從私鑰中提取公鑰
openssl dgst -verify yanhui.pub -sha256 -signature sign_sha256.txt uncompyle2-master.zip

4、使用md5和sha256對文件進行hash運算(算出文件的特性碼)
openssl dgst -md5 uncompyle2-master.zip
openssl dgst -sha256 uncompyle2-master.zip
openssl dgst -r -sha256 uncompyle2-master.zip  #不輸出算法名字

5、打印調試信息
openssl dgst -d -md5 uncompyle2-master.zip

6、二進制格式和16進制格式
openssl dgst -md5 -binary uncompyle2-master.zip
openssl dgst -md5 -hex uncompyle2-master.zip
openssl dgst -md5 -hex -c uncompyle2-master.zip   #以冒號分隔16進制結果,每兩個16進制字符以冒號隔開
3.3.11、標準命令ca(非常重要)
最小ca的應用實現。可以簽署各種格式的證書請求,以及產生吊銷列表。
它對於已經簽署的證書以及它們的狀態會通過文本數據庫來管理。

第一部分:CA的選項
(1) -config filename
指定CA使用的配置文件;
(2) -name section
指定CA配置文件中使用的段落是哪一段(默認是default_ca)
在後邊應用中會詳細介紹。
(3) -in filename
an input filename containing a single certificate request to be signed by the CA.
證書籤署請求的原文件,通常是CSR格式文件。
(3) -ss_cert filename
指定由CA自籤的證書;
(4) -spkac filename
a file containing a single Netscape signed public key and challenge and additional field values to be signed by the CA.
See the SPKAC FORMAT section for information on the required input and output format.
(5) -infiles
如果一次簽署多個CSR,指定該參數後,後邊可以跟多個文件名。
(6) -out filename
簽名後的證書文件名。證書的相關信息也會寫入。
(7) -outdir directory
證書保存的目錄。證書名是證書序列號,後綴還是.pem
(8) -cert
CA的證書文件名。
(9) -keyfile filename
簽署請求的私鑰文件;
(10) -keyform PEM|DER
私鑰文件的格式,默認是PEM格式。
(11) -key password
指定加密私鑰的密碼。要註釋命令行使用密碼的安全。
(12) -passin arg
使用密碼來源。5中形式,前邊已經講過了,這裏不再贅述。
(13) -verbose
詳細模式輸出。
(14) -notext
不要把證書文件的明文內容輸出到文件中去。
(15) -startdate date
this allows the start date to be explicitly set. The format of the date is YYMMDDHHMMSSZ (the same as an ASN1 UTCTime structure).
指定明確證書生效的日期。格式爲YYMMDDHHMMSSZ
(16) -enddate date
this allows the expiry date to be explicitly set. The format of the date is YYMMDDHHMMSSZ (the same as an ASN1 UTCTime structure).
指定證書的截止(過期)日期。格式爲YYMMDDHHMMSSZ
(17) -days arg
簽署證書的天數。
(18) -md alg
指定使用的消息摘要算法。可選值常見的有md5,sha1,mdc2,詳細信息請參見openssl dgst -h的輸出
(19) -policy arg
指定CA使用的策略。
(20) -msie_back
老版本兼容的一個選項。
(23) -batch
設置批處理的模式。所有的CSR會被自動處理。
(24) -extensions section
一般都用X509格式的證書,X509有幾個版本。使用此選項可以會改變辦法的證書的版本。
(25) -extfile file
an additional configuration file to read certificate extensions from (using the default section unless the -extensions option is also used).
(26) -utf8
this option causes field values to be interpreted as UTF8 strings, by default they are interpreted as ASCII.
This means that the field values, whether prompted from a terminal or obtained from a configuration file,
must be valid UTF8 strings.

第二部分:吊銷列表的選項
(1) -gencrl
this option generates a CRL based on information in the index file.
生成一個基於索引信息的吊銷列表文件;
(2) -crldays num
the number of days before the next CRL is due. That is the days from now to place in the CRL nextUpdate field.
吊銷的日期時間週期。
(3) -crlhours num
the number of hours before the next CRL is due.
具體時間。
(4) -revoke filename
撤銷吊銷的證書文件。
(5) -status serial
通過指定的序列號來查詢證書撤銷的狀態並退出。
(6) -updatedb
更新索引數據庫,並移除過期的證書。
(7) -crl_reason reason
revocation reason, where reason is one of: unspecified, keyCompromise, CACompromise, affiliationChanged, superseded, cessationOfOperation, certificateHold or removeFromCRL.
The matching of reason is case insensitive. Setting any revocation reason will make the CRL v2.
In practive removeFromCRL is not particularly useful because it is only used in delta CRLs which are not currently implemented.

(8) -crl_hold instruction
This sets the CRL revocation reason code to certificateHold and the hold instruction to instruction which must be an OID. Although any OID can be used only holdInstructionNone (the use of which is discouraged by RFC2459) holdInstructionCallIssuer or holdInstructionReject will normally be used.

(9) -crl_compromise time
This sets the revocation reason to keyCompromise and the compromise time to time. time should be in GeneralizedTime format that is YYYYMMDDHHMMSSZ.

(10) -crl_CA_compromise time
This is the same as crl_compromise except the revocation reason is set to CACompromise.

(11) -crlexts section
 the section of the configuration file containing CRL extensions to include. If no CRL extension section is present then a V1 CRL is created, if the CRL extension section is present (even if it is empty) then a V2 CRL is created. The CRL extensions specified are CRL extensions and not CRL entry extensions.  It should be noted that some software (for example Netscape) can't handle V2 CRLs. See x509v3_config(5) manual page for details of the extension section format.

第三部分:配置文件選項
默認的配置文件:/etc/pki/tls/openssl.cnf
oid_file
oid_section
new_certs_dir
和命令行選項-outdir作用一樣。指明簽好的證書路徑。
默認值配置文件中的值爲: /etc/pki/CA/newcerts
必須要提供。

certificate
和命令行選項-cert作用一樣。指明CA自籤的證書.
默認配置文件中的值爲: /etc/pki/CA/cacert.pem
必須要提供。

private_key
和-keyfile選項一樣。指明CA的私鑰路徑。
默認配置文件中的值爲: /etc/pki/CA/private/cakey.pem

RANDFILE
指明一個用來讀寫時候產生隨機值的文件。
默認配置文件中的值爲: /etc/pki/CA/private/.rand

default_days
和-days選項一樣。指明簽署證書的有效時間有多長。
默認配置文件中的值爲:365  #表示365天,默認是簽署1年

default_startdate
和命令行選項-startdate相同,如果沒有設置標識生成證書時間開始,往後退多久

default_enddate
和命令行選項-enddate相同,表示證書有效的截止日期。

default_crl_hours default_crl_days
分別對應-crlhours選項和--crldays選項。

default_md
和-md選項相同的。指明消息摘要算法。
默認配置文件中的值爲: sha256
必須要提供。

database
文件數據庫索引文件。如果不存在要創建,創建一個空文件。
必須要提供。

unique_subject
默認值是yes,默認配置文件中是註釋的。
如果設置爲no表示允許創建相同主題(subject)的證書。

serial
a text file containing the next serial number to use in hex. Mandatory.
This file must be present and contain a valid serial number.
包含下一個可用的16進制序列號的文本文件。
默認配置文件值:/etc/pki/CA/serial
必須要提供。

crlnumber
a text file containing the next CRL number to use in hex.
The crl number will be inserted in the CRLs only if this file exists.
If this file is present, it must contain a valid CRL number.
包含下一個,吊銷證書的16進制的編號。
默認配置文件值:/etc/pki/CA/crlnumber

x509_extensions
the same as -extensions.

crl_extensions
the same as -crlexts.

參考:
https://max.book118.com/html/2015/0627/19896336.shtm

案例等講了後面幾個標準命令後一起配合講解。
3.3.12、標準命令req(重點)
req - PKCS#10 certificate request and certificate generating utility.

req命令主要是創建和處理PKCS#10格式的證書籤署請求。也可以爲根CA創建自簽證書。

格式:
openssl req [-inform PEM|DER] [-outform PEM|DER] [-in filename] [-passin arg] [-out filename] [-passout arg] [-text]
[-pubkey] [-noout] [-verify] [-modulus] [-new] [-rand file(s)] [-newkey rsa:bits] [-newkey alg:file]  [-nodes] [-key filename]
[-keyform PEM|DER] [-keyout filename] [-keygen_engine id] [-[digest]] [-config filename] [-multivalue-rdn] [-x509]
[-days n] [-set_serial n] [-asn1-kludge] [-no-asn1-kludge] [-newhdr] [-extensionssection] [-reqexts section] [-utf8]
[-nameopt] [-reqopt] [-subject] [-subj arg] [-batch] [-verbose] [-engine id]

選項:
-inform DER|PEM
指定輸入文件格式。DER格式採用的是ASN1 DER編碼,是兼容PKCS#10格式的。PEM形式是默認的格式。是通過DER格式經過base64編碼而來,附加了一些
頭和尾部的輸出信息。
-outform DER|PEM
指定的輸出格式。
-in filename
要處理的CSR的文件名稱,如果指定了-new 或 -newkey選項,該選項無效;
-passin arg
輸入文件密碼來源。
-out filename
要輸出的文件名。
-passout arg
輸出文件密碼來源。
-text
將CSR文件裏的內容以可讀的方式打印出來。
-subject
打印請求主體或者證書(要指定-x509選項)主體信息。
-pubkey
打印公鑰信息。
-noout
不要打印CSR文件編碼版本信息。
-modulus
將CSR裏面包含的請求的公共係數。
-verify
驗證請求文件裏的簽名信息。
-new
this option generates a new certificate request.
It will prompt the user for the relevant field values.
The actual fields prompted for and their maximum and minimum sizes are specified in the configuration file and any requested extensions.
If the -key option is not used it will generate a new RSA private key using information specified in the configuration file.
這個選項用於產生一個新的證書籤署請求。會提示用戶交互式輸入一些相關的參數值。
實際設置的值提示以及他們的最大最小值都是在配置文件中指定的以及任何其他的請求擴展。
如果-key選項沒有指定,因爲不管是自籤也好,還是證書籤署請求也罷,都必須要有一個私鑰,
如果沒有-key選項,將會根據配置文件設置的缺省值來先產生一個RSA的私鑰文件。
-newkey arg
創建新的證書籤署請求(CSR格式文件)和一個新的私鑰文件。
參數有幾種形式:
    rsa:nbits 其中的nbits表示產生RSA私鑰的長度,如果省略,會根據配置文件缺省值生成;
如果產生DSA格式的私鑰文件,參數應該是DSA私鑰產生需要的參數文件名。格式:
dsa:dsa_parafile
-key filename
指定私鑰文件,支持PKCS#8格式的私鑰。
-keyform PEM|DER
通過-key指向的私鑰文件的格式,默認是PEM的。
-keyout filename
指明創建的新的私有密鑰文件的文件名。如果該選項沒有設置,將使用配置文件裏面指定的文件名。
-nodes
如果指定該選項後,生成的私有密鑰文件將不會被加密。
-[digest]
指定簽署請求用到的消息摘要算法。
-[md5|sha1|md2|mdc2]
如果沒有指定該選項,將會使用配置文件中對應的消息摘要算法設置的值。
如果是DSA的CSR將忽略這個選項,而採用sha1。
-config filename
允許指定額外的配置文件。(指定配置文件後,如果有相同的值對應不同參數,會以這個額外指定的配置文件爲準。)
-x509
用來自簽證書而不是證書籤署請求。一般用作產生一個測試證書或者爲根CA做自籤。
-days n
when the -x509 option is being used this specifies the number of days to certify the certificate for. The default is 30 days.
如果指定-x509選項,這個表示的數字爲簽署證書的天數。默認是30天。
沒有指定-x509時候,也可以使用這個選項。表示生成證書籤署請求,想要簽署的證書有效期時間天數。
-set_serial n
serial number to use when outputting a self signed certificate.
This may be specified as a decimal value or a hex value if preceded by 0x.
It is possible to use negative serial numbers but this is not recommended.
輸出一個自簽證書時候使用的序列號。可以指定爲10進制數字或16進制數值(要加上0x前綴)。
可以設置爲負值但是不推薦。
3.3.13、標準命令x509
x509是一個多用途的證書組件。他可以用於顯示證書的信息,轉換證書成各種形式,也可以向ca標準命令實現的"最小CA"一樣實現證書籤署請求,
也可以編輯設置證書的信任。
由於選項太多,按照一般功能劃分:
(1) 輸入,輸出以及一般選項

-inform DER|PEM|NET
This specifies the input format normally the command will expect an X509 certificate but this can change if other options such as -req are present.
The DER format is the DER encoding of the certificate and PEM is the base64 encoding of the DER encoding with header and footer lines added.
The NET option is an obscure Netscape server format that is now obsolete.

指定輸入文件的格式,建議使用DER或PEM,NET將被丟棄;
DER格式是DER編碼的證書格式;PEM一個在DER編碼格式基礎上使用base64編碼,然後添加一些頭部和尾部的行的證書格式。
NET是早期網景公司設計的一個比較晦澀的格式,現在將要被棄用。
-outform DER|PEM|NET
This specifies the output format, the options have the same meaning as the -inform option.
指定輸出文件格式,DER和PEM。不建議使用NET。
-in filename
This specifies the input filename to read a certificate from or standard input if this option is not specified.
指定讀取的證書文件,如果不指定會從標準輸入中讀取。
-out filename
This specifies the output filename to write to or standard output by default.
表示寫入的文件,不指定表示直接寫入標準輸出。
-md2|md5|-sha1|-mdc2
指定使用的消息摘要算法。如果默認不指定,會使用SHA1,對於DSA的私鑰,就算指定了該選項,也不會生效,因爲DSA的私鑰會一直使用SHA1。

(2) 顯示相關選項
-text
打印輸出信息以文本格式。全部詳細信息包括:公鑰,簽名算法,發行人和主題名字,序列號以及其他擴展信息以及信任設置信息。

-noout
this option prevents output of the encoded version of the request.
不允許輸出編碼後的部分的信息。
-pubkey
輸出證書的公鑰信息塊,以PEM格式輸出。
-modulus
this option prints out the value of the modulus of the public key contained in the certificate.
顯示證書中公鑰的模數值。
-serial
outputs the certificate serial number.
輸出證書的序列號信息。
-subject_hash 或-hash
outputs the "hash" of the certificate subject name. This is used in OpenSSL to form an index to allow certificates in a directory to be looked up by subject name.
輸出證書主體的"哈希"值。-hash選項是爲了向後兼容,所以暫時保留,含義一樣。
-issuer_hash
outputs the "hash" of the certificate issuer name.
輸出證書髮型名的hash值。
-subject
顯示證書的主題信息。
-issuer
顯示證書的髮型的名字。
-email
輸出郵件地址信息(如果沒有設置,將沒有結果)
-startdate
prints out the start date of the certificate, that is the notBefore date.
打印證書開始生效的日期。(證書如果涉及續費,這個時刻點表示最近一次續費的時刻)
-enddate
prints out the expiry date of the certificate, that is the notAfter date.
打印證書的過期日期時間。
-dates
prints out the start and expiry dates of a certificate.
打印證書的開始時間日期以及過期的時間日期。
-checkend arg
checks if the certificate expires within the next arg seconds and exits non-zero if yes it will expire or zero if not.
指定數值(單位秒),檢測經過這些時間後,證書是否過期。
-fingerprint
打印證書的指紋信息。
prints out the digest of the DER encoded version of the whole certificate (see digest options).
如果要查看的正式是DER格式的,記得要配合-inform DER來使用。
-C
打印證書以C代碼的形式。
(3) 信任設置相關選項
因爲信任設置屬性目前是實驗階段,有些選項可能會變化
-trustout
打印出可以信任的證書信息。
-setalias arg
設置證書別名。
-alias
打印證書別名。
-clrtrust
清除證書附加項裏所有有關用途允許的內容。
-clrreject
清楚證書附加項裏所有有關用途禁止的內容。
-addtrust arg
添加證書附加項裏所有有關用途允許的內容。
-addreject arg
添加證書附加項裏所有有關用途禁止的內容。
-purpose
打印證書附加項裏所有有關用途允許和用途禁止的內容。
3.3.14、標準命令crl
CRL表示吊銷列表;
crl命令用來處理DER格式或PEM格式的CRL文件。
openssl crl [-inform PEM|DER] [-outform PEM|DER] [-text] [-in filename] [-out filename] [-noout] [-hash] [-issuer] [-lastupdate] [-nextupdate] [-CAfile file] [-CApath dir]

-inform DER|PEM
指定輸入格式。
-outform DER|PEM
指定輸出格式。
-in filename
輸入文件。
-out filename
輸出文件。
-text
以文本格式打印CRL
-noout
don't output the encoded version of the CRL.
-hash
打印發型者的hash值。
-issuer
打印發行者的名字。
-lastupdate
output the lastUpdate field.
-nextupdate
output the nextUpdate field.
-CAfile file
verify the signature on a CRL by looking up the issuing certificate in file
-CApath dir
verify the signature on a CRL by looking up the issuing certificate in dir.
This directory must be a standard certificate directory: that is a hash of each subject name (using x509 -hash)
should be linked to each  certificate.
四、CA介紹,自建CA,頒發證書
4.1、混合加密解密圖解
加密: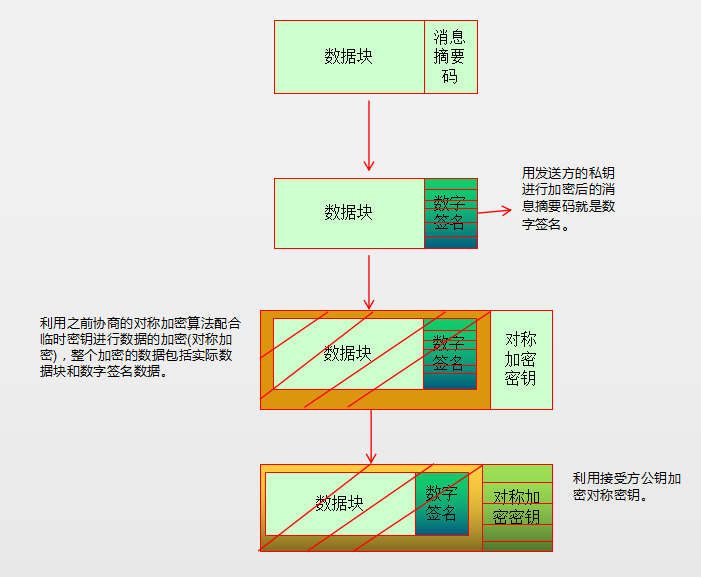
解密: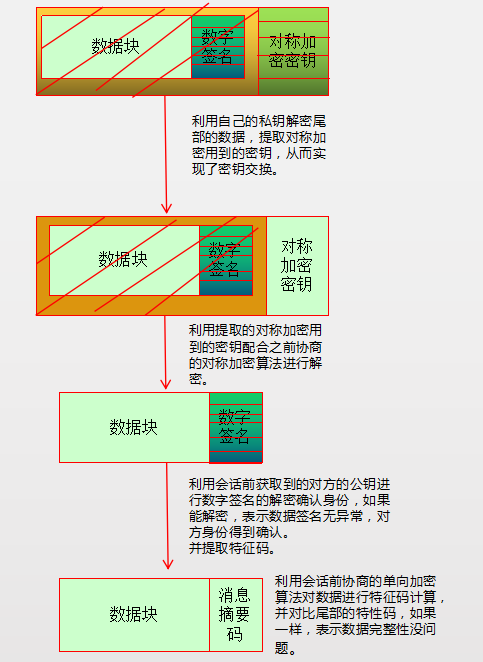
思考: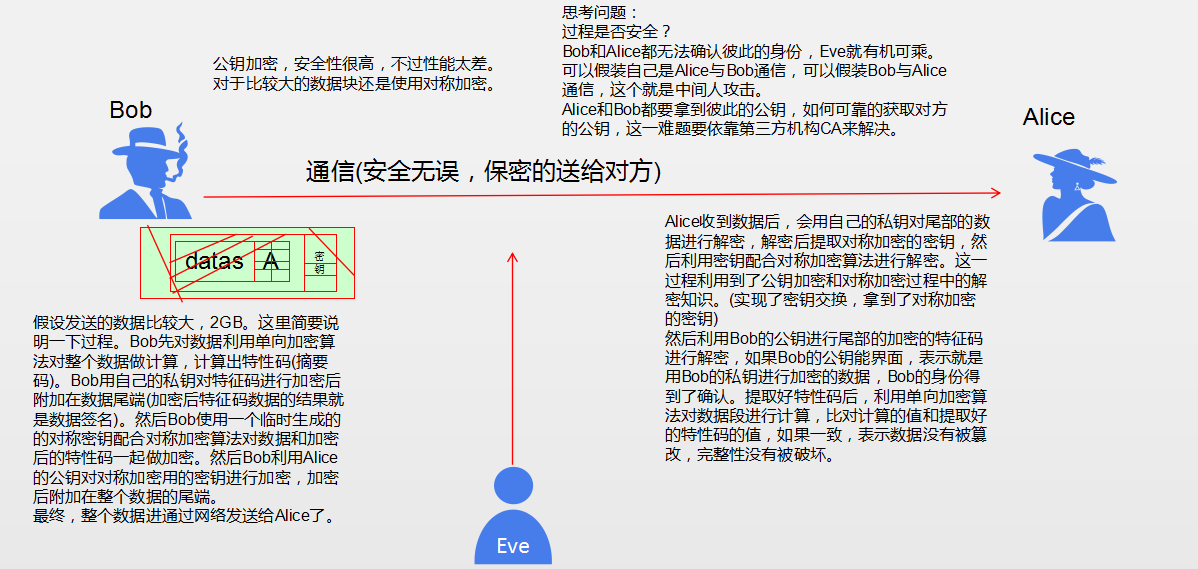
4.2、PKI和CA相關圖解
PKI(公鑰基礎設施),主要由以下部分組成:
簽證機構:CA
註冊機構:RA
證書吊銷列表:CRL
證書存儲庫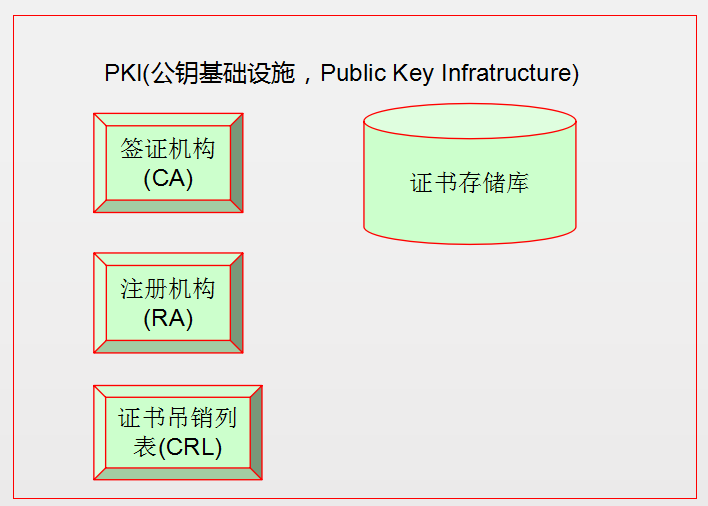
4.3、openssl的默認配置文件部分節選說明
默認配置文件:/etc/pki/tls/openssl.cnf
####################################################################
[ ca ]       #表示ca分組配置
default_ca      = CA_default            # The default ca section,表示ca默認的配置段

####################################################################
[ CA_default ]   #實際ca使用的是這個分組配置

dir             = /etc/pki/CA           # Where everything is kept,根路徑
certs           = $dir/certs            # Where the issued certs are kept,ca頒發過的證書默認存儲路徑
crl_dir         = $dir/crl              # Where the issued crl are kept,吊銷證書路徑
database        = $dir/index.txt        # database index file.存儲證書的數據庫索引文件,一個普通文本文件
#unique_subject = no                    # Set to 'no' to allow creation of
                                        # several ctificates with same subject.
new_certs_dir   = $dir/newcerts         # default place for new certs.頒發的新證書留存路徑

certificate     = $dir/cacert.pem       # The CA certificate,ca自己的證書,要絕對與這裏指向的一樣。
serial          = $dir/serial           # The current serial number,當前的序列號記錄文件
crlnumber       = $dir/crlnumber        # the current crl number,當前的吊銷編號記錄文件
                                        # must be commented out to leave a V1 CRL
crl             = $dir/crl.pem          # The current CRL
private_key     = $dir/private/cakey.pem # The private key,ca的私鑰存儲路徑,要與這裏絕對一致
RANDFILE        = $dir/private/.rand    # private random number file,要產生隨機數用到的文件

x509_extensions = usr_cert              # The extentions to add to the cert,證書的擴展信息,後邊有定義usr_cert分組
...... #省略一些信息
default_days    = 365                   # how long to certify for,簽署證書默認有效期,默認365天
default_crl_days= 30                    # how long before next CRL,證書吊銷時間,默認30天
default_md      = sha256                # use SHA-256 by default,默認的消息摘要sha256
preserve        = no                    # keep passed DN ordering
......#省略一些信息
[ req ]   #表示簽署請求時候的選項
default_bits            = 2048,默認的長度2048位
default_md              = sha256,默認的摘要算法,sha256
default_keyfile         = privkey.pem,默認生成的私鑰名字
distinguished_name      = req_distinguished_name
attributes              = req_attributes
x509_extensions = v3_ca # The extentions to add to the self signed cert
4.4、一臺服務器做根ca,一臺web服務器
ca的服務器ip信息:172.168.110.22
web服務器ip信息:172.168.110.21
1、在確定配置爲ca的服務器上生成一個自簽證書,併爲ca提供所需要的目錄及文件即可
以下部分在172.168.110.22上執行。
(1)生成私鑰(注意CA配置文件中指定的路徑和名字要與生成的私鑰保持一致)
(umask 077;openssl genrsa -out /etc/pki/CA/private/cakey.pem 4096)

[root@node1 ~]# (umask 077;openssl genrsa -out /etc/pki/CA/private/cakey.pem 4096)
Generating RSA private key, 4096 bit long modulus
............++
...........................................................................++
e is 65537 (0x10001)
[root@node1 ~]# ls -l /etc/pki/CA/private/cakey.pem
-rw------- 1 root root 3243 Nov  9 18:02 /etc/pki/CA/private/cakey.pem
(2)生成自簽證書(注意要和openssl的配置文件中指定的位置和名字保持一致)
openssl req -new -x509 -key /etc/pki/CA/private/cakey.pem -out /etc/pki/CA/cacert.pem -days 3655

[root@node1 ~]# openssl req -new -x509 -key /etc/pki/CA/private/cakey.pem -out /etc/pki/CA/cacert.pem -days 3655
You are about to be asked to enter information that will be incorporated
into your certificate request.
What you are about to enter is what is called a Distinguished Name or a DN.
There are quite a few fields but you can leave some blank
For some fields there will be a default value,
If you enter '.', the field will be left blank.
-----
Country Name (2 letter code) [XX]:CN     #國家
State or Province Name (full name) []:FuJian    #省份
Locality Name (eg, city) [Default City]:FuZhou   #城市,地方
Organization Name (eg, company) [Default Company Ltd]:yanhui #公司,組織
Organizational Unit Name (eg, section) []:ops #部門
Common Name (eg, your name or your server's hostname) []:ca.yanhui.com #ca的主機名
Email Address []:[email protected]  #email地址
(3)爲ca提供所需的目錄及文件
mkdir -p /etc/pki/CA/{certs,crl,newcerts}
touch /etc/pki/CA/{serial,index.txt}
echo 01 >/etc/pki/CA/serial

[root@node1 ~]# mkdir -p /etc/pki/CA/{certs,crl,newcerts}
[root@node1 ~]# touch /etc/pki/CA/{serial,index.txt}
[root@node1 ~]# echo 01 > /etc/pki/CA/serial
2、要在到證書進行安全通信的服務器,需要向ca請求籤署證書
以下步驟在172.168.110.21上執行。
(1) 用到證書的主機生成證書籤署請求用到的私鑰
cd /var/tmp/
(umask 077;openssl genrsa -out private.key 2048)

[root@node2 tmp]# cd /var/tmp/
[root@node2 tmp]# (umask 077;openssl genrsa -out private.key 2048)
Generating RSA private key, 2048 bit long modulus
................................................................................+++
..................................+++
e is 65537 (0x10001)
(2)生成證書籤署請求
openssl req -new -key /var/tmp/private.key -out /var/tmp/certificate.csr -days 365

[root@node2 tmp]# openssl req -new -key /var/tmp/private.key -out /var/tmp/certificate.csr -days 365
You are about to be asked to enter information that will be incorporated
into your certificate request.
What you are about to enter is what is called a Distinguished Name or a DN.
There are quite a few fields but you can leave some blank
For some fields there will be a default value,
If you enter '.', the field will be left blank.
-----
Country Name (2 letter code) [XX]:CN  #因爲是本地自建ca,記住要與自籤ca證書時候填寫一樣。
State or Province Name (full name) []:FuJian  #因爲是本地自建ca,記住要與自籤ca證書時候填寫一樣
Locality Name (eg, city) [Default City]:FuZhou  #因爲是本地自建ca,記住要與自籤ca證書時候填寫一樣
Organization Name (eg, company) [Default Company Ltd]:yanhui  #因爲是本地自建ca,記住要與自籤ca證書時候填寫一樣
Organizational Unit Name (eg, section) []:ops  #因爲是本地自建ca,記住要與自籤ca證書時候填寫一樣
Common Name (eg, your name or your server's hostname) []:www.yanhui.com #非常重要,這個就是站點使用的域名
Email Address []:[email protected] #郵箱,可以填寫自己的郵箱

Please enter the following 'extra' attributes
to be sent with your certificate request
A challenge password []:     #是否要爲證書使用提供一個額外的密碼,回車即可,不需要。
An optional company name []: #是否提供一個可選的公司名,回車,不需要填寫。
(3) 通過工具將證書籤署請求文件文件發送給ca,利用ftp或者scp網絡拷貝工具都行
[root@node2 tmp]# scp -P22 -p /var/tmp/certificate.csr [email protected]:/var/tmp/
[email protected]'s password:
certificate.csr                                                                        100% 1054   649.4KB/s   00:00
[root@node2 tmp]#
(4)特定步驟,在ca主機上執行證書籤署步驟
openssl ca -in /var/tmp/certificate.csr -out /var/tmp/certificate.crt -days 365

Using configuration from /etc/pki/tls/openssl.cnf
Check that the request matches the signature
Signature ok
Certificate Details:
        Serial Number: 1 (0x1)
        Validity
            Not Before: Nov  9 10:30:59 2018 GMT
            Not After : Nov  9 10:30:59 2019 GMT
        Subject:
            countryName               = CN
            stateOrProvinceName       = FuJian
            organizationName          = yanhui
            organizationalUnitName    = ops
            commonName                = www.yanhui.com
            emailAddress              = [email protected]
        X509v3 extensions:
            X509v3 Basic Constraints:
                CA:FALSE
            Netscape Comment:
                OpenSSL Generated Certificate
            X509v3 Subject Key Identifier:
                DA:E8:F8:DC:72:40:F5:BB:D2:AC:E7:7D:7F:FE:DF:3D:33:73:64:9E
            X509v3 Authority Key Identifier:
                keyid:C6:1B:54:1E:74:4E:D9:C5:63:14:66:A6:F3:C1:C1:48:40:4B:F7:A2

Certificate is to be certified until Nov  9 10:30:59 2019 GMT (365 days)
Sign the certificate? [y/n]:y   #是否要簽署證書

1 out of 1 certificate requests certified, commit? [y/n]y   #是否提交
Write out database with 1 new entries
Data Base Updated
4.5、不單獨生成私鑰,自籤時或簽署證書請求時候一次生成所需密鑰
ca的服務器ip信息:172.168.110.22
web服務器ip信息:172.168.110.21
以下步驟在ca主機上執行:
(1) 生成自簽證書(會生成所需要的私鑰)
(umask 077;openssl req -x509 -newkey rsa:4096 -nodes -keyout /etc/pki/CA/private/cakey.pem -out /etc/pki/CA/cacert.pem -days 3655)

[root@node1 CA]# (umask 077;openssl req -x509 -newkey rsa:4096 -nodes -keyout /etc/pki/CA/private/cakey.pem -out /etc/pki/CA/cacert.pem -days 3655)
Generating a 4096 bit RSA private key
................................++
...........................++
writing new private key to '/etc/pki/CA/private/cakey.pem'
-----
You are about to be asked to enter information that will be incorporated
into your certificate request.
What you are about to enter is what is called a Distinguished Name or a DN.
There are quite a few fields but you can leave some blank
For some fields there will be a default value,
If you enter '.', the field will be left blank.
-----
Country Name (2 letter code) [XX]:CN
State or Province Name (full name) []:FuJian
Locality Name (eg, city) [Default City]:FuZhou
Organization Name (eg, company) [Default Company Ltd]:yanhui
Organizational Unit Name (eg, section) []:ops
Common Name (eg, your name or your server's hostname) []:ca.yanhui.com
Email Address []:[email protected]
[root@node1 CA]# ls -l /etc/pki/CA/private/cakey.pem
-rw------- 1 root root 3272 Nov  9 22:54 /etc/pki/CA/private/cakey.pem
[root@node1 CA]# ls -l /etc/pki/CA/cacert.pem
-rw------- 1 root root 2106 Nov  9 22:54 /etc/pki/CA/cacert.pem
[root@node1 CA]# file /etc/pki/CA/cacert.pem
/etc/pki/CA/cacert.pem: PEM certificate
[root@node1 CA]# file /etc/pki/CA/private/cakey.pem
/etc/pki/CA/private/cakey.pem: ASCII text

用到的選項再次解釋:
    -x509表示自簽證書用到的一個比較特殊的選項
    -newkey rsa:4096 表示創建一個新的證書請求和一個新的RSA的4096長度的私鑰
    -nodes表示生成的私鑰不加使用密碼
    -keyout表示指明私鑰的路徑和名字,一定要與默認配置文件中ca所需要的私鑰路徑和名字一致
    -out指明創建愛你新的證書的路徑和名字,一定要與默認配置文件中ca所需要的證書路徑和名字一致
    -days表示這裏給ca自簽證書的使用天數爲3655一天
(2) 爲CA提供所需的目錄及文件
mkdir -p /etc/pki/CA/{certs,crl,newcerts}
touch /etc/pki/CA/{serial,index.txt}
echo 01 >/etc/pki/CA/serial
以下步驟在web主機上執行:
(1) 生成證書籤署請求(會生成所需的私鑰)
(umask 077;openssl req -newkey rsa:2048 -nodes -keyout /var/tmp/private.key -out /var/tmp/certificate.csr -days 365)

[root@node2 tmp]# (umask 077;openssl req -newkey rsa:2048 -nodes -keyout /var/tmp/private.key -out /var/tmp/certificate.csr -days 365)
Generating a 2048 bit RSA private key
.................................................................+++
..............................+++
writing new private key to '/var/tmp/private.key'
-----
You are about to be asked to enter information that will be incorporated
into your certificate request.
What you are about to enter is what is called a Distinguished Name or a DN.
There are quite a few fields but you can leave some blank
For some fields there will be a default value,
If you enter '.', the field will be left blank.
-----
Country Name (2 letter code) [XX]:CN
State or Province Name (full name) []:FuJian
Locality Name (eg, city) [Default City]:FuZhou
Organization Name (eg, company) [Default Company Ltd]:yanhui
Organizational Unit Name (eg, section) []:ops
Common Name (eg, your name or your server's hostname) []:www.yanhui.com
Email Address []:[email protected]

Please enter the following 'extra' attributes
to be sent with your certificate request
A challenge password []:
An optional company name []:
[root@node2 tmp]#
(2) 將證書籤署請求文件通過工具(ftp或scp或rsync等)傳遞給ca主機
scp -P22 -p /var/tmp/certificate.csr [email protected]:/var/tmp/

[root@node2 tmp]# scp -P22 -p /var/tmp/certificate.csr [email protected]:/var/tmp/
[email protected]'s password:
certificate.csr                                                                        100% 1054   584.9KB/s   00:00
[root@node2 tmp]#
以下步驟在ca主機上執行:
(3) 在ca主機上完成證書籤署請求並提供給站點主機下載或者傳遞給站點主機
openssl ca -in /var/tmp/certificate.csr -out /etc/pki/CA/certs/certificate.crt -days 365

[root@node1 CA]# openssl ca -in /var/tmp/certificate.csr -out /etc/pki/CA/certs/certificate.crt -days 365
Using configuration from /etc/pki/tls/openssl.cnf
Check that the request matches the signature
Signature ok
Certificate Details:
        Serial Number: 1 (0x1)
        Validity
            Not Before: Nov  9 15:09:07 2018 GMT
            Not After : Nov  9 15:09:07 2019 GMT
        Subject:
            countryName               = CN
            stateOrProvinceName       = FuJian
            organizationName          = yanhui
            organizationalUnitName    = ops
            commonName                = www.yanhui.com
            emailAddress              = [email protected]
        X509v3 extensions:
            X509v3 Basic Constraints:
                CA:FALSE
            Netscape Comment:
                OpenSSL Generated Certificate
            X509v3 Subject Key Identifier:
                C8:54:4C:34:A5:67:5E:BB:D8:5C:35:2B:A2:68:61:A9:91:E7:D7:A8
            X509v3 Authority Key Identifier:
                keyid:74:DE:B7:5F:FF:AC:08:25:F1:AD:91:83:2D:5F:1A:E1:6E:B7:77:43

Certificate is to be certified until Nov  9 15:09:07 2019 GMT (365 days)
Sign the certificate? [y/n]:y

1 out of 1 certificate requests certified, commit? [y/n]y
Write out database with 1 new entries
Data Base Updated
(4)把簽證的證書傳遞給站點服務器
scp -P22 -p /etc/pki/CA/certs/certificate.crt [email protected]:/var/tmp/
[root@node1 CA]# scp -P22 -p /etc/pki/CA/certs/certificate.crt [email protected]:/var/tmp/
[email protected]'s password:
certificate.crt 100% 5866 2.0MB/s 00:00
[root@node1 CA]#
[root@node1 CA]# ls
cacert.pem certs crl index.txt index.txt.attr index.txt.old newcerts private serial serial.old
[root@node1 CA]# ls -l /etc/pki/CA/cacert.pem #這個是ca的自籤的PEM格式的證書
-rw------- 1 root root 2106 Nov 9 22:54 /etc/pki/CA/cacert.pem
[root@node1 CA]# ls -l /etc/pki/CA/private/cakey.pem #這個是ca自簽證書時生成的PEM格式的私鑰
-rw------- 1 root root 3272 Nov 9 22:54 /etc/pki/CA/private/cakey.pem
[root@node1 CA]# ls -l /etc/pki/CA/index.txt
-rw-r--r-- 1 root root 110 Nov 9 23:09 /etc/pki/CA/index.txt
[root@node1 CA]# cat /etc/pki/CA/index.txt #這裏是記錄證書的索引文件,下面有信息
V 191109150907Z 01 unknown /C=CN/ST=FuJian/O=yanhui/OU=ops/CN=www.yanhui.com/[email protected]
[root@node1 CA]# ls -l /etc/pki/CA/certs/certificate.crt #這個是我ca簽署過的證書的保存路徑,也可以不存在這裏
-rw-r--r-- 1 root root 5866 Nov 9 23:09 /etc/pki/CA/certs/certificate.crt
[root@node1 CA]# md5sum /etc/pki/CA/certs/certificate.crt
2a6e90569f18b85ee49ee4a23452de12 /etc/pki/CA/certs/certificate.crt
[root@node1 CA]# ls -l /etc/pki/CA/newcerts/01.pem
#每次簽署一個新的證書,這個目錄下都會有一份備份,名字是編號加格式後綴(默認都是PEM格式)
-rw-r--r-- 1 root root 5866 Nov 9 23:09 /etc/pki/CA/newcerts/01.pem
[root@node1 CA]# md5sum /etc/pki/CA/newcerts/01.pem
2a6e90569f18b85ee49ee4a23452de12 /etc/pki/CA/newcerts/01.pem
[root@node1 CA]# ls -l /etc/pki/CA/serial #這個文件記錄當前簽署過的證書的序列號
-rw-r--r-- 1 root root 3 Nov 9 23:09 /etc/pki/CA/serial
[root@node1 CA]# ls -l /etc/pki/CA/serial.old
-rw-r--r-- 1 root root 3 Nov 9 23:09 /etc/pki/CA/serial.old
[root@node1 CA]# cat /etc/pki/CA/serial
02
[root@node1 CA]# cat /etc/pki/CA/serial.old
01
[root@node1 CA]# cat /etc/pki/CA/index.txt.attr
unique_subject = yes
[root@node1 CA]# ls -l /etc/pki/CA/index.txt.old
-rw-r--r-- 1 root root 0 Nov 9 23:09 /etc/pki/CA/index.txt.old
[root@node1 CA]# cat /etc/pki/CA/index.txt.old
[root@node1 CA]#
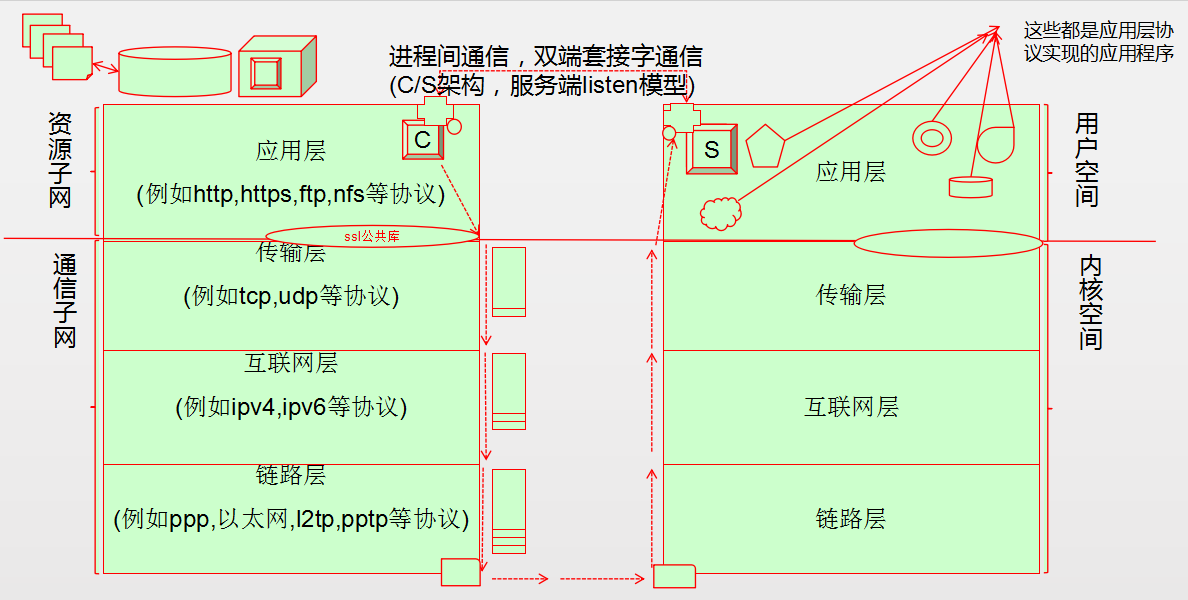
#上邊所有以.old爲後綴的文件都是備份文件。五、TCP/IP四層模型配合半層ssl開發庫以及SSL會話的步驟和階段
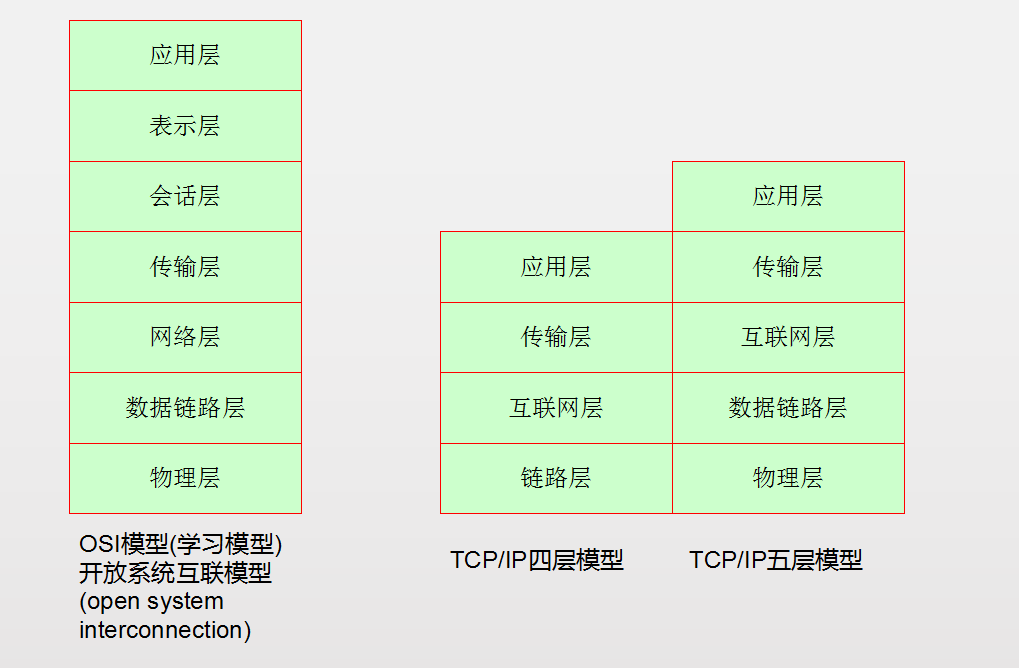
5.1、TCP/IP模型圖解

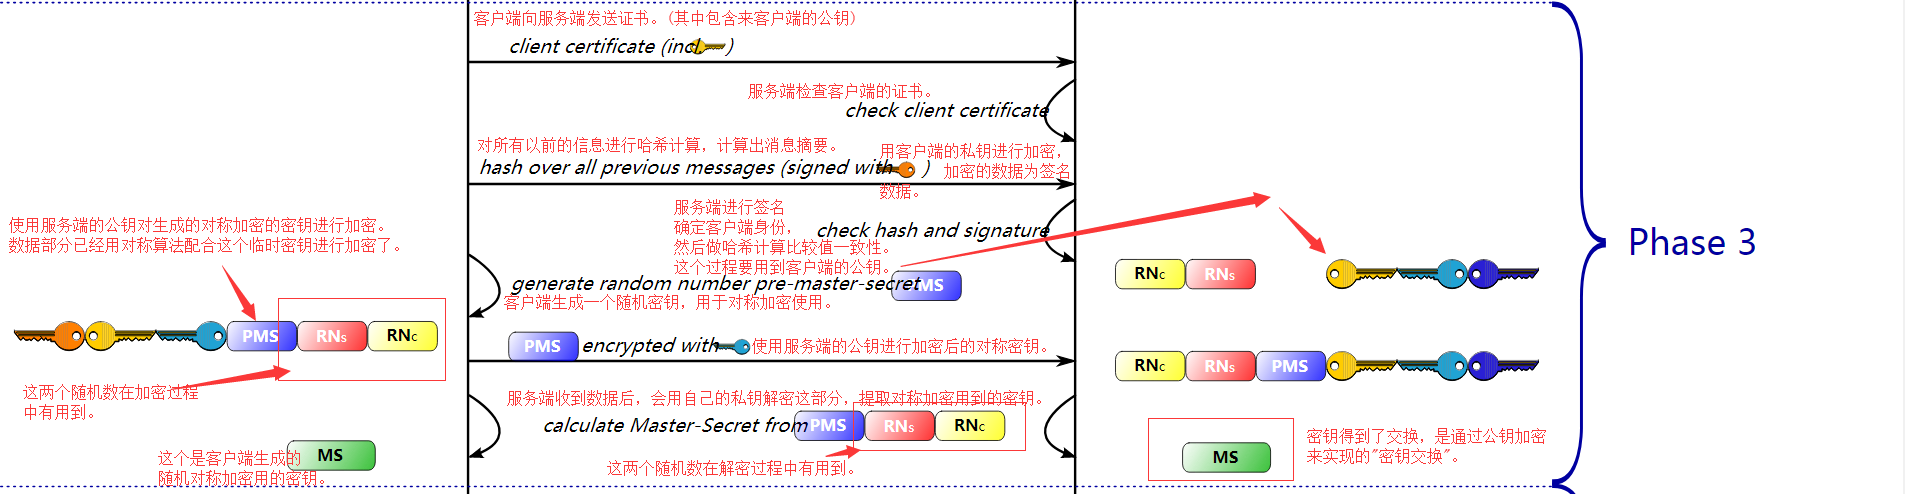
5.2、SSL會話階段圖解