


一. 搭建elasticsearch
- 上傳jdk-8u181-linux-x64.tar.gz和elasticsearch-6.1.4.tar.gz文件到系統任意目錄,
安裝java
解壓jdk-8u181-linux-x64.tar.gz文件
tar -zxvf jdk-8u181-linux-x64.tar.gz
編輯profile文件,添加jdk環境變量
vim /etc/profile
在最後添加
#JDK環境變量
JAVA_HOME=/usr/local/jdk1.8.0_181
CLASSPATH=$JAVA_HOME/lib/
PATH=$PATH:$JAVA_HOME/bin
export PATH JAVA_HOME CLASSPATH
引用環境變量
source /etc/profile
直接執行java –version 確定java已可用
解壓elasticsearch-6.1.4.tar.gz文件
tar –zxvf elasticsearch-6.1.4.tar.gz
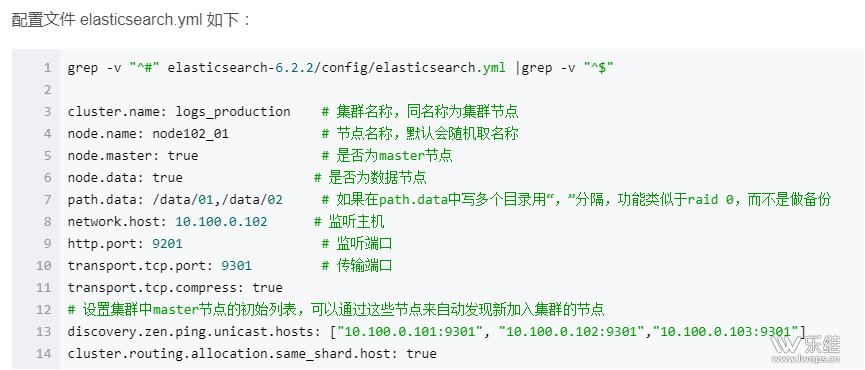
編輯修改elasticsearch的配置文件elasticsearch.yml
vim elasticsearch-6.1.4/config/elasticsearch.yml
主要修改以下信息(數據存放目錄以及日誌存放目錄需要添加執行權限,)

配置文件解析如下:
開啓服務(可以使用-d後臺啓用)
/usr/local/elasticsearch-6.1.4/bin/elasticsearch
樂維Tips:在啓動服務時,不能以root用戶開啓服務,elasticsearch需要以其他用戶開啓服務;
1、 需要創建用戶;
- 添加es用戶
- useradd es -m
- 設置es用戶密碼
- passwd es
2、 需要修改elasticsearch-6.1.4目錄、數據存放目錄、日誌存放目錄的所屬組和所屬用戶chown es:es /usr/local/elasticsearch-6.1.4/data chown es:es /usr/local/elasticsearch-6.1.4/logs chown es:es /usr/local/elasticsearch-6.1.4/
3、ERROR:bootstrap checks failed:max file descriptors [4096] for elasticsearchprocess likely too low, increase to at least [65536]
原因:無法創建本地文件問題,用戶最大可創建文件數太小
解決方案:
切換到root用戶,編輯limits.conf配置文件,
添加類似如下內容:
vi/etc/security/limits.conf
添加如下內容:
*  soft nofile 65536

* hard nofile 131072

* soft nproc 2048

* hard nproc 4096
注:* 代表Linux所有用戶名稱(比如hadoop)
保存、退出、重新登錄纔可生效
4、max virtualmemory areas vm.max_map_count [65530] likely too low, increase to at least[262144]
原因:最大虛擬內存太小
解決方案:切換到root用戶下,修改配置文件sysctl.conf
vi /etc/sysctl.conf
添加下面配置:
vm.max_map_count=655360
並執行命令:sysctl -p
5、max number ofthreads [1024] for user [es] likely too low, increase to at least [2048]
原因:無法創建本地線程問題,用戶最大可創建線程數太小
解決方案:
切換到root用戶,進入limits.d目錄下,修改90-nproc.conf 配置文件。
vi /etc/security/limits.d/90-nproc.conf
修改 soft nproc 1024 爲 soft nproc 2048
以es用戶啓動服務(-d 可以後臺啓動 )
su es
/usr/local/elasticsearch-6.1.4/bin/elasticsearch
開啓防火牆端口9200 TCP
firewall-cmd --zone=public --add-port=9200/tcp–permanent
在WEB上輸入IP:9200測試是否可以正常訪問使用
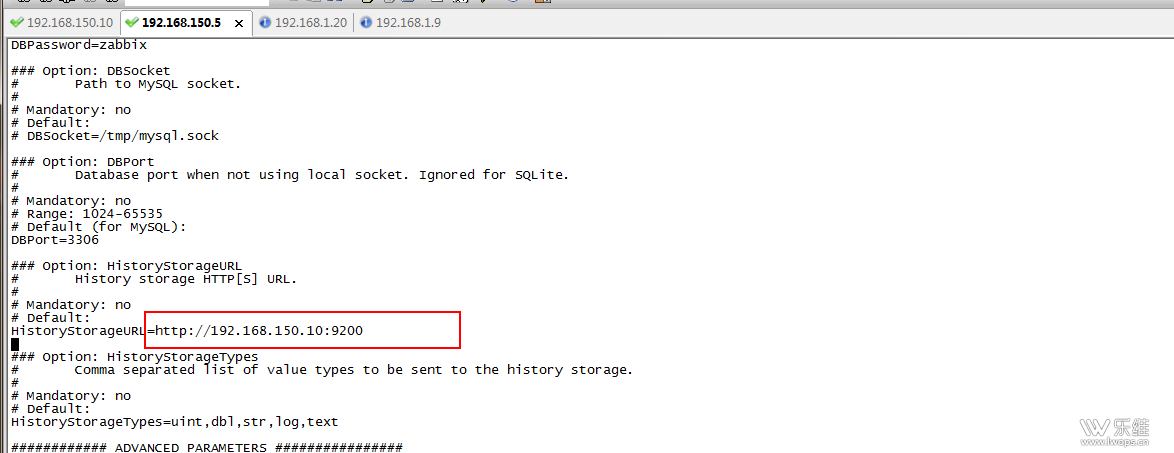
二. 與zabbix對接
需要修改zabbix_server的配置文件
修改HistoryStorageURL=http://192.168.150.10:9200
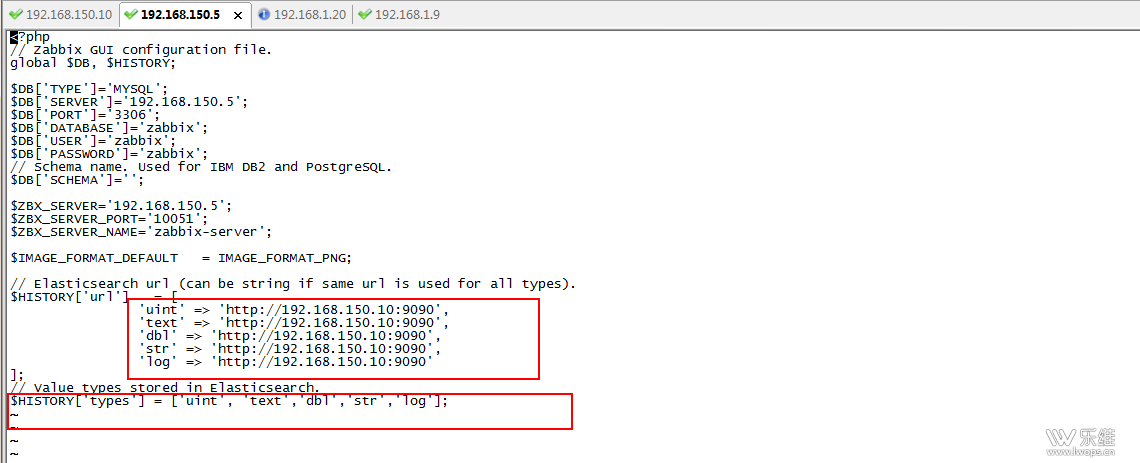
修改zabbix.conf.php文件
vi/usr/local/nginx/html/zabbix/conf/zabbix.conf.php
重啓zabbix_server
同步成功後
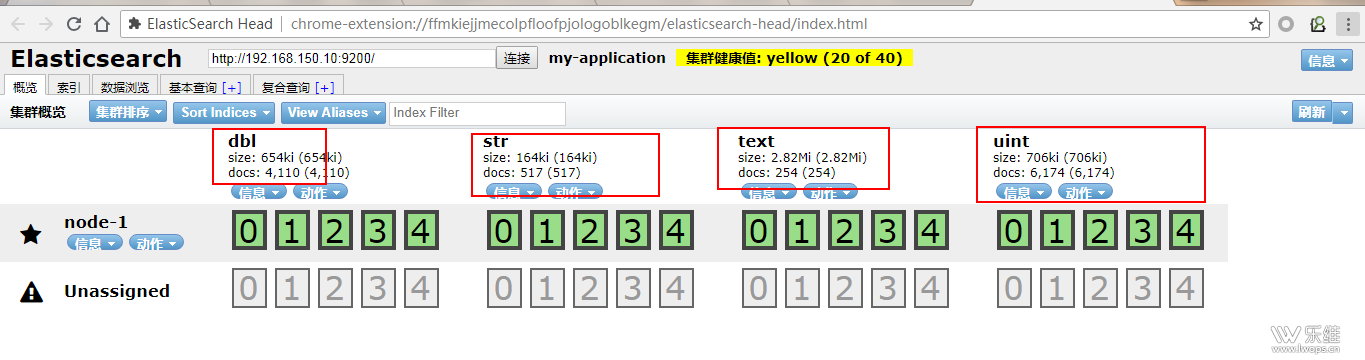
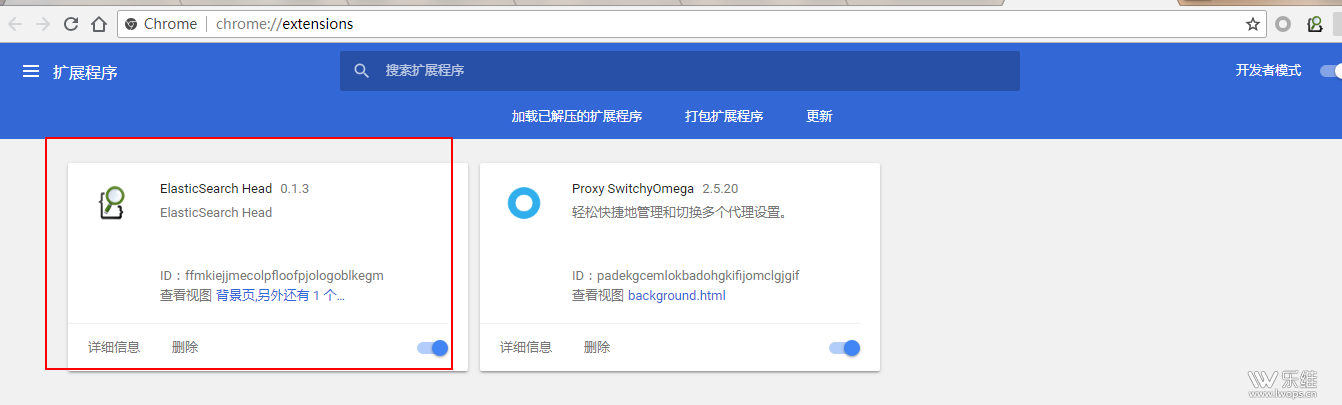
方法1、ElasticSearch Head可以直接在谷歌瀏覽器上進行安裝(推薦)
直接把文件拖到擴展程序進行添加
方法2、這裏介紹一個 Elasticsearch 可視化的管理插件 elasticsearch-head,可方便的查看,刪除,管理數據
安裝elasticsearch-head插件需要nodejs的支持
- nodejs安裝
- head安裝配置
請參考https://blog.csdn.net/zoubf/article/details/79007908
三. Elasticsearch常用命令
(由於沒有自帶的數據清理功能,需要手動編寫腳本)
1、curl 命令的使用
curl -X<VERB>'< PROTOCOL>://<HOST>:< PORT>/< PATH>?<QUERY_STRING>'-d '<BODY>'VERB HTTP方法:GET, POST, PUT, HEAD, DELETE
PROTOCOL http或者https協議(只有在Elasticsearch前面有https代理的時候可用)
HOST Elasticsearch集羣中的任何一個節點的主機名
PORT Elasticsearch HTTP服務所在的端口,默認爲9200
PATH API路徑,資源路徑(例如_count將返回集羣中文檔的數量)
QUERY_STRING 一些可選的查詢請求參數,例如?pretty參數將返回易讀的JSON數據
BODY 一個JSON格式的請求主體(如果請求需要的話)
具體詳細方法,請參考
https://www.linuxidc.com/Linux/2016-10/136548.htm
添加索引(zabbix爲數據庫名)
curl -XPUT'http://192.168.1.20:9090/zabbix?pretty'
創建成功後,默認會分配五個主分片(創建後不可更改,通過算法將數據存放在這五個分片中的一個,增刪改都是針對主分片的)和一個複製分片(可修改,每個主分片都對應一個複製分片),這兩個默認值都可以在配置文件中修改,也可以在創建的時候指定,如
curl -XPUT 'http://192.168.1.20:9090/zabbix?pretty'-d '{
"settings": {
"number_of_shards" : 2, #2個主分片
"number_of_replicas" : 0 #0個複製分片
}
}'
查看索引
curl -XGET'http://192.168.1.20:9090/zabbix?pretty'
查詢方式;
例如:
查詢所有文檔
等同於 curl-XGET ‘http://localhost:9200/test/article/_search?pretty’
curl -XGET 'http://localhost:9200/test/article/_search?pretty' -d '
{ "query": {
"match_all": {}
}
}'#返回
{
用時 毫秒
"took" : 4,
"timed_out" : false,
#分片信息
"_shards" : {
"total" : 5,
"successful" : 5,
"failed" : 0
},
"hits" : {
#文檔數
"total" : 3,
"max_score" : 1.0,
"hits" : [ {
"_index" : "test",
"_type" : "article",
"_id" : "AVf_6fM1vEkwGPLuUJqp",
"_score" : 1.0,
"_source" : {
"id" : 2,
"subject" : "第二篇文章標題",
"content" : "第二篇文章內容",
"author" : "jam"
}
}, {
"_index" : "test",
"_type" : "article",
"_id" : "4",
"_score" : 1.0,
"_source" : {
"id" : 4,
"subject" : "第四篇文章標題",
"content" : "第四篇文章內容-更新後",
"author" : "tomi"
}
}, {
"_index" : "test",
"_type" : "article",
"_id" : "3",
"_score" : 1.0,
"_source" : {
"id" : 3,
"subject" : "第三篇文章標題",
"content" : "第三篇文章內容",
"author" : "jam"
}
}}
查詢作者是名字包含“jam” 的文檔,返回id 是2和3 的文檔
curl -XGET 'http://localhost:9200/test/article/_search?pretty' -d '
{
"query": {
"match": {
"author": "jam"
}
}
}'
查詢文章內容包含“更新” 的文檔,返回id 是4 的文檔
curl -XGET 'http://localhost:9200/test/article/_search?pretty' -d '
{ "query": {
"match": {
"content": "更新"
}
}
}'
查詢全部索引
curl -XGET 'http://192.168.150.10:9200/_cat/indices/?v'
刪除所有數據包括自行添加的索引
curl -XDELETE 'http://192.168.150.10:9200/*'
2、 Elasticsearch清理數據
由於Elasticsearch沒有自帶的數據刪除配置,所以需要腳本進行清理數據
1)刪除索引是會立即釋放空間的,不存在所謂的“標記”邏輯。
2)刪除文檔的時候,是將新文檔寫入,同時將舊文檔標記爲已刪除。磁盤空間是否釋放取決於新舊文檔是否在同一個segment file裏面,因此ES後臺的segment merge在合併segment file的過程中有可能觸發舊文檔的物理刪除。
但因爲一個shard可能會有上百個segment file,還是有很大機率新舊文檔存在於不同的segment裏而無法物理刪除。想要手動釋放空間,只能是定期做一下force merge,並且將max_num_segments設置爲1。
刪除文檔
釋放空間
配置計劃任務
文件下載鏈接:https://pan.baidu.com/share/init?surl=FMQrjRapGQmXvkwWauTLZQ
密碼:x6I7
文章轉自elasticsearch搭建與zabbix對接
http://www.lwops.cn/forum.php?mod=viewthread&tid=70&fromuid=1
(出處: 樂維)