


一、斷路器簡介
Netflix has created a library called Hystrix that implements the circuit breaker pattern. In a microservice architecture it is common to have multiple layers of service calls.
—-摘自官網
Netflix開源了Hystrix組件,實現了斷路器模式,SpringCloud對這一組件進行了整合。 在微服務架構中,一個請求需要調用多個服務是非常常見的,如下圖:
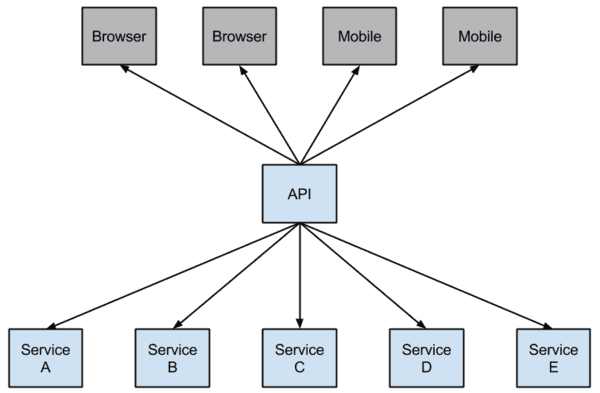
較底層的服務如果出現故障,會導致連鎖故障。當對特定的服務的調用的不可用達到一個閥值(Hystric 是5秒20次) 斷路器將會被打開。
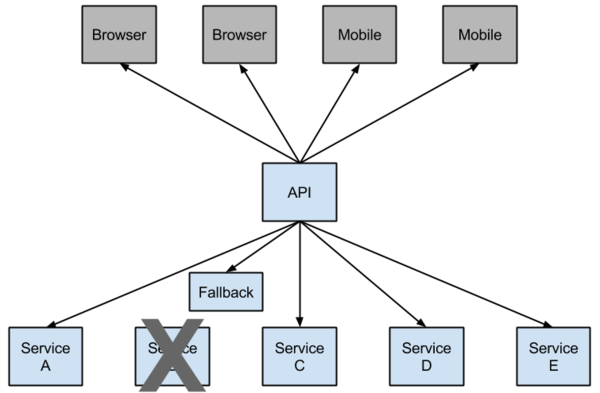
斷路打開後,可用避免連鎖故障,fallback方法可以直接返回一個固定值。
二、準備工作
這篇文章基於上一篇文章的工程,首先啓動上一篇文章的工程,啓動eureka-server 工程;啓動service-hi工程,它的端口爲8762。
三、在ribbon使用斷路器
改造serice-ribbon 工程的代碼,首先在pox.xml文件中加入spring-cloud-starter-hystrix的起步依賴:
<dependency>
    <groupId>org.springframework.cloud</groupId>
    <artifactId>spring-cloud-starter-hystrix</artifactId>
</dependency>
在程序的啓動類ServiceRibbonApplication 加@EnableHystrix註解開啓Hystrix:
@SpringBootApplication
@EnableDiscoveryClient
@EnableHystrix
public class ServiceRibbonApplication {

    public static void main(String[] args) {
        SpringApplication.run(ServiceRibbonApplication.class, args);
    }

    @Bean
    @LoadBalanced
    RestTemplate restTemplate() {
        return new RestTemplate();
    }

}
改造HelloService類,在hiService方法上加上@HystrixCommand註解。該註解對該方法創建了熔斷器的功能,並指定了fallbackMethod熔斷方法,熔斷方法直接返回了一個字符串,字符串爲”hi,”+name+”,sorry,error!”,代碼如下:
<dependency>
            <groupId>org.springframework.cloud</groupId>
            <artifactId>spring-cloud-starter-config</artifactId>
        </dependency>

        <dependency>
            <groupId>org.springframework.boot</groupId>
            <artifactId>spring-boot-starter-web</artifactId>
        </dependency>

        <dependency>
            <groupId>org.springframework.cloud</groupId>
            <artifactId>spring-cloud-starter-eureka</artifactId>
        </dependency>
        <dependency>
            <groupId>org.springframework.boot</groupId>
            <artifactId>spring-boot-starter-test</artifactId>
            <scope>test</scope>
        </dependency>
配置文件bootstrap.properties,注意是bootstrap。加上服務註冊地址爲http://localhost:8889/eureka/
spring.application.name=config-client
spring.cloud.config.label=master
spring.cloud.config.profile=dev
#spring.cloud.config.uri= http://localhost:8888/

eureka.client.serviceUrl.defaultZone=http://localhost:8889/eureka/
spring.cloud.config.discovery.enabled=true
spring.cloud.config.discovery.serviceId=config-server
server.port=8881
spring.cloud.config.discovery.enabled 是從配置中心讀取文件。
spring.cloud.config.discovery.serviceId 配置中心的servieId,即服務名。
這時發現,在讀取配置文件不再寫ip地址,而是服務名,這時如果配置服務部署多份,通過負載均衡,從而高可用。
