


一、生成圖片驗證碼的步驟
1.根據隨機數生成數字
2.將隨機數存到Session中
3.將生成的圖片寫到接口的響應中
public class ImageCode {

    private BufferedImage image;//展示的圖片
    private String code;//生成的隨機數,Session
    private LocalDateTime expireTime;//過期時間
    public BufferedImage getImage() {
        return image;
    }
    public void setImage(BufferedImage image) {
        this.image = image;
    }
    public String getCode() {
        return code;
    }
    public void setCode(String code) {
        this.code = code;
    }
    public LocalDateTime getExpireTime() {
        return expireTime;
    }
    public void setExpireTime(LocalDateTime expireTime) {
        this.expireTime = expireTime;
    }

    //是否過期
    public boolean isExpried() {
        return LocalDateTime.now().isAfter(expireTime);
    }

    public ImageCode(BufferedImage image, String code, LocalDateTime expireTime) {
        this.image = image;
        this.code = code;
        this.expireTime = expireTime;
    }

    //多少秒過期(60秒)
    public ImageCode(BufferedImage image, String code, int expireIn) {
        this.image = image;
        this.code = code;
        this.expireTime = LocalDateTime.now().plusSeconds(expireIn);
    }
}
@RestController
public class ValidateCodeController {
private static final String SESSION_KEY = "SESSION_KEY_IMAGE_CODE";
//操作Session的類
private SessionStrategy sessionStrategy = new HttpSessionSessionStrategy();
@GetMapping("/code/image")
public void createCode(HttpServletRequest request,HttpServletResponse response) throws IOException {
//1.根據隨機數生成數字
ImageCode imageCode = createImageCode(request);
//2.將隨機數存到Session中
//把請求傳遞進ServletWebRequest,
sessionStrategy.setAttribute(new ServletWebRequest(request), SESSION_KEY, imageCode);
//3.將生成的圖片寫到接口的響應中
ImageIO.write(imageCode.getImage(), "JPEG", response.getOutputStream());
}
//生成圖片
private ImageCode createImageCode(HttpServletRequest request) {
int width = 67;
int height = 23;
BufferedImage image = new BufferedImage(width, height, BufferedImage.TYPE_INT_RGB);
Graphics graphics = image.getGraphics();
Random random = new Random();
graphics.setColor(getRandColor(200,250));
graphics.fillRect(0, 0, width, height);
graphics.setFont(new Font("Times New Roman", Font.ITALIC, 20));
graphics.setColor(getRandColor(160,200));
for(int i=0;i<155;i++) {
int x = random.nextInt(width);
int y = random.nextInt(height);
int xl = random.nextInt(12);
int yl = random.nextInt(12);
graphics.drawLine(x, y, x+xl, y+yl);
}
String sRand = "";
for (int i = 0; i < 4; i++) {
String rand = String.valueOf(random.nextInt(10));
sRand +=rand;
graphics.setColor(new Color(20, random.nextInt(110), 20+random.nextInt(110),20+random.nextInt(110)));
graphics.drawString(rand, 13*i+6, 16);
}
graphics.dispose();
return new ImageCode(image, sRand, 60);
}
//隨機生成背景條紋
private Color getRandColor(int fc, int bc) {
Random random = new Random();
if (fc>255) {
fc = 255;
}
if (bc>255) {
bc = 255;
}
int r = fc + random.nextInt(bc-fc);
int g = fc + random.nextInt(bc - fc);
int b = fc + random.nextInt(bc - fc);
return new Color(r, g, b);
}
}前臺登錄頁面增加圖形驗證碼樣式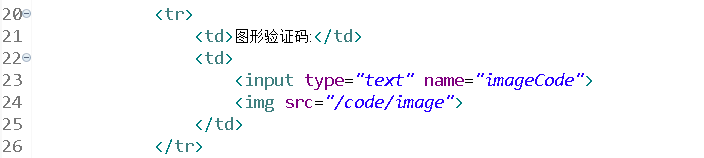
其次,再安全配置類;增加/code/image請求的
.antMatchers("/code/image").permitAll()二、運行項目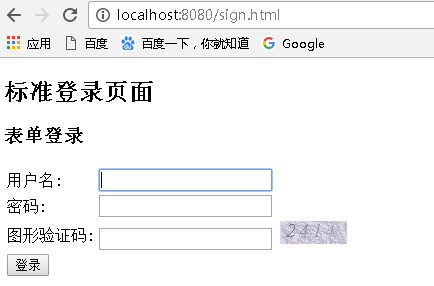
在點擊登錄按鈕之前,需要處理校驗碼校驗的邏輯這一步驟,這個步驟放在UsernamePasswordAuthenticationFilter之前,所以說,在安全配置類裏面需求寫一個自定義的Filter並且加在Username xx之前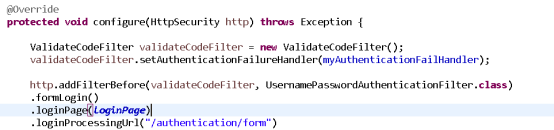
最後啓動項目,訪問:http://localhost:8080/sign.html
在不輸入驗證碼的時候,點擊登錄可以看到它把異常棧裏面的所有錯誤信息都打印出來了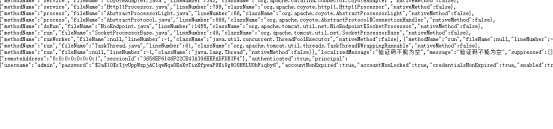
這個並不是我們想要的,這個時候需要修改一下失敗處理器AuthenticationFailureHandler
把返回所有堆棧信息的方法,改成只返回錯誤信息。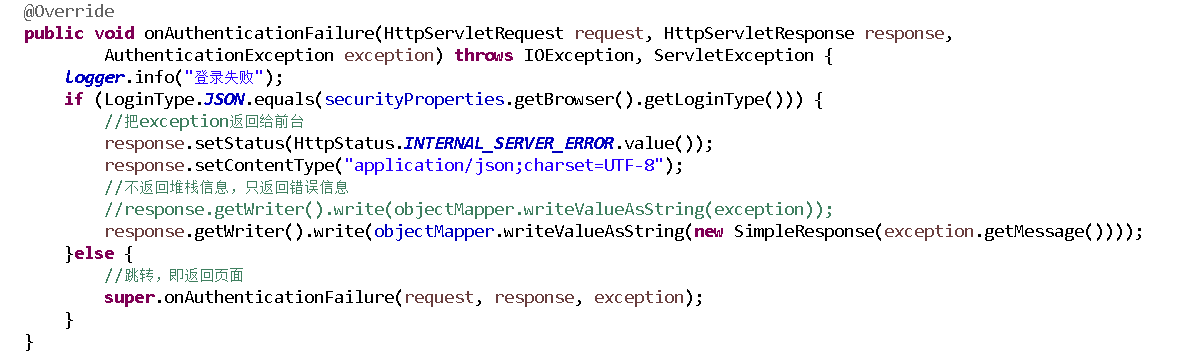
還有一個問題,就是驗證碼錯誤的時候過濾器沒有做攔截,而是繼續往下走了,這個時候需要更改Filter的方法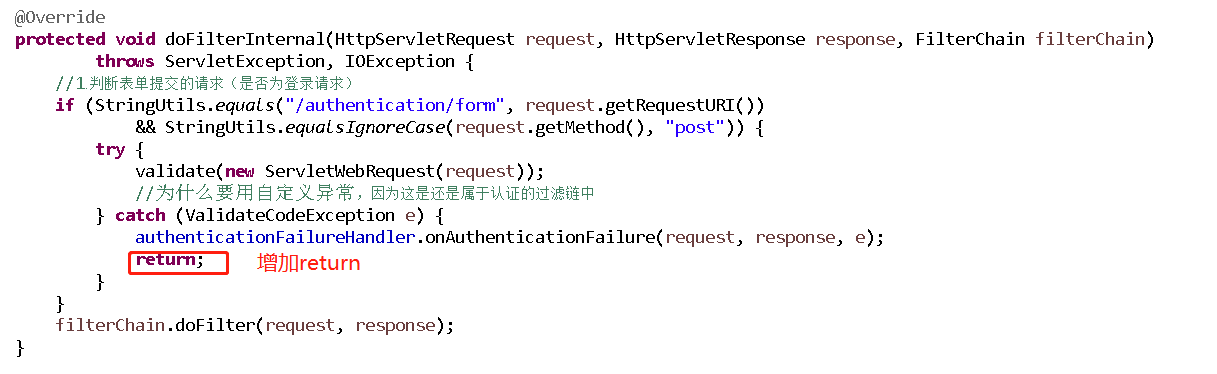
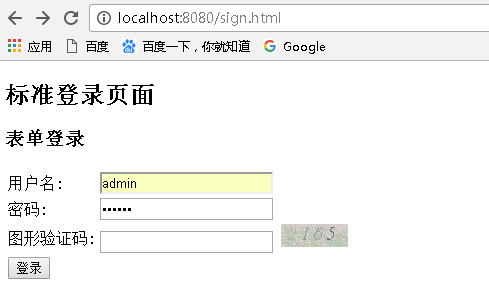
啓動項目,訪問:http://localhost:8080/sign.html
再不輸入驗證碼的時候,點擊登錄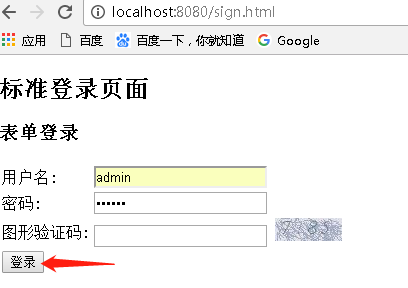
可以直接看到錯誤信息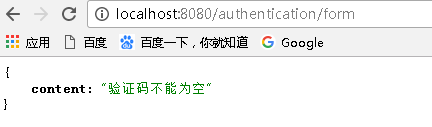
同理,之後繼續填寫正確的驗證碼,則可以得到對應的用戶信息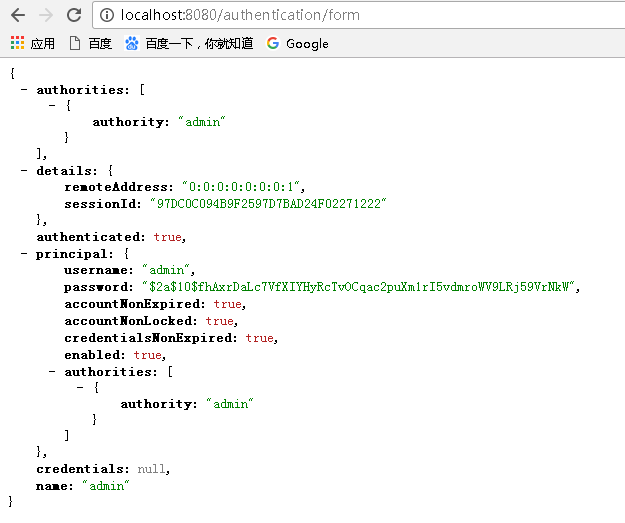
輸入錯誤,則有對應錯誤的消息提示,這個時候 驗證碼的功能纔算是完成了。