varnish介紹:
Varnish是一款高性能、開源的反向代理服務器和緩存服務器。Varnish使用內存緩存文件來減少響應時間和網絡帶寬消耗。
由於varnish先進的設計理念,性能要比squid高上許多, varnish還可以通過端口進行管理,使用正則語句做到清除指定緩存的功能,這些squid都做不到。但是varnish在高併發的情況下,資源消耗較高,而且varnish服務進程一~旦崩潰 ,重啓,內存中的緩存數據將全部丟失
varnish是基於現代設備設計的服務項目,所以僅支持64位系統。Manager Preess負責處理請求任務,保證每個任務分配一個worker threads。所以varnish是一 個重線程型服務。 除此之外,manager process包含接受CL命令控制的功能,包括調整運行參數,vcl|配置更新。初始化子進程Cacher Process ,並按一定頻率檢測cacher在線與否。
**製作varnish代理服務器
首先準備環境 編譯環境
yum install -y gcc gcc-c++ make
關閉防火牆或者設置防火牆規則
systemctl stop firewalld
setenforce 0
安裝所需依賴插件
yum install -y \
libtool \
ncourses-devel \
pcre-devel \
libedit-devel \
libxslt \
groff \
pkgconfig \
ncurses-devel \
python-*
安裝所需的依賴包
rpm -ivh libedit-devel-3.0-12.20121213cvs.el7.x86_64.rpm
rpm -ivh python-docutils-0.11-0.2.20130715svn7687.el7.noarch.rpm
解壓軟件包
tar xf varnish-5.2.1.tgz -C /opt
進入解壓後的文件夾中定義需要的模塊
cd /opt/varnish-5.2.1/
檢查系統環境
sh autogen.sh
定製功能
./configure \
--prefix=/usr/local/varnish \
--enable-debugging-symbols \
--enable-developer-warnings
編輯安裝
make && make install
軟連接
cd /usr/local/varnish/
ln -s /usr/local/varnish/sbin/varnishd /usr/sbin/
ln -s /usr/local/varnish/bin/* /usr/local/bin/
配置文件模板拷貝出來用
cp /usr/local/varnish/share/doc/varnish/example.vcl /usr/local/varnish/default.vcl
或者cp /opt/varnish-5.2.1/etc/example.vcl /usr/local/varnish/default.vcl
進入配置文件
vi /usr/local/varnish/default.vclg
注:.host 是代理httpd服務的IP地址

指定監聽的ip和端口啓動varnish
varnishd -f /usr/local/varnish/default.vcl -a 0.0.0.0:80
在另一臺linux虛擬機上搭建一個web服務器:
yum install -y httpd
vi /var/www/html/index.html
<h1>server 1</h1>
systemctl start httpd
測試,在windows瀏覽器中輸入http://192.168.80.100(varnish服務器的ip地址)
結果圖·
Varnishlog #查看日誌,實時滾動方式

以上是單臺代理服務器·
多帶代理服務器如下:
vi /usr/local/varnish/default.vcl
找到以下內容並修改:
vcl 4.0;
import directors; //新增一行,導入一個directors-----以下增加業務服務器節點-----
backend web1 { #把default修改爲web1,就是後面的web服務器,有幾個web節點就複製幾個backend域
.host = "192.168.80.101"; #後端web服務器的地址
.port = "80"; #web服務器端口
}
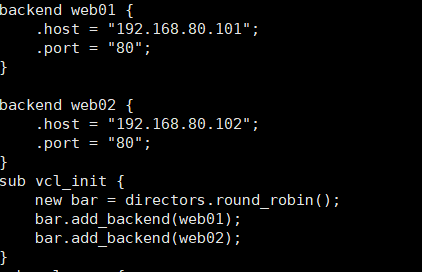
backend web2 {
.host = "192.168.80.102";
.port = "80";
}-----接着以上代碼接着定義調度算法及指定流量轉發----
sub vcl_init { #在init子函數中定義
new bar = directors.round_robin(); //random(隨機) round_robin dns
#定義服務器組,讓新的 bar 等於之前定義的變量directors,後面接輪詢(rr)算法
bar.add_backend(web1); #注意這裏有幾個backend就添加幾個
bar.add_backend(web2);
}
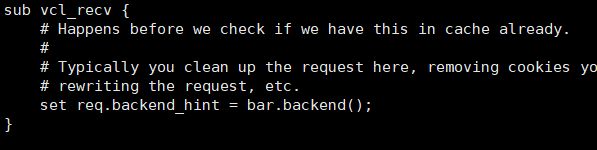
sub vcl_recv {
set req.backend_hint = bar.backend(); //流量轉發給所有結點 注意括號
}

檢查配置文件是否有錯誤
varnishd -C -f /usr/local/varnish/default.vcl > /dev/null
出現以下代表沒有錯誤

殺死進程
pkill -9 varnish
開啓服務
varnishd -f /usr/local/varnish/default.vcl
查看服務是否啓動
netstat -anpt | grep varnishd
注:由於varnish緩存的原因,當我們訪問varnish的時候,並沒有像我們預期的那樣根據rr算法各自訪問後面兩臺web服務器的不同頁面,這時我們讓一臺web服務器網絡中斷,這時varnish就會訪問到另一臺了。
後端主機健康檢測機制:
vi /usr/local/varnish/default.vcl
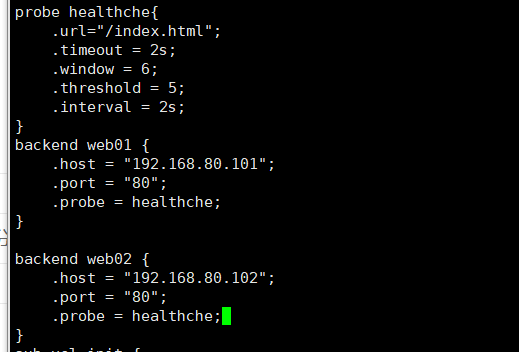
probe healthche { 定義健康檢測方法,自定義名稱
.url="/index.html"; #檢測時請求的URL,默認爲"/"
.timeout = 2s; #超時時間
.window = 6 ; #基於最近的多少次檢測來判斷其健康狀態
.threshold = 5; #最近.window中定義的這麼次檢查中至有.threshhold定義的次數是成功的;
.interval = 2s; #檢測頻度;
}
在定義後端服務器時引用檢測方法
backend web1 {
.host = "1921.68.80.100";
.port = "80";
.probe = healthche; #引用檢測方式
}
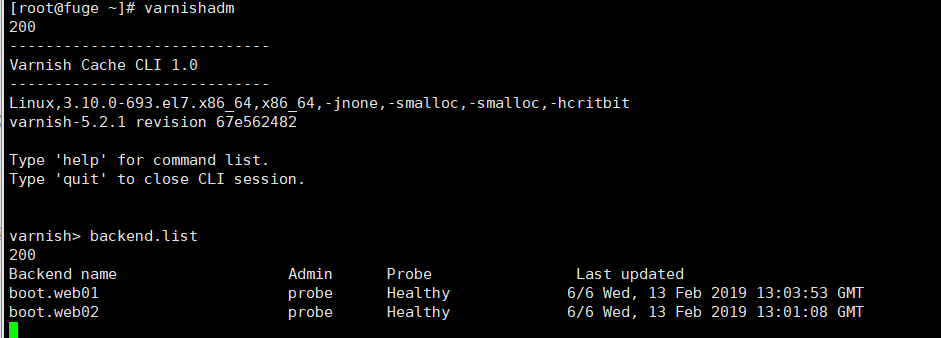
查看效果
varnishadm