


Ansible默认提供了很多模块来供我们使用。在Linux中,我们可以通过 ansible-doc -l 命令查看到当前Ansible支持哪些模块,通过 ansible-doc -s [模块名] 又可以查看该模块有哪些参数可以使用。
ansible [主机或组] -m [模块名] -a ['模块参数'] [ansible参数]
ansible-doc -l          # 命令查看到当前 ansible 都支持哪些模块
ansible-doc -s [模块名]  # 查看该模块有哪些参数可以使用
自动化运维工具Ansible常用模块按功能可分为:
云模块、集群模块、 命令模块、数据库模块、文件模块、资产模块、消息模块、监控模块、网络模块、通知模块、包管理模块、源码控制模块、系统模块、单元模块、web设施模块、windows模块。
具体模块可参考官网(http://docs.ansible.com/ansible/latest/list_of_all_modules.html)。
这里从官方分类的模块里选择最常用的一些模块进行介绍。
一、command模块
1、简介
- command模块用于在给的的节点上运行系统命令,比如echo hello
- 该模块通过-a跟上要执行的命令可以直接执行,它不会通过shell进行处理,因此诸如$ HOME和诸如“<”,“>”,“|”,“;”和“&”之类的操作将不起作用,也就是在command模块中无法使用管道符(如果需要这些功能,请使用shell模块)
- 对于Windows目标,请改用win_command模块
2、参数
chdir:运行command命令前先cd到这个目录
creates:如果这个参数对应的文件存在,就不运行command
removes:如果这个参数对应的文件不存在,就不运行command,与creates参数的作用相反
free_form:需要执行的脚本(没有真正的参数为free_form)
stdin(2.4后新增):将命令的stdin设置为指定的值
warn(1.8后新增):如果command_warnings在ansible.cfg中打开,如果设置为,则不要警告有关此特定行no
3、示例
(1)列出指定目录下的文件
# 在远程主机上创建test.sh脚本
[root@Client ~]# cat /root/test.sh
#!/bin/bash
i=0
echo $((i+1))
[root@Ansible ~]# ansible web -m command -a 'ls /root'
192.168.8.66 | SUCCESS | rc=0 >>
anaconda-ks.cfg
test.sh

# 执行远程主机上的test.sh脚本
[root@Ansible ~]# ansible web -m command -a 'ls /root creates=test.sh'
192.168.8.66 | SUCCESS | rc=0 >>
skipped, since test.sh exists
[root@Ansible ~]# ansible web -m command -a 'ls /root removes=test.sh'
192.168.8.66 | SUCCESS | rc=0 >>
anaconda-ks.cfg
test.sh
说明:首先切换目录到/root 目录中,然后查看test.sh是否存在,如果存在,那么命令不会执行;如果不存在,那么执行命令。
在这里也可以看到,命令是必须存在的,但是没有参数名为free_form参数。
(2)切换目录执行命令
# 查看远程主机上的test.sh脚本
[root@Ansible ~]# ansible web -m command -a 'cat test.sh chdir=/root'
192.168.8.66 | SUCCESS | rc=0 >>
#!/bin/bash
i=0
echo $((i+1))

[root@Ansible ~]# ansible web -m command -a 'sh test.sh chdir=/root'
192.168.8.66 | SUCCESS | rc=0 >>
1
(3)无法使用管道符
[root@Ansible ~]# ansible web -m command -a 'ls /root | grep test.sh'
192.168.8.66 | FAILED | rc=2 >>
test.sh

/root:
anaconda-ks.cfg
test.shls: 无法访问|: 没有那个文件或目录
ls: 无法访问grep: 没有那个文件或目录non-zero return code
4、注意事项
- 若要通过shell运行一个命令,比如<, >, |等,实际上我们需要shell模块
- command模块更安全,因为它不受用户环境的影响
- 从版本2.4开始,executable参数被删除。如果你需要此参数,请改用shell模块
二、raw模块
1、简介
- raw模块执行一个原始的命令,而不是通过模块子系统。这对我们来说很有用,而且只能在两种情况下完成。第一种情况是在较老的(Python 2.4和之前的版本)主机上安装python-simplejson,因为几乎所有核心模块都需要它,作为运行模块的依赖项。另一种是对任何没有安装任何Python的设备(如路由器)进行对话。在任何其他情况下,使用shell或命令模块更合适。给raw的参数直接通过配置的远程shell运行。在可用时返回标准输出、错误输出和返回代码。该模块没有更改处理程序支持
- 用法和shell 模块一样 ,也可以执行任意命令,就像在本机执行一样
- raw和command模块类似,两个模块都是调用远程主机的指令,但是raw支持管道(|)命令
- 该模块不需要远程系统上的python,就像脚本模块一样。该模块也支持Windows目标
2、参数
executable:改变用来执行命令的shell,应该是可执行文件的绝对路径
free_form:需要执行的脚本(没有真正的参数为free_form)
3、示例
[root@Ansible ~]# ansible web -m raw -a "hostname"
192.168.8.55 | SUCCESS | rc=0 >>
Ansible
Shared connection to 192.168.8.55 closed.

192.168.8.66 | SUCCESS | rc=0 >>
Client
Shared connection to 192.168.8.66 closed.

[root@Ansible ~]# ansible web -m raw -a "ifconfig ens33|sed -n 2p|cut -d' ' -f10"
192.168.8.55 | SUCCESS | rc=0 >>
192.168.8.55
Shared connection to 192.168.8.55 closed.

192.168.8.66 | SUCCESS | rc=0 >>
192.168.8.66
Shared connection to 192.168.8.66 closed.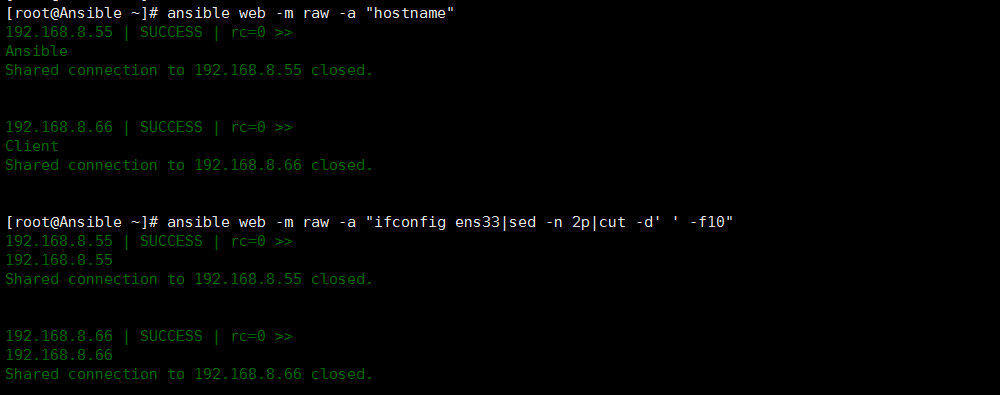
4、注意事项
- 如果要安全可靠地执行命令,最好使用shell或command模块来代替
- 如果从playbook中使用raw,则可能需要使用gather_facts: no禁用事实收集
三、shell模块
1、简介
- shell模块让远程主机在shell模块下执行任何命令,从而支持shell的特性,如管道等
- 与command模块几乎相同,就像在本机执行一样,但通过远程节点上的shel(/bin/sh)运行命令
2、参数
chdir:运行shell命令前先cd到这个目录
creates:如果这个参数对应的文件存在,就不运行shell
removes:如果这个参数对应的文件不存在,就不运行shell,与creates参数的作用相反
executable:改变用来执行命令的shell,应该是可执行文件的绝对路径
free_form:需要执行的脚本(没有真正的参数为free_form)
stdin(2.4后新增):将命令的stdin设置为指定的值
warn(1.8后新增):如果command_warnings在ansible.cfg中打开,如果设置为,则不要警告有关此特定行no
3、示例
切换目录,执行命令并保持输出
# 在远程主机上创建test.sh脚本
[root@Client ~]# cat /root/test.sh
#!/bin/bash
i=0
echo $((i+1))

# 执行远程主机上的test.sh脚本
[root@Ansible ~]# ansible web -m shell -a "sh test.sh > result chdir=/root"
192.168.8.66 | SUCCESS | rc=0 >>

[root@Ansible ~]# ansible web -m shell -a "cat result chdir=/root"
192.168.8.66 | SUCCESS | rc=0 >>
1
4、注意事项
- 如果你想安全可靠的执行命令,请使用command模块,这也是编写playbook的最佳实践
四、script模块
1、简介
- script模块的作用是将Ansible服务机上的script传送到远程主机之后再执行,原理类似于raw模块
- 给定的脚本将通过远程节点上的shell环境进行处理
- 该模块在远程系统上不需要python的支持
- 该模块也支持Windows目标
2、参数
chdir(2.4后新增):运行script命令前先cd到这个目录
creates(1.5后新增):如果这个参数对应的文件存在,就不运行script
removes(1.5后新增):如果这个参数对应的文件不存在,就不运行script,与creates参数的作用相反
decrypt(2.4后新增):此选项控制使用保管库对源文件进行自动解密
free_form:需要执行脚本的本地文件路径(没有真正的参数为free_form)
3、示例
# 在Ansible服务器上创建一个脚本并赋予可执行权限
[root@Ansible ~]# cat script.sh
#!/bin/bash
a='Hello World'
echo $a
echo "这是我的Ansible服务器脚本"
touch test.txt

[root@Ansible ~]# chmod +x script.sh

[root@Ansible ~]# ansible web -m script -a "script.sh chdir=/tmp"
192.168.8.66 | SUCCESS => {
    "changed": true,
    "rc": 0,
    "stderr": "Shared connection to 192.168.8.66 closed.\r\n",
    "stdout": "Hello World\r\n这是我的Ansible服务器脚本\r\n",
    "stdout_lines": [
        "Hello World",
        "这是我的Ansible服务器脚本"
    ]
}

# 在远程主机上创建成功test.txt
[root@Ansible ~]# ansible web -m command -a "ls /tmp"
192.168.8.66 | SUCCESS | rc=0 >>
ansible_G9sPom
test.txt
4、注意事项
- 当脚本执行时,ssh连接插件将通过-tt强制伪tty分配。伪ttys没有stderr通道,所有stderr被发送到标准输出。如果需要标准输出和标准错误分离,我们需要使用到copy模块
五、copy模块
1、简介
- copy模块是将本地或远程机器上的文件拷贝到远程主机上的某个位置
- 对于Windows目标,请改用win_copy模块
2、参数
attributes(2.3后新增):文件或目录应具有的属性,该字符串应该包含与lsattr显示的顺序相同顺序的属性
backup:在覆盖之前将原文件备份,备份文件包含时间信息,有两个选项:yes|no
checksum(2.5后新增):正在传输的文件的SHA1校验和。用于确定文件的副本是否成功
如果没有提供,那么将使用src文件的本地计算校验和
content:当用content代替src参数的时候,可以把文档的内容直接设定指定文件的值
decrypt(2.4后新增):此选项控制使用保管库对源文件进行自动解密
dest:必选项。要将源文件复制到的远程主机的绝对路径,如果源文件是一个目录,那么该路径也必须是个目录
directory_mode(1.5后新增):在进行递归复制时,请设置目录的模式。如果没有设置,我们将使用系统默认值。该模式仅在新创建的目录中设置,不会影响已存在的目录
follow(1.8后新增):表示是否遵循目标机器中的文件系统链接(如果存在)
force:如果远程主机包含该文件,但内容不同,如果设置为yes,则强制覆盖,如果为no,则只有当远程主机的目标位置不存在该文件时,才复制。默认为yes
group:设置文件或目录的所属组
owner:设置文件或目录的所属用户
local_follow(2.4后新增):是否遵循本地机器中的文件系统链接(如果存在)
mode:设置文件权限,模式实际上是八进制数字(如0644),少了前面的零可能会有意想不到的结果。从版本1.8开始,可以将模式指定为符号模式(例如u+rwx或u=rw,g=r,o=r)
remote_src(2.0后新增):如果是no,它将在原始主机上搜索src;如果是yes,它会去src的目标机子上搜索src。默认是no
目前remote_src不支持递归复制
src:将本地路径复制到远程主机,可以是绝对路径,也可以是相对路径。如果路径是一个目录,它将递归复制。在这种情况下,如果路径使用"/"来结尾,则只复制目录里的内容,如果没有使用"/"来结尾,则包含目录在内的整个内容全部复制,类似于rsync
unsafe_writes(2.2后新增):通常情况下,该模块使用原子操作来防止数据损坏或从目标文件读取不一致,有时系统会以防止这种情况的方式进行配置或破坏
validate:复制前是否检验需要复制目的地的路径
others:所有的file模块里的选项都可以在这里使用
3、示例
(1)backup复制前备份
复制本地文件到远程主机并对原文件进行备份(第一次复制之后,对本地文件稍作修改,第二次复制时,就能进行远程主机的备份)
[root@Ansible ~]# ansible web -m copy -a "src=/root/test.sh backup=yes dest=/root"
192.168.8.66 | SUCCESS => {
    "changed": true,
    "checksum": "e42a8fe379671479fbdad43a3b8737e3ada2f8be",
    "dest": "/root/test.sh",
    "gid": 0,
    "group": "root",
    "md5sum": "5636a7c4398fc86b919631387fc712e5",
    "mode": "0644",
    "owner": "root",
    "size": 30,
    "src": "/root/.ansible/tmp/ansible-tmp-1524816562.347795-100129918473420/source",
    "state": "file",
    "uid": 0
}
[root@Ansible ~]# echo "echo 'Hello world'" >> test.sh
[root@Ansible ~]# ansible web -m copy -a "src=/root/test.sh backup=yes dest=/root"
192.168.8.66 | SUCCESS => {
    "backup_file": "/root/test.sh.25144.2018-04-27@16:10:37~",     # 复制前的备份文件路径
    "changed": true,
    "checksum": "4d8e92c604221322f38cc04d8d6e87e84799153e",
    "dest": "/root/test.sh",
    "gid": 0,
    "group": "root",
    "md5sum": "0418be97c2fd733a9fb2aaec5977b559",
    "mode": "0644",
    "owner": "root",
    "size": 49,
    "src": "/root/.ansible/tmp/ansible-tmp-1524816636.447237-270228680719764/source",
    "state": "file",
    "uid": 0
}
[root@Ansible ~]# ansible web -m command -a "ls -l /root"
192.168.8.66 | SUCCESS | rc=0 >>
总用量 12
-rw-------. 1 root root 1382 4月   3 22:24 anaconda-ks.cfg
-rw-r--r--  1 root root   49 4月  27 16:10 test.sh
-rw-r--r--  1 root root   30 4月  27 16:09 test.sh.25144.2018-04-27@16:10:37~     # 复制前的备份文件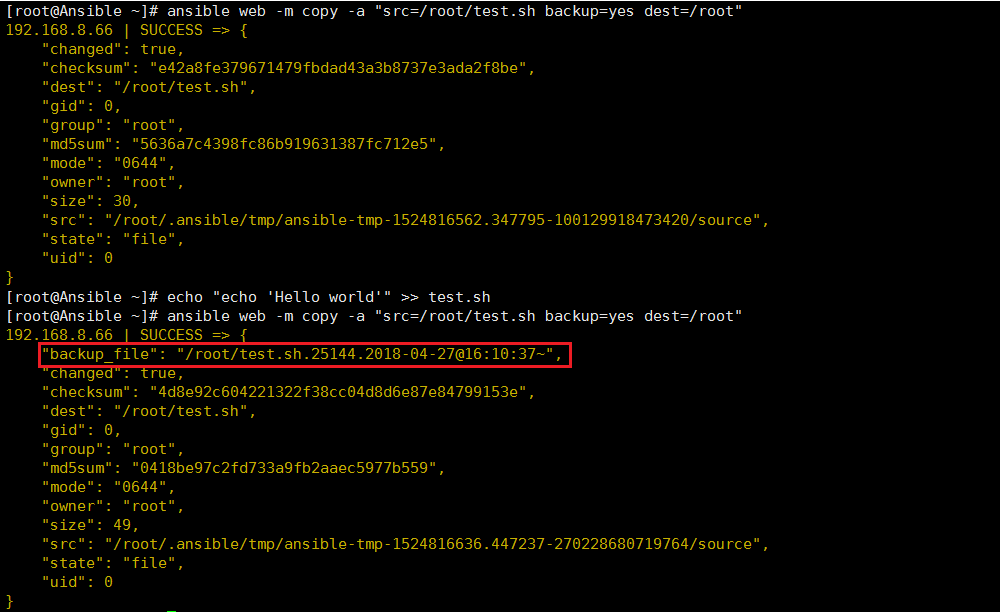
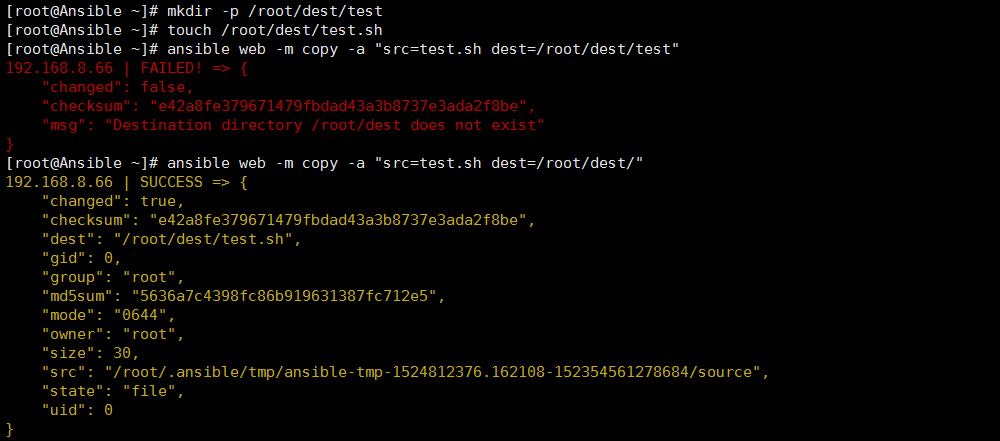
(2)src和dest都是文件
[root@Ansible ~]# mkdir -p /root/dest/test
[root@Ansible ~]# touch /root/dest/test.sh
[root@Ansible ~]# ansible web -m copy -a "src=test.sh dest=/root/dest/test"    # dest文件的父目录不存在将报错
192.168.8.66 | FAILED! => {
    "changed": false,
    "checksum": "e42a8fe379671479fbdad43a3b8737e3ada2f8be",
    "msg": "Destination directory /root/dest does not exist"
}
[root@Ansible ~]# ansible web -m copy -a "src=test.sh dest=/root/dest/"
192.168.8.66 | SUCCESS => {
    "changed": true,
    "checksum": "e42a8fe379671479fbdad43a3b8737e3ada2f8be",
    "dest": "/root/dest/test.sh",
    "gid": 0,
    "group": "root",
    "md5sum": "5636a7c4398fc86b919631387fc712e5",
    "mode": "0644",
    "owner": "root",
    "size": 30,
    "src": "/root/.ansible/tmp/ansible-tmp-1524812376.162108-152354561278684/source",
    "state": "file",
    "uid": 0
}
(3)src是目录
A、源目录以/结尾,只拷贝了目录下的内容
[root@Ansible ~]# ls /root/test/
123.txt  test.sh
[root@Ansible ~]# ansible web -m copy -a "src=/root/test/ dest=/tmp/"
192.168.8.66 | SUCCESS => {
    "changed": true,
    "dest": "/tmp/",
    "src": "/root/test/"
}
[root@Ansible ~]# ansible web -m command -a "ls -l /tmp"
192.168.8.66 | SUCCESS | rc=0 >>
总用量 4
-rw-r--r-- 1 root root  0 4月  27 17:04 123.txt
drwx------ 2 root root 65 4月  27 17:05 ansible_ejRWFz
-rw-r--r-- 1 root root 49 4月  27 17:04 test.sh
B、源目录未以/结尾,直接将src目录本身拷贝到目标主机
[root@Ansible ~]# ls /root/test/
123.txt  test.sh
[root@Ansible ~]# ansible web -m copy -a "src=/root/test dest=/tmp/"
192.168.8.66 | SUCCESS => {
    "changed": true,
    "dest": "/tmp/",
    "src": "/root/test"
}
[root@Ansible ~]# ansible web -m command -a "ls -l /tmp"
192.168.8.66 | SUCCESS | rc=0 >>
总用量 4
-rw-r--r-- 1 root root  0 4月  27 17:04 123.txt
drwx------ 2 root root 65 4月  27 17:07 ansible_ownGJc
drwxr-xr-x 2 root root 36 4月  27 17:07 test     # 这是一个目录
-rw-r--r-- 1 root root 49 4月  27 17:04 test.sh
(4)设置文件权限(owner/group/mode)
[root@Ansible ~]# ansible web -m copy -a "src=/root/test.sh dest=/root dest=/tmp owner=test group=test mode=0644"
192.168.8.66 | SUCCESS => {
    "changed": true,
    "checksum": "4d8e92c604221322f38cc04d8d6e87e84799153e",
    "dest": "/tmp/test.sh",
    "gid": 1001,
    "group": "test",
    "md5sum": "0418be97c2fd733a9fb2aaec5977b559",
    "mode": "0644",
    "owner": "test",
    "size": 49,
    "src": "/root/.ansible/tmp/ansible-tmp-1524817478.2402651-108214522667207/source",
    "state": "file",
    "uid": 1001
}
[root@Ansible ~]# ansible web -m command -a "ls -l /tmp"
192.168.8.66 | SUCCESS | rc=0 >>
总用量 4
drwx------ 2 root root 65 4月  27 16:26 ansible_zczZtp
-rw-r--r-- 1 test test 49 4月  27 16:24 test.sh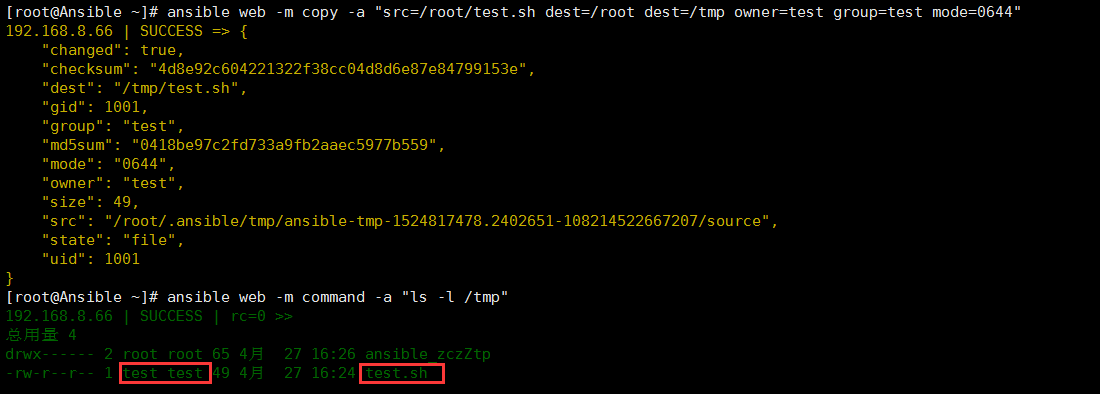
(5)content参数
把目录层次设置到特定的值,并输出到指定文件中。
[root@Ansible ~]# ansible web -m copy -a "content='root \n dest \n' dest=/root/dest"
192.168.8.66 | SUCCESS => {
    "changed": true,
    "checksum": "87984f77e2ad345c677b5191d78d5caeb7d41316",
    "dest": "/root/dest",
    "gid": 0,
    "group": "root",
    "md5sum": "dc18f79caca390e17c89e1c850f9f8a5",
    "mode": "0644",
    "owner": "root",
    "size": 13,
    "src": "/root/.ansible/tmp/ansible-tmp-1524818107.6488795-679046311890/source",
    "state": "file",
    "uid": 0
}
[root@Ansible ~]# ansible web -m command -a "cat /root/dest"
192.168.8.66 | SUCCESS | rc=0 >>
root
 dest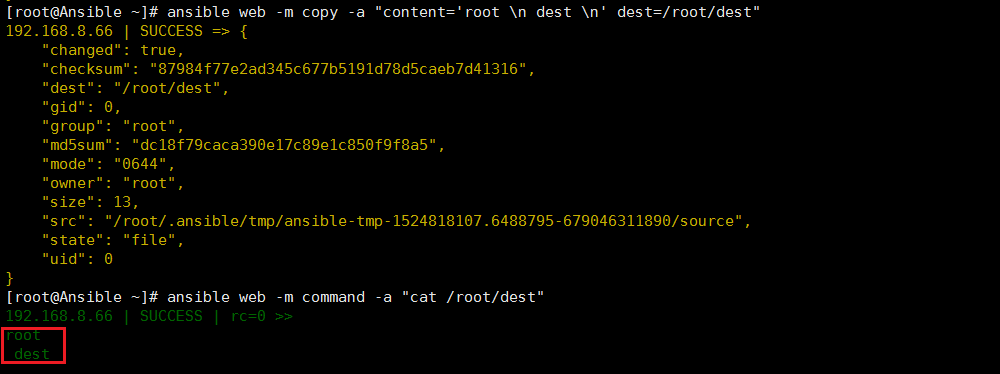
(6)force参数
如果远程主机包含该文件,但内容不同,如果设置为yes,则强制覆盖,如果为no,则只有当远程主机的目标位置不存在该文件时,才复制。
[root@Ansible ~]# ansible web -m copy -a "src=test.sh dest=/root/xztest force=no"
192.168.8.66 | SUCCESS => {
    "changed": true,
    "checksum": "4d8e92c604221322f38cc04d8d6e87e84799153e",
    "dest": "/root/xztest",
    "gid": 0,
    "group": "root",
    "md5sum": "0418be97c2fd733a9fb2aaec5977b559",
    "mode": "0644",
    "owner": "root",
    "size": 49,
    "src": "/root/.ansible/tmp/ansible-tmp-1524818671.0156403-161213944315961/source",
    "state": "file",
    "uid": 0
}
[root@Ansible ~]# ansible web -m copy -a "src=test.sh dest=/root/xztest force=no"
192.168.8.66 | SUCCESS => {
    "changed": false,
    "dest": "/root/xztest",
    "src": "/root/test.sh"
}
[root@Ansible ~]# ansible web -m command -a "ls -l /root"
192.168.8.66 | SUCCESS | rc=0 >>
总用量 8
-rw-------. 1 root root 1382 4月   3 22:24 anaconda-ks.cfg
-rw-r--r--  1 root root   49 4月  27 16:44 xztest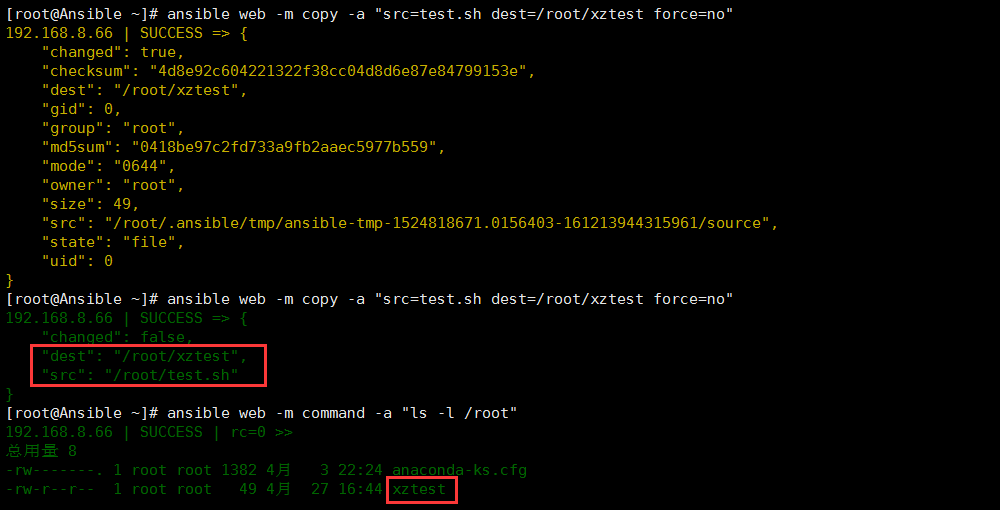
六、file模块
1、简介
- file模块,设置文件、符号链接和目录的属性,或删除文件、符号链接、目录
- 许多其他模块支持与file模块相同的选项(包括复制、模板和汇编)
- 对于Windows目标,请改用win_file模块
2、参数
attributes(2.3后新增):文件或目录应具有的属性。要获得支持的标志,请查看目标系统上chattr的手册页。该字符串应该包含与lsattr显示的顺序相同顺序的属性
follow(1.8后新增):是否遵循目的机器中的文件系统链接,(如果存在)。在Ansible 2.5之前,默认是no
force:强制创建软链接
group:设置文件或目录的所属组
owner:设置文件或目录的所属用户
mode:设置文件权限,模式实际上是八进制数字(如0644),少了前面的零可能会有意想不到的结果。从版本1.8开始,可以将模式指定为符号模式(例如u+rwx或u=rw,g=r,o=r)
path:定义目标文件/目录的路径,也可以用dest、name代替
recurse:是否递归设置文件的属性,只对目录有效(仅适用于state=directory)
selevel:要被链接的源文件的路径(仅适用于state=link)
dest:被链接到的路径(仅适用于state=link)
src:要链接到的文件路径(仅适用于state=link)
state:若果是directory,所有的子目录将被创建(如果它们不存在);若是file,文件将不会被创建(如果文件不存在);link表示符号链接;若是absent,目录、文件或链接会被递归删除;touch代表生成一个空文件;hard代表硬链接
touch:如果文件不存在,则会创建一个新的文件,如果文件或目录已存在,则更新其最后修改时间
unsafe_writes(2.2后新增):是否以不安全的方式进行,可能导致数据损坏
3、示例
(1)设置文件权限(owner/group/mode)
[root@Ansible ~]# ansible web -m command -a "ls -l /root/test.sh"
192.168.8.66 | SUCCESS | rc=0 >>
-rwxr-xr-x 1 root root 31 4月  28 10:41 /root/test.sh

[root@Ansible ~]# ansible web -m file -a "path=/root/test.sh owner=test group=test mode=0777"
192.168.8.66 | SUCCESS => {
    "changed": true,
    "gid": 1001,
    "group": "test",
    "mode": "0777",
    "owner": "test",
    "path": "/root/test.sh",
    "size": 31,
    "state": "file",
    "uid": 1001
}
[root@Ansible ~]# ansible web -m command -a "ls -l /root/test.sh"
192.168.8.66 | SUCCESS | rc=0 >>
-rwxrwxrwx 1 test test 31 4月  28 10:41 /root/test.sh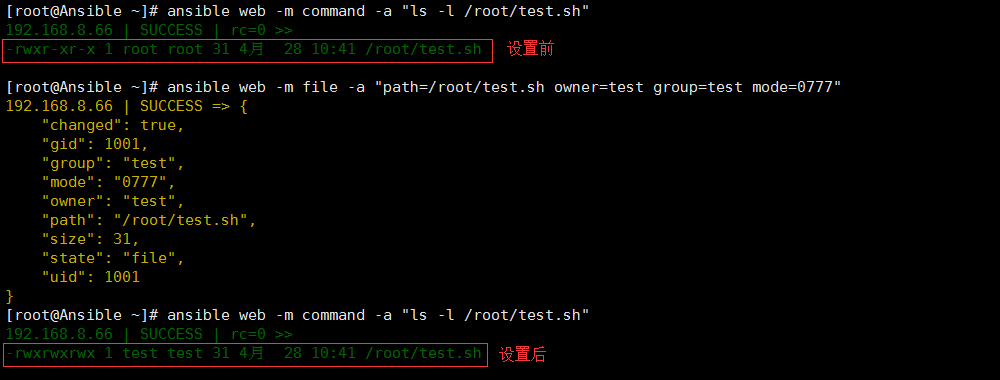
(2)创建空文件(state=touch)
[root@Ansible ~]# ansible web -m file -a "path=/tmp/xz_test state=touch mode=0644"
192.168.8.66 | SUCCESS => {
    "changed": true,
    "dest": "/tmp/xz_test",
    "gid": 0,
    "group": "root",
    "mode": "0644",
    "owner": "root",
    "size": 0,
    "state": "file",
    "uid": 0
}
[root@Ansible ~]# ansible web -m command -a "ls -l /tmp/xz_test"
192.168.8.66 | SUCCESS | rc=0 >>
-rw-r--r-- 1 root root 0 4月  28 10:49 /tmp/xz_test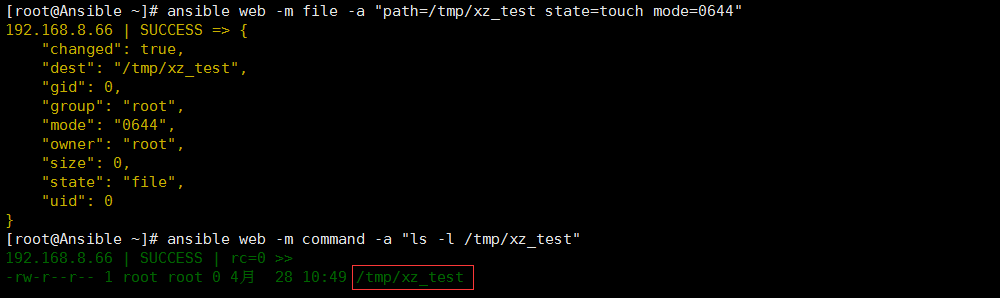
(3)创建目录(state=directory)
A、目录是递归创建的
[root@Ansible ~]# ansible web -m file -a "path=/tmp/test/xzxs/ state=directory mode=0755"
192.168.8.66 | SUCCESS => {
    "changed": true,
    "gid": 0,
    "group": "root",
    "mode": "0755",
    "owner": "root",
    "path": "/tmp/test/xzxs/",
    "size": 6,
    "state": "directory",
    "uid": 0
}
[root@Ansible ~]# ansible web -m command -a "ls -l /tmp/"
192.168.8.66 | SUCCESS | rc=0 >>
总用量 0
drwx------ 2 root root 65 4月  28 10:56 ansible_iy9v52
drwxr-xr-x 3 root root 18 4月  28 10:56 test
-rw-r--r-- 1 root root  0 4月  28 10:49 xz_test

[root@Ansible ~]# ansible web -m command -a "ls -l /tmp/test/"
192.168.8.66 | SUCCESS | rc=0 >>
总用量 0
drwxr-xr-x 2 root root 6 4月  28 10:56 xzxs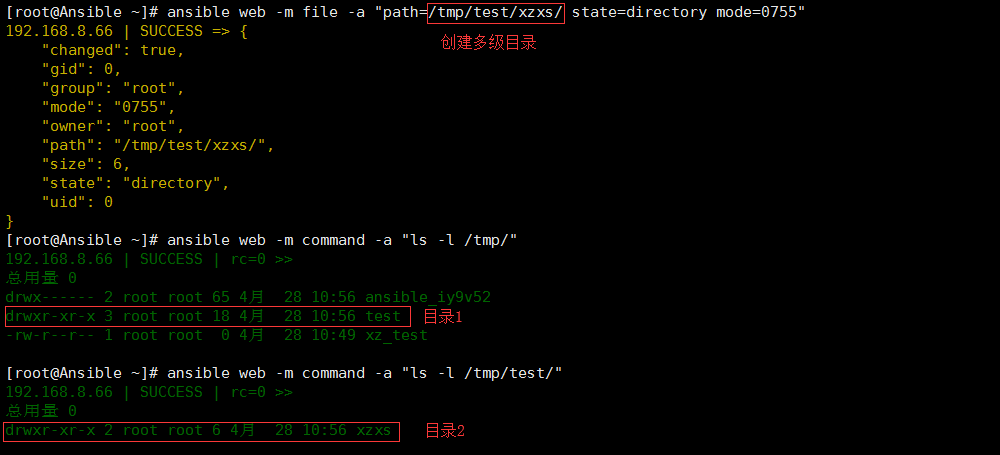
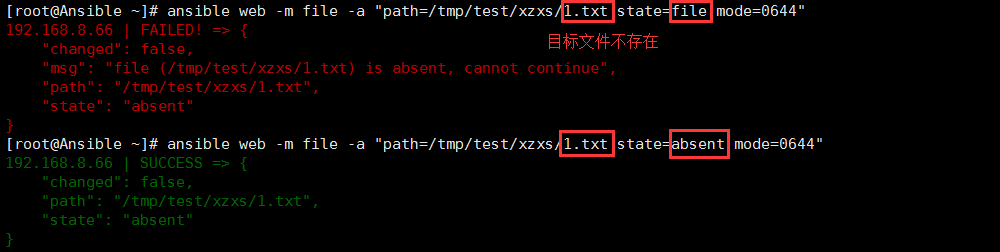
B、目标文件不存在
state=file时会报错,但是state=absent不会报错,执行状态也不会变化
[root@Ansible ~]# ansible web -m file -a "path=/tmp/test/xzxs/1.txt state=file mode=0644"
192.168.8.66 | FAILED! => {
    "changed": false,
    "msg": "file (/tmp/test/xzxs/1.txt) is absent, cannot continue",
    "path": "/tmp/test/xzxs/1.txt",
    "state": "absent"
}
[root@Ansible ~]# ansible web -m file -a "path=/tmp/test/xzxs/1.txt state=absent mode=0644"
192.168.8.66 | SUCCESS => {
    "changed": false,
    "path": "/tmp/test/xzxs/1.txt",
    "state": "absent"
}
(4)创建软链接(state=link)
[root@Ansible ~]# ansible web -m file -a "src=/etc/fstab dest=/tmp/123.txt state=link"
192.168.8.66 | SUCCESS => {
    "changed": true,
    "dest": "/tmp/123.txt",
    "gid": 0,
    "group": "root",
    "mode": "0777",
    "owner": "root",
    "size": 10,
    "src": "/etc/fstab",
    "state": "link",
    "uid": 0
}
[root@Ansible ~]# ansible web -m command -a "ls -l /tmp/"
192.168.8.66 | SUCCESS | rc=0 >>
总用量 0
lrwxrwxrwx 1 root root 10 4月  28 11:06 123.txt -> /etc/fstab   # 创建软链接
drwx------ 2 root root 65 4月  28 11:06 ansible_pfisoW
drwxr-xr-x 3 root root 18 4月  28 10:56 test
-rw-r--r-- 1 root root  0 4月  28 10:49 xz_test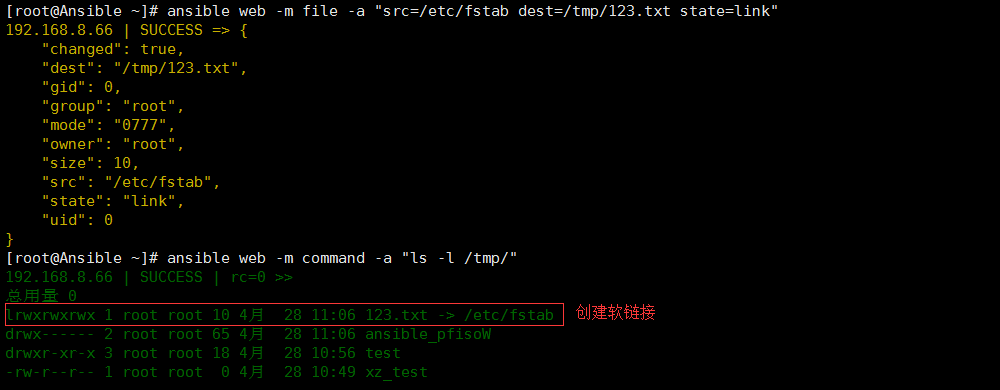
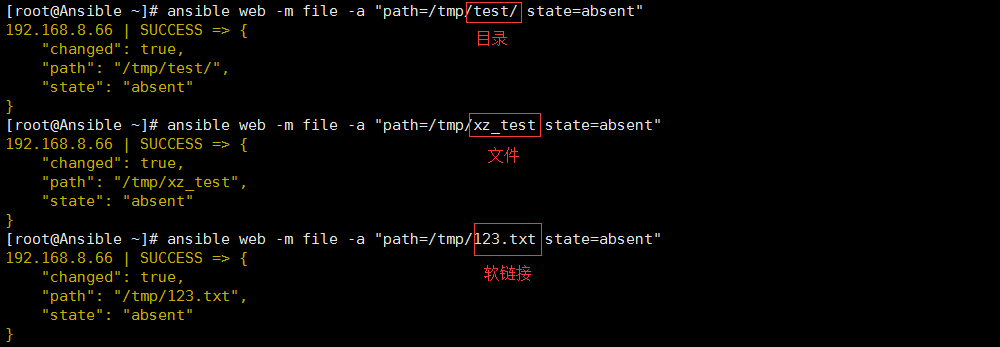
(5)删除文件、目录或者软链接(state=absent)
[root@Ansible ~]# ansible web -m file -a "path=/tmp/test/ state=absent"
192.168.8.66 | SUCCESS => {
    "changed": true,
    "path": "/tmp/test/",
    "state": "absent"
}
[root@Ansible ~]# ansible web -m file -a "path=/tmp/xz_test state=absent"
192.168.8.66 | SUCCESS => {
    "changed": true,
    "path": "/tmp/xz_test",
    "state": "absent"
}
[root@Ansible ~]# ansible web -m file -a "path=/tmp/123.txt state=absent"
192.168.8.66 | SUCCESS => {
    "changed": true,
    "path": "/tmp/123.txt",
    "state": "absent"
}
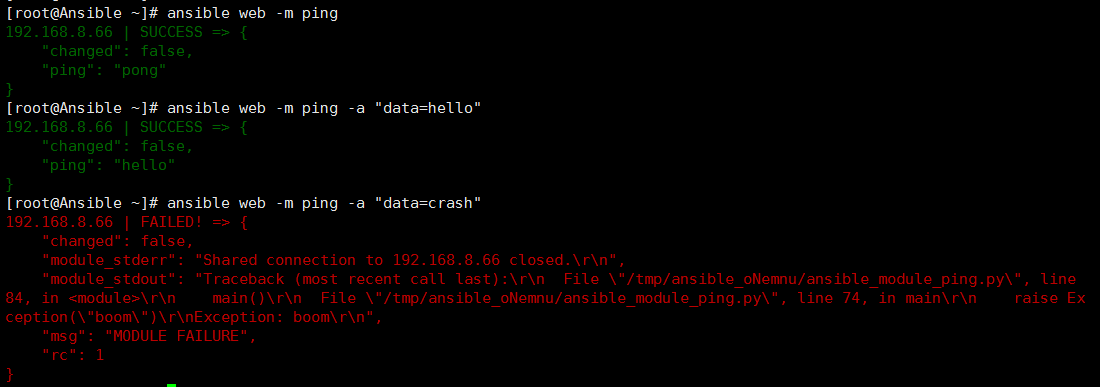
七、ping模块
1、简介
- ping模块用于确认和对象机器之间是否能够ping通,正常情况会返回pong
- ping模块在剧本中没有任何意义,但从/usr/bin/ansible或者/ansible-2.5.0/bin/ansible可以验证主机是否可以登录
- 这不是ICMP ping,这只是一个简单的测试模块,需要远程节点上的Python
- 对于Windows目标,请改用win_ping模块
- 对于网络目标,请改用net_ping模块
2、参数
data:要返回的数据为ping返回值。如果此参数设置为crash,模块将导致异常
3、示例
# 默认返回是pong
[root@Ansible ~]# ansible web -m ping
192.168.8.66 | SUCCESS => {
    "changed": false,
    "ping": "pong"
}

# 设置返回值是hello
[root@Ansible ~]# ansible web -m ping -a "data=hello"
192.168.8.66 | SUCCESS => {
    "changed": false,
    "ping": "hello"
}

# 设置返回值是crash,模块导致异常
[root@Ansible ~]# ansible web -m ping -a "data=crash"
192.168.8.66 | FAILED! => {
    "changed": false,
    "module_stderr": "Shared connection to 192.168.8.66 closed.\r\n",
    "module_stdout": "Traceback (most recent call last):\r\n  File \"/tmp/ansible_oNemnu/ansible_module_ping.py\", line 84, in <module>\r\n    main()\r\n  File \"/tmp/ansible_oNemnu/ansible_module_ping.py\", line 74, in main\r\n    raise Exception(\"boom\")\r\nException: boom\r\n",
    "msg": "MODULE FAILURE",
    "rc": 1
}
八、service模块
1、简介
- service模块用于控制远程主机的服务,说白了,就是Linux下的service命令
- 支持的init系统包括BSD init,OpenRC,SysV,Solaris SMF,systemd,upstart
- 对于Windows目标,请改用win_service模块
2、参数
arguments:如果打开这个标记,backrefs会改变模块的一些操作:insertbefore和insertafter参数会被忽略。当regexp不匹配文件中的任何行时,文件不会做任何修改,否则 使用扩展的line参数 替换 最后一个匹配正则表达式的行
enabled:服务是否开机自动启动yes|no。enabled和state至少要有一个被定义
name:必选项,服务名称
pattern:如果通过status指令来查看服务的状态时,没有响应,就会通过ps指令在进程中根据该模式进行查找,如果匹配到,则认为该服务依然在运
runlevel:运行级别
sleep(1.3后新增):如果服务被重新启动,则睡眠多少秒再执行停止和启动命令
state:对当前服务执行启动,停止、重启、重新加载等操作(started,stopped,restarted,reloaded)
use(2.2后新增):以哪个用户的身份执行
3、示例
(1)启动、停止、重启或重载服务
# 启动(started)
[root@Ansible ~]# ansible web -m service -a "name=httpd state=started"
192.168.8.66 | SUCCESS => {
    "changed": true,
    "name": "httpd",
    "state": "started",
    "status": {
        ……
    }
}
# 停止(stopped)
[root@Ansible ~]# ansible web -m service -a "name=httpd state=stopped"
192.168.8.66 | SUCCESS => {
    "changed": true,
    "name": "httpd",
    "state": "stopped",
    "status": {
        ……
    }
}
# 重启(restarted)
[root@Ansible ~]# ansible web -m service -a "name=httpd state=restarted"
192.168.8.66 | SUCCESS => {
    "changed": true,
    "name": "httpd",
    "state": "started",
"status": {
        ……
    }
}
# 重载(reloaded)
[root@Ansible ~]# ansible web -m service -a "name=httpd state=reloaded"
192.168.8.66 | SUCCESS => {
    "changed": true,
    "name": "httpd",
    "state": "started",
"status": {
        ……
    }
}

**(2)设置服务开机自启动**
[root@Ansible ~]# ansible web -m service -a "name=httpd enabled=yes"
192.168.8.66 | SUCCESS => {
    "changed": true,
    "enabled": true,
    "name": "httpd",
    "status": {
        ……
    }
}
九、systemd模块
1、简介
- systemd模块用于控制远程主机的systemd服务,说白了,就是Linux下的systemd命令。需要远程主机支持systemd
- 用法和service模块基本相同
2、参数
daemon_reload:在执行任何其他操作之前运行守护进程重新加载,以确保systemd已经读取其他更改
enabled:服务是否开机自动启动yes|no。enabled和state至少要有一个被定义
masked:是否将服务设置为masked状态,被mask的服务是无法启动的
name:必选项,服务名称
no_block(2.3后新增):不要同步等待操作请求完成
state:对当前服务执行启动,停止、重启、重新加载等操作(started,stopped,restarted,reloaded)
user:使用服务的调用者运行systemctl,而不是系统的服务管理者
3、示例
(1)启动、停止、重启或重载服务
# 启动(started)
[root@Ansible ~]# ansible web -m systemd -a "name=httpd state=started"
192.168.8.66 | SUCCESS => {
    "changed": true,
    "name": "httpd",
    "state": "started",
    "status": {
        ……
    }
}
# 停止(stopped)
[root@Ansible ~]# ansible web -m systemd -a "name=httpd state=stopped"
192.168.8.66 | SUCCESS => {
    "changed": true,
    "name": "httpd",
    "state": "stopped",
    "status": {
        ……
    }
}
# 重启(restarted)
[root@Ansible ~]# ansible web -m systemd -a "name=httpd state=restarted"
192.168.8.66 | SUCCESS => {
    "changed": true,
    "name": "httpd",
    "state": "started",
    "status": {
        ……
    }
}
# 重载(reloaded)
[root@Ansible ~]# ansible web -m systemd -a "name=httpd state=reloaded"
192.168.8.66 | SUCCESS => {
    "changed": true,
    "name": "httpd",
    "state": "started",
    "status": {
        ……
    }
}
(2)设置服务masked状态
# 先将服务停止
[root@Ansible ~]# ansible web -m systemd -a "name=httpd state=stopped"
192.168.8.66 | SUCCESS => {
    "changed": true,
    "name": "httpd",
    "state": "stopped",
    "status": {
        ……
    }
}

[root@Ansible ~]# ansible web -m systemd -a "name=httpd masked=yes"
192.168.8.66 | SUCCESS => {
    "changed": true,
    "name": "httpd",
    "status": {
        ……
    }
}
# 服务已无法启动
[root@Ansible ~]# ansible web -m systemd -a "name=httpd state=started"
192.168.8.66 | FAILED! => {
    "changed": false,
    "msg": "Unable to start service httpd: Failed to start httpd.service: Unit is masked.\n"
}
# 撤销mask
[root@Ansible ~]# ansible web -m systemd -a "name=httpd masked=no"
192.168.8.66 | SUCCESS => {
    "changed": true,
    "name": "httpd",
    "status": {
        ……
    }
}
# 可以启动成功
[root@Ansible ~]# ansible web -m systemd -a "name=httpd state=started"
192.168.8.66 | SUCCESS => {
    "changed": true,
    "name": "httpd",
    "state": "started",
"status": {
        ……
    }
}
十、lineinfile模块
1、简介
- lineinfile模块用于确保一个特定的行在一个文件中,或使用一个正则表达式替换现有的行
- 如果想要改变文件中相似的多行,可以使用replace模块。如果想要插入、更新、删除一个行块,可以使用blockinfile模块
2、参数
attributes(2.3后增加):文件或目录应具有的属性。要获得支持的标志,请查看目标系统上chattr的手册页。该字符串应该包含与lsattr显示的顺序相同顺序的属性
backrefs:如果打开这个标记,backrefs会改变模块的一些操作:insertbefore和insertafter参数会被忽略。当regexp不匹配文件中的任何行时,文件不会做任何修改,否则 使用扩展的line参数 替换 最后一个匹配正则表达式的行
backup:用于创建一个包含时间戳信息的备份文件。以便在错误的修改了文件的时候,能够找回原始的文件
create:与state=present一起使用。如果指定了这个参数,当要修改的文件不存在的时候,会创建它。否则会报错
firstmatch(2.5后增加):用于insertafter或insertbefore。如果设置,insertafter并inserbefore找到第一行有正则表达式匹配
group:设置文件/目录的所属组
insertafter:当regexp不匹配文件中的任何行的时候,会将新行插入到其所指定的正则表达式匹配的行中的最后一行的后面。insertafter也支持一个特殊的值:EOF(代表文件的末尾)。若没有匹配的行,那么就会插入EOF
insertbefore:当regexp不匹配文件中的任何行的时候,会将line参数所指定的行,插入到insertbefore所指定的正则表达式匹配的行中的最后一行的前面,当insertbefore所指定的正则表达式不匹配任何行时,会插入到文件的末尾,同时insertbefore还可以是一个特殊的值:BOF(代表文件的开始);否则,会使用line参数所指定的行替换regexp所匹配的行中的最后一行
line:要插入或者替换的行。如果设置了backrefs参数,那么line中可以包含位置分组或命名分组,lineinfile模块会使用regexp捕获的分组填充它们
mode:设置文件权限,模式实际上是八进制数字(如0644),少了前面的零可能会有意想不到的结果。从版本1.8开始,可以将模式指定为符号模式(例如u+rwx或u=rw,g=r,o=r)
others:file模块的其他参数可以在这里使用
owner:设置文件或目录的所属用户
path:要修改的文件,也可以使用dest、destfile、name
regexp(1.7后增加):用于搜索文件中的每一行的正则表达式。对于state=present,这个正则表达式所匹配的行中的最后一行会被替换;对于state=present,会删除所有匹配的行
state:用于设置 新增或替换一行,还是删除行(present、absent)
unsafe_writes(2.2后增加):是否以不安全的方式进行,可能导致数据损坏
validate:复制前是否检验需要复制目的地的路径
3、示例
(1)文本替换
将/etc/selinux/config文件中所有匹配^SELINUX=正则表达式的行中的最后一行使用SELINUX=disabled替换
如果regexp不匹配文件中的任何一行,则将line所指定的行插入到文件的末尾
[root@Ansible ~]# ansible web -m lineinfile -a "path=/etc/selinux/config regexp='^SELINUX=' line='SELINUX=disabled'"
192.168.8.66 | SUCCESS => {
    "backup": "",
    "changed": true,
    "msg": "line replaced"
}
# 查看结果
[root@Ansible ~]# ansible web -m command -a "cat /etc/selinux/config"
192.168.8.66 | SUCCESS | rc=0 >>

# This file controls the state of SELinux on the system.
# SELINUX= can take one of these three values:
#     enforcing - SELinux security policy is enforced.
#     permissive - SELinux prints warnings instead of enforcing.
#     disabled - No SELinux policy is loaded.
SELINUX=disabled                                   # 修改成功
# SELINUXTYPE= can take one of three two values:
#     targeted - Targeted processes are protected,
#     minimum - Modification of targeted policy. Only selected processes are protected.
#     mls - Multi Level Security protection.
SELINUXTYPE=targeted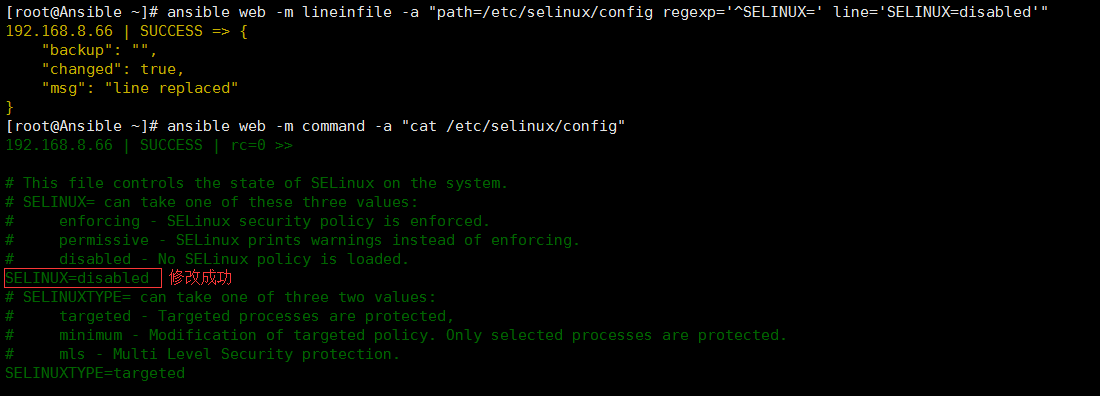
(2)删除行
将/tmp/test.sh文件中所有匹配^pwd的行删除
# 删除前内容
[root@Ansible ~]# ansible web -m command -a "cat /tmp/test.sh"
192.168.8.66 | SUCCESS | rc=0 >>
#!/bin/bash
echo "Hello world"
pwd
pwd1=123456789
pwd2=test
# 删除行
[root@Ansible ~]# ansible web -m lineinfile -a "path=/tmp/test.sh regexp='^pwd' state=absent"
192.168.8.66 | SUCCESS => {
    "backup": "",
    "changed": true,
    "found": 3,
    "msg": "3 line(s) removed"
}
# 再次运行,没有匹配
[root@Ansible ~]# ansible web -m lineinfile -a "path=/tmp/test.sh regexp='^pwd' state=absent"
192.168.8.66 | SUCCESS => {
    "backup": "",
    "changed": false,
    "found": 0,
    "msg": ""
}
# 删除后
[root@Ansible ~]# ansible web -m command -a "cat /tmp/test.sh"
192.168.8.66 | SUCCESS | rc=0 >>
#!/bin/bash
echo "Hello world"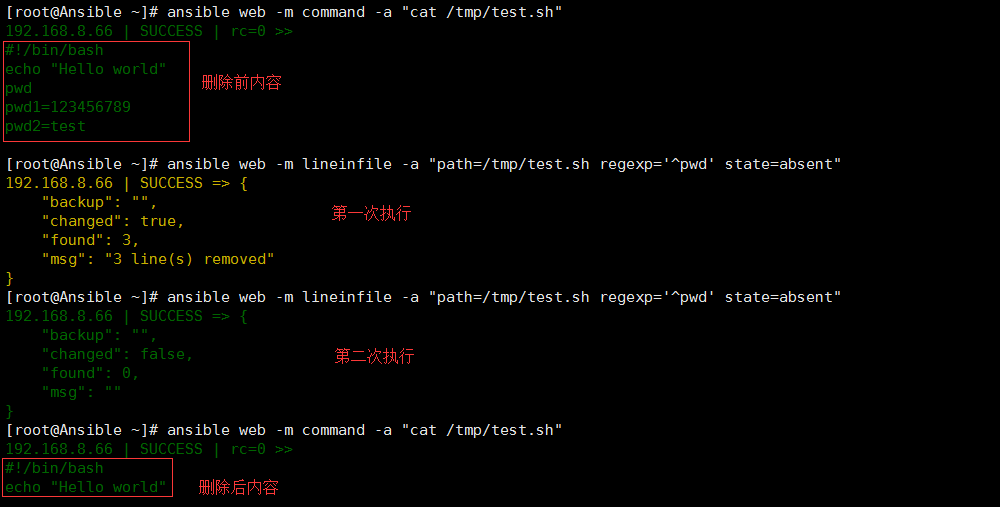
(3)替换行并设置文件权限
# 执行前
[root@Ansible ~]# ansible web -m command -a "cat /etc/hosts"
192.168.8.66 | SUCCESS | rc=0 >>
127.0.0.1   localhost localhost.localdomain localhost4 localhost4.localdomain4
::1         localhost localhost.localdomain localhost6 localhost6.localdomain6
192.168.8.55 Ansible
192.168.8.66 Client
# 执行中
[root@Ansible ~]# ansible web -m lineinfile -a "path=/etc/hosts regexp='^127.0.0.1' line='127.0.0.1 localhost' owner=root group=root mode=0644"
192.168.8.66 | SUCCESS => {
    "backup": "",
    "changed": true,
    "msg": "line replaced"
}
# 执行后
[root@Ansible ~]# ansible web -m command -a "cat /etc/hosts"
192.168.8.66 | SUCCESS | rc=0 >>
127.0.0.1 localhost
::1         localhost localhost.localdomain localhost6 localhost6.localdomain6
192.168.8.55 Ansible
192.168.8.66 Client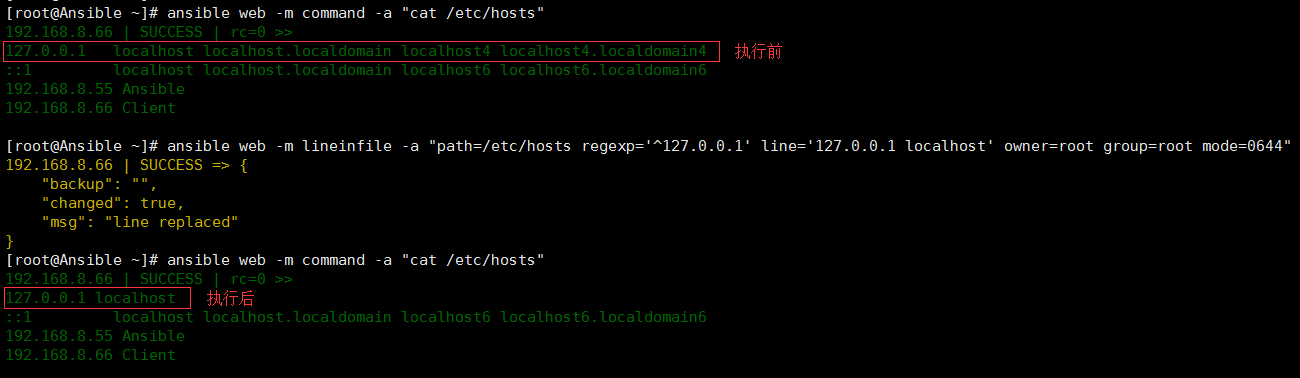
(4)insertafter和insertbefore
当文件中没有匹配正则表达式^Listen80的行时,会将Listen 80插入到^#Listen所匹配的最后一行的后面
[root@Ansible ~]# ansible web -m lineinfile -a "path=/etc/httpd/conf/httpd.conf regexp='^Listen80' insertafter='^#Listen' line='Listen 80'"
192.168.8.66 | SUCCESS => {
    "backup": "",
    "changed": true,
    "msg": "line added"
}
# insertbefore的使用方法类似
[root@Ansible ~]# ansible web -m lineinfile -a "path=/etc/httpd/conf/httpd.conf regexp='^#Listen80' insertbefore='^Listen 80' line='#Listen 80'"
192.168.8.66 | SUCCESS => {
    "backup": "",
    "changed": true,
    "msg": "line added"
}
(5)为文件新增一行
直接在文件中新增一行(如果line不存在则会插入),而不通过正则表达式进行匹配
[root@Ansible ~]# ansible web -m lineinfile -a "path=/root/test.sh line='xiaozuo test'"
192.168.8.66 | SUCCESS => {
    "backup": "",
    "changed": true,
    "msg": "line added"
}
# 再次执行
[root@Ansible ~]# ansible web -m lineinfile -a "path=/root/test.sh line='xiaozuo test'"
192.168.8.66 | SUCCESS => {
    "backup": "",
    "changed": false,
    "msg": ""
}
# 执行后的文件
[root@Ansible ~]# ansible web -m command -a "cat /root/test.sh"
192.168.8.66 | SUCCESS | rc=0 >>
#!/bin/bash
echo 'Hello world'
xiaozuo test          # 新增的行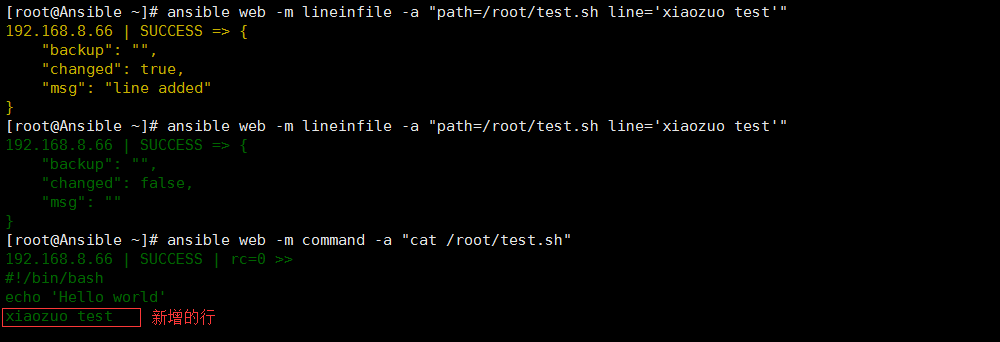
(6)backrefs用法
backrefs为no时,如果没有匹配,则添加一行line。如果匹配了,则把匹配内容替被换为line内容。
backrefs为yes时,如果没有匹配,则文件保持不变。如果匹配了,把匹配内容替被换为line内容。
# backrefs为yes时,匹配到了,并把匹配内容替被换为line内容
[root@Ansible ~]# ansible web -m lineinfile -a "path=/root/test.sh line='xiaozuo xiansen' regexp='^xiaozuo' backrefs=yes"
192.168.8.66 | SUCCESS => {
    "backup": "",
    "changed": true,
    "msg": "line replaced"
}
# backrefs为yes时,没有匹配到,则文件保持不变
[root@Ansible ~]# ansible web -m lineinfile -a "path=/root/test.sh line='xiaozuo xiansen' regexp='^xiaozuo1' backrefs=yes"
192.168.8.66 | SUCCESS => {
    "backup": "",
    "changed": false,
    "msg": ""
}
# backrefs为no时,没有匹配到,则添加一行line
[root@Ansible ~]# ansible web -m lineinfile -a "path=/root/test.sh line='xiaozuo xiansen' regexp='^xiaozuo1' backrefs=no"
192.168.8.66 | SUCCESS => {
    "backup": "",
    "changed": true,
    "msg": "line added"
}
# 执行后的文件
[root@Ansible ~]# ansible web -m command -a "cat /root/test.sh"
192.168.8.66 | SUCCESS | rc=0 >>
#!/bin/bash
echo 'Hello world'
xiaozuo xiansen
xiaozuo xiansen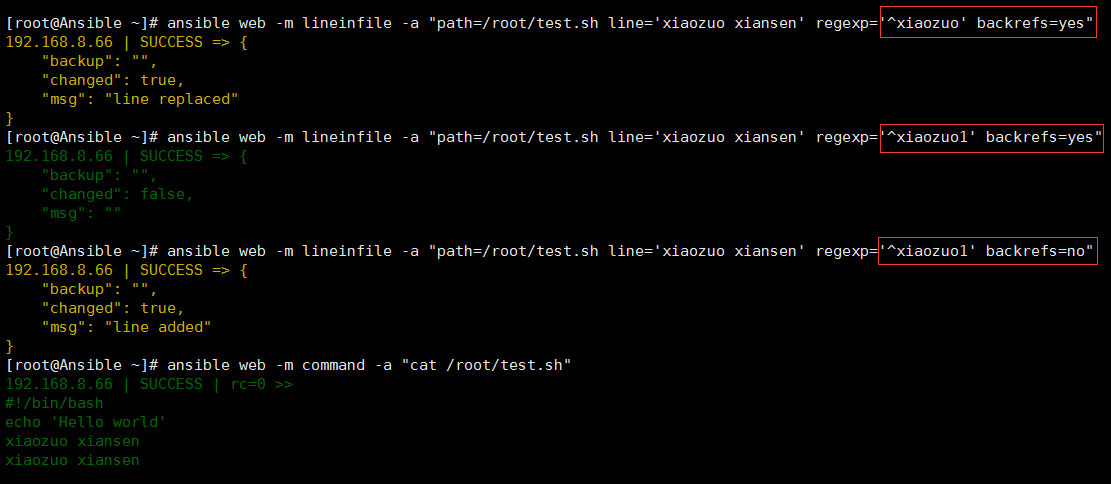
十一、setup模块
1、简介
setup模块被剧本自动调用,以收集有关可用于剧本的远程主机的有用变量
****也可以直接通过/usr/bin/ansible或者/ansible-2.5.0/bin/ansible来检查主机可用的变量
该模块也支持Windows目标
2、参数
fact_path(1.3后增加):用于本地(.fact)的路径, 如果文件不可执行,则会读取该目录中的文件;(如果可执行)并将其结果添加到ansible_local的信息中
filter:过滤串
gather_subset(2.1后增加):将收集的其他信息限制在给定的子集中。可能的值:all,min,hardware,network,virtual,ohai和facter可以指定一个值列表来指定一个更大的子集。值也可以与初始值一起使用,!以指定不应收集该特定子集(如:!hardware, !network, !virtual, !ohai, !facter. if !all)。为避免收集最小子集,请指定!all和!min子集。要仅收集特定信息,请使用!all、!min,并指定特定的信息子集
gather_timeout(2.2后增加):设置单个信息收集的默认超时值,以秒为单位
3、示例
(1)收集fact并进行保存
# 将所有主机的信息输入到/tmp/facts目录下
[root@Ansible ~]# ansible web -m setup --tree /tmp/facts
192.168.8.66 | SUCCESS => {
"ansible_facts": {
"ansible_all_ipv4_addresses": [
"192.168.8.66"
……
]
"module_setup": true
},
"changed": false
}
[root@Ansible ~]# ls /tmp/facts/
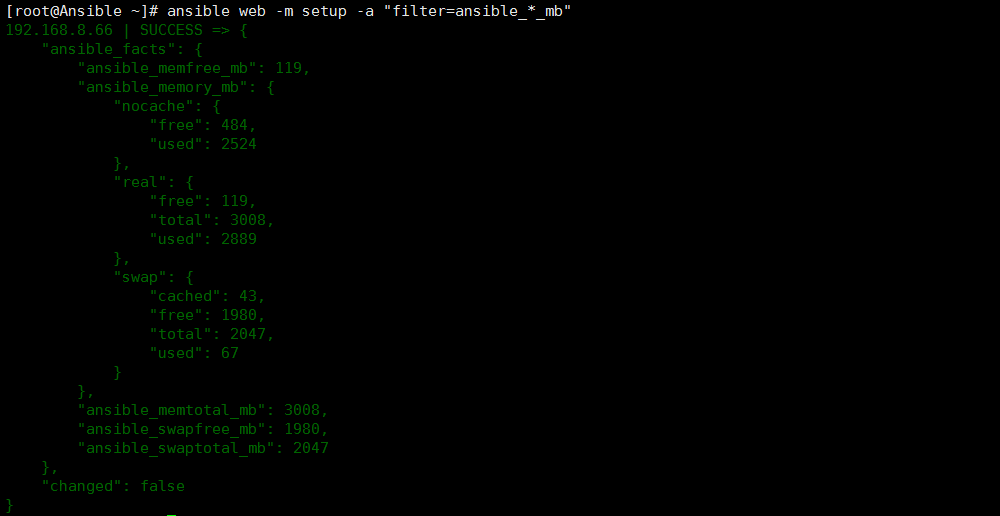
192.168.8.66(2)收集内存信息
[root@Ansible ~]# ansible web -m setup -a "filter=ansible_*_mb"
192.168.8.66 | SUCCESS => {
    "ansible_facts": {
        "ansible_memfree_mb": 119,
        "ansible_memory_mb": {
            "nocache": {
                "free": 484,
                "used": 2524
            },
            "real": {
                "free": 119,
                "total": 3008,
                "used": 2889
            },
            "swap": {
                "cached": 43,
                "free": 1980,
                "total": 2047,
                "used": 67
            }
        },
        "ansible_memtotal_mb": 3008,
        "ansible_swapfree_mb": 1980,
        "ansible_swaptotal_mb": 2047
    },
    "changed": false
}
(3)收集主机网卡信息
[root@Ansible ~]# ansible web -m setup -a "filter=ansible_ens33"
192.168.8.66 | SUCCESS => {
    "ansible_facts": {
        "ansible_ens33": {
            "active": true,
            "device": "ens33",
            ……
            "ipv4": {
                "address": "192.168.8.66",
                "broadcast": "192.168.8.255",
                "netmask": "255.255.255.0",
                "network": "192.168.8.0"
            },
            "ipv6": [
                {
                    "address": "fe80::118:fa64:e919:e3be",
                    "prefix": "64",
                    "scope": "link"
                }
            ],
            "type": "ether"
        }
    },
    "changed": false
}
(4)收集fact回报信息
[root@Ansible ~]# ansible web -m setup -a 'gather_subset=!all,!any,facter'
192.168.8.66 | SUCCESS => {
    "ansible_facts": {
        "ansible_apparmor": {
            "status": "disabled"
        },
        "ansible_architecture": "x86_64",
        "ansible_cmdline": {
            "BOOT_IMAGE": "/vmlinuz-3.10.0-514.el7.x86_64",
            "LANG": "zh_CN.UTF-8",
            "quiet": true,
            "rhgb": true,
            "ro": true,
            "root": "UUID=edeced73-160f-4b2f-beff-cb5ac7ab9904"
        },
        "ansible_date_time": {
            "date": "2018-04-28",
            "day": "28",
            ……
        "module_setup": true
    },
    "changed": false
}
(5)收集自定义显示信息
[root@Ansible ~]# ansible web -m setup -a "fact_path='/root/'"
192.168.8.66 | SUCCESS => {
    "ansible_facts": {
        "ansible_all_ipv4_addresses": [
            "192.168.8.66"
        ],
        ……
        "module_setup": true
    },
    "changed": false
}
十二、stat模块
1、简介
- stat模块获取远程文件状态信息,包括atime、ctime、mtime、md5、uid、gid等
2、参数
checksum_algorithm(2.0后增加):确定文件校验和的算法。如果主机不能使用指定的算法,会抛出一个错误(默认为sha1)
follow:是否遵循符号链接
get_attributes(2.3后增加):如果存在,使用lsattr工具获取文件属性
get_checksum(1.8后增加):是否返回文件的校验和(默认sha1)
get_md5:是否返回文件的md5总和
get_mime(2.1后增加):使用特殊文件格式并返回有关文件性质的数据
path:文件、对象的完整路径以获取信息
3、示例
(1)显示文件的所有信息
[root@Ansible ~]# ansible web -m stat -a "path=/etc/sysctl.conf"
192.168.8.66 | SUCCESS => {
    "changed": false,
    "stat": {
        "atime": 1524903484.3457322,
        ……
        "block_size": 4096,
        "blocks": 8,
        "charset": "us-ascii",
        "checksum": "174e13595eb0138cb67ba86af0ee090277d5a86a",
        "ctime": 1523506659.1721358,
        "dev": 2051,
        ……
        "gid": 0,
        "gr_name": "root",
        "inode": 16973829,
        ……
        "mimetype": "text/plain",
        "mode": "0644",
        "mtime": 1523506659.1651359,
        "nlink": 1,
        "path": "/etc/sysctl.conf",
        "pw_name": "root",
        ……
        "size": 473,
        "uid": 0,
        "version": "18446744073344397267",
        ……
    }
}
(2)显示MD5值
[root@Ansible ~]# ansible web -m stat -a "path=/etc/sysctl.conf get_md5=yes"
192.168.8.66 | SUCCESS => {
    "changed": false,
    "stat": {
        "atime": 1524903484.3457322,
        ……
        "block_size": 4096,
        "blocks": 8,
        "charset": "us-ascii",
        "checksum": "174e13595eb0138cb67ba86af0ee090277d5a86a",
        "ctime": 1523506659.1721358,
        "dev": 2051,
        ……
        "gid": 0,
        "gr_name": "root",
        "inode": 16973829,
        ……
        "md5": "6683269958dbb7ad3a91435b1f83424e",   # md5值
        "mimetype": "text/plain",
        "mode": "0644",
        "mtime": 1523506659.1651359,
        "nlink": 1,
        "path": "/etc/sysctl.conf",
        "pw_name": "root",
        ……
        "size": 473,
        "uid": 0,
        "version": "18446744073344397267",
        ……
    }
}
十三、cron模块
1、简介
- cron模块用于远程主机crontab配置,管理计划任务
2、参数
backup:对远程主机上的原任务计划内容修改之前创建crontab的备份
cron_file:如果指定该选项,则用该文件替换远程主机上的cron.d目录下的用户的任务计划
day:日(1-31,,/2,……)
hour:小时(0-23,,/2,……)
minute:分钟(0-59,,/2,……)
month:月(1-12,,/2,……)
weekday:周(0-7,,……)
disabled(2.0后增加)
env(2.1后增加)
insertafter(2.1后增加):和state=present和一起使用env。如果指定,则在声明指定的环境变量之后将插入环境变量
insertbefore(2.1后增加):和state=present和一起使用env。如果指定,则将在声明指定的环境变量之前插入环境变量
job:要执行的任务,依赖于state=present
name:该任务的描述,如果state=absent,则为必需。请注意,如果名称未设置且state=present,则将始终创建新的crontab项,而不管现有项是什么
reboot:如果作业应该在重新启动时运行。此选项已弃用。用户应该使用special_time
special_time(1.3后增加):指定什么时候执行,参数:reboot、yearly、annually、monthly、weekly、daily、hourly
state:确认该任务计划是创建还是删除
user:以哪个用户的身份执行crontab
3、示例
(1)新增一个重启任务
[root@Ansible ~]# ansible web -m cron -a "name='a job for reboot' special_time=reboot job='/some/job.sh'"
192.168.8.66 | SUCCESS => {
    "changed": true,
    "envs": [],
    "jobs": [
        "a job for reboot"
    ]
}
(2)新增一个定时任务
# 在指定节点上定义一个计划任务,每隔3分钟到主控端更新一次时间
[root@Ansible ~]# ansible all -m cron -a "name='custom job' minute=*/3 hour=* day=* month=* weekday=* job='/usr/sbin/ntpdate 192.168.8.66'"
192.168.8.66 | SUCCESS => {
    "changed": true,
    "envs": [],
    "jobs": [
        "a job for reboot",
        "custom job"
    ]
}
[root@Ansible ~]# ansible all -m command -a "crontab -l"
192.168.8.66 | SUCCESS | rc=0 >>
#Ansible: a job for reboot
@reboot /some/job.sh
#Ansible: custom job
*/3 * * * * /usr/sbin/ntpdate 192.168.8.66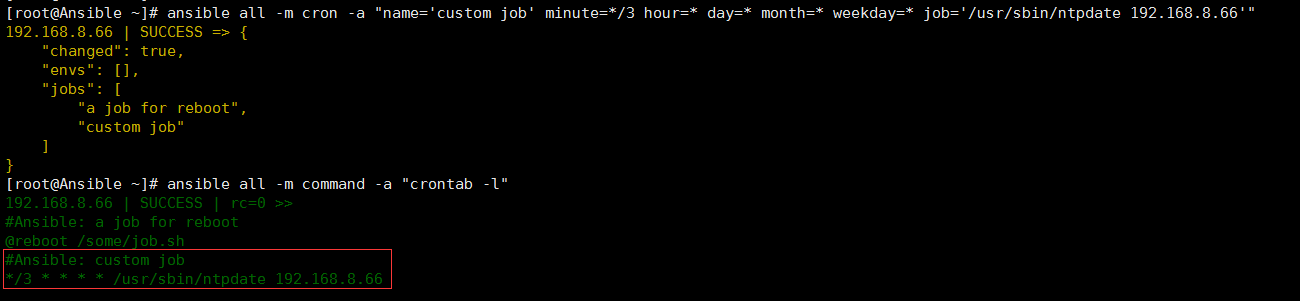
(3)删除定时任务
[root@Ansible ~]# ansible all -m cron -a "name='custom job' state=absent"
192.168.8.66 | SUCCESS => {
    "changed": true,
    "envs": [],
    "jobs": [
        "a job for reboot"
    ]
}
[root@Ansible ~]# ansible all -m command -a "crontab -l"
192.168.8.66 | SUCCESS | rc=0 >>
#Ansible: a job for reboot
@reboot /some/job.sh
十四、yum模块
1、简介
- yum模块是使用yum软件包管理器安装,升级,降级,删除和列出软件包和组
2、参数
allow_downgrade(2.4后新增):是否允许指定的软件包和版本降级,可能已安装的该软件包为更高的版本。设置allow_downgrade = True可以使此模块以非幂等方式运行
conf_file:yum的配置文件
disable_gpg_check:是否禁用正在安装的软件包签名的GPG检查。只有当状态存在或最新时才有效
disable_plugin(2.5后新增):要为安装/更新操作禁用的插件名称。禁用的插件不会在事务之外持续存在
enable_plugin(2.5后新增):用于安装/更新操作的插件名称。启用的插件不会在事务之外持续存在
disablerepo:重新定位存储库以禁用安装/更新操作,不启用某个源
enablerepo:重新定位存储库以启用安装/更新操作,启用某个源
exclude (2.0后新增):要在状态=存在或最新时排除的包名称
installroot(2.3后新增):指定一个替代的installroot,相对于它将安装所有软件包
list:包名相对于yum list <package>运行相当于。除了列出的软件包,使用还可以列出如下:installed,updates,available和repos
name:指定要安装的包,如果有多个版本需要指定版本,否则安装最新的包。当使用state=latest时,这可以是'*',这意味着运行yum -y update
security(2.4后新增):如果设置为yes,state=latest则只安装标记为安全相关的更新
skip_broken(2.3后新增):通过从交易中删除导致问题的软件包来解决问题
state:安装(present或installed),安装最新版(latest),卸载程序包(absent)
update_cache(1.9后新增) :强制yum检查缓存是否过期并在需要时重新下载。只有当状态存在或最新时才有效
update_only(2.5后新增):使用最新的,仅更新安装的软件包。不要安装软件包。只有在状态最新时才有效
validate_certs(2.1后新增):这仅适用于使用https url作为rpm的来源。例如用于本地安装。如果设置为no,SSL证书将不会被验证。
这应该只设置为no在使用自签名证书的个人控制站点上使用,因为它可以避免验证源站点。
2.1之前的代码工作,如果这是设置yes
3、示例
(1)安装Apache软件包
[root@Ansible ~]# ansible all -m yum -a "state=present name=httpd"
192.168.8.66 | SUCCESS => {
    "changed": true,
    "msg": "",
    "rc": 0,
    "results": [
        "Loaded plugins: fastestmirror\nLoading mirror speeds from cached hostfile\nResolving Dependencies\n--> Running transaction check\n---> Package httpd.x86_64 0:2.4.6-45.el7.centos will be installed\n--> Finished Dependency Resolution\n\nDependencies Resolved\n\n================================================================================\n Package       Arch           Version                      Repository      Size\n================================================================================\nInstalling:\n httpd         x86_64         2.4.6-45.el7.centos          CentOS         2.7 M\n\nTransaction Summary\n================================================================================\nInstall  1 Package\n\nTotal download size: 2.7 M\nInstalled size: 9.4 M\nDownloading packages:\nRunning transaction check\nRunning transaction test\nTransaction test succeeded\nRunning transaction\n  Installing : httpd-2.4.6-45.el7.centos.x86_64                             1/1 \n  Verifying  : httpd-2.4.6-45.el7.centos.x86_64                             1/1 \n\nInstalled:\n  httpd.x86_64 0:2.4.6-45.el7.centos                                            \n\nComplete!\n"
    ]
}
(2)删除Apache软件包
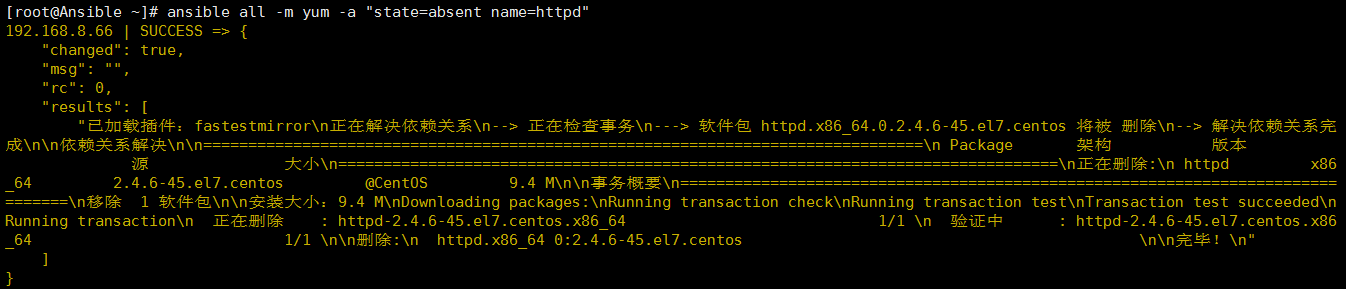
[root@Ansible ~]# ansible all -m yum -a "state=absent name=httpd"
192.168.8.66 | SUCCESS => {
    "changed": true,
    "msg": "",
    "rc": 0,
    "results": [
        "已加载插件:fastestmirror\n正在解决依赖关系\n--> 正在检查事务\n---> 软件包 httpd.x86_64.0.2.4.6-45.el7.centos 将被 删除\n--> 解决依赖关系完成\n\n依赖关系解决\n\n================================================================================\n Package       架构           版本                        源               大小\n================================================================================\n正在删除:\n httpd         x86_64         2.4.6-45.el7.centos         @CentOS         9.4 M\n\n事务概要\n================================================================================\n移除  1 软件包\n\n安装大小:9.4 M\nDownloading packages:\nRunning transaction check\nRunning transaction test\nTransaction test succeeded\nRunning transaction\n  正在删除    : httpd-2.4.6-45.el7.centos.x86_64                            1/1 \n  验证中      : httpd-2.4.6-45.el7.centos.x86_64                            1/1 \n\n删除:\n  httpd.x86_64 0:2.4.6-45.el7.centos                                            \n\n完毕!\n"
    ]
}
(3)升级所有软件包
[root@Ansible ~]# ansible all -m yum -a "state=latest name='*'"
192.168.8.66 | SUCCESS => {
    "changed": false,
    "msg": "",
    "rc": 0,
    "results": [
        "Nothing to do here, all packages are up to date"
    ]
}
(4)升级所有软件包,不包括Apache相关软件包
[root@Ansible ~]# ansible all -m yum -a "state=latest name='*' exclude='httpd'"
192.168.8.66 | SUCCESS => {
    "changed": false,
    "msg": "",
    "rc": 0,
    "results": [
        "Nothing to do here, all packages are up to date"
    ]
}
(5)从远程repo安装nginx rpm
[root@Ansible ~]# ansible all -m yum -a "state=present name=http://nginx.org/packages/centos/7/noarch/RPMS/nginx-release-centos-7-0.el7.ngx.noarch.rpm"(6)从本地文件安装nginx rpm
[root@Ansible ~]# ansible all -m yum -a "state=present name=/usr/local/nginx-1.14.0-1.el7_4.ngx.x86_64.rpm"(7)安装'Development tools'软件包组
[root@Ansible ~]# ansible all -m yum -a "state=present name='@Development tools'"十五、user、group模块
1、简介
- user模块是请求的是useradd, userdel, usermod三个指令
- group模块请求的是groupadd, groupdel, groupmod 三个指令
- user、group模块管理远程主机用户帐户和用户属性
2、参数
(1)user模块参数
append:如果yes仅添加组,则不会将它们设置为组中的列表
comment:(可选)设置用户帐户的描述(又名GECOS)
create_home:除非设置为no,否则在创建帐户或主目录不存在时,将为用户创建主目录。在版本2.5中更改createhome为create_home
expires(1.9后增加):用户在epoch中的到期时间,在不支持此操作的平台上会被忽略。目前支持Linux,FreeBSD和DragonFlyBSD
force:与starte一起使用时state=absent,行为如同userdel --force
generate_ssh_key:是否为有问题的用户生成SSH密钥。这不会覆盖现有的SSH密钥
group:(可选)设置用户的主要组(采用组名)
groups:指定用户的属组。将用户放在组列表中。当设置为空字符串('groups =')时,用户将从除主组以外的所有组中移除
home:指定用户的家目录,需要与createhome配合使用
login_class:可以选择设置FreeBSD,DragonFlyBSD,OpenBSD和NetBSD系统的用户登录类
move_home:如果设置为yes使用时home=,尝试将用户的主目录移动到指定的目录(如果它尚未存在)
name:要创建,删除或修改的用户的名称
password:可选择将用户的密码设置为加密值。在Darwin / OS X系统上,这个值必须是明文。谨防安全问题。有关生成这些密码值的各种方法的详细信息,请参阅http://docs.ansible.com/ansible/faq.html#how-do-i-generate-crypted-passwords-for-the-user-module
remove:当state=absent时,remove=yes则表示连同家目录一起删除,等价于userdel -r
seuser(2.1后增加):(可选)在启用selinux的系统上设置选择器类型(user_u)
shell:指定用户的shell环境
skeleton(2.0后增加):可选择设置家庭骨架目录。需要create_home选项!
ssh_key_bits:可以指定要创建的SSH密钥中的位数
ssh_key_comment:(可选)为SSH密钥定义注释
ssh_key_file:可以指定SSH密钥文件名。如果这是一个相对文件名,那么它将相对于用户的主目录
ssh_key_passphrase:为SSH密钥设置密码。如果未提供密码,则SSH密钥将默认为不含密码
ssh_key_type:可以指定要生成的SSH密钥的类型。可用的SSH密钥类型将取决于目标主机上的实现
state:是创建还是删除
system:创建帐户时,如果设置为yes,则成为系统帐户。此设置无法在现有用户上更改
uid:(可选)设置用户的UID
update_password(1.3后增加):always将会更新密码,如果它们不同。on_create将只为新创建的用户设置密码
(2)group模块参数
gid:(可选)设置用户的GID
name:要管理的组的名称
state:该组是否应该存在于远程主机上,创建(present),删除(absent)
system:如果是,则表示所创建的组是系统组,默认no
3、示例
(1)将用户xiaozuo添加到特定的uid和admin组中
[root@Ansible ~]# ansible all -m user -a "name=xiaozuo comment=test uid=1040 group=root"
192.168.8.66 | SUCCESS => {
    "changed": true,
    "comment": "test",
    "create_home": true,
    "group": 0,
    "home": "/home/xiaozuo",
    "name": "xiaozuo",
    "shell": "/bin/bash",
    "state": "present",
    "system": false,
    "uid": 1040
}
[root@Ansible ~]# ansible all -m command -a "id xiaozuo"
192.168.8.66 | SUCCESS | rc=0 >>
uid=1040(xiaozuo) gid=0(root) 组=0(root)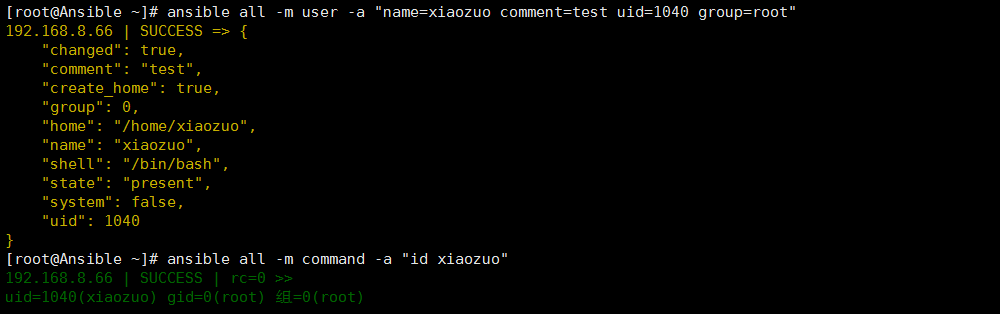
(2)删除xiaozuo用户
[root@Ansible ~]# ansible all -m user -a "name=xiaozuo state=absent remove=yes"
192.168.8.66 | SUCCESS => {
    "changed": true,
    "force": false,
    "name": "xiaozuo",
    "remove": true,
    "state": "absent"
}
[root@Ansible ~]# ansible all -m command -a "id xiaozuo"
192.168.8.66 | FAILED | rc=1 >>
id: xiaozuo: no such usernon-zero return code
(3)创建group组
[root@Ansible ~]# ansible all -m group -a "name=admin"
192.168.8.66 | SUCCESS => {
    "changed": true,
    "gid": 1002,
    "name": "admin",
    "state": "present",
    "system": false
}
(4)删除group组
[root@Ansible ~]# ansible all -m group -a "name=admin state=absent"
192.168.8.66 | SUCCESS => {
    "changed": true,
    "name": "admin",
    "state": "absent"
}
(5)为用户james创建一个2048位SSH密钥:
[root@Ansible ~]# ansible all -m user -a "name=james generate_ssh_key=yes ssh_key_bits=2048 ssh_key_file=.ssh/id_rsa"
192.168.8.66 | SUCCESS => {
    "changed": true,
    "comment": "",
    "create_home": true,
    "group": 1002,
    "home": "/home/james",
    "name": "james",
    "shell": "/bin/bash",
    "ssh_fingerprint": "2048 cb:78:0e:12:d7:74:f5:30:fc:23:a4:33:cc:50:1b:57  ansible-generated on Client (RSA)",
    "ssh_key_file": "/home/james/.ssh/id_rsa",
    "ssh_public_key": "ssh-rsa AAAAB3NzaC1yc2EAAAADAQABAAABAQC7WBkImiornzorZCzK0cSo2ZWwHHky4hRts8LFuTbgMCH2q7uI6DVyCxBMJSmgFLKLMgiXyTA0TwYckWW08XdfwjZ6X6KAhAGHFpb497eFRkJJiHgP4TM28YpTaoqKLfjHsQmNRqaC84zZCRbxorAZONhhgnz499YectLLS6QtJtCBlOuP3U5ianJrftD5hg/g4R651F23+cSxNHJ8f7A6dpNuc+iFc4wdrz4DiVn4g5WvXyrL6H9MXcUJfhbisgonVif4KD9xKuPNIXLH5yKRggF07Na0RiLVWq9Je4r4dvQFybETdFBtLd4R/UlzOjw6aq9HQO/bPGt3ivHVz2/l ansible-generated on Client",
    "state": "present",
    "system": false,
    "uid": 1002
}
十六、synchronize模块
1、简介
- 由于synchronize模块会调用rsync命令,因此首先要记得提前安装好rsync软件包
- synchronize模块用于将Ansible机器的指定目录推送(push)到远程主机的指定目录下
2、参数
archive: 归档,相当于同时开启recursive(递归)、links(链接)、perms(权限)、times(时间)、owner(所有者)、group(组标志)和-D选项都为yes,默认该项为开启
checksum(1.6后增加): 跳过检测sum值,默认关闭,archive选项默认处于启用状态时,checksum选项不会禁用它
compress(1.7后增加): 在传输过程中压缩文件数据。在大多数情况下,请保持启用状态
copy_links:复制符号链接文件,指向的项目(指示对象)被复制,而不是符号链接,默认为no,注意后面还有一个links参数
delete: 删除不存在的文件,默认no
dest:目标主机上将从源同步的路径; 路径可以是绝对的或相对的
dest_port(1.5后增加):默认目录主机上的ssh端口号,默认是22
dirs:传速目录不进行递归,默认为no,即进行目录递归
existing_only(1.5后增加):跳过在接收器上创建新文件
group:保留组
link_dest(2.5后增加):在rsync期间添加一个目标到硬链接
links:将符号链接复制为符号链接
owner:保留所有者(仅限超级用户)
partial(2.0后增加):告诉rsync保留部分文件,该文件应该使文件的其余部分以更快的速度传输
perms:保留权限
private_key(1.6后增加):指定用于基于SSH的rsync连接的私钥(例如~/.ssh/id_rsa)
recursive:递归到目录中
rsync_opts(1.6后增加):通过传入数组来指定其他rsync选项
rsync_path:指定要在远程主机上运行的rsync命令
rsync_timeout:在几秒钟内为rsync命令指定一个 --timeout
set_remote_user:主要用于/etc/ansible/hosts中定义或默认使用的用户与rsync使用的用户不同的情况
src:源主机上将被同步到目标的路径;路径可以是绝对的或相对的
times:保留修改时间
use_ssh_args(2.0后增加):使用ansible.cfg中指定的ssh_args
verify_host(2.0后增加):验证目标主机密钥
mode: 指定同步的方向。push或pull 模块,push模的话,一般用于从本机向远程主机上传文件,pull 模式用于从远程主机上取文件
3、示例
(1)使用synchronize模块时,远程主机首先要安装rsync软件包(我这里已经安装过了)
[root@Ansible ~]# ansible all -m yum -a "state=present name=rsync"
192.168.8.66 | SUCCESS => {
    "changed": false,
    "msg": "",
    "rc": 0,
    "results": [
        "rsync-3.0.9-17.el7.x86_64 providing rsync is already installed"
    ]
}
(2)远程客户端安装好rsync包后就可以在Ansible服务端使用rsync进行同步
[root@Ansible ~]# ansible all -m synchronize -a "src=/test/ dest=/tmp/backup/ compress=yes"
192.168.8.66 | SUCCESS => {
    "changed": true,
    "cmd": "/usr/bin/rsync --delay-updates -F --compress --archive --rsh=/usr/bin/ssh -S none -o StrictHostKeyChecking=no -o UserKnownHostsFile=/dev/null --out-format=<<CHANGED>>%i %n%L /test/ 192.168.8.66:/tmp/backup/",
    "msg": "cd+++++++++ ./\n",
    "rc": 0,
    "stdout_lines": [
        "cd+++++++++ ./"
    ]
}
[root@Ansible ~]# ansible all -m command -a "ls -ld /tmp/backup/"
192.168.8.66 | SUCCESS | rc=0 >>
drwxr-xr-x 2 root root 6 5月   1 15:38 /tmp/backup/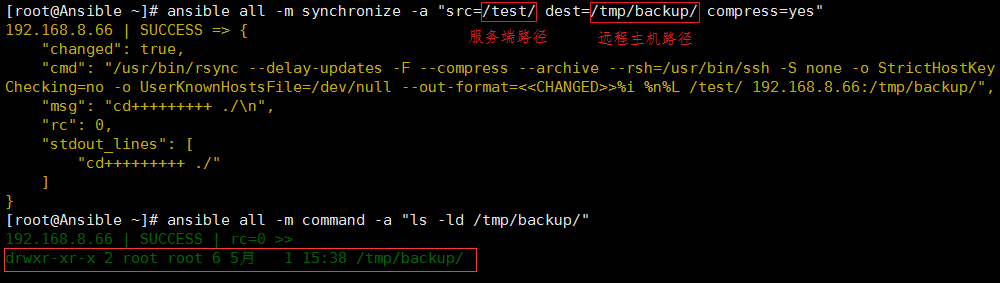
(3)将Client的/tmp/backup/ 目录拉取到Ansible的/test 目录下
[root@Ansible ~]# ansible all -m command -a "ls -l /tmp/backup/"
192.168.8.66 | SUCCESS | rc=0 >>
总用量 0
-rw-r--r-- 1 root root 0 5月   1 15:50 abc.txt

[root@Ansible ~]# ansible 192.168.8.66 -m synchronize -a "mode=pull src=/tmp/backup/ dest=/test/ compress=yes"192.168.8.66 | SUCCESS => {
    "changed": true,
    "cmd": "/usr/bin/rsync --delay-updates -F --compress --archive --rsh=/usr/bin/ssh -S none -o StrictHostKeyChecking=no -o UserKnownHostsFile=/dev/null --out-format=<<CHANGED>>%i %n%L 192.168.8.66:/tmp/backup/ /test/",
    "msg": ".d..t...... ./\n>f+++++++++ abc.txt\n",
    "rc": 0,
    "stdout_lines": [
        ".d..t...... ./",
        ">f+++++++++ abc.txt"
    ]
}
[root@Ansible ~]# ll /test/
总用量 0
-rw-r--r-- 1 root root 0 5月   1 15:50 abc.txt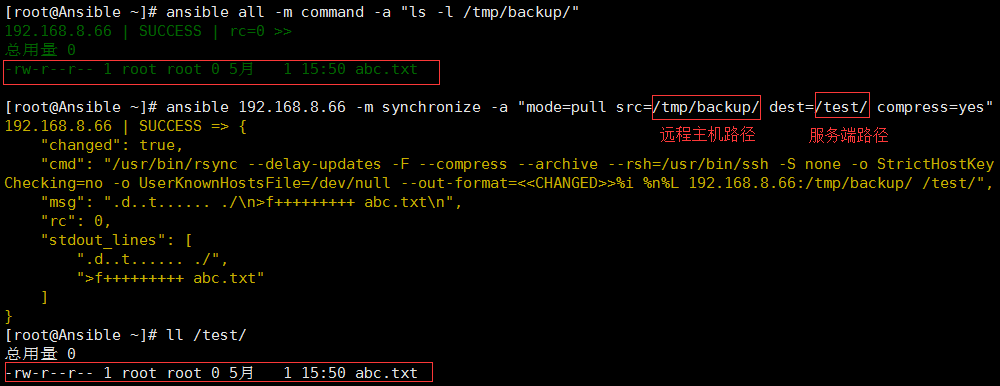
十七、mount模块
1、简介
- mount模块控制/etc/fstab中的活动和配置挂载点
2、参数
backup(2.5后增加):创建一个包含时间戳信息的备份文件,这样如果您以某种方式错误地修改了该文件,就可以获取原始文件
boot(2.2后增加):确定文件系统是否应该在启动时加载。仅适用于Solaris系统
fstab:如果需要在chroot环境中配置挂载点,这才能使用到
fstype:文件系统类型。当需要的状态是present或mounted
opts:传递给mount命令的参数
path:安装点的路径(例如/mnt/files)。在2.3之前,这个选项只能用作dest、destfile和name
name:挂载点。从Ansible 2.3开始,name选项已被更改为path,但name仍然适用
src:要安装在路径上的设备。需要时状态设置为present或mounted
state:必选项。删除挂载点(absent)、自动创建挂载点并挂载(mounted)、只处理fstab中的配置(present)、卸载(unmounted)
3、示例
(1)把本地的磁盘挂载到远程主机上
[root@Ansible ~]# ansible all -m mount -a "name=/mnt src=/dev/sda3 fstype=xfs state=mounted opts=rw"
192.168.8.66 | SUCCESS => {
    "changed": true,
    "dump": "0",
    "fstab": "/etc/fstab",
    "fstype": "xfs",
    "name": "/mnt",
    "opts": "rw",
    "passno": "0",
    "src": "/dev/sda3"
}
[root@Ansible ~]# ansible all -a "cat /mnt/etc/fstab"
192.168.8.66 | SUCCESS | rc=0 >>

#
# /etc/fstab
# Created by anaconda on Tue Apr  3 22:19:07 2018
#
# Accessible filesystems, by reference, are maintained under '/dev/disk'
# See man pages fstab(5), findfs(8), mount(8) and/or blkid(8) for more info
#
UUID=edeced73-160f-4b2f-beff-cb5ac7ab9904 /                       xfs     defaults        0 0
UUID=a4f23d30-13d8-423f-b77b-86a78f4dfa2a /boot                   xfs     defaults        0 0
UUID=46bab4fe-7f95-4b24-aff2-bfcf6967ab70 swap                    swap    defaults        0 0
/dev/sda3 /mnt xfs rw 0 0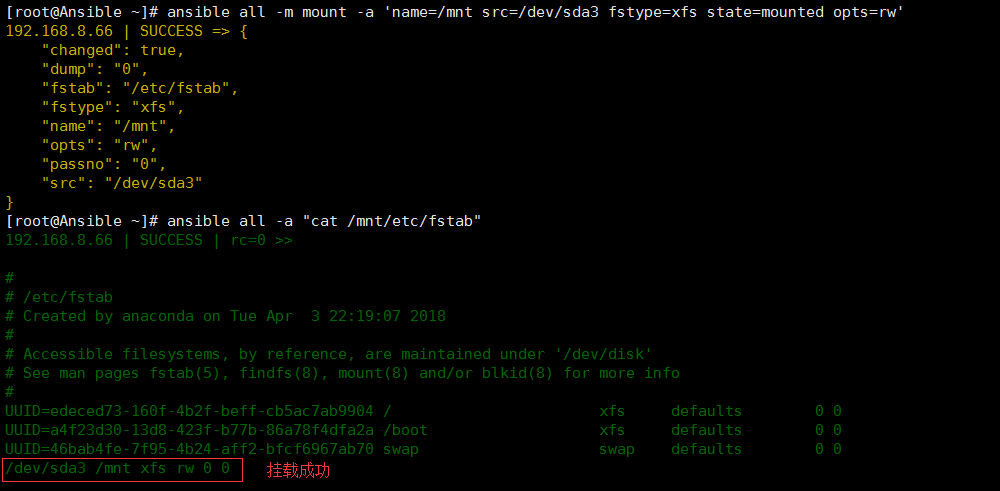
十八、get_url模块
1、简介
- get_url模块是将文件从HTTP,HTTPS或FTP下载到远程主机,类似于wget。远程主机必须能够直接访问远程资源
- HTTP重定向可以从HTTP重定向到HTTPS,因此应该确保这两种协议的代理环境都是正确的
- 在Ansible 2.4中,当使用-check运行时,它将执行HEAD请求来验证URL,但不会下载整个文件或对照哈希进行验证
- 对于Windows目标,请改用win_get_url模块
2、参数
attributes(2.3后增加):文件或目录属性,该字符串应该包含与lsattr显示的顺序相同顺序的属性
backup(2.1后增加):创建一个包含时间戳信息的备份文件,这样如果您以某种方式错误地修改了该文件,就可以获取原始文件
checksum(2.0后增加):如果将校验和传递给此参数,则目标文件的摘要将在下载后进行计算,以确保其完整性并验证传输是否成功完成。格式:<算法>:<校验和>,例如checksum="sha256:D98291AC[...]B6DC7B97"
client_cert(2.4后增加):PEM格式的证书链文件用于SSL客户端身份验证。该文件也可以包含密钥,如果包含密钥,client_key则不需要
client_key(2.4后增加):PEM格式的文件,其中包含您的私钥用于SSL客户端身份验证。如果同时client_cert包含证书和密钥,则不需要此选项
dest:将文件下载到的绝对路径
force:如果是yes,将每次下载文件,并替换该文件内容;如果是no,该文件只在目标不存在时下载。一般应该yes只适用于小本地文件
force_basic_auth(2.0后增加):httplib2,uri模块使用的库仅在web服务响应具有401状态的初始请求时才发送认证信息。由于某些基本身份验证服务无法正确发送401,因此登录将失败。此选项强制在初始请求时发送基本身份验证标头
group:设置文件或目录的所属组
owner:设置文件或目录的所属用户
headers(2.0后增加):以“key:value,key:value”格式将自定义HTTP标头添加到请求中
mode:设置文件或目录的权限。对于那些习惯于/usr/bin/chmod的记住,模式实际上是八进制数字(如0644or 01777)。离开前导零可能会有意想不到的结果。从版本1.8开始,可以将模式指定为符号模式(例如u+rwx或u=rw,g=r,o=r)
others:file模块的所有参数也可以在这里使用
sha256sum(1.3后增加):如果将SHA-256校验和传递给此参数,则目标文件的摘要将在下载后进行计算,以确保其完整性并验证传输是否成功完成。此选项已弃用。改为使用checksum
timeout(1.8后增加):URL请求超时(以秒为单位)
tmp_dest(2.1后增加):临时文件下载到的绝对路径
url:下载的URL地址
url_password(1.6后增加):用于HTTP基本身份验证的密码
url_username(1.6后增加):用于HTTP基本身份验证的用户名
use_proxy:如果no,它不使用代理,即使在目标主机上的环境变量中定义了一个代理
validate_certs:如果no,SSL证书不会被验证。这只能用于使用自签名证书的个人控制网站
3、示例
(1)下载页面
[root@Ansible ~]# ansible all -m get_url -a "url=https://www.baidu.com/ dest=/tmp mode=0440"
192.168.8.66 | SUCCESS => {
    "changed": true,
    "checksum_dest": null,
    "checksum_src": "77e920ff2d5ce5ac4bb3c399c7f3fa29dd7ced82",
    "dest": "/tmp/index.html",
    "gid": 0,
    "group": "root",
    "md5sum": "8f1f3fef541f7dbb36a8755a9f0eff40",
    "mode": "0440",
    "msg": "OK (227 bytes)",
    "owner": "root",
    "size": 227,
    "src": "/tmp/tmp4yv2WD",
    "state": "file",
    "status_code": 200,
    "uid": 0,
    "url": "https://www.baidu.com/"
}
[root@Ansible ~]# ansible all -m command -a "ls -l /tmp/"
192.168.8.66 | SUCCESS | rc=0 >>
总用量 4
drwx------ 2 root root  65 5月   2 09:48 ansible_ngh7w4
-r--r----- 1 root root 227 5月   2 09:48 index.html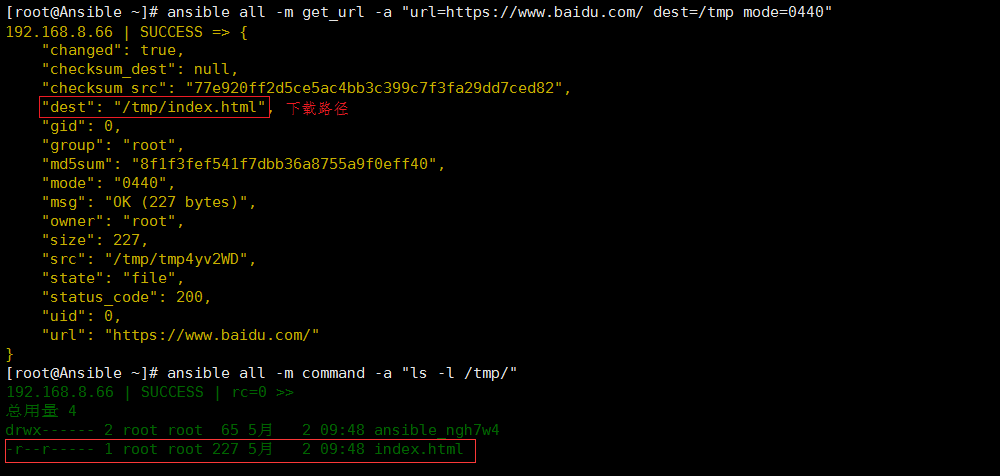
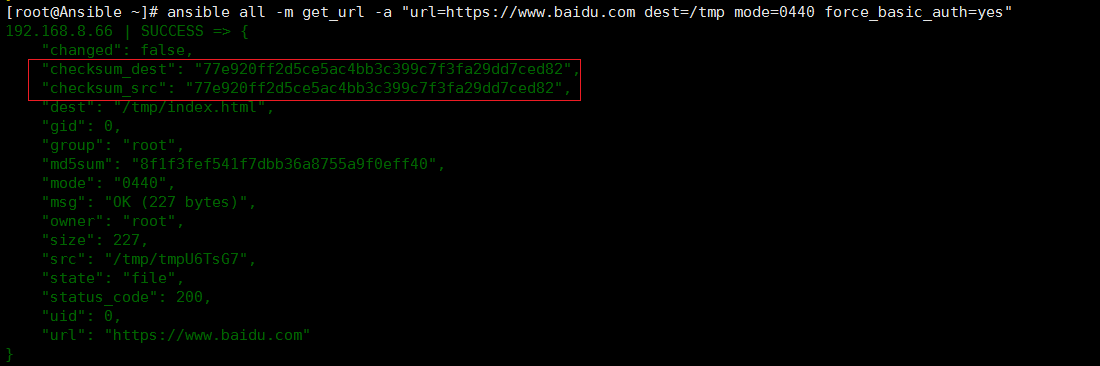
(2)下载文件并强制基本认证
[root@Ansible ~]# ansible all -m get_url -a "url=https://www.baidu.com dest=/tmp mode=0440 force_basic_auth=yes"
192.168.8.66 | SUCCESS => {
    "changed": false,
    "checksum_dest": "77e920ff2d5ce5ac4bb3c399c7f3fa29dd7ced82",
    "checksum_src": "77e920ff2d5ce5ac4bb3c399c7f3fa29dd7ced82",
    "dest": "/tmp/index.html",
    "gid": 0,
    "group": "root",
    "md5sum": "8f1f3fef541f7dbb36a8755a9f0eff40",
    "mode": "0440",
    "msg": "OK (227 bytes)",
    "owner": "root",
    "size": 227,
    "src": "/tmp/tmpU6TsG7",
    "state": "file",
    "status_code": 200,
    "uid": 0,
    "url": "https://www.baidu.com"
}
(3)从文件路径下载文件
[root@Ansible ~]# ansible all -m get_url -a "url=http://192.168.8.8/file/file.txt dest=/tmp/test.txt"
192.168.8.66 | SUCCESS => {
    "changed": true,
    "checksum_dest": null,
    "checksum_src": "da39a3ee5e6b4b0d3255bfef95601890afd80709",
    "dest": "/tmp/test.txt",
    "gid": 0,
    "group": "root",
    "md5sum": "d41d8cd98f00b204e9800998ecf8427e",
    "mode": "0644",
    "msg": "OK (0 bytes)",
    "owner": "root",
    "size": 0,
    "src": "/tmp/tmpfdh4qg",
    "state": "file",
    "status_code": 200,
    "uid": 0,
    "url": "http://192.168.8.8/file/file.txt"
}
# 查看下载文件
[root@Ansible ~]# ansible all -m command -a "ls -l /tmp/test.txt"
192.168.8.66 | SUCCESS | rc=0 >>
-rw-r--r-- 1 root root 0 5月   2 10:12 /tmp/test.txt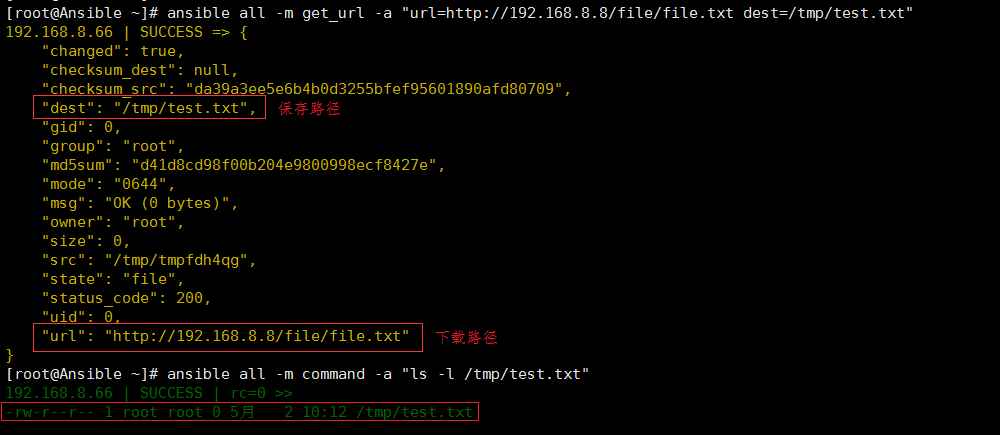
十九、sysctl包管理模块
1、简介
- sysctl模块用于远程主机sysctl的配置
- sysctl模块可以在更改配置之后执行/sbin/sysctl –p
2、参数
ignoreerrors:使用此选项可忽略有关未知键的错误
name:指定sysctl变量的键值,使用,分隔多个值
reload:更新sysctl的配置。如果yes,则更新,执行/sbin/sysctl -p sysctl_file。如果no,即使更新了也不重新加载sysctl_file
state:条目在sysctl文件中是否存在
sysctl_file:指定绝对路径sysctl.conf。如果不是/etc/sysctl.conf,可以使用该参数指定
sysctl_set(1.5后新增):使用sysctl命令和设置,并在必要时使用-w进行设置
value:sysctl密钥的期望值
3、示例
(1)在/etc/sysctl.conf中将vm.swappiness设置为5
[root@Ansible ~]# ansible all -m sysctl -a "name=vm.swappiness value=5 state=present sysctl_file=/etc/sysctl.conf"
192.168.8.66 | SUCCESS => {
    "changed": true
}
# 查看是否替换成功
[root@Ansible ~]# ansible all -m command -a "tail -1 /etc/sysctl.conf"
192.168.8.66 | SUCCESS | rc=0 >>
vm.swappiness=5
(2)从/etc/sysctl.conf中删除vm.swappiness条目
[root@Ansible ~]# ansible all -m sysctl -a "name=vm.swappiness state=absent sysctl_file=/etc/sysctl.conf"
192.168.8.66 | SUCCESS => {
    "changed": true
}
(3)支持ipv4的路由转发(路径与Centos版本有关)
# 在文件中设置ip转发并且不重新加载sysctl文件
[root@Ansible ~]# ansible all -m sysctl -a "name=net.ipv4.ip_forward value=1 sysctl_set=yes sysctl_file=/usr/lib/sysctl.d/50-default.conf"
192.168.8.66 | SUCCESS => {
    "changed": true
}
# 在文件中设置ip转发并在必要时重新加载
[root@Ansible ~]# ansible all -m sysctl -a "name=net.ipv4.ip_forward value=1 sysctl_set=yes state=present reload=yes sysctl_file=/usr/lib/sysctl.d/50-default.conf"
192.168.8.66 | SUCCESS => {
    "changed": false
}
二十、unarchive模块
1、简介
- unarchive模块用于解压文件
- 默认情况下,它将在解包之前将源文件从本地复制到目标主机
- 设置remote_src = yes将解包目标主机上已有的解压文件
- 对于Windows目标,请改用win_unzip模块
2、参数
这个模块有两种用法:
(1)将Ansible主机上的压缩包在本地解压缩后传到远程主机上,这种情况下,copy=yes
(2)将远程主机上的某个压缩包解压缩到指定路径下。这种情况下,需要设置copy=no
具体的参数如下:
attributes(2.3后新增):文件或目录的属性
copy:在解压文件之前,是否先将文件复制到远程主机,默认为yes。若为no,则要求目标主机上压缩包必须存在
creates(1.6后新增):指定的绝对路径(文件或目录)已经存在时,则解压指令不执行
decrypt(2.4后新增):控制使用保管库对源文件进行自动解密
dest:远程主机上的一个绝对路径,即文件解压的路径
exclude(2.1后新增):列出想要从非归档操作中排除的目录和文件条目
extra_opts(2.1后新增):通过传入数组来指定其他选项
group:解压后文件或目录的所属组
owner:解压后文件或目录的所属组用户
keep_newer(2.1后新增):不要替换比归档文件更新的现有文件
list_files(2.0后新增):如果设置为yes,则会列出压缩包里的文件,默认为no
mode:解压后文件或目录的权限。对于那些习惯于/usr/bin/chmod的记住,模式实际上是八进制数字(如0644or 01777)。离开前导零可能会有意想不到的结果。从版本1.8开始,可以将模式指定为符号模式(例如u+rwx或u=rw,g=r,o=r)
remote_src(2.2后新增):设置为yes表示归档文件已经在远程系统上,而不是本地的Ansible控制器。这个选项是与之互斥的copy
src:如果copy为yes,则需要指定压缩文件的源路径。如果remote_src=no(默认),将归档文件的本地路径复制到目标服务器; 可以是绝对的或相对的。如果remote_src=yes,将目标服务器上的路径解压到现有的存档文件。
如果remote_src=yes并src包含://,远程机器将首先从URL下载文件。(version_added 2.0)。这仅适用于简单情况,对于完全下载支持,请使用get_url模块
validate_certs(2.2后新增):仅适用于使用https URL作为文件的来源
3、示例
(1)将 ansible.tar解压缩到远程主机/tmp/ 中
# 创建一个本地tar包
[root@Ansible ~]# cd /etc/
[root@Ansible etc]# tar cf ansible.tar ansible/
# 将ansible.tar解压到远程主机上
 [root@Ansible etc]# ansible all -m unarchive -a "src=/etc/ansible.tar dest=/tmp/ mode=0755"
192.168.8.66 | SUCCESS => {
    "changed": true,
    "dest": "/tmp/",
    "extract_results": {
        "cmd": [
            "/usr/bin/gtar",
            "--extract",
            "-C",
            "/tmp/",
            "-f",
            "/root/.ansible/tmp/ansible-tmp-1525230128.965889-28889483585284/source"
        ],
        "err": "",
        "out": "",
        "rc": 0
    },
    "gid": 0,
    "group": "root",
    "handler": "TarArchive",
    "mode": "01777",
    "owner": "root",
    "size": 142,
    "src": "/root/.ansible/tmp/ansible-tmp-1525230128.965889-28889483585284/source",
    "state": "directory",
    "uid": 0
}
# 进行验证
[root@Ansible etc]# ansible all -m command -a "ls -l /tmp"
192.168.8.66 | SUCCESS | rc=0 >>
总用量 0
drwxr-xr-x 2 root root 38 5月   2 10:12 ansible
drwx------ 2 root root 65 5月   2 11:02 ansible_z_94tQ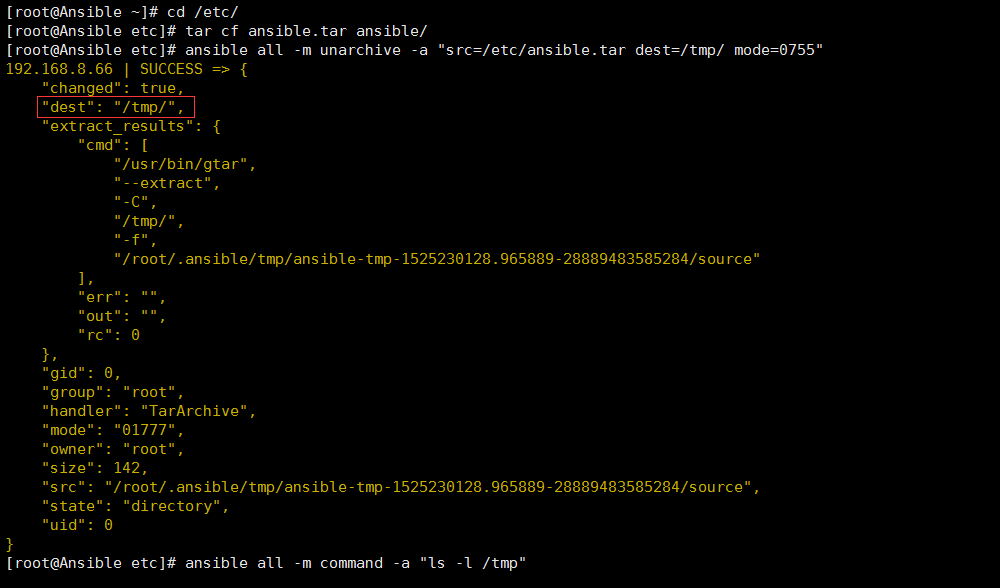
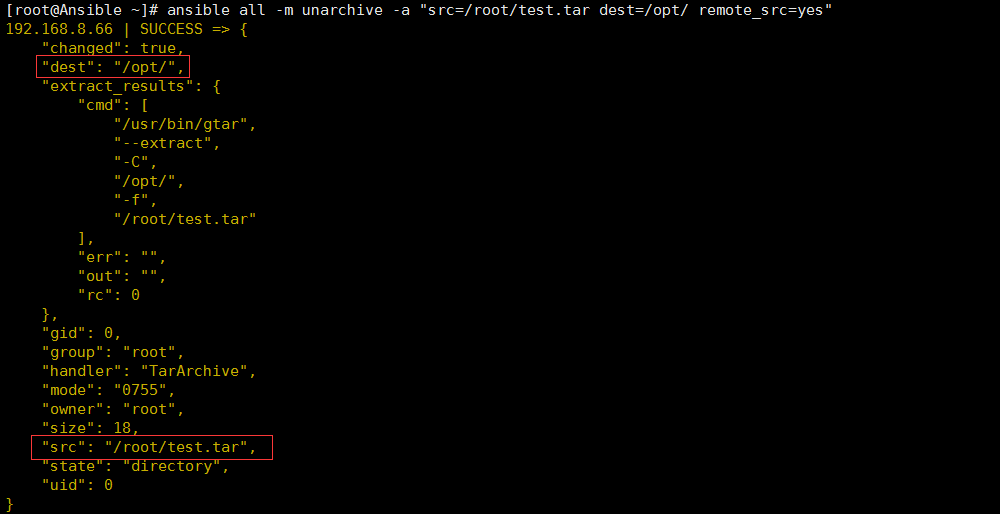
(2)将远程主机test.tar解压缩到指定目录/opt/ 中
# 在远程主机创建一个tar包
[root@Client ~]# mkdir /root/test
[root@Client ~]# tar cf test.tar test/
[root@Client ~]# ll
总用量 12
drwxr-xr-x 2 root root     6 5月   2 11:12 test
-rw-r--r-- 1 root root 10240 5月   2 11:12 test.tar
# 在Ansible服务端进行操作
[root@Ansible ~]# ansible all -m unarchive -a "src=/root/test.tar dest=/opt/ remote_src=yes"
192.168.8.66 | SUCCESS => {
    "changed": true,
    "dest": "/opt/",
    "extract_results": {
        "cmd": [
            "/usr/bin/gtar",
            "--extract",
            "-C",
            "/opt/",
            "-f",
            "/root/test.tar"
        ],
        "err": "",
        "out": "",
        "rc": 0
    },
    "gid": 0,
    "group": "root",
    "handler": "TarArchive",
    "mode": "0755",
    "owner": "root",
    "size": 18,
    "src": "/root/test.tar",
    "state": "directory",
    "uid": 0
}
以上就是Ansible常用的模块,如果还需要其它的模块的话可以查看官方文档,也可以通过命令来进行查看
1、查看所有的模块命令: ansible-doc -l
2、查看具体某个模块用法:ansible-doc -s MODULE_NAME