這兩天看了點網絡編程,根據教程寫了一個小的註冊服務,貼出來。
本實例分別演示用GET方式和POST方式想服務器發送註冊信息,分爲客戶端和服務器端兩部分:
客戶端註冊用戶信息,發送到服務器
服務器端接收信息並向客戶端返回註冊信息。(服務器端使用J2EE中的Servlet技術來實現,併發布到Tomcat服務器上)
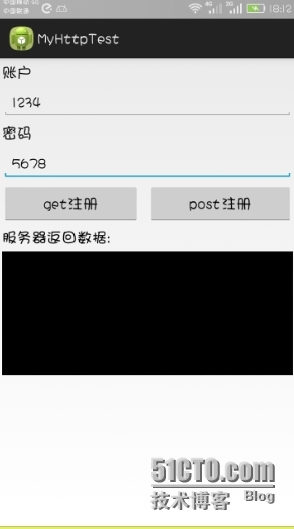
代碼運行效果如下:
客戶端:
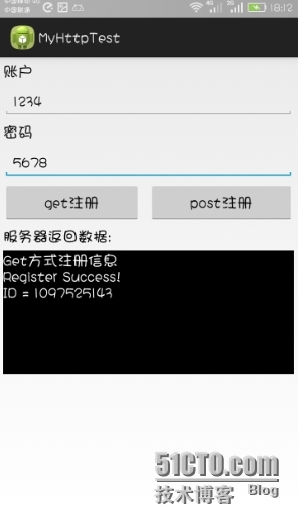
1.點擊get註冊按鈕後:
客戶端:
服務器端:
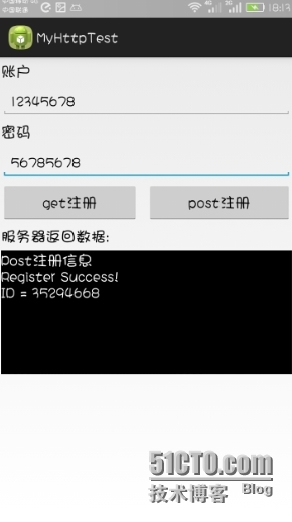
2.點擊post註冊按鈕後:
客戶端:
服務器端:
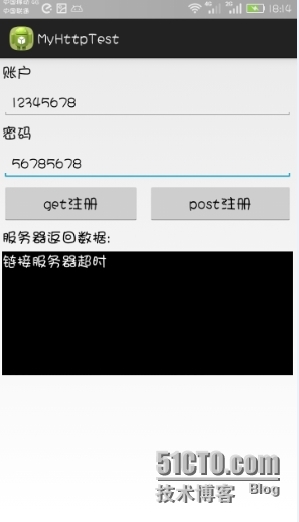
3.當服務器端關閉時:
客戶端註冊信息時會提示鏈接超時:
這就是完整的運行圖,下面給出完整代碼和代碼註釋:
客戶端代碼:
1.activity_main.xml代碼:
<LinearLayout xmlns:android="http://schemas.android.com/apk/res/android"
xmlns:tools="http://schemas.android.com/tools"
android:layout_width="match_parent"
android:layout_height="match_parent"
android:orientation="vertical"
tools:context=".MainActivity" >
<TextView android:layout_width="fill_parent"
android:layout_height="wrap_content"
android:text="賬戶"
android:layout_marginTop="5.0dip"
android:layout_marginLeft="5.0dip"
android:layout_marginRight="5.0dip"
android:textStyle="bold"
android:textAppearance="?android:textAppearanceMedium" />
<EditText android:id="@+id/username"
android:layout_width="fill_parent"
android:layout_height="wrap_content"
android:layout_marginTop="5.0dip"
android:layout_marginLeft="5.0dip"
android:layout_marginRight="5.0dip" />
<TextView android:layout_width="fill_parent"
android:layout_height="wrap_content"
android:text="密碼"
android:layout_marginTop="5.0dip"
android:layout_marginLeft="5.0dip"
android:layout_marginRight="5.0dip"
android:textStyle="bold"
android:textAppearance="?android:textAppearanceMedium" />
<EditText android:id="@+id/password"
android:layout_width="fill_parent"
android:layout_height="wrap_content"
android:layout_marginTop="5.0dip"
android:layout_marginLeft="5.0dip"
android:layout_marginRight="5.0dip" />
<LinearLayout android:orientation="horizontal"
android:layout_width="fill_parent"
android:layout_height="wrap_content">
<Button android:id="@+id/button_get"
android:layout_width="wrap_content"
android:layout_height="wrap_content"
android:layout_marginTop="5.0dip"
android:layout_marginLeft="5.0dip"
android:layout_marginRight="5.0dip"
android:layout_weight="1.0"
android:text="get註冊" />
<Button
android:id="@+id/button_post"
android:layout_width="wrap_content"
android:layout_height="wrap_content"
android:layout_marginTop="5.0dip"
android:layout_marginLeft="5.0dip"
android:layout_marginRight="5.0dip"
android:layout_weight="1.0"
android:text="post註冊" />
</LinearLayout>
<TextView
android:layout_width="fill_parent"
android:layout_height="wrap_content"
android:text="服務器返回數據:"
android:layout_marginTop="5.0dip"
android:layout_marginLeft="5.0dip"
android:layout_marginRight="5.0dip"
android:textStyle="bold"
android:textAppearance="?android:textAppearanceMedium" />
<TextView android:id="@+id/response_msg"
android:layout_width="fill_parent"
android:layout_height="150dip"
android:layout_marginTop="5.0dip"
android:layout_marginLeft="5.0dip"
android:layout_marginRight="5.0dip"
android:textStyle="bold"
android:textAppearance="?android:textAppearanceMedium" />
</LinearLayout>
2.MainActivity.java代碼:
public class MainActivity extends Activity {
private static final String SERVER_ADDRESS = "http://10.248.27.195:8080/HttpServer/UserRegisterServer";
private EditText username;
private EditText password;
private Button getMetond;
private Button postMethod;
private TextView responseMessage;
Handler handler=new Handler(){
public void handleMessage(android.os.Message msg) {
if(msg.what==0x101){
Bundle bundle=msg.getData();
String responseMsg = bundle.getString("msg");
responseMessage.setText(responseMsg);
}
}
};
public void onCreate(Bundle savedInstanceState) {
super.onCreate(savedInstanceState);
setContentView(R.layout.activity_main);
// 初始化控件
username = (EditText) findViewById(R.id.username);
password = (EditText) findViewById(R.id.password);
getMetond = (Button) findViewById(R.id.button_get);
postMethod = (Button) findViewById(R.id.button_post);
responseMessage = (TextView) findViewById(R.id.response_msg);
responseMessage.setBackgroundColor(Color.BLACK);
responseMessage.setTextColor(Color.WHITE);
getMetond.setOnClickListener(new OnClickListener() {
public void onClick(View v) {
registerByGetRequest();
}
});
// 註冊"以GET方式註冊"按鈕事件監聽器,以GET方式發送數據,並顯示服務器返回結果
postMethod.setOnClickListener(new OnClickListener() {
public void onClick(View v) {
registerByPostRequest();
}
});
}
// 註冊"以POST方式註冊"按鈕事件監聽器, 以POST方式發送數據,並顯示服務器返回結果
/**
* 以GET請求方式與服務器進行通信
*/
private void registerByGetRequest() {
new Thread(new Runnable() {
public void run() {
// TODO Auto-generated method stub
Message m=new Message();
m.what=0x101;
Bundle bundle=new Bundle();
try {
String url = new StringBuffer(SERVER_ADDRESS).append("?un=")
.append(username.getText().toString().trim())
.append("&pwd=")
.append(password.getText().toString().trim())
.toString();
HttpClient httpClient = new DefaultHttpClient();
httpClient.getParams().setParameter(CoreConnectionPNames.CONNECTION_TIMEOUT, 3000);
httpClient.getParams().setParameter(CoreConnectionPNames.SO_TIMEOUT, 3000 );
//超時操作
HttpGet httpGetRequest = new HttpGet(url);
HttpResponse response = httpClient.execute(httpGetRequest);
if (HttpStatus.SC_OK == response.getStatusLine().getStatusCode())
{
String responseMsg = "Get方式註冊信息\n"+EntityUtils.toString(response.getEntity());
bundle.putString("msg",responseMsg);
m.setData(bundle);
handler.sendMessage(m);
}else{
String errorMsg = "錯誤";
bundle.putString("msg",errorMsg);
m.setData(bundle);
handler.sendMessage(m);
}
}catch (ClientProtocolException e) {
e.printStackTrace();
} catch (IOException e) {
bundle.putString("msg","鏈接服務器超時");
m.setData(bundle);
handler.sendMessage(m);
e.printStackTrace();
}
}
}).start();
}
/**
* 以POST請求方式與服務器進行通信
*/
private void registerByPostRequest() {
new Thread(new Runnable() {
public void run() {
// TODO Auto-generated method stub
Message m=new Message();
m.what=0x101;
Bundle bundle=new Bundle();
try {
HttpClient httpClient = new DefaultHttpClient();
//初始化HttpClient對象
HttpPost httpPostRequest = new HttpPost(SERVER_ADDRESS);
//創建HttpPost鏈接
httpClient.getParams().setParameter(CoreConnectionPNames.CONNECTION_TIMEOUT, 3000);
httpClient.getParams().setParameter(CoreConnectionPNames.SO_TIMEOUT, 3000 );
//超時操作
List<NameValuePair> paramList = new ArrayList<NameValuePair>();
BasicNameValuePair userNameParam = new BasicNameValuePair("un", username.getText().toString().trim());
BasicNameValuePair emailParam = new BasicNameValuePair("pwd", password.getText().toString().trim());
paramList.add(userNameParam);
paramList.add(emailParam);
//數據處理
HttpEntity httpEntity = new UrlEncodedFormEntity(paramList, HTTP.UTF_8);
//對數據進行編碼
httpPostRequest.setHeader("content-type", "text/html");
//設置數據類型
httpPostRequest.setEntity(httpEntity);
//向服務器發送HttpPost請求
HttpResponse response = httpClient.execute(httpPostRequest);
//讀取服務器返回的數據
if (HttpStatus.SC_OK == response.getStatusLine().getStatusCode()){
String responseMsg = "Post註冊信息\n"+EntityUtils.toString(response.getEntity());
bundle.putString("msg",responseMsg);
m.setData(bundle);
handler.sendMessage(m);
}else{
String errorMsg = "錯誤:" + response.getStatusLine().toString();
bundle.putString("msg",errorMsg);
m.setData(bundle);
handler.sendMessage(m);
}
} catch (ClientProtocolException e) {
e.printStackTrace();
} catch (IOException e) {
bundle.putString("msg","鏈接服務器超時");
m.setData(bundle);
handler.sendMessage(m);
e.printStackTrace();
}
}
}).start();
}
}
服務器端:
UserRegisterServer.java代碼:
public class UserRegisterServer extends HttpServlet {
private static final long serialVersionUID = 1L;
/**
* @see HttpServlet#HttpServlet()
*/
public UserRegisterServer() {
super();
}
/**
* 當請求爲HTTP GET時執行此方法
* @see HttpServlet#doGet(HttpServletRequest request, HttpServletResponse response)
*/
protected void doGet(HttpServletRequest request, HttpServletResponse response) throws ServletException, IOException {
String userName = request.getParameter("un");
String password = request.getParameter("pwd");
if(userName!=""&&password!=""&&userName!=null&&password!=null){
System.out.println("Get方式用戶註冊信息:\n");
System.out.println("用戶名:" + userName);
System.out.println("郵箱: " + password);
response.getWriter().print("Register Success!\nID = " + generateUserId());
// 向客戶端發送數據
}
else{
System.out.println("用戶名或郵箱不正確");
response.getWriter().print("UserName ERROR or Email ERROR!");
}
}
/**
* 當請求爲HTTP POST時執行此方法
* @see HttpServlet#doPost(HttpServletRequest request, HttpServletResponse response)
*/
protected void doPost(HttpServletRequest request, HttpServletResponse response) throws ServletException, IOException {
// 讀取從客戶端發送來的數據
BufferedReader br = new BufferedReader(new InputStreamReader((ServletInputStream)request.getInputStream()));
String data = null;
StringBuilder sb = new StringBuilder();
while((data = br.readLine())!=null){
sb.append(data);
}
String temp = URLDecoder.decode(sb.toString(), "utf-8");
// 對數據進行解碼操作
System.out.println("Post方式用戶註冊信息:\n " + temp);
response.getWriter().print("Register Success!\nID = " + generateUserId());
// 向客戶端發送數據
}
/**
* 生成隨機數代表當前註冊用戶ID
* @return
*/
private String generateUserId(){
Random ran = new Random();
return String.valueOf(Math.abs(ran.nextInt()));
}
}
這就是完整的代碼了,其中get方式和post方式的區別:
1. get是從服務器上獲取數據,post是向服務器傳送數據。
2. get是把參數數據隊列加到提交表單的ACTION屬性所指的URL中,值和表單內各個字段一一對應,在URL中可以看到。post是通過HTTP post機制,將表單內各個字段與其內容放置在HTML HEADER內一起傳送到ACTION屬性所指的URL地址。用戶看不到這個過程。
3. 對於get方式,用Request.QueryString獲取變量的值,對於post方式,用Request.Form獲取提交的數據。
4. get傳送的數據量較小,不能大於2KB。post傳送的數據量較大,一般被默認爲不受限制。但理論上,IIS4中最大量爲80KB,IIS5中爲100KB。
5. get安全性非常低,post安全性較高。但是執行效率卻比Post方法好。

建議:
1、get方式的安全性較Post方式要差些,包含機密信息的話,建議用Post數據提交方式;
2、在做數據查詢時,建議用Get方式;而在做數據添加、修改或刪除時,建議用Post方式;


