自動安裝Linux系統之"SystemImager”(下)
在《自動安裝Linux系統之“SystemImager”》中,我們已經完成鏡像服務器和黃金客戶端的安裝併成功的製作了一份黃金客戶端鏡像。本文接下來介紹如何配置鏡像服務器和要安裝系統的客戶端,最終完成客戶端的自動安裝。
SystemImager支持從PXE、CD、USB或硬盤等方法完成自動安裝操作系統,這裏主要介紹使用PXE方式安裝。這就需要安裝DHCP服務器來給客戶端提供IP地址以及其它信息;安裝TFTP服務器完成客戶端使用TFTP協議下載引導文件並執行。
在鏡像服務器上,依次執行如下命令完成DHCP和TFTP的安裝:
[root@ localhost Server]# rpm -ivh dhcp-3.0.5-13.el5.i386.rpm[root@ localhost Server]# rpm -ivh tftp-server-0.42-3.1.i386.rpm
4、配置SystemImager服務
SystemImager提供了si_mkbootserver命令,利用交互的方式可以幫助我們自動的完成鏡像服務器網絡啓動服務器的安裝和配置。主要包括PxeLinux、TFTP和DHCP等服務的配置。在整個過程中會自動執行測試功能用於檢查配置是否正常,如果發現錯誤會宣告失敗並生成錯誤日誌,根據錯誤提示能夠方便用戶快速的更正錯誤。
(1)執行si_mkbootserver命令後,提示我們這個腳本將要修改的配置文件以及重新啓動的服務,輸入“y”繼續。
[root@localhost ~]# si_mkbootserverWARNING: this script may modify the following files:--> /etc/services--> /etc/inetd.conf--> /etc/xinetd.d/tftpAnd can restart inetd, xinetd or tftp servers.Do you wish to continue (y/[n])? yOk, continuing...Checking for a tftp server... found.Checking if tftp server is H. Peter Anvin's tftp server... yup - right on!Checking for a running inetd... Not found.Checking for a running xinetd... 16428.Looking for update-inetd... not found.Backing up /etc/xinetd.d/tftp...Moving /etc/xinetd.d/tftp to /etc/xinetd.d/tftp.si_mkbootserver.bak0...done.Restaring xinetd ...Stopping xinetd: [ OK ]Starting xinetd: [ OK ]done.Looking for a tftp client... found.Checking for loopback interface... up.Does tftp server work... yes.Looking for a pxe daemon... which: no pxe in (/usr/local/sbin:/usr/local/bin:/sbin:/bin:/usr/sbin:/usr/bin)not found.
(2)接下來,將要爲BootServer配置Pxe,在詢問“pxelinux bootloader”路徑時,由於“/usr/lib/syslinux/pxelinux.0”路徑是syslinux安裝後的默認路徑,直接回車即可。
WARNING: your bootserver will be configured without a pxe daemon!(ignore this warning if you're using a recent distro)done.What is the path to the pxelinux bootloader [/usr/lib/syslinux/pxelinux.0]? #直接回車Copying /usr/lib/syslinux/pxelinux.0 to /var/lib/tftpboot/X86PC/UNDI/linux-install/linux.0 ... done.Linking /var/lib/tftpboot/pxelinux.bin to /var/lib/tftpboot/X86PC/UNDI/linux-install/linux.0 ...done.Copying /var/lib/tftpboot/X86PC/UNDI/linux-install/pxelinux.cfg to /var/lib/tftpboot/pxelinux.cfg...Ok, configuration complete.
(3)在詢問你是否運行si_mkdhcpserver命令配置DHCP Server,這裏直接輸入“y”回車。si_mkdhcpserver命令能夠幫助我們自動的完成對DHCP配置文件的修改,主要包含了你的域名、網段、子網掩碼和將要給客戶端分配的有效地址範圍等信息。
Once you're DHCP server is configured, you should be all set.Do you want to run si_mkdhcpserver to configure your DHCP server ([y]/n)? y 輸入“y”Welcome to the SystemImager "si_mkdhcpserver" command. This command willprepare this computer to be a DHCP server by creating a dhcpd.conf filefor use with your ISC DHCP server (v2 or v3).If there is an existing file, it will be backed up with the.beforesystemp_w_picpathr extension.Continue? (y/[n]): y
(4)程序使用了交互式的方式,詢問你使用的DHCP軟件包的版本、配置文件名稱、輸入域名、網段、子網掩碼、地址池等信息,根據實際環境填寫。
Trying to probe your DNS domain. Please wait...Type your response or hit <Enter> to accept [defaults]. If you don'thave a response, such as no first or second DNS server, just hit<Enter> and none will be used.What is your DHCP daemon major version number (2 or 3)? [3]:What is the name of your DHCP daemon config file? [/etc/dhcpd.conf]:What is your domain name? [localdomain]:What is your network number? [192.168.1.0]: 172.16.0.0What is your netmask? [255.255.0.0]:What is the starting IP address for your dhcp range? [172.16.0.1]: 172.16.0.11What is the ending IP address for your dhcp range? [172.16.255.254]: 172.16.0.200What is the IP address of your first DNS server? []:What is the IP address of your default gateway? [172.16.255.254]: 172.16.0.1What is the IP address of your p_w_picpath server? [172.16.255.254]: 172.16.0.10What is the IP address of your boot server? [172.16.255.254]: 172.16.0.10What is the IP address of your log server? []:Use tmpfs staging on client? (If unsure, choose "n") [n]:Do you want to use Flamethrower (multicast) to install your clients? [n]:What... is the air-speed velocity of an unladen swallow? []:Wrong!!! (with a Monty Python(TM) accent...)Press <Enter> to continue...
(5)下圖中列出了你剛剛填寫的信息,確認無誤後,輸入“y”完成配置。
Ahh, but seriously folks...Here are the values you have chosen:#######################################################################ISC DHCP daemon version: 3ISC DHCP daemon config file: /etc/dhcpd.confDNS domain name: localdomainNetwork number: 172.16.0.0Netmask: 255.255.0.0Starting IP address for your DHCP range: 172.16.0.11Ending IP address for your DHCP range: 172.16.0.200First DNS server:Second DNS server:Third DNS server:Default gateway: []Image server: 172.16.0.10Boot server: 172.16.0.10Log server:Log server port:Flamethrower directory port:Use tmpfs staging on client: nSSH files download URL:#######################################################################Are you satisfied? (y/[n]): y
(6)開始創建DHCP服務的配置文件,並提示使用si_mkdhcpserver命令修改該配置文件。輸入“y”重新啓動DHCP服務,至此,DHCP服務,pxe服務配置完成。
The dhcp server configuration file (/etc/dhcpd.conf) file has beencreated for you. Please verify it for accuracy.If this file does not look satisfactory, you can run this command againto re-create it: "si_mkdhcpserver"WARNING!: If you have multiple physical network interfaces, be sure toedit the init script that starts dhcpd to specify the interface thatis connected to your DHCP clients. Here's an example:Change "/usr/sbin/dhcpd" to "/usr/sbin/dhcpd eth1".Depending on your distribution, you may be able to set this with the"INTERFACES" variable in "/etc/default/dhcp", "/etc/default/dhcp3-server",or similar, or in your dhcpd initialization script ("/etc/init.d/dhcpd","/etc/init.d/dhcp3-server", or similar).Also, be sure to start or restart your dhcpd daemon. This can usuallybe done with a command like "/etc/init.d/dhcpd restart" or similar.Would you like me to restart your DHCP server software now? (y/[n]): yStarting dhcpd: [ok]
(7)如果鏡像服務器中有多個鏡像的話,就要告知哪一個節點安裝哪一個鏡像。si_addclients爲鏡像的安裝腳本創建符號鏈接。si_addclients改寫鏡像服務器的/etc/hosts
和/var/lib/systemp_w_picpathr/scripts/hosts文件。Hosts文件爲自動安裝客戶端查閱他們的主機名提供默認的機制。
[root@localhost ~]# si_addclientsWelcome to the SystemImager "si_addclients" utility--------------------------------------------------------------------------------This utility has 3 sections."Section 1" will ask you for your hostname information."Section 2" will allow you to create softlinks from each client hostname toyour "master" script in the "/var/lib/systemp_w_picpathr/scripts" directory.Example: www297.sh -> web_server_p_w_picpath_v1.master"Section 3" will ask you for IP address information that will be combinedwith the hostname information provided in Section 1 to create entries in"/etc/hosts" for each of these same clients. New entries will be appendedto the end of "/etc/hosts". If you specify new hostnames for existing IPaddresses, those entries will be re-written in place to reflect the newhost names.Continue? ([y]/n): y #輸入“y”,繼續。
(8)在si_addclients的第一個配置部分,需要指出自動安裝節點的主機名稱樣式。一個主機範圍的字段和一個域名用來定義我們要自動安裝的節點的主機名;
si_addclients -- Section 1 (hostname information)--------------------------------------------------------------------------------The next series of questions will be used to create a range of hostnames.You will be asked for your domain name, the base host name, a beginningnumber, and an ending number.For example, if you answer:domain name = systemp_w_picpathr.orghost range = www7-www11,www20Then the result will be a series of hostnames that looks like this:www7.systemp_w_picpathr.orgwww8.systemp_w_picpathr.orgwww9.systemp_w_picpathr.orgwww10.systemp_w_picpathr.orgwww11.systemp_w_picpathr.orgwww20.systemp_w_picpathr.orgWhat is your domain name? []: vfast.comWhat is the hosts range that you want me to use? []: node11-node200I will work with hostnames: node11-node200in the domain: vfast.comAre you satisfied? (y/[n]): y
(9)在第二個配置部分,將前一部分定義的節點映射到到鏡像;
si_addclients -- Section 2 (soft links to master script)--------------------------------------------------------------------------------Would you like me to create soft links to a "master" script so that hosts:node11-node200can be autoinstalled with one of the available p_w_picpaths? ([y]/n): yHere is a list of available autoinstall scripts:vfast_backupWhich script would you like these hosts to be installed with?[vfast_backup]:Your soft links have been created.Press <Enter> to continue...
(10)在第三個配置部分,si_addclients命令請求IP地址範圍,這個IP保存在/etc/hosts和/var/lib/systemp_w_picpathr/scripts/hosts文件中。當自動安裝客戶端啓動時,它會從鏡像服務器中檢索後面的文件並應用它查找主機名。
si_addclients -- Section 3 (adding or modifying /etc/hosts entries)--------------------------------------------------------------------------------Your target machines need to be able to determine their host names from theirIP addresses, unless their host name is specified in a local.cfg file.The preferred method for doing this is with DNS. If you have a working DNSthat has IP address to hostname resolution properly configured for yourtarget machines, then answer "n" here.If you don't have a working DNS, or you want to override the information inDNS, then answer "y" here to add entries to the "/etc/hosts" file on yourp_w_picpath server. After adding these entries, the /etc/hosts file will becopied to "/var/lib/systemp_w_picpathr/scripts" where it can be retrieved by yourtarget machines.I will ask you for your clients' IP addresses one subnet at a time.Would you like me to continue? (y/[n]): ysi_addclients -- Section 3 (adding or modifying /etc/hosts entries -- continued...)--------------------------------------------------------------------------------Hostnames range is: node11-node200What is the IPs address range (e.g. 10.0.0.1-10.0.0.100,10.0.0.101)?[]: 172.16.0.11-172.16.0.200I will work with IP addresses: 172.16.0.11-172.16.0.200and hostnames: node11-node200Are you satisfied? (y/[n]): yUse of uninitialized value in concatenation (.) or string at /usr/sbin/si_addclients line 552.These entries have been added to /etc/hosts, and /etc/hosts has been copiedto /var/lib/systemp_w_picpathr/scripts for use by your auto-install clients.Press <Enter> to continue...si_addclients: successfully completed.
(11)執行si_mkclientnetboot 來製作多臺要克隆機器通過網絡安裝的對應啓動介質:
[root@localhost ~]# si_mkclientnetboot --netboot --clients node11-node200[netboot] using the kernel and initrd.img for architecture: i386[netboot] using the flavor: standard[root@localhost ~]#
(12)啓動systemp_w_picpathr-server-rsyncd服務,使用rsync服務克隆系統。將以下服務設置重啓自動啓動。
[root@localhost ~]# /etc/init.d/systemp_w_picpathr-server-rsyncd startStarting rsync daemon for systemp_w_picpathr: already running.[root@localhost ~]# chkconfig systemp_w_picpathr-server-rsyncd on[root@localhost ~]# chkconfig dhcpd on[root@localhost ~]# chkconfig xinetd on
5、克隆操作系統
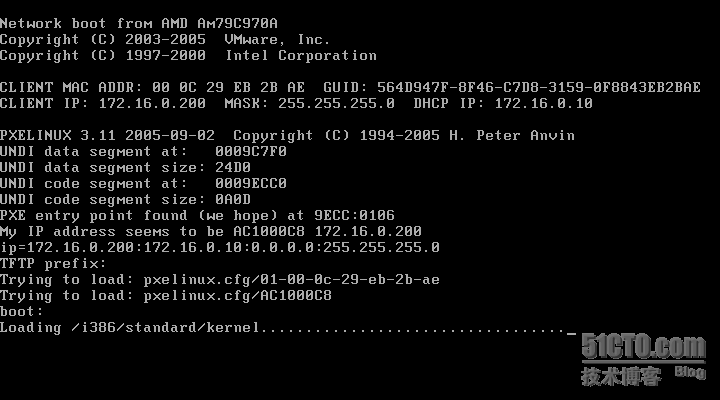
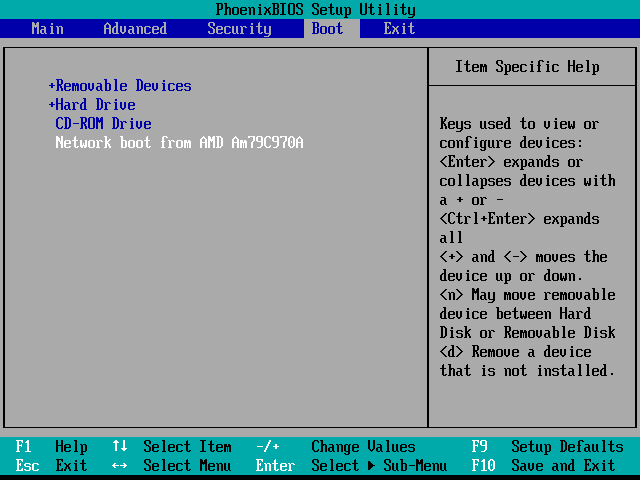
最後設置客戶端BIOS選擇從網卡啓動。具體方法因BIOS版本不同而異。
網卡中的PXE代碼會聯繫DHCP服務器來獲取IP地址以及啓動鏡像,然後啓動鏡像被載入並運行。