


本來想用python腳本監控一下mysql的,沒有找到相關資料,懶得折騰了,使用官方自帶的監控模板進行監控mysql
添加zabbix-agent配置文件
把默認的userparameter_mysql.conf 文件進行替換爲一下內容
[root@test-mq01 zabbix_agentd.d]# cat userparameter_mysql.conf
#UserParameter=mysql.status[*],echo "show global status where Variable_name='$1';" | HOME=/var/lib/zabbix mysql -N | awk '{print $$2}'
UserParameter=mysql.status[*],/etc/zabbix/script/mysql/chk_mysql.sh $1

#UserParameter=mysql.size[*],bash -c 'echo "select sum($(case "$3" in both|"") echo "data_length+index_length";; data|index) echo "$3_length";; free) echo "data_free";; esac)) from information_schema.tables$([[ "$1" = "all" || ! "$1" ]] || echo " where table_schema=\"$1\"")$([[ "$2" = "all" || ! "$2" ]] || echo "and table_name=\"$2\"");" | HOME=/var/lib/zabbix mysql -N'

#UserParameter=mysql.ping,HOME=/var/lib/zabbix mysqladmin ping | grep -c alive
UserParameter=mysql.ping,mysqladmin -u root -pRoo -P3306 -h192.168.2.252  ping | grep -c alive
UserParameter=mysql.version,mysql -V
添加chk_mysql.sh腳本文件
/etc/zabbix/script/mysql/chk_mysql.sh
#!/bin/bash
# -------------------------------------------------------------------------------
# FileName:    check_mysql.sh
# Revision:    1.0
# Date:        2018/01/31
# Author:      chunk
# Email:
# Website:
# Description:
# Notes:       ~
# -------------------------------------------------------------------------------
# Copyright:
# License:     GPL

# 用戶名
MYSQL_USER='root'

# 密碼
MYSQL_PWD='Root'

# 主機地址/IP
MYSQL_HOST='192.168.2.252'

# 端口
MYSQL_PORT='3306'

# 數據連接
MYSQL_CONN="/usr/bin/mysqladmin -u${MYSQL_USER} -p${MYSQL_PWD} -h${MYSQL_HOST} -P${MYSQL_PORT}"

# 參數是否正確
if [ $# -ne "1" ];then
    echo "arg error!"
fi

# 獲取數據
case $1 in
    Uptime)
        result=`${MYSQL_CONN} status|cut -f2 -d":"|cut -f1 -d"T"`
        echo $result
        ;;
    Com_update)
        result=`${MYSQL_CONN} extended-status |grep -w "Com_update"|cut -d"|" -f3`
        echo $result
        ;;
    Slow_queries)
        result=`${MYSQL_CONN} status |cut -f5 -d":"|cut -f1 -d"O"`
        echo $result
        ;;
    Com_select)
        result=`${MYSQL_CONN} extended-status |grep -w "Com_select"|cut -d"|" -f3`
        echo $result
                ;;
    Com_rollback)
        result=`${MYSQL_CONN} extended-status |grep -w "Com_rollback"|cut -d"|" -f3`
                echo $result
                ;;
    Questions)
        result=`${MYSQL_CONN} status|cut -f4 -d":"|cut -f1 -d"S"`
                echo $result
                ;;
    Com_insert)
        result=`${MYSQL_CONN} extended-status |grep -w "Com_insert"|cut -d"|" -f3`
                echo $result
                ;;
    Com_delete)
        result=`${MYSQL_CONN} extended-status |grep -w "Com_delete"|cut -d"|" -f3`
                echo $result
                ;;
    Com_commit)
        result=`${MYSQL_CONN} extended-status |grep -w "Com_commit"|cut -d"|" -f3`
                echo $result
                ;;
    Bytes_sent)
        result=`${MYSQL_CONN} extended-status |grep -w "Bytes_sent" |cut -d"|" -f3`
                echo $result
                ;;
    Bytes_received)
        result=`${MYSQL_CONN} extended-status |grep -w "Bytes_received" |cut -d"|" -f3`
                echo $result
                ;;
    Com_begin)
        result=`${MYSQL_CONN} extended-status |grep -w "Com_begin"|cut -d"|" -f3`
                echo $result
                ;;

        *)
        echo "Usage:$0(Uptime|Com_update|Slow_queries|Com_select|Com_rollback|Questions|Com_insert|Com_delete|Com_commit|Bytes_sent|Bytes_received|Com_begin)"
        ;;
esac
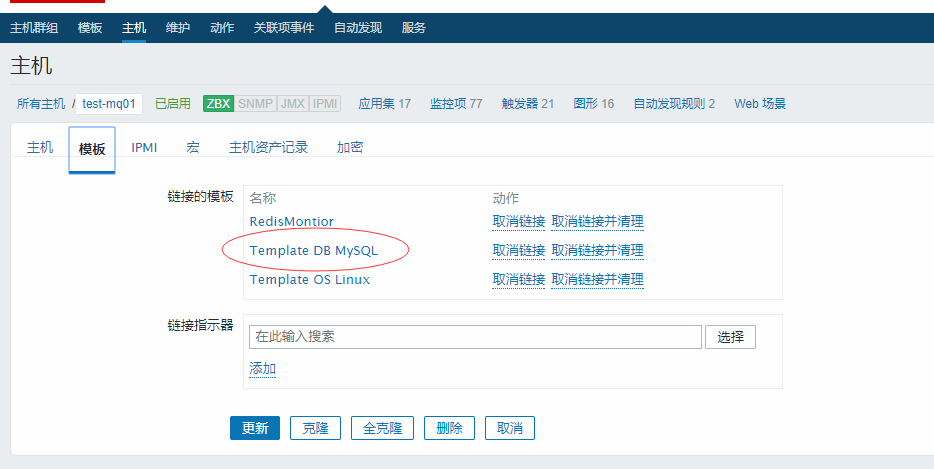
在zabbix-web端主機添加模板鏈接
重啓監控端agent
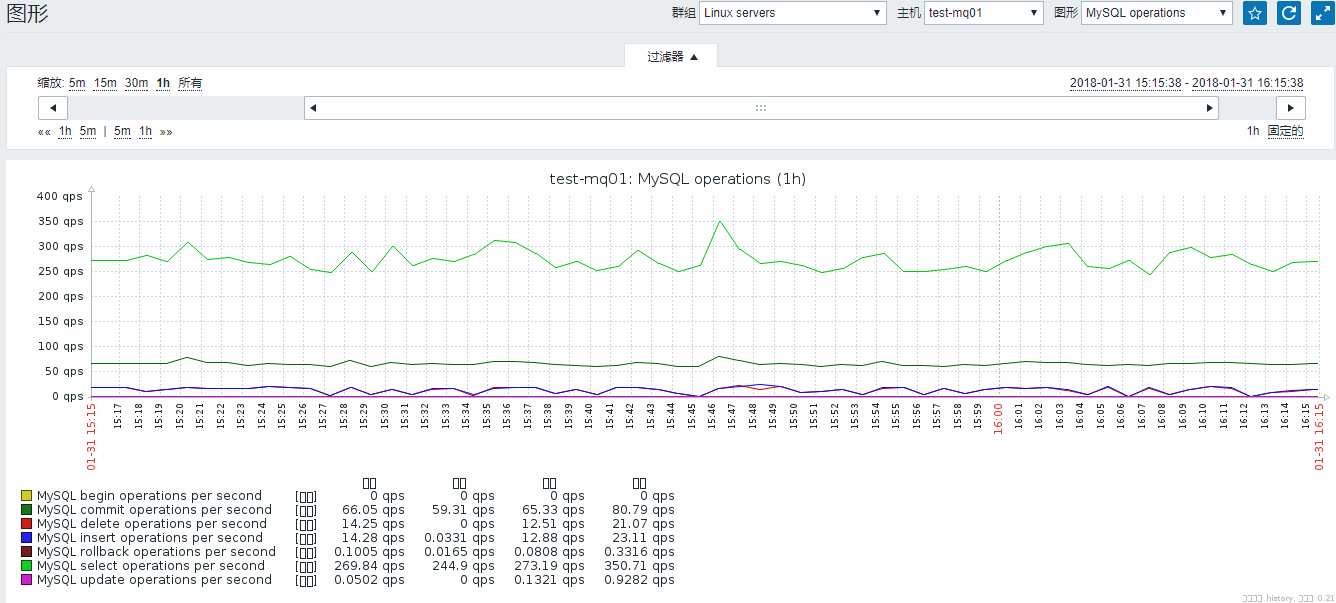
service zabbix-agent restartzabbix server端測試是否有數據
[root@tools-jenkins ~]# zabbix_get -s 192.168.2.41 -k mysql.status[Questions]
3533479678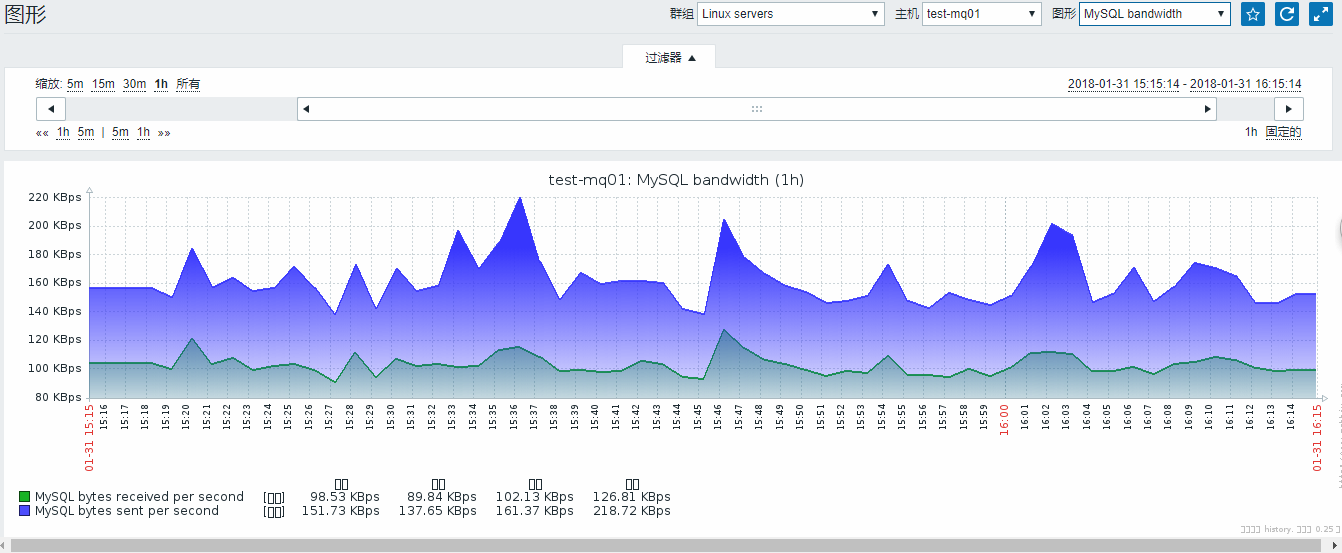
[Warning] Using a password on the command line interface can be insecure.
這個其實很簡單,腳本中導入export MYSQL_PWD=<password>,或者/etc/bashrc導入export MYSQL_PWD=<password>
最後腳本少-p,大概格式是這樣:
#原數據連接
# 數據連接
MYSQL_CONN="/usr/bin/mysqladmin -u${MYSQL_USER}  -p${MYSQL_PWD} -h${MYSQL_HOST} -P${MYSQL_PORT}"
# 新數據連接
MYSQL_CONN="/usr/bin/mysqladmin -u${MYSQL_USER}  -h${MYSQL_HOST} -P${MYSQL_PORT}"