


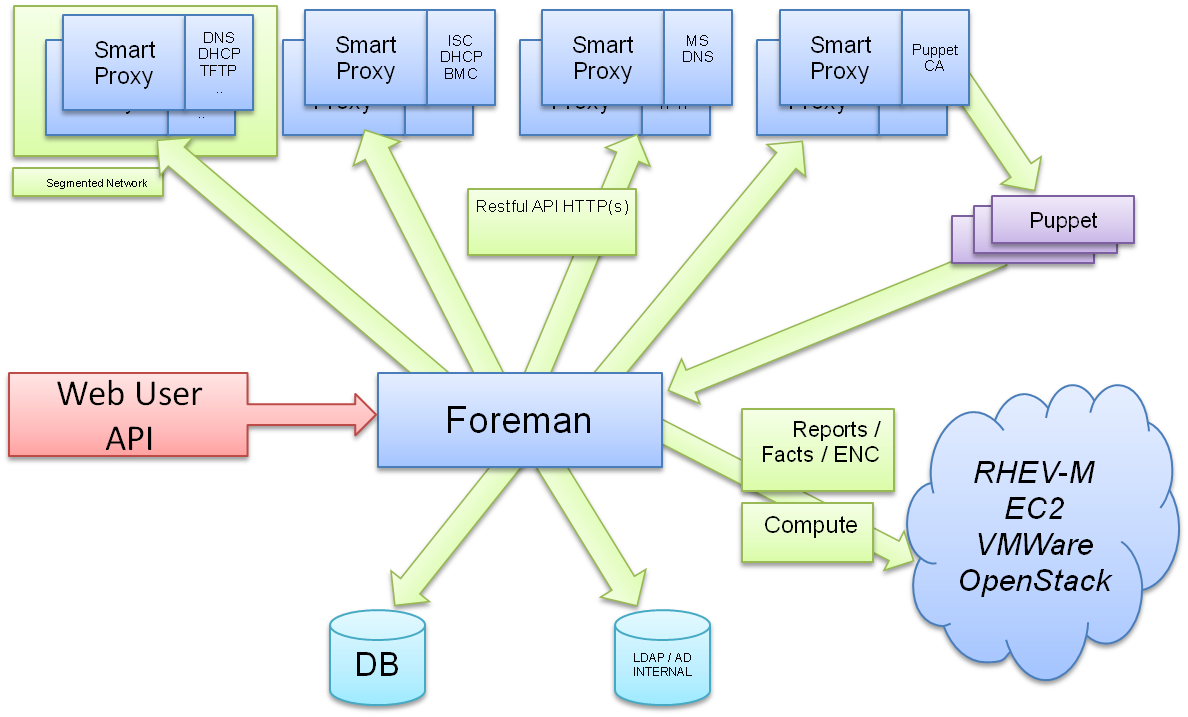
foreman架構:
本文主要講述搭建foreman,及集成進nginx的過程
環境說明:
CentOS 5.8 x86_64
puppet version:3.1.1
master hostname:server.domain.com
client hostname:client.test.com
----------------------------------------------
- 1,puppet,nginx環境
- 均按上篇文章所部署安裝好puppet,nginx,ruby等
- 2,配置yum源
- # rpm -ivh http://yum.theforeman.org/releases/1.1/el5/x86_64/foreman-release-1.1stable-3.el5.noarch.rpm
- 3,安裝foreman,foreman-proxy
- # yum -y install foreman-installer
- # ruby /usr/share/foreman-installer/generate_answers.rb
- 分別輸入三次 y
- # yum install ruby-mysql
- # yum -y install foreman foreman-proxy
- # chown foreman.foreman -R /usr/share/foreman
- # su - foreman -s /bin/bash -c /usr/share/foreman/extras/dbmigrate
- # vim /usr/share/foreman/config/database.yml
- 原文件爲sqllite的配置,此處改爲mysql作爲數據庫存儲
- =================================================
- production:
- adapter: mysql
- database: puppet
- username: puppet
- password: puppet
- host: localhost
- socket: "/tmp/mysql.sock"
- =================================================
- mysql> create database puppet CHARACTER SET utf8;
- mysql> grant all privileges on puppet.* to puppet@'localhost' identified by 'puppet';
- mysql> flush privileges;
- # cd /usr/share/foreman/
- RAILS_ENV=production rake db:migrate
- rake puppet:migrate:populate_hosts RAILS_ENV=production
- # chown foreman.foreman /usr/share/foreman/tmp/secret_token
- # vim /etc/foreman-proxy/settings.yml
- ==========================================================
- :trusted_hosts:
- - server.domain.com
- :puppetca: true
- :puppet: true
- :puppet_conf: /etc/puppet/puppet.conf
- =========================================================
- # /etc/init.d/foreman-proxy start 啓動proxy 端口8443
- 4,集成進nginx
- nginx虛擬主機如下:
- server {
- listen 443;
- server_name server.domain.com;
- ssl on;
- ssl_certificate /var/lib/puppet/ssl/certs/server.domain.com.pem;
- ssl_certificate_key /var/lib/puppet/ssl/private_keys/server.domain.com.pem;
- #Verify puppetmaster clients against Puppet CA
- ssl_crl /var/lib/puppet/ssl/ca/ca_crl.pem;
- ssl_client_certificate /var/lib/puppet/ssl/certs/ca.pem;
- ssl_verify_client optional;
- ssl_verify_depth 1;
- access_log /usr/local/nginx/logs/foreman_access.log;
- error_log /usr/local/nginx/logs/foreman_error.log debug;
- root /usr/share/foreman/public;
- passenger_enabled on;
- passenger_set_cgi_param HTTPS on;
- passenger_set_cgi_param SSL_CLIENT_S_DN $ssl_client_s_dn;
- passenger_set_cgi_param SSL_CLIENT_VERIFY $ssl_client_verify;
- }
- # /etc/init.d/nginxd start ###啓動nginx
- 5,訪問foreman
- 輸入網址:https://server.domain.com
- 默認賬號:admin 密碼:changeme
- 進入之後配置more-configureation-smart proxies----
- 添加proxy地址: https://server.domain.com:8443
- #vim /etc/puppet/node.rb
- :url => "https://server.domain.com",
- 6,設置report自動導入foreman
- # cp /usr/share/foreman-installer/foreman/templates/foreman-report.rb.erb /usr/lib/ruby/site_ruby/1.8/puppet/reports/foreman.rb
- # vim foreman.rb
- 修改成一下配置,其他不變(ps:一直就是卡在住錯)
- #<%= ERB.new(File.read(File.expand_path("_header.erb",File.dirname(file)))).result(binding) -%>
- # copy this file to your report dir - e.g. /usr/lib/ruby/1.8/puppet/reports/
- # add this report in your puppetmaster reports - e.g, in your puppet.conf add:
- # reports=log, foreman # (or any other reports you want)
- # URL of your Foreman installation
- $foreman_url = 'https://server.domain.com'
- # if CA is specified, remote Foreman host will be verified
- $foreman_ssl_ca = "/var/lib/puppet/ssl/certs/ca.pem"
- # ssl_cert and key are required if require_ssl_puppetmasters is enabled in Foreman
- $foreman_ssl_cert = "/var/lib/puppet/ssl/certs/server.domain.com.pem"
- $foreman_ssl_key = "/var/lib/puppet/ssl/private_keys/server.domain.com.pem"
- 客戶端需修改
- agent配置如下
- [agent]
- classfile = $vardir/classes.txt
- localconfig = $vardir/localconfig
- report = true
- pluginsync = true
- masterport = 8140
- environment = production
- certname = client.test.com
- server = server.domain.com
- listen = true
- 服務器端修改
- [master]
- autosign = $confdir/autosign.conf { mode = 664 }
- reports = log,foreman
- external_nodes = /etc/puppet/node.rb
- node_terminus = exec
- ca = true
- =======================
- 7,class,host.facts導入foreman
- #cd /usr/share/foreman
- #導入hosts 和facts
- rake puppet:import:hosts_and_facts RAILS_ENV=production
- 把/etc/puppet/modules底下的模塊都複製至/etc/puppet/modules/production
- 在foreman web管理
- mode---configuration---puppet classes
- 點擊import from server 即可
主要截圖如下:


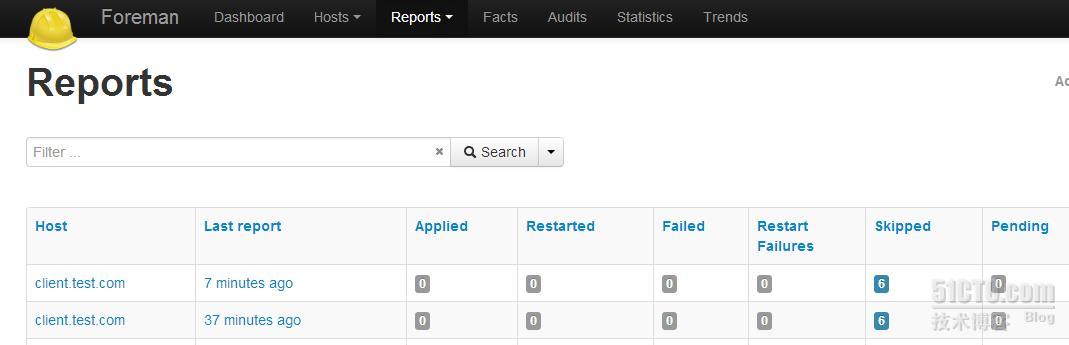
這樣puppet系列文章已基本完成;
在此感謝下itnihao,liu.cy的指導 (ps:爲了文章的完整性,所以引用了大量itnihao文章的內容)