


当时因为Quantum 还有很多BUG 网络服务仍使用nova-network
整体规划
各个主机都要有不同的主机名,openstack使用hostname区别内部的各个主机。
三台主机:
control.test.com 控制节点
compute-01.test.com 计算节点
compute-02.test.com 计算节点
主机ip地址:
Control.test.com:
eth0: 192.168.3.164 /24(公网) eht1: 192.168.4.164/24(私网)
compute-01.test.com:
eth0: 192.168.3.165/24(公网) eth1: 192.168.4.165/24(私网)
compute-02.test.com:
eth0: 192.168.3.166/24(公网) eth1: 192.168.4.166/24(私网)
………….
计算节点 保留eth1网口给虚拟机用
其中 192.168.3.0/24 作为物理机IP段(可认为是公网IP,)
192.168. 4.0/24 作为物理机服务之间的通讯
192.168.3.168---192.168.3.190 作为虚拟机 Floating_ip 段(分配给虚拟机,从外部可以直接访问的,可以认为是公网IP地址)
虚拟机网段规划:
本次采用的是vlan模式,并且是多nova-network服务模式
虚拟机内整体网段:
10.100.0.0/24 , 再在此段上划分出vlan段
划分的三个vlan段:
10.100.0.0/24 vlan_id 2
虚拟机迁移:
配置nfs ,来做迁移
由于程序中会对共享目录中的uid进行操作,所以需要nfs server 和client端的uid是一致的,至少必须不同主机之间nova用户的uid是一致的,libvirt-bin用户也要一致
所以用存储服务器(192.168.3.166) 作为nfs server
别的计算节点 作为 client端
两个计算节点之间测试迁移
虚拟机挂载额外磁盘:
openstack使用LVM来划分磁盘,利用tgt + open_iscsi来实现局域网内磁盘设备的利用
现在我们提供磁盘的主机是存储服务器(192.168.3.166),同时也是一个nfs server节点。
当要给虚拟机划分磁盘时,首先利用lvm在ubuntu2划分指定大小的一块磁盘,然后利用tgt 服务,把磁盘声明出去,运行目标虚拟机的物理主机会去找到这个盘,并登陆使用,分配给其上的虚拟机使用。
源
目前Folsom进入ubuntu 12.04的官方的源,不过需要你手工添加。
- cat <<EOF >>/etc/apt/sources.list
- deb http://ubuntu-cloud.archive.canonical.com/ubuntu precise-proposed/folsom main
- deb http://ubuntu-cloud.archive.canonical.com/ubuntu precise-updates/folsom main
- EOF
运行下面命令
- apt-get install ubuntu-cloud-keyring
- apt-get update
Hostname设置
- cat /etc/hostname
- control
- cat /etc/hosts
- 127.0.0.1 localhost
- 192.168.4.165 compute-01.test.com compute-01
- 192.168.4.166 compute-02.test.com compute-02
- hostname
- control
- hostname -f
- control.test.com
网络
直接设置 /etc/network/interface
- auto lo
- iface lo inet loopback
- auto eth0
- iface eth0 inet static
- address 192.168.3.164
- netmask 255.255.255.0
- gateway 192.168.3.1
- auto eth1
- iface eth1 inet static
- address 192.168.4.164
- netmask 255.255.255.0
重启服务
- /etc/init.d/networking restart
设置IP转发
- sed -i -r 's/^\s*#(net\.ipv4\.ip_forward=1.*)/\1/' /etc/sysctl.conf
- sysctl -p
一、安装控制节点
安装 NTP服务
编辑 /etc/ntp.conf ,在 server ntp.ubuntu.com 下添加两行
- server ntp.ubuntu.com
- server 127.127.1.0
- fudge 127.127.1.0 stratum 10
或者直接运行下面命令
- sed -i 's/server ntp.ubuntu.com/server ntp.ubuntu.com\nserver 127.127.1.0\nfudge 127.127.1.0 stratum 10/g' /etc/ntp.conf
重启NTP服务
- service ntp restart
安装mysql
- apt-get -y install mysql-server python-mysqldb
安装时输入mysql的root用户密码:root-pass
设置监听Ip
- sed -i 's/127.0.0.1/0.0.0.0/g' /etc/mysql/my.cnf
重启服务
- service mysql restart
创建数据库
- mysql -uroot -proot-pass <<EOF
- CREATE DATABASE nova;
- GRANT ALL PRIVILEGES ON nova.* TO 'nova'@'%' IDENTIFIED BY 'nova-pass';
- CREATE DATABASE glance;
- GRANT ALL PRIVILEGES ON glance.* TO 'glance'@'%' IDENTIFIED BY 'glance-pass';
- CREATE DATABASE keystone;
- GRANT ALL PRIVILEGES ON keystone.* TO 'keystone'@'%'IDENTIFIED BY ' keystone-pass';
- CREATE DATABASE cinder;
- GRANT ALL PRIVILEGES ON cinder.* TO 'cinder'@'%'IDENTIFIED BY 'cinder-pass';
- FLUSH PRIVILEGES;
- EOF
安装RabbitMQ
- apt-get -y install rabbitmq-server
把默认密码 guest,改成rabbit-pass
- rabbitmqctl change_password guest rabbit-pass
注意:如果hostname 和 hosts文件中主机名不相同服务无法启动
安装keystone
keystone 认证服务:openstack中各个组件之间传递消息,或者用户对虚拟机的管理都要通过keystone认证,以保证某个请求是合法的
- apt-get install keystone python-keystone python-keystoneclient
默认keystone使用sqlite ,改为mysql, 删除原来的数据库文件
- rm /var/lib/keystone/keystone.db
配置 /etc/keystone/keystone.conf
- [DEFAULT]
- admin_token = 012345SECRET99TOKEN012345
- bind_host = 0.0.0.0
- public_port = 5000
- admin_port = 35357
- compute_port = 8774
- verbose = True
- debug = True
- log_file = keystone.log
- log_dir = /var/log/keystone
- log_config = /etc/keystone/logging.conf
- [sql]
- connection = mysql://keystone:[email protected]:3306/keystone
- idle_timeout = 200
重启服务和初始化数据库
- service keystone restart
- keystone-manage db_sync
查看数据库中是否创建了这些表,版本不一样可能表也不一样

配置tenant,user 和 role
tenant : 租户,代替了原本的project的概念,一个tenant 应该是一个整个的工程,在这个tenant里面可以创建user, 可以给这个user 配置role , 然后这个user 可以在这个 tenant 里面创建虚拟机,配置安全组等
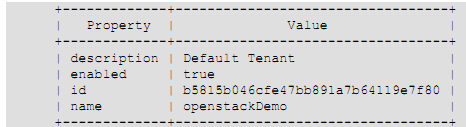
创建tenant
- keystone --token 012345SECRET99TOKEN012345 --endpoint http://192.168.4.164:35357/v2.0 tenant-create --name openstackDemo --description "Default Tenant" --enabled true
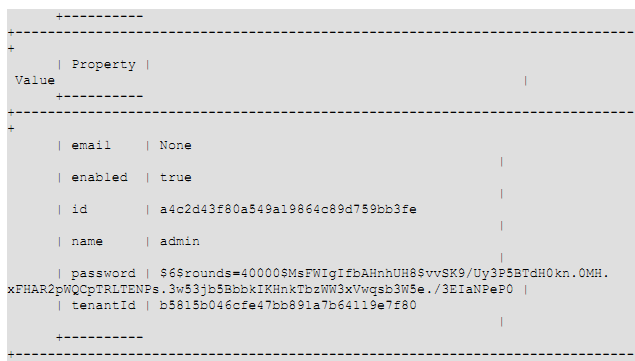
在这个tenant里创建用户 adminUser
- keystone --token 012345SECRET99TOKEN012345 --endpoint http://192.168.4.164:35357/v2.0 user-create --tenant_id b5815b046cfe47bb891a7b64119e7f80 --name adminUser --pass secretword --enabled true
创建默认角色 admin 和memberRole
- keystone --token 012345SECRET99TOKEN012345 --endpoint http://192.168.4.164:35357/v2.0 role-create --name admin

- keystone --token 012345SECRET99TOKEN012345 --endpoint http://192.168.4.164:35357/v2.0 role-create --name memberRole

给 openstackDemo tenant 里的adminUser 赋予admin 权限
- keystone --token 012345SECRET99TOKEN012345 --endpoint http://192.168.4.164:35357/v2.0 user-role-add --user_id a4c2d43f80a549a19864c89d759bb3fe --tenant_id b5815b046cfe47bb891a7b64119e7f80 --role_id e3d9d157cc95410ea45d23bbbc2e5c10
这个命令没有输出,如果有多个tenant 的话要赋予权限给相应
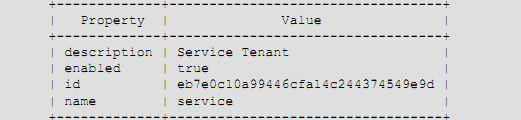
创建一个Service tenant , 这个tenant里包括所有的服务用户
- keystone --token 012345SECRET99TOKEN012345 --endpoint http://192.168.4.164:35357/v2.0 tenant-create --name service --description "Service Tenant" --enabled true
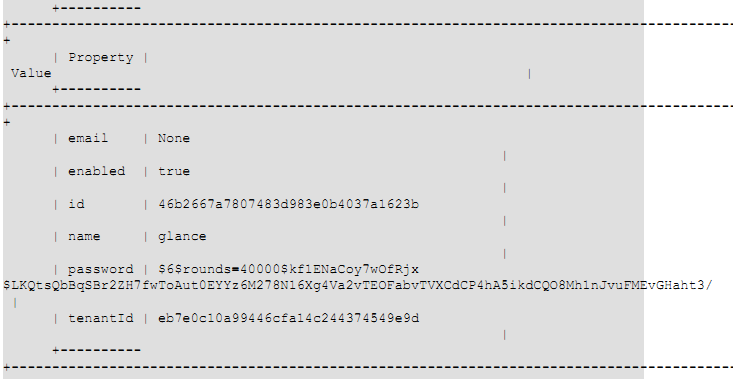
在service tenant里 创建 glance service 用户
- keystone --token 012345SECRET99TOKEN012345 --endpoint http://192.168.4.164:35357/v2.0 user-create --tenant_id eb7e0c10a99446cfa14c244374549e9d --name glance --pass glance --enabled true
把 admin 角色赋予glance 服务用户
- keystone --token 012345SECRET99TOKEN012345 --endpoint http://192.168.4.164:35357/v2.0 user-role-add --user_id 46b2667a7807483d983e0b4037a1623b --tenant_id eb7e0c10a99446cfa14c244374549e9d --role_id e3d9d157cc95410ea45d23bbbc2e5c10
这个命令没有输出
在service tenant 里创建nova service 用户
- keystone --token 012345SECRET99TOKEN012345 --endpoint http://192.168.4.164:35357/v2.0 user-create --tenant_id eb7e0c10a99446cfa14c244374549e9d --name nova --pass nova --enabled true

给nova服务用户赋予 admin 角色
- keystone --token 012345SECRET99TOKEN012345 --endpoint http://192.168.4.164:35357/v2.0 user-role-add --user_id 54b3776a8707834d983e0b4037b1345c --tenant_id eb7e0c10a99446cfa14c244374549e9d --role_id e3d9d157cc95410ea45d23bbbc2e5c10
在service tenant 里创建ec2 服务用户
- keystone --token 012345SECRET99TOKEN012345 --endpoint http://192.168.4.164:35357/v2.0 user-create --tenant_id eb7e0c10a99446cfa14c244374549e9d --name ec2 --pass ec2 --enabled true
给ec2服务用户赋予admin角色
- keystone --token 012345SECRET99TOKEN012345 --endpoint http://192.168.4.164:35357/v2.0 user-role-add --user_id 32e7668b8707834d983e0b4037b1345c --tenant_id eb7e0c10a99446cfa14c244374549e9d --role_id e3d9d157cc95410ea45d23bbbc2e5c10
keystone 上定义service 端点: endpoint
endpoint上定义了openstack 各个服务的 API endpoint (入口)
定义方式有两种,
1,使用模板文件:
/etc/keystone/default_catalog.templates
2. 使用数据库作为后端
我们使用数据库的方式配置endpoint
修改 /etc/keystone/keystone.conf 的 [catalog] 默认使用数据库

如果使用模板文件,则修改为:

创建keystone 服务 和 服务端点(service endpoints)
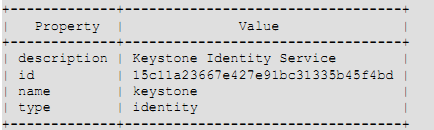
创建identity服务
- keystone --token 012345SECRET99TOKEN012345 --endpoint http://192.168.4.164:35357/v2.0 service-create --name=keystone --type=identity --description="Keystone Identity Service"
- keystone --token 012345SECRET99TOKEN012345 --endpoint http://192.168.4.164:35357/v2.0 endpoint-create --region RegionOne --service_id=15c11a23667e427e91bc31335b45f4bd --publicurl=http://192.168.4.164:5000/v2.0 --internalurl=http://192.168.4.164:5000/v2.0 --adminurl=http://192.168.4.164:35357/v2.0

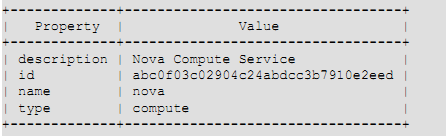
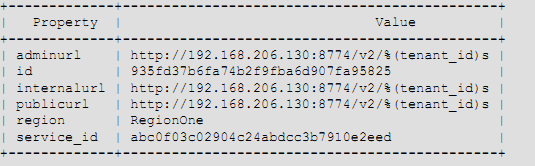
创建compute 服务 ,需要为endpoint制定一个tenant
- keystone --token 012345SECRET99TOKEN012345 --endpoint http://192.168.4.164:35357/v2.0 service-create --name=nova --type=compute --description="Nova Compute Service"
- keystone --token 012345SECRET99TOKEN012345 --endpoint http://192.168.4.164:35357/v2.0 endpoint-create --region RegionOne --service_id=abc0f03c02904c24abdcc3b7910e2eed --publicurl='http://192.168.4.164:8774/v2/%(tenant_id)s' --internalurl='http://192.168.4.164:8774/v2/%(tenant_id)s' --adminurl='http://192.168.4.164:8774/v2/%(tenant_id)s'
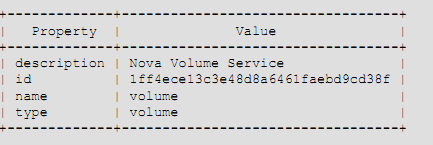
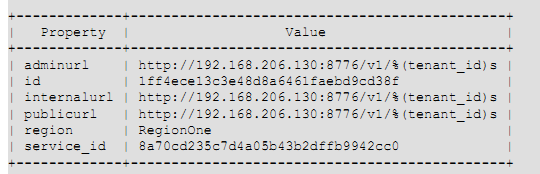
定义volume service ,也需要制定 tenant
- keystone --token 012345SECRET99TOKEN012345 --endpoint http://192.168.4.164:35357/v2.0 service-create --name=volume --type=volume --description="Nova Volume Service"
- keystone --token 012345SECRET99TOKEN012345 --endpoint http://192.168.4.164:35357/v2.0 endpoint-create --region RegionOne --service_id=1ff4ece13c3e48d8a6461faebd9cd38f --publicurl='http://192.168.4.164:8776/v1/%(tenant_id)s' --internalurl='http://192.168.4.164:8776/v1/%(tenant_id)s' --adminurl='http://192.168.4.164:8776/v1/%(tenant_id)s'
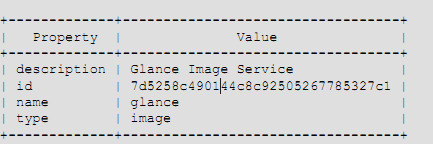
定义 p_w_picpath 服务
- keystone --token 012345SECRET99TOKEN012345 --endpoint http://192.168.4.164:35357/v2.0 service-create --name=glance --type=p_w_picpath --description="Glance Image Service"
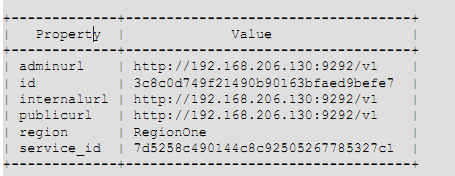
- keystone --token 012345SECRET99TOKEN012345 --endpoint http://192.168.4.164:35357/v2.0 endpoint-create --region RegionOne --service_id=7d5258c490144c8c92505267785327c1 --publicurl=http://192.168.4.165:9292/v1 --internalurl=http://192.168.4.165:9292/v1 --adminurl=http://192.168.4.165:9292/v1
注意:如果glance服务从控制节点分开,命令中端口是9292的IP都要改成glance服务器的IP
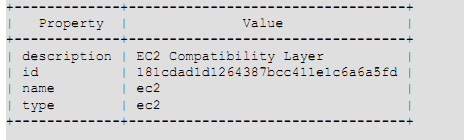
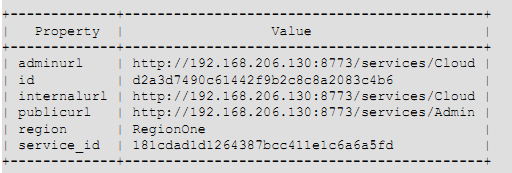
定义EC2服务
- keystone --token 012345SECRET99TOKEN012345 --endpoint http://192.168.4.164:35357/v2.0 service-create --name=ec2 --type=ec2 --description="EC2 Compatibility Layer"
- keystone --token 012345SECRET99TOKEN012345 --endpoint http://192.168.4.164:35357/v2.0 endpoint-create --region RegionOne --service_id=181cdad1d1264387bcc411e1c6a6a5fd --publicurl=http://192.168.4.164:8773/services/Cloud --internalurl=http://192.168.4.164:8773/services/Cloud --adminurl=http://192.168.4.164:8773/services/Admin
验证认证服务的正确性
- sudo apt-get install curl openssl
- curl -d '{"auth": {"tenantName": "adminTenant", "passwordCredentials":{"username": "adminUser", "password": "secretword"}}}' -H "Content-type:application/json" http://192.168.4.164:35357/v2.0/tokens | python -mjson.tool
安装glance服务
在存储节点安装镜像服务器 (不一定要安装在控制节点,可以单独拿出一台物理主机部署glance)如果分开的话要先安装计算节点服务(sudo apt-get install nova-compute nova-network nova-api novnc)或先创建计算节点中所用到的账户,因为nova会使用到计算节点的账户
- apt-get -y install glance glance-api python-glanceclient glance-common
注意:如果glance服务和控制节点分开,必须在glance服务器安装python-keystone模块,否则glance服务无法启动
删掉默认的数据库,因为后面要配置mysql数据库
- sudo rm /var/lib/glance/glance.sqlite
配置
编辑/etc/glance/glance-api.conf 和 /etc/glance/glance-registry.conf
- sql_connection = mysql://glance:[email protected]/glance
- auth_host = 192.168.4.164
- admin_tenant_name = service
- admin_user = glance
- admin_password = glance-pass
编辑 /etc/glance/glance-api.conf
- #notifier_strategy = noop
- notifier_strategy = rabbit
- #rabbit_password = guest
- rabbitrabbit_password = rabbit-pass
运行下面命令
- cat <<EOF >>/etc/glance/glance-api.conf
- flavor = keystone+cachemanagement
- EOF
- cat <<EOF >>/etc/glance/glance-registry.conf
- flavor = keystone
- EOF
重启服务
- service glance-api restart && service glance-registry restart
在ubuntu12.04 glance 数据表是在 version control 之下的,运行下面的步骤
如果glance服务和控制机分开的话要安装python-mysqldb
- glance-manage version_control 0
- glance-manage db_sync
- sudo service glance-registry restart
验证glance
- glance --version
获取测试镜像
- mkdir /tmp/p_w_picpaths
- cd /tmp/p_w_picpaths/
- wget http://smoser.brickies.net/ubuntu/ttylinux-uec/ttylinux-uec-amd64-12.1_2.6.35-22_1.tar.gz
- tar -zxvf ttylinux-uec-amd64-12.1_2.6.35-22_1.tar.gz
注意:上传镜像时,如果glance服务从控制节点分开,下面命令中的IP:127.0.0.1都要改成keystone服务器的IP(内网ip)
上传kernel
- glance --os_username=adminUser --os_password=secretword --os_tenant=openstackDemo --os_auth_url=http://127.0.0.1:5000/v2.0 add name="tty-linux-kernel" disk_format=aki container_format=aki < ttylinux-uec-amd64-12.1_2.6.35-22_1-vmlinuz

上传initrd
- glance --os_username=adminUser --os_password=secretword --os_tenant=openstackDemo --os_auth_url=http://127.0.0.1:5000/v2.0 add name="tty-linux-ramdisk" disk_format=ari container_format=ari < ttylinux-uec-amd64-12.1_2.6.35-22_1-loader

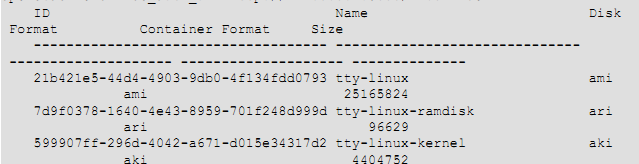
上传镜像
- glance --os_username=adminUser --os_password=secretword --os_tenant=openstackDemo --os_auth_url=http://127.0.0.1:5000/v2.0 add name="tty-linux" disk_format=ami container_format=ami kernel_id=599907ff-296d-4042-a671-d015e34317d2 ramdisk_id=7d9f0378-1640-4e43-8959-701f248d999d < ttylinux-uec-amd64-12.1_2.6.35-22_1.img

- glance --os_username=adminUser --os_password=secretword --os_tenant=openstackDemo --os_auth_url=http://127.0.0.1:5000/v2.0 index
上面的例子使用 --os_username, --os_password, --os_tenant, --os_auth_url ,也可以使用 OS_*环境变量
例如: vi openrc
- export OS_USERNAME=adminUser
- export OS_TENANT_NAME=openstackDemo
- export OS_PASSWORD=secretword
- export OS_AUTH_URL=http://192.168.4.164:5000/v2.0/
- export OS_REGION_NAME=RegionOne
安装nova服务
- apt-get -y install nova-api nova-cert nova-common nova-scheduler python-nova python-novaclient nova-consoleauth novnc nova-novncproxy
配置
编辑 /etc/nova/api-paste.ini
- auth_host = 192.168.4.164
- auth_port = 35357
- auth_protocol = http
- admin_tenant_name = service
- admin_user = nova
- admin_password = nova
编辑文件 /etc/nova/nova.conf
- [DEFAULT]
- logdir=/var/log/nova
- state_path=/var/lib/nova
- lock_path=/run/lock/nova
- verbose=False
- api_paste_config=/etc/nova/api-paste.ini
- scheduler_driver=nova.scheduler.simple.SimpleScheduler
- s3_host=192.168.4.164
- ec2_host=192.168.4.164
- ec2_dmz_host=192.168.4.164
- rabbit_host=192.168.4.164
- rabbitrabbit_password=rabbit-pass
- cc_host=192.168.4.164
- nova_url=http://192.168.4.164:8774/v1.1/
- sql_connection=mysql://nova:[email protected]/nova
- ec2_url=http://192.168.4.164:8773/services/Cloud
- root_helper=sudo nova-rootwrap /etc/nova/rootwrap.conf
- # Auth
- use_deprecated_auth=false
- auth_strategy=keystone
- keystone_ec2_url=http://192.168.4.164:5000/v2.0/ec2tokens
- # Imaging service
- glance_api_servers=192.168.4.165:9292
- p_w_picpath_service=nova.p_w_picpath.glance.GlanceImageService
- # Vnc configuration
- novnc_enabled=true
- novncproxy_base_url=http://0.0.0.0:6080/vnc_auto.html
- novncproxy_port=6080
- vncserver_proxyclient_address=0.0.0.0
- vncserver_listen=0.0.0.0
- # Network settings
- #network_api_class=nova.network.quantumv2.api.API
- #quantum_url=http://192.168.4.164:9696
- #quantum_auth_strategy=keystone
- #quantum_admin_tenant_name=service
- #quantumquantum_admin_username=quantum
- #quantum_admin_password=
- #quantum_admin_auth_url=http://192.168.4.164:35357/v2.0
- #libvirt_vif_driver=nova.virt.libvirt.vif.LibvirtHybridOVSBridgeDriver
- #linuxnet_interface_driver=nova.network.linux_net.LinuxOVSInterfaceDriver
- #firewall_driver=nova.virt.libvirt.firewall.IptablesFirewallDriver
- ###### NETWORK
- #network_manager=nova.network.manager.FlatDHCPManager
- network_manager=nova.network.manager.VlanManager
- force_dhcp_release=True
- dhcpbridge_flagfile=/etc/nova/nova.conf
- dhcpbridge=/usr/bin/nova-dhcpbridge
- firewall_driver=nova.virt.libvirt.firewall.IptablesFirewallDriver
- public_inter>
- flat_inter>
- vlan_inter>
- flat_network_bridge=br100
- fixed_range=10.100.0.0/24
- multi_host=true
- # Compute #
- #compute_driver=libvirt.LibvirtDriver
- ###### COMPUTE
- libvirt_type=kvm
- connection_type=libvirt
- instanceinstance_name_template=instance-%08x
- api_paste_config=/etc/nova/api-paste.ini
- allow_resize_to_same_host=True
- libvirt_use_virtio_for_bridges=true
- start_guests_on_host_boot=true
- resume_guests_state_on_host_boot=true
- # Cinder #
- volume_api_class=nova.volume.cinder.API
- osapi_volume_listen_port=5900
创建nova数据表
- nova-manage db sync
重启服务
- service nova-api restart
- service nova-cert restart
- service nova-consoleauth restart
- service nova-scheduler restart
- service nova-novncproxy restart
安装cinder服务
在存储节点安装cinder服务
- apt-get install -y cinder-api cinder-scheduler cinder-volume open-iscsi tgt python-cinderclient
硬盘专门一个分区给volume使用
- pvcreate /dev/sda5
- vgcreate cinder-volumes /dev/sda5
编辑 /etc/cinder/cinder.conf ,直接运行下面命令就可以
- [DEFAULT]
- rootwrap_config = /etc/cinder/rootwrap.conf
- sql_connection = mysql://cinder:[email protected]:3306/cinder
- api_paste_confg = /etc/cinder/api-paste.ini
- iscsi_helper = ietadm
- volume_group = cinder-volumes
- volumevolume_name_template = volume-%s
- rabbitrabbit_password = rabbit-pass
- logdir = /var/log/cinder
- verbose = False
- auth_strategy = keystone
编辑 /etc/cinder/api-paste.ini
- admin_tenant_name = service
- admin_user = cinder
- admin_password = cinder
同步数据库
- cinder-manage db sync
重启服务
- service cinder-api restart
- service cinder-scheduler restart
- service cinder-volume restart
nova 命令创建额外存储
volume-attach Attach a volume to a server.
volume-create Add a new volume.
volume-delete Remove a volume.
volume-detach Detach a volume from a server.
volume-list List all the volumes.
volume-show Show details about a volume.
创建

显示volume

显示虚拟机

挂载

显示volume

挂好的显示 in-use
卸载

显示volume

进入虚拟机就会看到 /dev/下面多了个磁盘文件