1.Linux常用的系统监控命令
OpenIPMI
lscpu 查看CPU信息
w 查看系统的登录用户
mpstat 1 查看每秒CPU的负载
free 查看系统负载
iostat 实时查看磁盘的IO
top 实时查看系统负载 z加颜色 x高亮排序列 < > 左右移动
htop top的升级版,支持鼠标
free -h 内存命令
df -h 磁盘命令
iftop 查看网卡接口信息
2.安装前准备(lamp)
yum -y --nogpgcheck -C install httpd zabbix-web zabbix-server-mysql zabbix-web-mysql\
zabbix-get mysql-server php55w php55w-mysql php55w-common php55w-gd php55w-mbstring\
php55w-mcrypt php55w-devel php55w-xml php55w-bcmath zabbix-get zabbix-java-gateway\
wqy-microhei-fonts net-snmp net-snmp-utils gcc gcc-c++ autoconf java unixODBC-devel\
OpenIPMI-devel java-devel
注:https://pan.baidu.com/s/1qYw4V2s?qq-pf-to=pcqq.group#list/path=%2F (提供repo源,以及zabbix下载源)
实验环境可以关闭防火墙及selinux,生产环境在防火墙开放相关端口,这里我就直接关闭防火墙和selinux,被监控
的服务器或者交换机必须要再同一个网段的或者可以相互ping通
[root@zabbix-server ~]# service iptables stop
iptables: Setting chains to policy ACCEPT: filter [ OK ]
iptables: Flushing firewall rules: [ OK ]
iptables: Unloading modules: [ OK ]
[root@zabbix-server ~]# setenforce 0
3.服务端配置LAMP环境
yum -y install httpd mysql-server
默认Base的php是5.3
zabbix 3.0 要求php版本在5.4 以上
rpm -ivh http://repo.webtatic.com/yum/el6/x86_64/webtatic-release-6-9.noarch.rpm
yum -y install php55w php55w-mysql php55w-common php55w-gd php55w-mbstring php55w-mcrypt php55w-devel php55w-xml php55w-bcmath
4.Zabbix 服务端安装(zabbix3.0以上版本已经将汉化包打入源包中)
rpm -ivh http://repo.zabbix.com/zabbix/3.0/rhel/6/x86_64/zabbix-release-3.0-1.el6.noarch.rpm
yum -y install zabbix-web zabbix-server-mysql zabbix-web-mysql
5.配置Zabbix服务端
Apache http 不需要配置
mysql配置
\cp /usr/share/mysql/my-medium.cnf /etc/my.cnf
sed -i.ori '115a DBPassword=zabbix' /etc/zabbix/zabbix_server.conf #配置zabbix server连接数据库
/etc/init.d/mysqld start
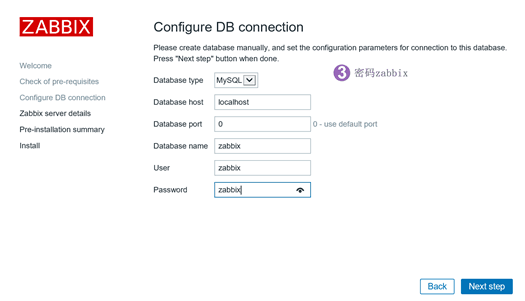
mysql -e 'create database zabbix character set utf8 collate utf8_bin;' 数据库创建zabbix用户
mysql -e "grant all on zabbix.* to zabbix@'localhost' identified by 'zabbix';" 授权本机用户
zcat /usr/share/doc/zabbix-server-mysql-3.0.9/create.sql.gz |mysql -uzabbix -pzabbix zabbix 初始化数据库
6.php配置
sed -i.ori 's#max_execution_time = 30#max_execution_time = 300#;s#max_input_time = 60#max_input_time = 300#;s#post_max_size = 8M#post_max_size = 16M#;910a date.timezone = Asia/Shanghai' /etc/php.ini(配置web界面需要这样,否则无法通过)
egrep -n "^post_max_size|^max_execution_time|^max_input_time|^date.timezone" /etc/php.ini
cp -R /usr/share/zabbix/ /var/www/html/ #网页文件复制
chmod -R 755 /etc/zabbix/web #文件授权
chown -R apache.apache /etc/zabbix/web
7启动服务zabbix服务
# 启动apache && zabbix
echo "ServerName 127.0.0.1:80">>/etc/httpd/conf/httpd.conf
/etc/init.d/httpd start
/etc/init.d/zabbix-server start
# 开机自启动
cat>>/etc/rc.local<<EOF
/etc/init.d/mysqld start
/etc/init.d/httpd start
/etc/init.d/zabbix-server start
EOF
8.zabbix网页端解决中文乱码
wget -O /etc/yum.repos.d/epel.repo http://mirrors.aliyun.com/repo/epel-6.repo
yum -y install wqy-microhei-fonts
\cp /usr/share/fonts/wqy-microhei/wqy-microhei.ttc /usr/share/fonts/dejavu/DejaVuSans.ttf
zabbix客户端配置
1. 安装
rpm -ivh zabbix-agent-3.0.9-1.el6.x86_64.rpm
包的地址:http://mirrors.aliyun.com/zabbix/zabbix/3.0/rhel/6/x86_64/zabbix-agent-3.0.9-1.el6.x86_64.rpm
2. 配置
sed -i.ori 's#Server=127.0.0.1#Server=172.16.1.61#' /etc/zabbix/zabbix_agentd.conf #指定zabbix服务端地址
3.启动
/etc/init.d/zabbix-agent start
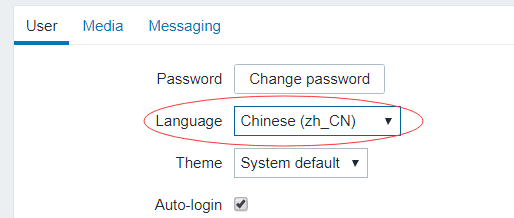
WEB登录界面更改语言
地址:http://10.0.0.61/zabbix/setup.php
1.


