


準備環境:172.18.9.200是gitlab、172.18.9.201是jenkins
Git是gitlab的客戶端命令,gitlab是應用程序
一、使用清華大學的鏡像:
rpm包國內下載地址:https://mirrors.tuna.tsinghua.edu.cn/gitlab-ce/yum/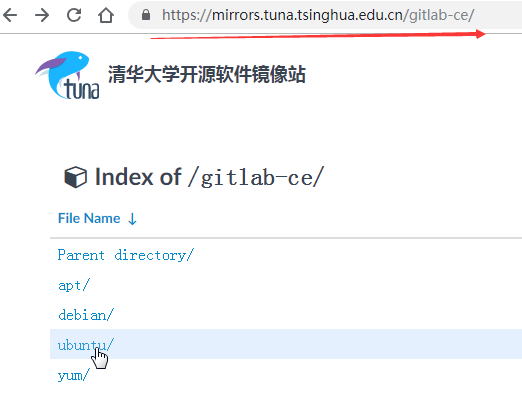
二、[root@centos7 src]#yum install -y gitlab-ce-11.9.8-ce.0.el7.x86_64.rpm
(注:我在此處停留很久,因爲我yum時總是報錯“Nothing to do”,只要我們mount上光盤,配好epel源aliyun的鏡像即可yum了,因爲此時源碼包已上傳至虛擬機,這時下載源碼包已經和yum源沒關係了)
三、[root@centos7 src]#vim /etc/ssh/sshd_config
port=2022 #默認爲22,必改
四、[root@centos7 src]#vim /etc/gitlab/gitlab.rb
external_url 'http://172.18.9.150' 此項改爲IP,是爲了讓開發人員能連上我們。
###Email Settings
gitlab_rails['smtp_enable'] = true
gitlab_rails['smtp_address'] = "smtp.163.com"
gitlab_rails['smtp_port'] = 25
gitlab_rails['smtp_user_name'] = "[email protected]"
gitlab_rails['smtp_password'] = "zhang@123"
gitlab_rails['smtp_domain'] = "163.com"
gitlab_rails['smtp_authentication'] = :login
gitlab_rails['smtp_enable_starttls_auto'] = true
gitlab_rails['smtp_tls'] = false
gitlab_rails['gitlab_email_from'] = "[email protected]"
user["git_user_email"] = rooroot@"163.com" 該處的“”必須加上,
五、一條命令查看gitlab的相關插件:
[root@200 ~]#gitlab-
gitlab-ctl gitlab-psql gitlab-rails gitlab-rake
六、重新編譯:[root@200 ~]#gitlab-ctl reconfigure
七、查看狀態:[root@200 src]#gitlab-ctl status
run: alertmanager: (pid 30017) 149s; run: log: (pid 29629) 188s
run: gitaly: (pid 29893) 154s; run: log: (pid 28314) 338s
run: gitlab-monitor: (pid 29950) 153s; run: log: (pid 29390) 212s
run: gitlab-workhorse: (pid 29911) 154s; run: log: (pid 29077) 243s
run: logrotate: (pid 29207) 233s; run: log: (pid 29228) 230s
run: nginx: (pid 29144) 239s; run: log: (pid 29167) 236s
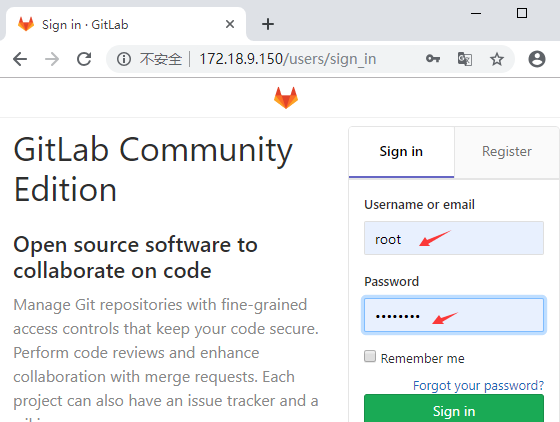
八、訪問測試:
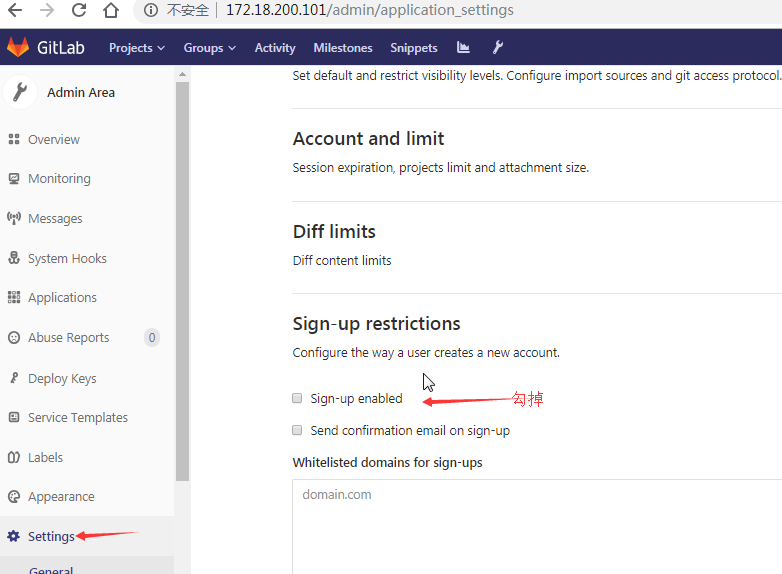
九、
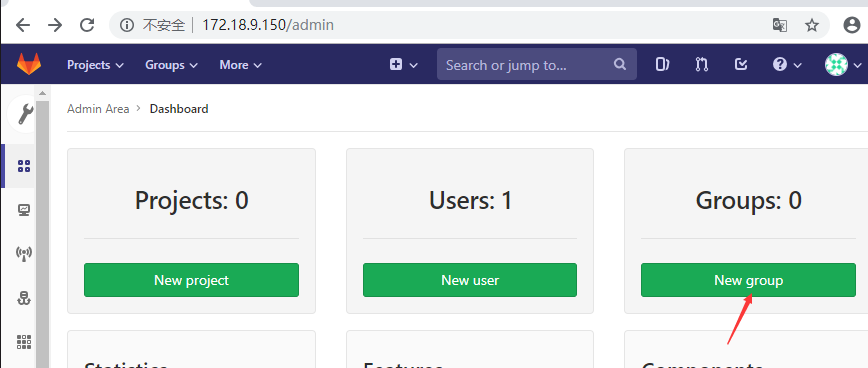
十、點擊USE1 new user後,操作如下:
十一、務必時間同步,重啓gitlab後就可以繼續操作了,時間不同步結果就失敗:
[root@200 src]#ntpdate 172.18.0.1
23 Apr 11:41:27 ntpdate[32929]: adjust time server 172.18.0.1 offset -0.188343 sec
[root@200 src]#gitlab-ctl restart
ok: run: alertmanager: (pid 32972) 0s
ok: run: gitaly: (pid 32987) 0s
ok: run: nginx: (pid 33037) 1s
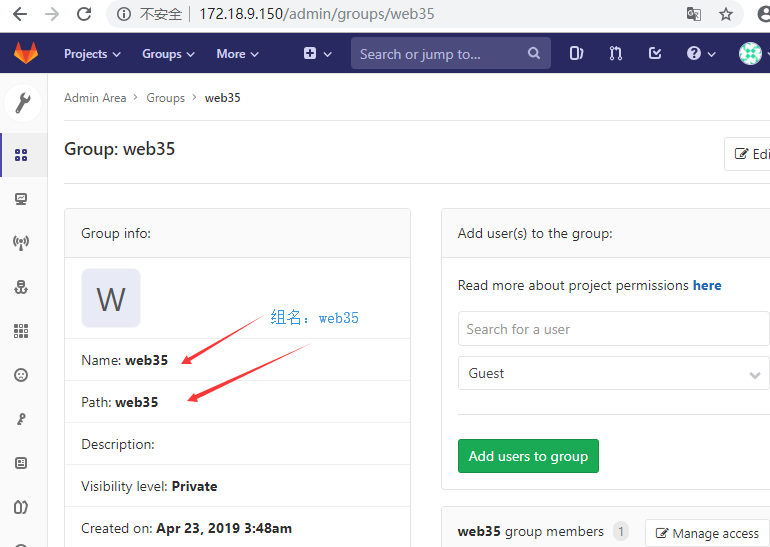
十二、創建組:
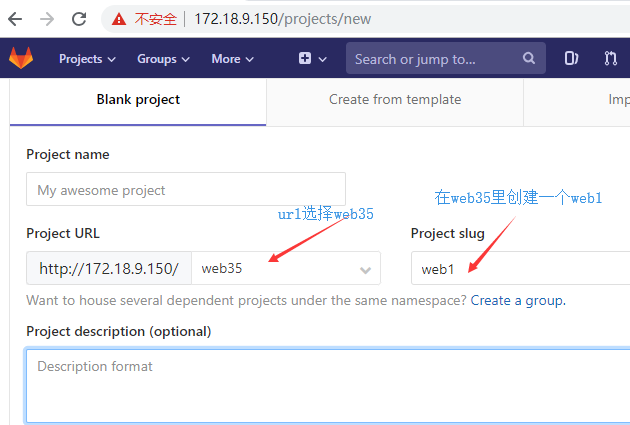
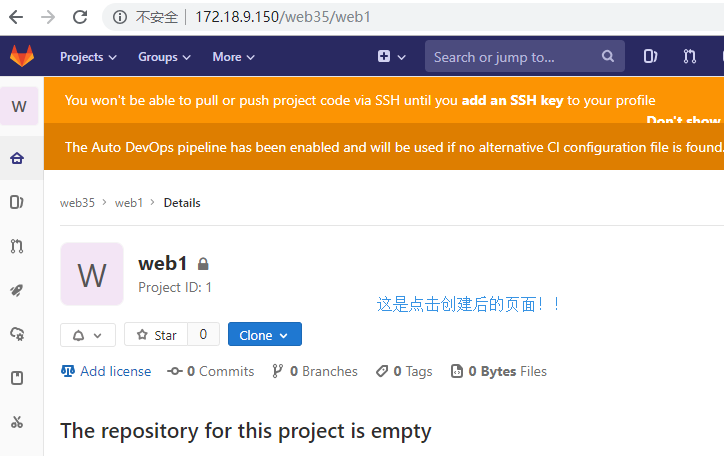
十三、創建項目:
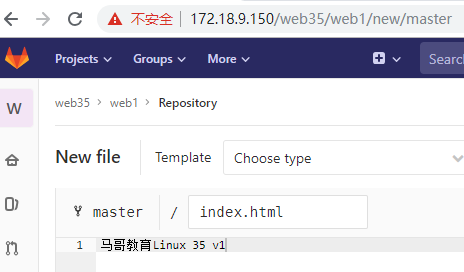
十四、創建新文件:點擊提交,第一個版本就被放在倉庫裏了:
十五、在201主機安裝git: [root@201 ~]#yum install -y git
十六、我們在201主機克隆git:
[root@201 ~]#git clone http://172.18.9.150/web35/web1.git
Cloning into 'web1'...
Username for 'http://172.18.9.150': Leslie #這是name
Password for 'http://[email protected]':
remote: Enumerating objects: 3, done.
remote: Counting objects: 100% (3/3), done.
remote: Total 3 (delta 0), reused 0 (delta 0)
Unpacking objects: 100% (3/3), done.
[root@201 ~]#ll
total 12
drwxr-xr-x. 3 root root 36 Apr 23 12:23 web1
[root@201 ~]#cd web1/
[root@201 web1]#ll
total 4
-rw-r--r--. 1 root root 23 Apr 23 12:23 index.html
[root@201 web1]#vim index.html
馬哥教育Linux 35 v1
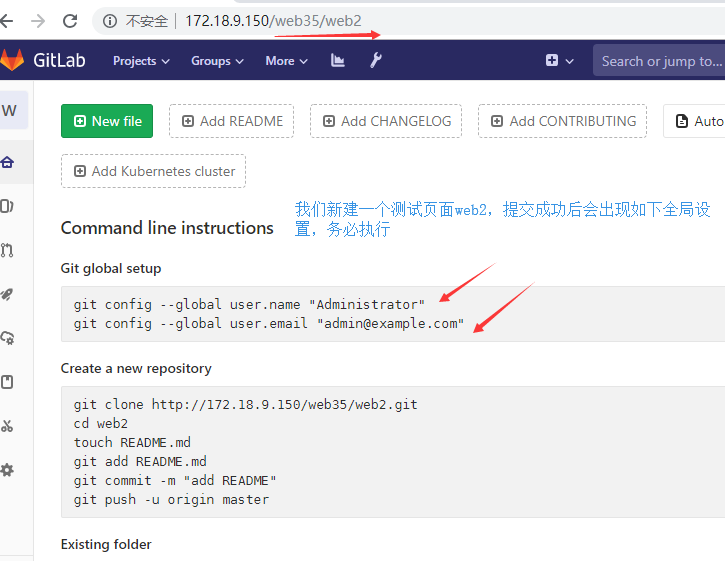
十七、新建一個測試頁:
十八、執行Git config --global:
[root@201 ~]#git config --global user.name "user1"
[root@201 ~]#git config --global user.email "[email protected]"
[root@201 ~]#cd web1/
[root@201 web1]#vim index.html
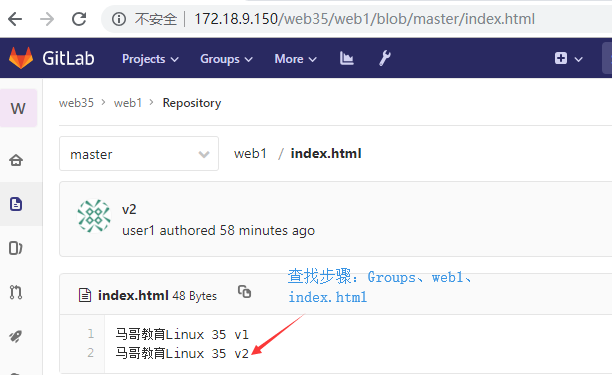
馬哥教育 Linux 35 v1
馬哥教育 Linux 35 v2
[root@201 web1]#git add ./*
[root@201 web1]#git commit -m "v2"
[master ca130ab] v2
1 file changed, 2 insertions(+), 1 deletion(-)
[root@201 web1]#git push
warning: push.default is unset; its implicit value is changing in
Git 2.0 from 'matching' to 'simple'. To squelch this message
and maintain the current behavior after the default changes, use:
git config --global push.default matching
To squelch this message and adopt the new behavior now, use:
git config --global push.default simple
See 'git help config' and search for 'push.default' for further information.
(the 'simple' mode was introduced in Git 1.7.11. Use the similar mode
'current' instead of 'simple' if you sometimes use older versions of Git)
Username for 'http://172.18.9.150': Leslie
Password for 'http://[email protected]':
Counting objects: 5, done.
Writing objects: 100% (3/3), 258 bytes | 0 bytes/s, done.
Total 3 (delta 0), reused 0 (delta 0)
To http://172.18.9.150/web35/web1.git
3af0975..ca130ab master -> master #默認是master
十九、找到web2,這是第一臺服務器就可以進行git push拉取了。
二十、查看分支:[root@201 web1]#git branch
- master
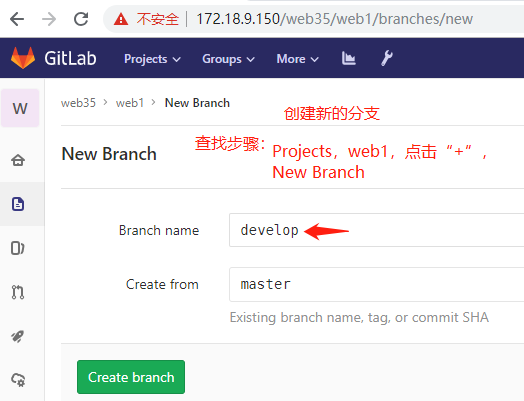
二十一、添加一個分支,這時,我們再去git checkout branch時要加“-b”參數:
![20190419 Gitlab部分]()
二十二、[root@201 web1]#git checkout -b develop
Switched to a new branch 'develop'
[root@201 web1]#git branch -
develop
master
{插播:如何尋找develop分支的clone}:
步驟:Groups,web35,web1,點擊“+”,創建新branch,再返回web1點擊“clone”,即可!!二十三、我們克隆一個分支:develop
[root@200 src]#git clone -b develop http://172.18.9.150/web35/web1.git
Cloning into 'web1'...
Username for 'http://172.18.9.150': Leslie
Password for 'http://[email protected]':
remote: Enumerating objects: 6, done.
remote: Counting objects: 100% (6/6), done.
remote: Compressing objects: 100% (2/2), done.
remote: Total 6 (delta 0), reused 0 (delta 0)
Unpacking objects: 100% (6/6), done.二十四、[root@200 web1]#vim web1/index.html
馬哥教育Linux 35 v1
馬哥教育Linux 35 v2
馬哥教育Linux 35 v3 #這些內容只有經過測試纔會被髮布到線上二十五、[root@200 web1]#git commit -m "v3"
[develop 89e511c] v3
1 file changed, 2 insertions(+)
[root@200 web1]#git push
warning: push.default is unset; its implicit value is changing in
Git 2.0 from 'matching' to 'simple'. To squelch this message
and maintain the current behavior after the default changes, use:git config --global push.default matching
To squelch this message and adopt the new behavior now, use:
git config --global push.default simple
See 'git help config' and search for 'push.default' for further information.
(the 'simple' mode was introduced in Git 1.7.11. Use the similar mode
'current' instead of 'simple' if you sometimes use older versions of Git)
Username for 'http://172.18.9.150': Leslie
Password for 'http://[email protected]':
Counting objects: 5, done.
Delta compression using up to 4 threads.
Compressing objects: 100% (2/2), done.
Writing objects: 100% (3/3), 266 bytes | 0 bytes/s, done.
Total 3 (delta 0), reused 0 (delta 0)
remote:
remote: To create a merge request for develop, visit:
remote: http://172.18.9.150/web35/web1/merge_requests/new?merge_request%5Bsource_branch%5D=develop
remote:
To http://172.18.9.150/web35/web1.git
ca130ab..89e511c develop -> develop
二十六、Gitlab 回滾:
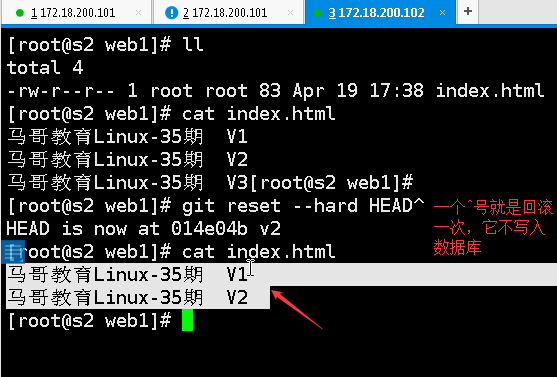
回滾到v1: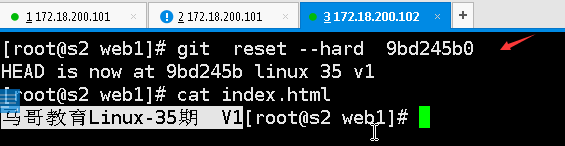
二十七:git 常用命令:
git config --globaluser.name “name“ #設置全局用戶名
git config --globaluser.email [email protected]#設置全局郵箱
git config --global –list #列出用戶全局設置
git add index.html / . #添加指定文件、目錄或當前目錄下所有數據到暫存區
git commit -m“11“ #提交文件到工作區
gitstatus #查看工作區的狀態
git push #提交代碼到服務器
git pull #獲取代碼到本地
gitlog #查看操作日誌
vim . gitignore #定義忽略文件
基於倉庫的回滾:git reset --hard HEAD^^ #git 版本回滾, HEAD 爲當前版本,加一個^爲上一個,^^爲上上一個版本
gitreflog # #獲取每次提交的 ID,可以使用--hard 根據提交的 ID 進行版本回退
gitreset --hard 5ae4b06 #回退到指定 id 的版本
#git branch #查看當前所處的分支
#git checkout -b develop #創建並切換到一個新分支
#git checkout develop #切換分支