一、郵件服務架構
bind:域名解析
postfix:實現SMTP協議,用於發件
dovecot:實現POP3和IMAP協議,用於收件
Cyrus-SASL函數庫:用於用戶認證
courier-authlib:使用MySQL數據庫中的表進行身份驗證
extmail和extman:提供webmail
引自馬哥文檔的結構圖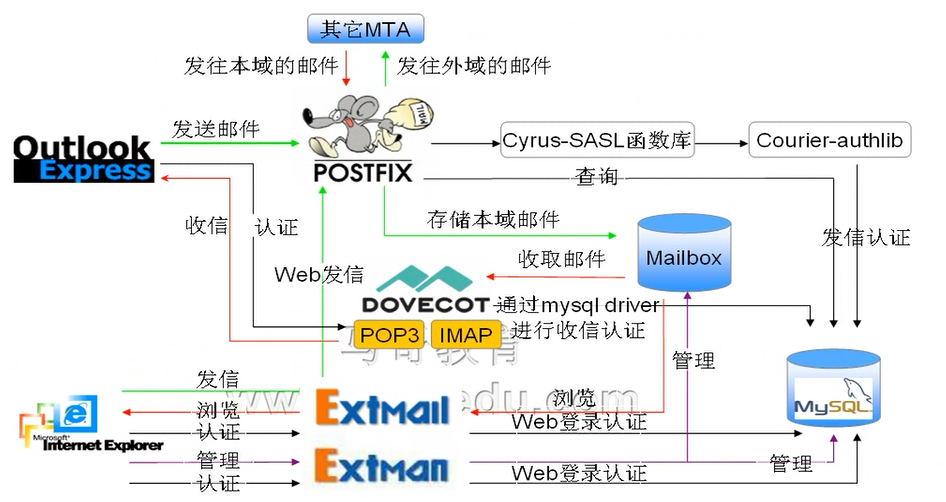
系統:CentOS Linux release 7.4.1708 (Core)
二、部署bind
2.1、yum安裝
yum -y install bind bind-utils2.2、配置bind
主配置文件
vim /etc/named.conf
        //listen-on port 53 { 127.0.0.1; };
        //listen-on-v6 port 53 { ::1; };
       //allow-query     { localhost; };
直接註釋listen與allow-query,就可以監聽在所有地址上並且允許所有主機訪問
定義正反向區域配置文件
vim /etc/named.rfc1912.zones
zone "zhongdianjizhi.com" IN {
        type master;
        file "zhongdianjizhi.com.zone";
};
zone "118.168.192.in-addr.arpa" {
        type master;
        file "zhongdianjizhi.com.local";
};
定義區域解析庫文件(配置A記錄與MX記錄)
cd /var/named
cp -p named.localhost zhongdianjizhi.com.zone
cp -p named.localhost zhongdianjizhi.com.local
vim /var/named/zhongdianjizhi.com.zone
$TTL 86400
@ IN SOA ns.zhongdianjizhi.com. admin.zhongdianjizhi.com. (
201902 ; serial
2H ; refresh
10M ; retry
3D ; expire
1D ) ; minimum
IN NS ns
IN MX 10 mail
ns IN A 192.168.118.100
mail IN A 192.168.118.100vim /var/named/zhongdianjizhi.com.local
$TTL 86400
@ IN SOA ns.zhongdianjizhi.com. admin.zhongdianjizhi.com. (
201902 ; serial
2H ; refresh
10M ; retry
3D ; expire
1D ) ; minimum
IN NS ns.zhongdianjizhi.com.
1 IN PTR ns.zhongdianjizhi.com.
1 IN PTR mail.zhongdianjizhi.com.2.3、檢查配置文件是否有語法錯誤
named-checkzone "zhongdianjizhi.com.zone" /var/named/zhongdianjizhi.com.zone
named-checkzone "118.168.192.in-addr.arpa" /var/named/zhongdianjizhi.com.local
2.4、修改區域解析庫文件權限與屬組
chgrp named /var/named/zhongdianjizhi.com.*
chmod 640 /var/named/zhongdianjizhi.com.*
2.5、將本機dns解析指向本機dns服務器
vim /etc/resolv.conf
nameserver 192.168.118.100
2.6、修改主機名
hostnamectl set-hostname mail.zhongdianjizhi.com2.7、啓動named服務(bind是包名,服務名爲named)
systemctl start named
systemctl enable named
2.8、測試解析
dig -t A mail.zhongdianjizhi.com @192.168.118.100
dig -x 192.168.118.100 @192.168.118.100
三、編譯安裝postfix
3.1、準備
移除系統自帶的postfix
rpm -e postfix刪除postfix用戶
userdel postfix
groupdel postdrop
新建用戶
groupadd -g 2525 postfix
useradd -g 2525 -u 2525 -M -s /sbin/nologin postfix
groupadd -g 2526 postdrop
useradd -g 2526 -u 2526 -M -s /sbin/nologin postdrop
3.2下載postfix源碼包,目前的穩定版爲3.4版本
wget ftp://ftp.cuhk.edu.hk/pub/packages/mail-server/postfix/official/postfix-3.4.5.tar.gz3.3、安裝mariadb
yum -y install mariadb-server mariadb-devel
systemctl start mariadb.service
3.4、安裝編譯環境及其他所需包
yum -y install gcc gcc-c++ make pcre-devel expat-devel perl
yum -y install   openssl openssl-devel db4-devel ntpdate  bzip2 php-mysql cyrus-sasl-md5 perl-GD perl-DBD-MySQL perl-GD perl-CPAN perl-CGI perl-CGI-Session cyrus-sasl-lib cyrus-sasl-plain cyrus-sasl cyrus-sasl-devel libtool-ltdl-devel telnet mail libicu-devel m4 expect httpd
3.5、找到mysql與sasl的頭文件以及庫文件安裝位置
rpm -ql mariadb-devel
Mysql include:/usr/include/mysql
Mysql lib:/usr/lib64/mysql

rpm -ql cyrus-sasl-devel
Sasl lib:/usr/lib64/sasl2
Sasl include:/usr/include/sasl
3.6、準備編譯
cd /usr/local/src/; tar -xf postfix-3.4.5.tar.gz
cd postfix-3.4.5/
#編譯時指定上一步找到的頭文件以及庫文件位置
make makefiles 'CCARGS=-DHAS_MYSQL -I/usr/include/mysql -DUSE_SASL_AUTH -DUSE_CYRUS_SASL -I/usr/include/sasl -DUSE_TLS ' 'AUXLIBS=-L/usr/lib64/mysql -lmysqlclient -lz -lrt -lm -L/usr/lib64/sasl2 -lsasl2   -lssl -lcrypto'
make && make install
在make install過程中交互式的填寫配置文件
Please specify the prefix for installed file names. Specify this ONLY
if you are building ready-to-install packages for distribution to OTHER
machines. See PACKAGE_README for instructions.
install_root: [/]
Please specify a directory for scratch files while installing Postfix. You
must have write permission in this directory.
tempdir: [/usr/local/src/postfix-3.0.11] /tmp/extmail     #更改tmp目錄,其他的全部默認
Please specify the final destination directory for installed Postfix
configuration files.
config_directory: [/etc/postfix]
Please specify the final destination directory for installed Postfix
administrative commands. This directory should be in the command search
path of adminstrative users.
command_directory: [/usr/sbin]
Please specify the final destination directory for installed Postfix
daemon programs. This directory should not be in the command search path
of any users.
daemon_directory: [/usr/libexec/postfix]
Please specify the final destination directory for Postfix-writable
data files such as caches or random numbers. This directory should not
be shared with non-Postfix software.
data_directory: [/var/lib/postfix]
Please specify the final destination directory for the Postfix HTML
files. Specify "no" if you do not want to install these files.
html_directory: [no]
Please specify the owner of the Postfix queue. Specify an account with
numerical user ID and group ID values that are not used by any other
accounts on the system.
mail_owner: [postfix]
Please specify the final destination pathname for the installed Postfix
mailq command. This is the Sendmail-compatible mail queue listing command.
mailq_path: [/usr/bin/mailq]
Please specify the final destination directory for the Postfix on-line
manual pages. You can no longer specify "no" here.
manpage_directory: [/usr/local/man]
Please specify the final destination pathname for the installed Postfix
newaliases command. This is the Sendmail-compatible command to build
alias databases for the Postfix local delivery agent.
newaliases_path: [/usr/bin/newaliases]
Please specify the final destination directory for Postfix queues.
queue_directory: [/var/spool/postfix]
Please specify the final destination directory for the Postfix README
files. Specify "no" if you do not want to install these files.
readme_directory: [no]
Please specify the final destination pathname for the installed Postfix
sendmail command. This is the Sendmail-compatible mail posting interface.
sendmail_path: [/usr/sbin/sendmail]
Please specify the group for mail submission and for queue management
commands. Specify a group name with a numerical group ID that is
not shared with other accounts, not even with the Postfix mail_owner
account. You can no longer specify "no" here.
setgid_group: [postdrop]
Please specify the final destination directory for Postfix shared-library
files.
shlib_directory: [no]
3.7、配置postfix
主配置文件:/etc/postfix/main.cf
maildrop配置文件:/etc/postfix/master.cf 可通過postconf -e修改
備份
cp /etc/postfix/main.cf{,.bak}
配置文件main.cf
#第94行 修改郵局主機名
myhostname = mail.zhongdianjizhi.com
#第102行 修改郵局域名
mydomain = zhongdianjizhi.com
#第118行 寄出郵件域名,刪除註釋
myorigin = $mydomain
#第132行 修改監聽所有網卡,刪除註釋
inet_interfaces = all
#第180行 修改可接收郵件的主機名和域名,可被中繼的域名
mydestination = $myhostname, localhost.$mydomain, localhost, $mydomain
#第279 修改可接收郵件的主機名和域名,可被中繼的主機
mynetworks = 192.168.118.0/24, 127.0.0.0/8
#第434行,取消註釋
home_mailbox = Maildir/
#第676行 開啓同時使用ipv4和ipv6協議,定義postfix進程監聽的IP地址
inet_protocols = all
#第266行 指定信任網段類型
mynetworks_style = host
#第311行 指定允許中轉郵件的域名,取消註釋
relay_domains = $mydestination
#第401行,設置郵件的別名映射表,取消註釋
alias_maps = hash:/etc/aliases
配置結束後使用postconf -n查看配置並覈對
3.8、配置服務啓動腳本
vim /etc/init.d/postfix
#!/bin/bash
#
# postfix      Postfix Mail Transfer Agent
#
# chkconfig: 2345 80 30
# description: Postfix is a Mail Transport Agent, which is the program \
#              that moves mail from one machine to another.
# processname: master
# pidfile: /var/spool/postfix/pid/master.pid
# config: /etc/postfix/main.cf
# config: /etc/postfix/master.cf
# Source function library.
. /etc/rc.d/init.d/functions
# Source networking configuration.
. /etc/sysconfig/network
# Check that networking is up.
[ $NETWORKING = "no" ] && exit 3
[ -x /usr/sbin/postfix ] || exit 4
[ -d /etc/postfix ] || exit 5
[ -d /var/spool/postfix ] || exit 6
RETVAL=0
prog="postfix"
start() {
     # Start daemons.
     echo -n $"Starting postfix: "
        /usr/bin/newaliases >/dev/null 2>&1
     /usr/sbin/postfix start 2>/dev/null 1>&2 && success || failure $"$prog start"
     RETVAL=$?
     [ $RETVAL -eq 0 ] && touch /var/lock/subsys/postfix
        echo
     return $RETVAL
}
stop() {
  # Stop daemons.
     echo -n $"Shutting down postfix: "
     /usr/sbin/postfix stop 2>/dev/null 1>&2 && success || failure $"$prog stop"
     RETVAL=$?
     [ $RETVAL -eq 0 ] && rm -f /var/lock/subsys/postfix
     echo
     return $RETVAL
}
reload() {
     echo -n $"Reloading postfix: "
     /usr/sbin/postfix reload 2>/dev/null 1>&2 && success || failure $"$prog reload"
     RETVAL=$?
     echo
     return $RETVAL
}
abort() {
     /usr/sbin/postfix abort 2>/dev/null 1>&2 && success || failure $"$prog abort"
     return $?
}
flush() {
     /usr/sbin/postfix flush 2>/dev/null 1>&2 && success || failure $"$prog flush"
     return $?
}
check() {
     /usr/sbin/postfix check 2>/dev/null 1>&2 && success || failure $"$prog check"
     return $?
}
restart() {
     stop
     start
}
# See how we were called.
case "$1" in
  start)
     start
     ;;
  stop)
     stop
     ;;
  restart)
     stop
     start
     ;;
  reload)
     reload
     ;;
  abort)
     abort
     ;;
  flush)
     flush
     ;;
  check)
     check
     ;;
  status)
       status master
     ;;
  condrestart)
     [ -f /var/lock/subsys/postfix ] && restart || :
     ;;
  *)
     echo $"Usage: $0 {start|stop|restart|reload|abort|flush|check|status|condrestart}"
     exit 1
esac
exit $?
添加權限,並開機啓動
chmod +x /etc/init.d/postfix
chkconfig --add postfix
chkconfig postfix on
chown postfix.postfix -R /var/lib/postfix/
chown postfix.postfix /var/spool/ -R
3.9、生成別名
newaliases
ls /etc/aliases.db
3.10、啓動並測試
useradd jym
systemctl start postfix
[root@mail ~]# telnet mail.zhongdianjizhi.com 25
Trying fe80::4c54:bb23:c6db:6473%ens33...
telnet: connect to address fe80::4c54:bb23:c6db:6473%ens33: Connection refused
Trying 192.168.118.100...
Connected to mail.zhongdianjizhi.com.
Escape character is '^]'.
220 mail.zhongdianjizhi.com ESMTP Postfix
mail from:[email protected]
250 2.1.0 Ok
rcpt to:[email protected]
250 2.1.5 Ok
data
354 End data with <CR><LF>.<CR><LF>
hello,this is test mail.
.
250 2.0.0 Ok: queued as 13259132D75
quit
221 2.0.0 Bye
Connection closed by foreign host.
Note:寫完郵件正文需要以.結束
發送成功
[root@mail ~]# tail /var/log/maillog|grep sent
Jul  1 16:29:56 mail postfix/local[8749]: 13259132D75: to=<[email protected]>, relay=local, delay=66, dela
ys=66/0.01/0/0, dsn=2.0.0, status=sent (delivered to maildir)
四、安裝dovecot
4.1、yum安裝dovecot
yum -y install dovecot dovecot-mysql依賴包:clucene-core
4.2、配置dovecot
vim /etc/dovecot/dovecot.conf
#第24行,取消註釋
protocols = imap pop3 lmtp
#第30行,取消註釋
listen = *, ::
#第33行,取消註釋
base_dir = /var/run/dovecot/
vim /etc/dovecot/conf.d/10-mail.conf
#第30行,取消註釋,爲dovecot指明郵箱位置
mail_location = maildir:/var/mailbox/%d/%n/Maildir配置dovecot連接mysql
cp /etc/dovecot/conf.d/auth-sql.conf.ext /etc/dovecot/conf.d/auth-sql.conf
vim /etc/dovecot/conf.d/auth-sql.conf
passdb {
  driver = sql

  # Path for SQL configuration file, see example-config/dovecot-sql.conf.ext
  args = /etc/dovecot/dovecot-sql.conf
}
userdb {
  driver = sql
  args = /etc/dovecot/dovecot-sql.conf
}
vim /etc/dovecot/dovecot-sql.conf
driver = mysql
connect = host=localhost dbname=extmail user=extmail password=extmail
default_pass_scheme = CRYPT
password_query = SELECT username AS user,password AS password FROM mailbox WHERE username = '%u'
user_query = SELECT maildir, uidnumber AS uid, gidnumber AS gid FROM mailbox WHERE username = '%u'
4.3、啓動
systemctl start dovecot.service 4.4、測試收件
echo "111111" | passwd --stdin jym
[root@mail ~]# telnet mail.zhongdianjizhi.com 110
Trying fe80::4c54:bb23:c6db:6473%ens33...
Connected to mail.zhongdianjizhi.com.
Escape character is '^]'.
+OK Dovecot ready.
user jym
+OK
pass 111111
+OK Logged in.
list
+OK 2 messages:
1 506
2 495
.
retr 1
+OK 506 octets
Return-Path: <[email protected]>
X-Original-To: [email protected]
Delivered-To: [email protected]
Received: from mail.zhongdianjizhi.com (mail.zhongdianjizhi.com [192.168.118.100])
    by mail.zhongdianjizhi.com (Postfix) with ESMTP id 13259132D75
    for <[email protected]>; Mon,  1 Jul 2019 16:28:51 +0000 (GMT)
Message-Id: <[email protected]>
Date: Mon,  1 Jul 2019 16:28:51 +0000 (GMT)
From: [email protected]

hello,this is test mail.
五、sasl配置
配置文件:/etc/sysconfig/saslauthd
5.1、啓動
systemctl start saslauthd.service
systemctl enable saslauthd.service
5.2、測試
testsaslauthd -ujym -p1111115.3、smtpd配置
vim /usr/lib64/sasl2/smtpd.conf
創建smtpd.conf配置文件並寫入
log_level: 3  #生產環境關閉,現用於測試
pwcheck_method: authdaemond
mech_list: PLAIN LOGIN
authdaemond_path:/usr/local/courier-authlib/var/spool/authdaemon/socket #authlib的socket路徑
5.4、postfix關於smtp的配置
vim /etc/postfix/main.cf
broken_sasl_auth_clients = yes
smtpd_recipient_restrictions=permit_mynetworks,permit_sasl_authenticated,reject_invalid_hostname,reject_non_fqd
n_hostname,reject_unknown_sender_domain,reject_non_fqdn_sender,reject_non_fqdn_recipient,reject_unknown_recipient_domain,reject_unauth_pipelining,reject_unauth_destinationsmtpd_sasl_auth_enable = yes
smtpd_sasl_local_domain = $myhostname
smtpd_sasl_security_options = noanonymous
smtpd_sasl_path = smtpd
六、編譯安裝courier-authlib
postfix使用courier-authlib實現虛擬用戶的認證
下載地址:http://www.courier-mta.org/download.html
6.1、編譯安裝courier-unicode
wget https://sourceforge.net/projects/courier/files/courier-unicode/2.1/courier-unicode-2.1.tar.bz2
tar xf courier-unicode-2.1.tar.bz2
cd courier-unicode-2.1/
./configure
make && make install
6.2、編譯安裝courier-authlib
wget https://sourceforge.net/projects/courier/files/authlib/0.69.0/courier-authlib-0.69.0.tar.bz2
tar xf courier-authlib-0.69.0.tar.bz2
cd courier-authlib-0.69.0/
#在編譯選項中指定mysql認證,指明mysql的庫文件,頭文件位置,指明安裝目錄以及配置文件目錄
./configure --prefix=/usr/local/courier-authlib     --sysconfdir=/etc     --without-authpam     --without-authshadow     --without-authvchkpw     --without-authpgsql     --with-authmysql     --with-mysql-libs=/usr/lib64/mysql     --with-mysql-includes=/usr/include/mysql     --with-redhat     --with-authmysqlrc=/etc/authmysqlrc     --with-authdaemonrc=/etc/authdaemonrc     --with-mailuser=postfix --with-mailgroup=postfix

make && make install
6.3、配置courier-authlib
chmod 755 /usr/local/courier-authlib/var/spool/authdaemon
cp /etc/authdaemonrc.dist  /etc/authdaemonrc
cp /etc/authmysqlrc.dist  /etc/authmysqlrc
配置使用mysql認證
vim /etc/authdaemonrc
authmodulelist="authmysql"
authmodulelistorig="authmysql"
daemons=10   #併發
配置其通過mysql進行郵件賬號認證
vim /etc/authmysqlrc
MYSQL_SERVER            localhost
MYSQL_USERNAME          extmail   #使用數據庫的所有者的用戶名
MYSQL_PASSWORD          extmail  #使用數據庫的所有者的密碼,生產環境下結合實際情況修改,如要修改,後面一系列都要修改
MYSQL_SOCKET            /var/lib/mysql/mysql.sock   #mysql的socket文件路徑,根據mysql的安裝方式,路徑不同
MYSQL_PORT               3306
MYSQL_DATABASE          extmail
MYSQL_USER_TABLE        mailbox
MYSQL_CRYPT_PWFIELD     password     #設置用戶密碼
DEFAULT_DOMAIN          zhongdianjizhi.com    #默認域
MYSQL_UID_FIELD         '2525'        #postfix用戶的UID
MYSQL_GID_FIELD         '2525'
MYSQL_LOGIN_FIELD       username  #用戶所在的表名,必須是username
MYSQL_HOME_FIELD        concat('/var/mailbox/',homedir)  #用戶賬號家目錄
MYSQL_NAME_FIELD        name   #
MYSQL_MAILDIR_FIELD     concat('/var/mailbox/',maildir)
6.4、導出authlib的庫文件給操作系統
echo "/usr/local/courier-authlib/lib/courier-authlib" >> /etc/ld.so.conf.d/courier-authlib.conf
ldconfig
6.5、提供sysv服務腳本
cp courier-authlib.sysvinit /etc/rc.d/init.d/courier-authlib
chmod 755 /etc/rc.d/init.d/courier-authlib
6.6、啓動服務
systemctl start courier-authlib.service
systemctl enable courier-authlib.service
6.7、新建虛擬用戶郵箱所在的目錄,並將其權限賦予postfix用戶
mkdir -pv /var/mailbox
chown -R postfix /var/mailbox/
七、配置postfix支持虛擬域和虛擬用戶
7.1、編輯/etc/postfix/main.cf,添加以下內容
#####virtual mailbox settings#####
virtual_mailbox_base = /var/mailbox
virtual_mailbox_maps = mysql:/etc/postfix/mysql_virtual_mailbox_maps.cf
virtual_mailbox_domains = mysql:/etc/postfix/mysql_virtual_domains_maps.cf
virtual_alias_domains =
virtual_alias_maps = mysql:/etc/postfix/mysql_virtual_alias_maps.cf
virtual_uid_maps = static:2525
virtual_gid_maps = static:2525
virtual_transport = virtual

#####QUOTA settings#####
message_size_limit = 14336000
virtual_mailbox_limit = 20971520
啓用虛擬域後,需要取消中心域,即註釋掉myhostname,mydestionation,mydomain,myorigin,或者將mydestionation修改爲需要的域。
#第94行 修改郵局主機名
#myhostname = mail.zhongdianjizhi.com
#第102行 修改郵局域名
#mydomain = zhongdianjizhi.com
#第118行 寄出郵件域名,刪除註釋
#myorigin = $mydomain
#第180行 修改可接收郵件的主機名和域名,可被中繼的域名
#mydestination = $myhostname, localhost.$mydomain, localhost, $mydomain
#第279 修改爲只允許本機
mynetworks = 127.0.0.0/8
Note:以上配置的.cf配置文件都是由extman來提供
7.2、使用extman源碼目錄下docs目錄中的extmail.sql和init.sql建立數據庫
進入源碼包
tar xf extman-1.1.tar.gz
cd extman-1.1/docs/
啓動mariadb
systemctl start mariadb.service修改extmail.sql 文件(mysql5.1以上版本需修改)
sed -i 's/TYPE/ENGINE/g' extmail.sql 導入數據庫
mysql -uroot  < extmail.sql
mysql -uroot  < init.sql
7.3、授予用戶extmail訪問extmail數據庫的權限
MariaDB [extmail]> GRANT all privileges on extmail.* TO extmail@localhost IDENTIFIED BY 'extmail';
MariaDB [extmail]> GRANT all privileges on extmail.* TO [email protected] IDENTIFIED BY 'extmail';
7.4、準備虛擬用戶的配置文件
cp mysql_virtual_* /etc/postfix/7.5、重啓postfix
systemctl restart postfix.service八、安裝extmail與extman
8.1、安裝extmail到httpd根目錄/var/www下
tar xf extmail-1.2.tar.gz
mkdir -pv /var/www/extsuite
mv extmail-1.2 /var/www/extsuite/extmail
cp /var/www/extsuite/extmail/webmail.cf.default /var/www/extsuite/extmail/webmail.cf
8.2、修改extmail主配置文件
vim /var/www/extsuite/extmail/webmail.cf
#修改語言爲中文
SYS_USER_LANG = zh_CN
#修改用戶郵件存放目錄
SYS_MAILDIR_BASE = /var/mailbox
#修改鏈接數據庫的用戶名密碼
SYS_MYSQL_USER = extmail
SYS_MYSQL_PASS = extmail
#修改authdaemo socket文件位置
SYS_AUTHLIB_SOCKET = /usr/local/courier-authlib/var/spool/authdaemon/socket
8.3、安裝extman到httpd根目錄/var/www下
mv extman-1.1/ /var/www/extsuite/extman
cp /var/www/extsuite/extman/webman.cf.default /var/www/extsuite/extman/webman.cf
8.4、修改extman主配置文件
vim /var/www/extsuite/extman/webman.cf
#修改用戶郵件存放目錄
SYS_MAILDIR_BASE = /var/mailbox
#關閉驗證模塊
SYS_CAPTCHA_ON = 0
#修改ID號
SYS_DEFAULT_UID = 2525
SYS_DEFAULT_GID = 2525
#修改連接數據庫的用戶名密碼
SYS_MYSQL_USER = extmail
SYS_MYSQL_PASS = extmail
#修改存放session的臨時目錄
SYS_SESS_DIR = /tmp
8.5、創建extman保存session的臨時目錄
mkdir -pv /tmp/extman
chown -R postfix.postfix /tmp/extman
8.6、驗證
[root@mail ~]# /usr/local/courier-authlib/sbin/authtest -s login [email protected] extmail
Authentication succeeded.

     Authenticated: [email protected]  (uid 2525, gid 2525)
    Home Directory: /var/mailbox/extmail.org/postmaster
           Maildir: /var/mailbox/extmail.org/postmaster/Maildir/
             Quota: (none)
Encrypted Password: $1$phz1mRrj$3ok6BjeaoJYWDBsEPZb5C0
Cleartext Password: extmail
           Options: (none)
九、配置apache
9.1、修改httpd主配置文件
vim /etc/httpd/conf/httpd.conf
#第119行,註釋中心主機
#DocumentRoot "/var/www/html"
#修改用戶與組爲postfix
User postfix
Group postfix

結尾加上虛擬主機配置
<VirtualHost *:80>
ServerName mail.zhongdianjizhi.com
DocumentRoot /var/www/extsuite/extmail/html/
ScriptAlias /extmail/cgi /var/www/extsuite/extmail/cgi
Alias /extmail /var/www/extsuite/extmail/html
ScriptAlias /extman/cgi /var/www/extsuite/extman/cgi
Alias /extman /var/www/extsuite/extman/html
</VirtualHost>
9.2、修改cgi目錄的屬主
chown -R postfix.postfix /var/www/extsuite/extmail/cgi/
chown -R postfix.postfix /var/www/extsuite/extman/cgi/
9.3、配置文件語法檢查
httpd -t9.4、編譯安裝Unix-Syslog
tar xf Unix-Syslog-1.1.tar.gz
cd Unix-Syslog-1.1/
perl Makefile.PL
make && make install
9.5、啓動httpd
systemctl start httpd十、登陸webmail管理
http://192.168.118.100/extmail
10.1、郵箱管理--添加域與用戶
默認用戶名:[email protected]
默認密碼:extmail123

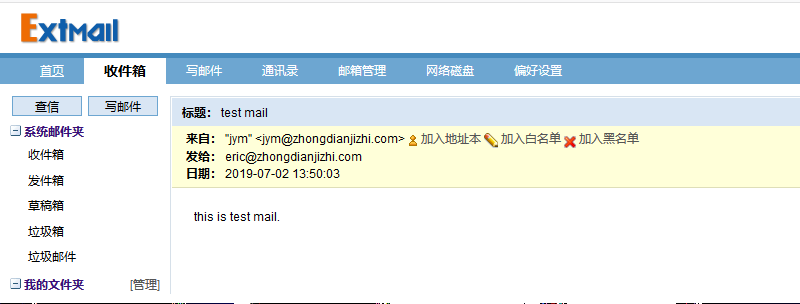
10.2、登陸郵箱
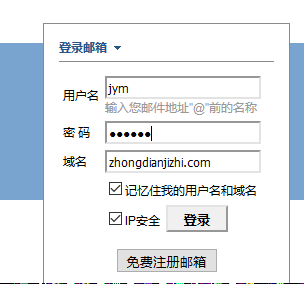
10.3、測試收發郵件