


配置開發環境
開發工具
- Node.js
- VS Code / WebStorm
搭建NPM私服
推薦使用Nexus,概念和配置方法同Maven私服一致,分爲proxy、hosted、group三類。
創建proxy如下: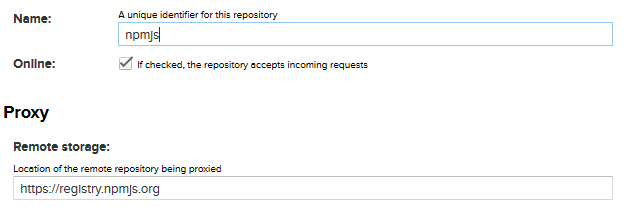
Remote URL: https://registry.npmjs.org
hosted、group創建方法不再贅述。創建完畢後在home下創建.npmrc文件,其內填寫group地址,如下:
registry=http://localhost:8081/repository/npm-public/
NPM
Angular 7,Node.js版本要求8.x或10.x。Angular 8,Node.js版本要求10.9.0或以上。
Windows系統下載安裝包安裝即可,RHEL、CentOS、Fedora執行如下命令安裝:
$ curl --silent --location https://rpm.nodesource.com/setup_8.x | sudo bash -
or
$ curl --silent --location https://rpm.nodesource.com/setup_10.x | sudo bash -
$ sudo yum -y install nodejs
查看nodejs、npm版本:
node -v
npm -v
更新npm:
npm i npm@latest -gNPM幫助
npm help
npm -l 列出所有命令用法
npm <command> -h 查看某一命令用法,如:
npm ls -h
npm help npm 在瀏覽器中查看幫助文檔,如:
npm help index (Index of all npm documentation)
npm help folders
npm help install
Angular項目創建後,可運行以下命令查看package版本信息:
npm ls 列出所有package
npm view [package] 查看package發佈的版本,如:
npm view ng-zorro-antd versions 列出所有ng-zorro-antd版本
npm view ng-zorro-antd 查看最新ng-zorro-antd版本信息
npm view [email protected] 查看[email protected]版本信息
進入node_modules/package目錄下,運行npm version可查看安裝的版本。
Angular CLI
安裝Angular CLI
npm install -g @angular/cli@latest注意:要用@latest
更新Angular CLI
Global package:
npm uninstall -g @angular/cli
npm cache verify
npm install -g @angular/cli@latest
Local project package:
# use rmdir /S/Q node_modules in Windows Command Prompt
# use rm -r -fo node_modules in Windows PowerShell
rm -rf node_modules
npm install --save-dev @angular/cli@latest
npm install
ng幫助
ng help 顯示所有命令的幫助
ng [command name] --help  顯示某一命令的幫助
ng add <collection> Add support for a library to your project
ng new <name> [options] Creates a new directory and a new Angular app
ng generate <schematic> [options] Generates and/or modifies files based on a schematic
ng update <packages> [options] Updates your application and its dependencies
ng build <project> [options] Builds your app and places it into the output path (dist/ by default)
ng serve <project> [options] Builds and serves your app, rebuilding on file changes
ng test <project> [options] Run unit tests in existing project
ng e2e <project> [options] Run e2e tests in existing project
常用參數:
--aot Build using Ahead of Time compilation
--base-href Base url for the application being built
--i18n-file Localization file to use for i18n
--prod Flag to set configuration to "prod"
Available schematics:
- serviceWorker
- application
- class
- component
- directive
- enum
- guard
- interface
- module
- pipe
- service
- universal
- appShell
- library
Angular CLI 6.0的新功能
ng add <collection> Add support for a library to your project
ng update <packages> [options] Updates your application and its dependencies.
ng generate library <name> create a library project within your CLI workspace
更新package
Angular每6個月發佈一個主版本,可運行ng update更新package。
ng update
在Project根目錄下運行ng update會顯示需要更新的package,可以選擇更新部分或全部package。
ng update
    We analyzed your package.json, there are some packages to update:

      Name                               Version                  Command to update
     --------------------------------------------------------------------------------
      @angular/cli                       6.2.8 -> 8.0.2           ng update @angular/cli
      @angular/core                      6.1.10 -> 8.0.0          ng update @angular/core
      @angular/core                      6.1.10 -> 7.2.15         ng update @angular/core
      rxjs                               6.3.3 -> 6.5.2           ng update rxjs

    There might be additional packages that are outdated.
Or run ng update --all to try to update all at the same time.package.json中的version語法請參見The semantic versioner for npm
npm update
npm updatenpm-check-updates
使用npm-check-updates是另一種package更新方式:
- 安裝npm-check-updates
npm i -g npm-check-updates - 升級
ncu -u - 安裝新版本
npm install
UI組件
UI組件,建議從Angular官網推薦的前幾個中選擇,它們都是開源/免費的:ag-Grid、Amexio、Angular Material、NG-ZORRO、Awade Jigsaw。
- ag-Grid(The best Javascript grid in the world)
數據表格組件,支持排序、篩選、編輯、選擇、分組、聚合、旋轉等許多強大的功能和操作 - Amexio
- 130+ UI組件
- 支持拖拽
- 響應式網頁設計
- 57個主題
- 支持圖表、地圖、儀表盤
- Angular Material
Angular官方組件庫,提供表單控件、導航、佈局、按鈕、彈出窗口、數據表格等組件。 - NG-ZORRO
阿里出品的企業級UI組件,由阿里計算平臺事業部、阿里雲等不同部門的一些小夥伴在原業務組件的基礎上共同構建而成,設計完全兼容並遵守Ant Design的規範,並定期會與 Ant Design React 版本保持功能同步。NG-ZORRO符合國人使用習慣,國內用戶較多。
ng-zorro-antd 是 Angular 版本 Ant Design 的實現,這意味着只有 Ant Design 支持的交互、功能纔會被 ng-zorro-antd 實現。 - Awade Jigsaw
中興大數據UED團隊出品
NG-ZORRO
- 初始化配置
進入項目文件夾,執行以下命令將自動完成ng-zorro-antd的初始化配置,包括引入國際化文件,導入模塊,引入樣式文件等
ng add ng-zorro-antd- 定製主題
初始化項目時,運行ng add ng-zorro-antd --theme 會自動配置主題文件src/theme.less,編輯文件即可自定義主題。樣式使用了Less作爲開發語言。
- 代碼演示
NG-ZORRO使用簡單,文檔、示例代碼全面,摘錄示例代碼如下:
表單
import { Component, OnInit } from '@angular/core';
import {
  AbstractControl,
  FormBuilder,
  FormGroup,
  Validators
} from '@angular/forms';

@Component({
  selector: 'nz-demo-form-normal-login',
  template: `
    <form nz-form [formGroup]="validateForm" class="login-form" (ngSubmit)="submitForm()">
      <nz-form-item>
        <nz-form-control>
          <nz-input-group nzPrefixIcon="anticon anticon-user">
            <input type="text" nz-input formControlName="userName" placeholder="Username">
          </nz-input-group>
          <nz-form-explain *ngIf="validateForm.get('userName').dirty && validateForm.get('userName').errors">Please input your username!</nz-form-explain>
        </nz-form-control>
      </nz-form-item>
      <nz-form-item>
        <nz-form-control>
          <nz-input-group nzPrefixIcon="anticon anticon-lock">
            <input type="password" nz-input formControlName="password" placeholder="Password">
          </nz-input-group>
          <nz-form-explain *ngIf="validateForm.get('password').dirty && validateForm.get('password').errors">Please input your Password!</nz-form-explain>
        </nz-form-control>
      </nz-form-item>
      <nz-form-item>
        <nz-form-control>
          <label nz-checkbox formControlName="remember">
            <span>Remember me</span>
          </label>
          <a class="login-form-forgot" class="login-form-forgot">Forgot password</a>
          <button nz-button class="login-form-button" [nzType]="'primary'">Log in</button>
          Or
          <a href="">register now!</a>
        </nz-form-control>
      </nz-form-item>
    </form>
  `,
  styles: [ `
    .login-form {
      max-width: 300px;
    }

    .login-form-forgot {
      float: right;
    }

    .login-form-button {
      width: 100%;
    }
  `
  ]
})
export class NzDemoFormNormalLoginComponent implements OnInit {
  validateForm: FormGroup;

  submitForm(): void {
    for (const i in this.validateForm.controls) {
      this.validateForm.controls[ i ].markAsDirty();
      this.validateForm.controls[ i ].updateValueAndValidity();
    }
  }

  constructor(private fb: FormBuilder) {
  }

  ngOnInit(): void {
    this.validateForm = this.fb.group({
      userName: [ null, [ Validators.required ] ],
      password: [ null, [ Validators.required ] ],
      remember: [ true ]
    });
  }
}
效果圖: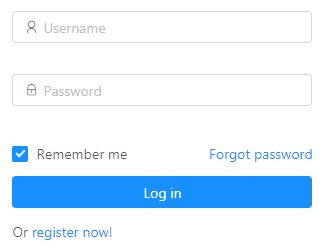
- NG-ZORRO Table
使用push或splice修改nzData的數據不會生效,需如下操作:
// 增加數據
this.dataSet = [ ...this.dataSet, {
  key    : `${this.i}`,
  name   : `Edward King ${this.i}`,
  age    : '32',
  address: `London, Park Lane no. ${this.i}`
}];
// 刪除數據
this.dataSet = this.dataSet.filter(d => d.key !== i);- 測試
注意,在angular.json的test部分也要引入樣式和SVG icon資源。
"test": {
  ...
    "styles": [
      "src/theme.less",
      "src/styles.css"
    ],
    "assets": [
      ...
      {
        "glob": "**/*",
        "input": "./node_modules/@ant-design/icons-angular/src/inline-svg/",
        "output": "/assets/"
      }
    ]
  }
}
使用NG-ZORRO組件的頁面,需導入BrowserAnimationsModule和NgZorroAntdModule:
TestBed.configureTestingModule({
     imports: [
       BrowserAnimationsModule,
       NgZorroAntdModule
     ]
})
自定義Pagination
使用NG-ZORRO的Pagination組件,演示如何自定義組件,如何使用HttpParams。
- 自定義組件PageComponent
page.components.ts
import {Component, EventEmitter, Input, Output} from '@angular/core';
import {DEFAULT_PAGE_SIZE} from '../../vo/page';

@Component({
  selector: 'app-page',
  templateUrl: './page.component.html'
})

export class PageComponent {
  @Input()
  total: number;

  @Input()
  pageIndex: number;

  @Input()
  pageSize = DEFAULT_PAGE_SIZE;

  pageSizeOptions = [10, 20, 30, 40];

  @Output()
  pageChange: EventEmitter<any> = new EventEmitter();

  indexChange(index: any) {
    this.pageChange.emit({'pageIndex': index, 'pageSize': this.pageSize});
  }

  sizeChange(size: any) {
    this.pageChange.emit({'pageIndex': 1, 'pageSize': size});
  }
}
page.components.html
<div style="float: right;">
  <nz-pagination [nzTotal]="total" [(nzPageIndex)]="pageIndex" (nzPageIndexChange)="indexChange($event)" [(nzPageSize)]="pageSize" [nzPageSizeOptions]="pageSizeOptions"
                 (nzPageSizeChange)="sizeChange($event)" nzShowSizeChanger>
  </nz-pagination>
</div>- 頁面調用
<app-page [total]="total" [pageIndex]="pageIndex" (pageChange)="pageChanged($event)"></app-page>...
pageChanged(event: any): void {
this.getAirlines(event.pageIndex - 1, event.pageSize);
}
getAirlines(page: number, size: number): void {
this.airlineService.searchAirlines(this.airline, page, size)
.subscribe(data => {
this.airlines = data.content;
this.totalItems = data.totalElements;
});
}
...- HttpParams
其餘方法略過,最終要調用HttpClient的get方法,需要封裝查詢參數、分頁參數(後臺使用Spring Data分頁方法):
...
this.http.get<T>('url', {params})
...
封裝方法如下:
import {HttpParams} from '@angular/common/http';
import {DEFAULT_PAGE_SIZE} from '../vo/page';

...
  pageParams<T>(data: T, page?: number, size?: number): HttpParams {
    let params = new HttpParams()
      .set('page', page ? page.toString() : '0')
      .set('size', size ? size.toString() : DEFAULT_PAGE_SIZE.toString());

    if (data === null) {
      return params;
    }

    Object.keys(data).forEach(function (key) {
      let value = data[key];
      if (value === '') {
        return;
      }
      if (value instanceof Date) {
        value = value.toISOString();
      }
      params = params.set(key, value);
    });
    return params;
  }
注意,不能寫成這樣:
let params = new HttpParams();
params.set('orderBy', '"$key"')
params.set('limitToFirst', "1");
HttpParams是不可變的,上面寫法將返回空值。
ExcelJS
ExcelJS是讀寫XLSX和CSV格式文件的開源組件,MIT License。相對於SheetJS組件,ExcelJS更容易設置Excel樣式。
安裝ExcelJS:
npm install --save exceljsExcelJS寫文件需使用FileSaver.js:
npm install --save file-saver然後在tsconfig.json中添加:
"paths": {
  "exceljs": [
    "node_modules/exceljs/dist/exceljs.js",
    "node_modules/file-saver/dist/FileSaver.js"
  ]
}
使用示例:
import {Workbook} from 'exceljs';
import * as fs from 'file-saver';

...
  const workBook = new Workbook();
  const workSheet = workBook.addWorksheet('Sheet1');
  workSheet.columns = [
    {header: 'ID', key: 'id', width: 12},
    {header: 'Name', key: 'name', width: 12},
    {header: 'Email', key: 'email', width: 50}
  ];

    var rows = [
    {id:1, name: 'Jason', email: '[email protected]'},
        {id:2, name: 'Coco', email: '[email protected]'}
    ];
    worksheet.addRows(rows);

  workSheet.getRow(1).eachCell((cell, colNumber) => {
    cell.fill = {type: 'pattern', pattern: 'solid', fgColor: {argb: 'FF00CCFF'}, bgColor: {argb: 'FFFFFF00'}};
    cell.font = {bold: true};
  });
  workSheet.getColumn('email').alignment = { vertical: 'bottom', horizontal: 'left' };

  workBook.xlsx.writeBuffer().then(value => {
    const blob = new Blob([value], {type: 'application/vnd.openxmlformats-officedocument.spreadsheetml.sheet'});
    fs.saveAs(blob, 'test');
  });
...
CKEditor 4
開源WYSIWYG HTML編輯器,支持GPL, LGPL, MPL協議。用法如下:
- Include CKEditor javascript files in your application
<script src="https://cdn.ckeditor.com/4.7.3/full-all/ckeditor.js"></script>- Install ng2-ckeditor
npm install --save ng2-ckeditor3.Include CKEditorModule in your main module
import { CKEditorModule } from 'ng2-ckeditor';

@NgModule({
  // ...
  imports:      [
    CKEditorModule
  ],
  // ...
})
export class AppModule { }- usage
<ckeditor [(ngModel)]="content" [config]="{extraPlug×××: 'divarea'}" name="editor"></ckeditor>學習資料
Angular
Angular中文
TypeScript
TypeScript中文網
NPM Docs
RxJS
NG-ZORRO
CKEditor Ecosystem
Learn Angular 5
Angular HTTP Client - Quickstart Guide
Angular Architecture - Smart Components vs Presentational Components