


主要内容:Spring Boot 2的基础应用、CORS配置、Actuator监控;Spring Boot集成springfox-swagger,利用Swagger生成JSON API文档,利用Swagger UI、Postman进行Rest API测试;Angular 6新特性,Angular与Spring Boot、Spring Security、JWT集成的方法;Spring Boot、Angular集成Sonar、Jenkins等。
本文主要参考了Rich Freedman先生的博客"Integrating Angular 2 with Spring Boot, JWT, and CORS",使用了部分代码(tour-of-heroes-jwt-full),博客地址请见文末参考文档。前端基于Angular官方样例Tour of Heroes。完整源码请从github下载:heroes-api, heroes-web 。
技术堆栈
- Spring Boot 2.1.1.RELEASE
- Spring Security
- Spring Data
- Spring Actuator
- JWT
- Springfox Swagger 2.9.2
- Angular 6.0
测试工具: Postman
代码质量检查: Sonar
CI: Jenkins
推荐IDE: IntelliJ IDEA、WebStorm/Visual Studio Code
Java代码中使用了lombok注解,IDE要安装lombok插件。
Spring Boot
创建Spring Boot App
创建Spring Boot项目最简易的方式是使用SPRING INITIALIZR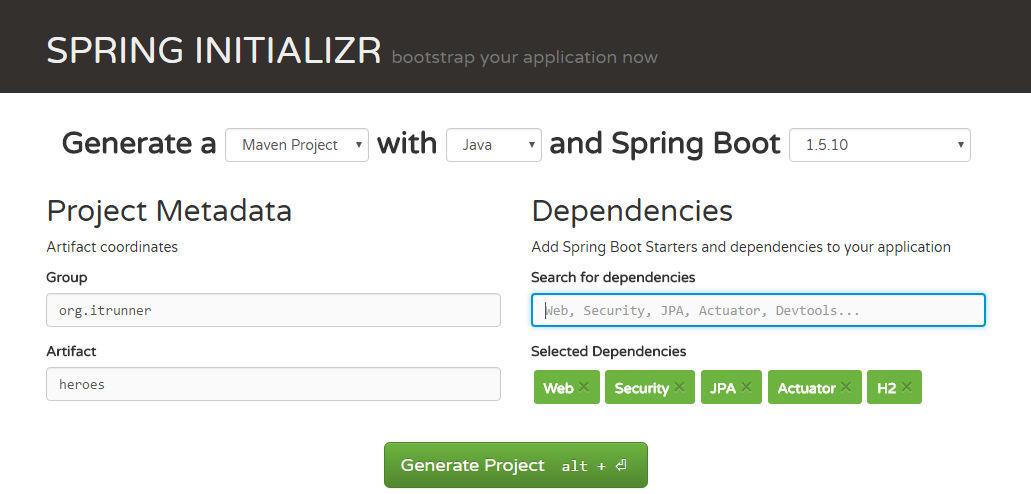
输入Group、Artifact,选择Dependency(Web、JPA、Security、Actuator、H2、PostgreSQL、Lombok)后,点击Generate Project,会生成zip包。下载后解压,编辑POM文件,添加java-jwt和springfox-swagger。我们选用了两个数据库H2、PostgreSQL,分别用于开发、测试环境,将其修改到两个profile dev和prod内。完成的POM文件如下:
<?xml version="1.0" encoding="UTF-8"?>
<project xmlns="http://maven.apache.org/POM/4.0.0" xmlns:xsi="http://×××w.w3.org/2001/XMLSchema-instance"
         xsi:schemaLocation="http://maven.apache.org/POM/4.0.0 http://maven.apache.org/xsd/maven-4.0.0.xsd">
    <modelVersion>4.0.0</modelVersion>

    <groupId>org.itrunner</groupId>
    <artifactId>heroes-api</artifactId>
    <version>1.0.0</version>
    <packaging>jar</packaging>

    <name>heroes</name>
    <description>Demo project for Spring Boot</description>

    <parent>
        <groupId>org.springframework.boot</groupId>
        <artifactId>spring-boot-starter-parent</artifactId>
        <version>2.1.1.RELEASE</version>
        <relativePath/>
    </parent>

    <properties>
        <project.build.sourceEncoding>UTF-8</project.build.sourceEncoding>
        <project.reporting.outputEncoding>UTF-8</project.reporting.outputEncoding>
        <project.profile>dev</project.profile>
        <java.version>1.8</java.version>
    </properties>

    <profiles>
        <profile>
            <id>dev</id>
            <activation/>
            <properties>
                <project.profile>dev</project.profile>
            </properties>
            <dependencies>
                <dependency>
                    <groupId>com.h2database</groupId>
                    <artifactId>h2</artifactId>
                    <scope>runtime</scope>
                </dependency>
            </dependencies>
        </profile>

        <profile>
            <id>prod</id>
            <properties>
                <project.profile>prod</project.profile>
            </properties>
            <dependencies>
                <dependency>
                    <groupId>org.postgresql</groupId>
                    <artifactId>postgresql</artifactId>
                    <scope>runtime</scope>
                </dependency>
            </dependencies>
        </profile>
    </profiles>

    <dependencies>
        <dependency>
            <groupId>org.springframework.boot</groupId>
            <artifactId>spring-boot-starter-data-jpa</artifactId>
        </dependency>
        <dependency>
            <groupId>org.springframework.boot</groupId>
            <artifactId>spring-boot-starter-web</artifactId>
        </dependency>
        <dependency>
            <groupId>org.springframework.boot</groupId>
            <artifactId>spring-boot-starter-security</artifactId>
        </dependency>
        <dependency>
            <groupId>org.springframework.boot</groupId>
            <artifactId>spring-boot-starter-actuator</artifactId>
        </dependency>
        <dependency>
            <groupId>com.auth0</groupId>
            <artifactId>java-jwt</artifactId>
            <version>3.4.1</version>
        </dependency>
        <dependency>
            <groupId>io.springfox</groupId>
            <artifactId>springfox-swagger2</artifactId>
            <version>2.9.2</version>
        </dependency>
        <dependency>
            <groupId>io.springfox</groupId>
            <artifactId>springfox-swagger-ui</artifactId>
            <version>2.9.2</version>
        </dependency>
        <dependency>
            <groupId>org.projectlombok</groupId>
            <artifactId>lombok</artifactId>
            <scope>provided</scope>
        </dependency>
        <dependency>
            <groupId>org.springframework.boot</groupId>
            <artifactId>spring-boot-starter-test</artifactId>
            <scope>test</scope>
        </dependency>
        <dependency>
            <groupId>org.springframework.security</groupId>
            <artifactId>spring-security-test</artifactId>
            <scope>test</scope>
        </dependency>
    </dependencies>

    <build>
        <plugins>
            <plugin>
                <groupId>org.springframework.boot</groupId>
                <artifactId>spring-boot-maven-plugin</artifactId>
            </plugin>
        </plugins>
    </build>
</project>
Application配置
Spring Boot可以零配置运行,为适应不同的环境可添加配置文件application.properties或application.yml来自定义配置、扩展配置。
本文以YML文件为例:
spring:
  banner:
    charset: utf-8
    image:
      location: classpath:banner.jpg
    location: classpath:banner.txt
  resources:
    add-mappings: true

api:
  base-path: /api

cors:
  allowed-origins: "*"
  allowed-methods: GET,POST,DELETE,PUT,OPTIONS
  allowed-headers: Origin,X-Requested-With,Content-Type,Accept,Accept-Encoding,Accept-Language,Host,Referer,Connection,User-Agent,Authorization

jwt:
  header: Authorization
  secret: mySecret
  expiration: 7200
  issuer: ITRunner
  authentication-path: /auth

springfox:
  documentation:
    swagger:
      v2:
        path: /api-docs

management:
  server:
    port: 8090
  endpoints:
    web:
      base-path: /actuator
      exposure:
        include: health,info

info:
  app:
    name: heroes
    version: 1.0

---
spring:
  profiles: dev
  jpa:
    hibernate:
      ddl-auto: create-drop
    properties:
      hibernate:
        format_sql: true
    show-sql: true
  datasource:
    platform: h2
    initialization-mode: always
server:
  port: 8080

---
spring:
  profiles: prod
  jpa:
    database-platform: org.hibernate.dialect.PostgreSQLDialect
    hibernate:
      ddl-auto: update
    properties:
      hibernate:
        default_schema: heroes
        format_sql: true
        jdbc:
          lob:
            non_contextual_creation: true
    show-sql: true
  datasource:
    platform: postgresql
    driver-class-name: org.postgresql.Driver
    url: jdbc:postgresql://localhost:5432/postgres
    username: hero
    password: hero
    initialization-mode: never
server:
  port: 8000

---
spring:
  profiles:
    active: @project.profile@
配置文件中包含了Banner、Swagger、CORS、JWT、Actuator、Profile等内容,其中active profile使用@project.profile@与pom属性建立了关联,这些将在后面的演示中用到。
下面是用来读取自定义配置的类Config:
package org.itrunner.heroes.config;

import org.springframework.boot.context.properties.ConfigurationProperties;
import org.springframework.stereotype.Component;

import java.util.ArrayList;
import java.util.List;

@Component
@ConfigurationProperties
public class Config {

    private Cors cors = new Cors();

    private Jwt jwt = new Jwt();

    // getter & setter

    public static class Cors {
        private List<String> allowedOrigins = new ArrayList<>();

        private List<String> allowedMethods = new ArrayList<>();

        private List<String> allowedHeaders = new ArrayList<>();

        // getter & setter
    }

    public static class Jwt {
        private String header;

        private String secret;

        private Long expiration;

        private String issuer;

        private String authenticationPath;

        // getter & setter
    }
}
自定义Banner
  banner:
    charset: utf-8
    image:
      location: classpath:banner.jpg
    location: classpath:banner.txt
  resources:
    add-mappings: true
Spring Boot启动时会在控制台输出Banner信息,支持文本和图片。图片支持gif、jpg、png等格式,会转换成ASCII码输出。
Log配置
Spring Boot Log支持Java Util Logging、 Log4J2、Logback,默认使用Logback。Log可以在application.properties或application.yml中配置。
application.properties:
logging.file=/var/log/heroes.log
logging.level.org.springframework.web=debug
也可以使用单独的配置文件(放在resources目录下)
logback-spring.xml:
<?xml version="1.0" encoding="UTF-8"?>
<configuration>
    <springProfile name="dev">
        <property name="LOG_FILE" value="D:/heroes.log"/>
    </springProfile>
    <springProfile name="prod">
        <property name="LOG_FILE" value="/var/log/heroes.log"/>
    </springProfile>

    <include resource="org/springframework/boot/logging/logback/base.xml"/>

    <logger name="root" level="WARN"/>

    <springProfile name="dev">
        <logger name="root" level="INFO"/>
    </springProfile>
        <springProfile name="prod">
        <logger name="root" level="INFO"/>
    </springProfile>
</configuration>
初始化数据
可通过配置指定Spring Boot启动时是否初始化数据:
  datasource:
    initialization-mode: always
在resources下创建data.sql文件,内容如下:
INSERT INTO HERO(ID, NAME) VALUES(NEXTVAL('HERO_SEQ'), 'Black Widow');
INSERT INTO HERO(ID, NAME) VALUES(NEXTVAL('HERO_SEQ'), 'Superman');
INSERT INTO HERO(ID, NAME) VALUES(NEXTVAL('HERO_SEQ'), 'Rogue');
INSERT INTO HERO(ID, NAME) VALUES(NEXTVAL('HERO_SEQ'), 'Batman');
INSERT INTO HERO(ID, NAME) VALUES(NEXTVAL('HERO_SEQ'), 'Jason');

INSERT INTO USERS(ID, USERNAME, PASSWORD, EMAIL, ENABLED, LASTPASSWORDRESETDATE) VALUES (NEXTVAL('USER_SEQ'), 'admin', '$2a$08$lDnHPz7eUkSi6ao14Twuau08mzhWrL4kyZGGU5xfiGALO/Vxd5DOi', '[email protected]', TRUE, to_date('01-01-2018', 'dd-MM-yyyy'));
INSERT INTO USERS(ID, USERNAME, PASSWORD, EMAIL, ENABLED, LASTPASSWORDRESETDATE) VALUES (NEXTVAL('USER_SEQ'), 'jason', '$2a$10$6m2VoqZAxa.HJNErs2lZyOFde92PzjPqc88WL2QXYT3IXqZmYMk8i', '[email protected]', TRUE, to_date('01-01-2018','dd-MM-yyyy'));
INSERT INTO USERS(ID, USERNAME, PASSWORD, EMAIL, ENABLED, LASTPASSWORDRESETDATE) VALUES (NEXTVAL('USER_SEQ'), 'fisher', '$2a$10$TBPPC.JbSjH1tuauM8yRauF2k09biw8mUDmYHMREbNSXPWzwY81Ju', '[email protected]', FALSE, to_date('01-01-2018','dd-MM-yyyy'));

INSERT INTO AUTHORITY (ID, AUTHORITY_NAME) VALUES (NEXTVAL('AUTHORITY_SEQ'), 'ROLE_USER');
INSERT INTO AUTHORITY (ID, AUTHORITY_NAME) VALUES (NEXTVAL('AUTHORITY_SEQ'), 'ROLE_ADMIN');

INSERT INTO USER_AUTHORITY (USER_ID, AUTHORITY_ID) VALUES (1, 1);
INSERT INTO USER_AUTHORITY (USER_ID, AUTHORITY_ID) VALUES (1, 2);
INSERT INTO USER_AUTHORITY (USER_ID, AUTHORITY_ID) VALUES (2, 1);
INSERT INTO USER_AUTHORITY (USER_ID, AUTHORITY_ID) VALUES (3, 1);
说明:
- 不同数据库语法不同时,可创建多个初始化文件,命名格式data-${platform}.sql,比如data-h2.sql、data-postgresql.sql
- 密码与用户名相同
Domain
在"Tour of Heroes"中使用了angular-in-memory-web-api,此处使用H2嵌入式数据库取代,增加Hero Domain。
Hero Domain
package org.itrunner.heroes.domain;

import lombok.AllArgsConstructor;
import lombok.Data;
import lombok.NoArgsConstructor;

import javax.persistence.*;
import javax.validation.constraints.NotNull;

@Entity
@Data
@NoArgsConstructor
@AllArgsConstructor
public class Hero {
    @Id
    @Column(name = "ID")
    @GeneratedValue(strategy = GenerationType.SEQUENCE, generator = "HERO_SEQ")
    @SequenceGenerator(name = "HERO_SEQ", sequenceName = "HERO_SEQ", allocationSize = 1)
    private Long id;

    @Column(name = "NAME", unique = true, length = 30)
    @NotNull
    private String name;
}
在我们的例子中,包含用户验证功能,新增User、Authority Domain:
User Domain
package org.itrunner.heroes.domain;

import lombok.Getter;
import lombok.Setter;

import javax.persistence.*;
import javax.validation.constraints.NotNull;
import javax.validation.constraints.Size;
import java.util.Date;
import java.util.List;

@Entity
@Getter
@Setter
@Table(name = "USERS")
public class User {
    @Id
    @Column(name = "ID")
    @GeneratedValue(strategy = GenerationType.SEQUENCE, generator = "USER_SEQ")
    @SequenceGenerator(name = "USER_SEQ", sequenceName = "USER_SEQ")
    private Long id;

    @Column(name = "USERNAME", length = 50, unique = true)
    @NotNull
    @Size(min = 4, max = 50)
    private String username;

    @Column(name = "PASSWORD", length = 100)
    @NotNull
    @Size(min = 4, max = 100)
    private String password;

    @Column(name = "EMAIL", length = 50)
    @NotNull
    @Size(min = 4, max = 50)
    private String email;

    @Column(name = "ENABLED")
    @NotNull
    private Boolean enabled;

    @Column(name = "LASTPASSWORDRESETDATE")
    @Temporal(TemporalType.TIMESTAMP)
    @NotNull
    private Date lastPasswordResetDate;

    @ManyToMany(fetch = FetchType.EAGER)
    @JoinTable(name = "USER_AUTHORITY", joinColumns = {@JoinColumn(name = "USER_ID", referencedColumnName = "ID")},
            inverseJoinColumns = {@JoinColumn(name = "AUTHORITY_ID", referencedColumnName = "ID")})
    private List<Authority> authorities;
}
Authority Domain
package org.itrunner.heroes.domain;

import lombok.Data;

import javax.persistence.*;
import javax.validation.constraints.NotNull;
import java.util.List;

@Entity
@Data
@Table(name = "AUTHORITY")
public class Authority {
    @Id
    @Column(name = "ID")
    @GeneratedValue(strategy = GenerationType.SEQUENCE, generator = "AUTHORITY_SEQ")
    @SequenceGenerator(name = "AUTHORITY_SEQ", sequenceName = "AUTHORITY_SEQ")
    private Long id;

    @Column(name = "AUTHORITY_NAME", length = 50)
    @NotNull
    @Enumerated(EnumType.STRING)
    private AuthorityName name;

    @ManyToMany(mappedBy = "authorities", fetch = FetchType.LAZY)
    private List<User> users;
}
AuthorityName
package org.itrunner.heroes.domain;

public enum AuthorityName {
    ROLE_USER, ROLE_ADMIN
}
Repository
JpaRepository提供了常用的方法,仅需增加一些自定义实现:
HeroRepository
package org.itrunner.heroes.repository;

import org.itrunner.heroes.domain.Hero;
import org.springframework.data.jpa.repository.JpaRepository;
import org.springframework.data.jpa.repository.Query;
import org.springframework.data.repository.query.Param;

import java.util.List;

public interface HeroRepository extends JpaRepository<Hero, Long> {

    @Query("select h from Hero h where lower(h.name) like CONCAT('%', lower(:name), '%')")
    List<Hero> findByName(@Param("name") String name);

}
UserRepository
package org.itrunner.heroes.repository;

import org.itrunner.heroes.domain.User;
import org.springframework.data.jpa.repository.JpaRepository;

public interface UserRepository extends JpaRepository<User, Long> {
    User findByUsername(String username);
}
Service
为了演示Service的使用,增加了HeroService,在Service层配置了transaction。
package org.itrunner.heroes.service;

import org.itrunner.heroes.domain.Hero;
import org.itrunner.heroes.exception.HeroNotFoundException;
import org.itrunner.heroes.repository.HeroRepository;
import org.springframework.beans.factory.annotation.Autowired;
import org.springframework.stereotype.Service;
import org.springframework.transaction.annotation.Transactional;

import java.util.List;

@Service
@Transactional
public class HeroService {
    @Autowired
    private HeroRepository repository;

    public Hero getHeroById(Long id) {
        return repository.findById(id).orElseThrow(() -> new HeroNotFoundException(id));
    }

    public List<Hero> getAllHeroes() {
        return repository.findAll();
    }

    public List<Hero> findHeroesByName(String name) {
        return repository.findByName(name);
    }

    public Hero saveHero(Hero hero) {
        return repository.save(hero);
    }

    public void deleteHero(Long id) {
        repository.deleteById(id);
    }
}
Rest Controller
HeroController
演示了GET、POST、PUT、DELETE方法的使用。
package org.itrunner.heroes.controller;

import org.itrunner.heroes.domain.Hero;
import org.itrunner.heroes.service.HeroService;
import org.springframework.beans.factory.annotation.Autowired;
import org.springframework.http.MediaType;
import org.springframework.web.bind.annotation.*;

import java.util.List;

@RestController
@RequestMapping(value = "${api.base-path}", produces = MediaType.APPLICATION_JSON_VALUE)
public class HeroController {
    @Autowired
    private HeroService service;

    @GetMapping("/heroes/{id}")
    public Hero getHeroById(@PathVariable("id") Long id) {
        return service.getHeroById(id);
    }

    @GetMapping("/heroes")
    public List<Hero> getHeroes() {
        return service.getAllHeroes();
    }

    @GetMapping("/heroes/")
    public List<Hero> searchHeroes(@RequestParam("name") String name) {
        return service.findHeroesByName(name);
    }

    @PostMapping("/heroes")
    public Hero addHero(@RequestBody Hero hero) {
        return service.saveHero(hero);
    }

    @PutMapping("/heroes")
    public Hero updateHero(@RequestBody Hero hero) {
        return service.saveHero(hero);
    }

    @DeleteMapping("/heroes/{id}")
    public void deleteHero(@PathVariable("id") Long id) {
        service.deleteHero(id);
    }
}
异常处理
在HeroController中没有处理异常的代码,如数据操作失败会返回什么结果呢?Spring Boot有全局的异常处理机制,返回ResponseEntity。如添加了重复的记录,将显示如下信息:
可查看BasicErrorController类的error(HttpServletRequest request)方法跟踪其是如何处理的:
public ResponseEntity<Map<String, Object>> error(HttpServletRequest request) {
    Map<String, Object> body = getErrorAttributes(request, isIncludeStackTrace(request, MediaType.ALL));
    HttpStatus status = getStatus(request);
    return new ResponseEntity<>(body, status);
}
显然返回500错误一般是不合适的,错误信息也可能需要修改,可使用@ExceptionHandler自定义异常处理机制,如下:
@ExceptionHandler(DataAccessException.class)
public ResponseEntity<Map<String, Object>> handleDataAccessException(DataAccessException exception) {
    LOG.error(exception.getMessage(), exception);
    Map<String, Object> body = new HashMap<>();
    body.put("message", exception.getMessage());
    return ResponseEntity.badRequest().body(body);
}
如@ExceptionHandler中未指定参数将会处理方法参数列表中的所有异常。
对于自定义的异常,可使用@ResponseStatus注解定义code和reason,未定义reason时message将显示异常信息。
package org.itrunner.heroes.exception;

import org.springframework.web.bind.annotation.ResponseStatus;

import static org.springframework.http.HttpStatus.NOT_FOUND;

@ResponseStatus(code = NOT_FOUND)
public class HeroNotFoundException extends RuntimeException {
    public HeroNotFoundException(Long id) {
        this("Could not find hero with id '%s'", id);
    }

    public HeroNotFoundException(String name) {
        this("Could not find hero with name '%s'", name);
    }

    public HeroNotFoundException(String message, Object... args) {
        super(String.format(message, args));
    }
}
也可以使用@ControllerAdvice定义一个类统一处理Exception,如下:
package org.itrunner.heroes.exception;

import org.slf4j.Logger;
import org.slf4j.LoggerFactory;
import org.springframework.dao.DataAccessException;
import org.springframework.dao.DataIntegrityViolationException;
import org.springframework.dao.DuplicateKeyException;
import org.springframework.http.ResponseEntity;
import org.springframework.web.bind.annotation.ControllerAdvice;
import org.springframework.web.bind.annotation.ExceptionHandler;

@ControllerAdvice(basePackages = {"org.itrunner.heroes.controller"})
public class ErrorControllerAdvice {
    private static final Logger LOG = LoggerFactory.getLogger(ErrorControllerAdvice.class);

    @ExceptionHandler({
            DuplicateKeyException.class,
            DataIntegrityViolationException.class,
            DataAccessException.class,
            Exception.class
    })
    public ResponseEntity<ErrorMessage> handleException(Exception e) {
        LOG.error(e.getMessage(), e);

        if (e instanceof DuplicateKeyException) {
            return handleMessage("40001", e.getMessage());
        }

        if (e instanceof DataIntegrityViolationException) {
            return handleMessage("40002", e.getMessage());
        }

        if (e instanceof DataAccessException) {
            return handleMessage("40003", e.getMessage());
        }

        return handleMessage("40000", e.getMessage());
    }

    private ResponseEntity<ErrorMessage> handleMessage(String code, String message) {
        return ResponseEntity.badRequest().body(new ErrorMessage(code, message));
    }
}
package org.itrunner.heroes.exception;
import io.swagger.annotations.ApiModel;
@ApiModel
public class ErrorMessage {
private String code;
private String message;
public ErrorMessage() {
}
public ErrorMessage(String code, String message) {
this.code = code;
this.message = message;
}
// getter & setter
}
说明:@RestController内定义的ExceptionHandler优先级更高。
CORS
出于安全原因,浏览器限制从脚本内发起的跨源(域或端口)HTTP请求。这意味着Web应用程序(如XMLHttpRequest和Fetch)只能从加载应用程序的同一个域请求HTTP资源。CORS机制允许Web 应用服务器进行跨域访问控制,从而使跨域数据传输得以安全进行。
CORS(Cross-Origin Resource Sharing)
For simple cases like this GET, when your Angular code makes an XMLHttpRequest that the browser determines is cross-origin, the browser looks for an HTTP header named Access-Control-Allow-Origin in the response. If the response header exists, and the value matches the origin domain, then the browser passes the response back to the calling javascript. If the response header does not exist, or it's value does not match the origin domain, then the browser does not pass the response back to the calling code, and you get the error that we just saw.
For more complex cases, like PUTs, DELETEs, or any request involving credentials (which will eventually be all of our requests), the process is slightly more involved. The browser will send an OPTION request to find out what methods are allowed. If the requested method is allowed, then the browser will make the actual request, again passing or blocking the response depending on the Access-Control-Allow-Origin header in the response.
Spring Web支持CORS,只需配置一些参数。因我们引入了Spring Security,这里我们继承WebSecurityConfigurerAdapter,先禁用CSRF,不进行用户验证。
package org.itrunner.heroes.config;

import org.itrunner.heroes.config.Config.Cors;
import org.springframework.beans.factory.annotation.Autowired;
import org.springframework.context.annotation.Bean;
import org.springframework.context.annotation.Configuration;
import org.springframework.security.config.annotation.web.builders.HttpSecurity;
import org.springframework.security.config.annotation.web.configuration.EnableWebSecurity;
import org.springframework.security.config.annotation.web.configuration.WebSecurityConfigurerAdapter;
import org.springframework.web.cors.CorsConfiguration;
import org.springframework.web.cors.CorsConfigurationSource;
import org.springframework.web.cors.UrlBasedCorsConfigurationSource;

@Configuration
@EnableWebSecurity
@SuppressWarnings("SpringJavaAutowiringInspection")
public class WebSecurityConfig extends WebSecurityConfigurerAdapter {
    @Autowired
    private Config config;

    @Override
    protected void configure(HttpSecurity http) throws Exception {
        http.cors().and().csrf().disable().authorizeRequests().anyRequest().permitAll();
    }

    @Bean
    CorsConfigurationSource corsConfigurationSource() {
        CorsConfiguration configuration = new CorsConfiguration();
        Cors cors = config.getCors();
        configuration.setAllowedOrigins(cors.getAllowedOrigins());
        configuration.setAllowedMethods(cors.getAllowedMethods());
        configuration.setAllowedHeaders(cors.getAllowedHeaders());
        UrlBasedCorsConfigurationSource source = new UrlBasedCorsConfigurationSource();
        source.registerCorsConfiguration("/**", configuration);
        return source;
    }

}
说明:若前后台域名不一致,如未集成CORS,前端Angular访问时将会报如下错误:
Cross-Origin Request Blocked: The Same Origin Policy disallows reading the remote resource at http://localhost:8080/api/heroes. (Reason: CORS header ‘Access-Control-Allow-Origin’ missing)
启动Spring Boot
启动HeroesApplication。
package org.itrunner.heroes;

import org.springframework.boot.SpringApplication;
import org.springframework.boot.autoconfigure.SpringBootApplication;
import org.springframework.boot.autoconfigure.domain.EntityScan;
import org.springframework.data.jpa.repository.config.EnableJpaRepositories;

@SpringBootApplication
@EnableJpaRepositories(basePackages = {"org.itrunner.heroes.repository"})
@EntityScan(basePackages = {"org.itrunner.heroes.domain"})
public class HeroesApplication {

    public static void main(String[] args) {
        SpringApplication.run(HeroesApplication.class, args);
    }
}
在启动时可以指定启用的profile:--spring.profiles.active=dev
Postman测试
Postman是一款非常好用的Restful API测试工具,可保存历史,可配置环境变量,常和Swagger UI结合使用。
单元测试与集成测试
单元测试
使用mockito进行单元测试,示例:
package org.itrunner.heroes.service;

import org.itrunner.heroes.domain.Hero;
import org.itrunner.heroes.repository.HeroRepository;
import org.junit.Before;
import org.junit.Test;
import org.junit.runner.RunWith;
import org.mockito.InjectMocks;
import org.mockito.Mock;
import org.mockito.junit.MockitoJUnitRunner;

import java.util.ArrayList;
import java.util.List;
import java.util.Optional;

import static org.assertj.core.api.Assertions.assertThat;
import static org.mockito.BDDMockito.given;

@RunWith(MockitoJUnitRunner.class)
public class HeroServiceTest {
    @Mock
    private HeroRepository heroRepository;

    @InjectMocks
    private HeroService heroService;

    private List<Hero> heroes;

    @Before
    public void setup() {
        heroes = new ArrayList<>();
        heroes.add(new Hero(1L, "Rogue"));
        heroes.add(new Hero(2L, "Jason"));

        given(heroRepository.findById(1L)).willReturn(Optional.of(heroes.get(0)));
        given(heroRepository.findAll()).willReturn(heroes);
        given(heroRepository.findByName("o")).willReturn(heroes);
    }

    @Test
    public void getHeroById() {
        Hero hero = heroService.getHeroById(1L);
        assertThat(hero.getName()).isEqualTo("Rogue");
    }

    @Test
    public void getAllHeroes() {
        List<Hero> heroes = heroService.getAllHeroes();
        assertThat(heroes.size()).isEqualTo(2);
    }

    @Test
    public void findHeroesByName() {
        List<Hero> heroes = heroService.findHeroesByName("o");
        assertThat(heroes.size()).isEqualTo(2);
    }
}
集成测试
使用@RunWith(SpringRunner.class)和@SpringBootTest进行集成测试,使用TestRestTemplate来调用Rest Api。
@SpringBootTest的webEnvironment属性有以下可选值:
- MOCK: Loads a WebApplicationContext and provides a mock servlet environment. Embedded servlet containers are not started when using this annotation.
- RANDOM_PORT: Loads an ServletWebServerApplicationContext and provides a real servlet environment. Embedded servlet containers are started and listen on a random port.
- DEFINED_PORT: Loads a ServletWebServerApplicationContext and provides a real servlet environment. Embedded servlet containers are started and listen on a defined port (from your application.properties or on the default port of 8080).
- NONE: Loads an ApplicationContext by using SpringApplication but does not provide any servlet environment.
当进行集成测试时,推荐使用RANDOM_PORT,这样会随机选择一个可用端口。
package org.itrunner.heroes;

import org.itrunner.heroes.domain.Hero;
import org.junit.Test;
import org.junit.runner.RunWith;
import org.springframework.beans.factory.annotation.Autowired;
import org.springframework.boot.test.context.SpringBootTest;
import org.springframework.boot.test.web.client.TestRestTemplate;
import org.springframework.http.HttpEntity;
import org.springframework.http.HttpMethod;
import org.springframework.http.ResponseEntity;
import org.springframework.test.context.junit4.SpringRunner;

import java.util.HashMap;
import java.util.List;
import java.util.Map;

import static org.assertj.core.api.Assertions.assertThat;

@RunWith(SpringRunner.class)
@SpringBootTest(webEnvironment = SpringBootTest.WebEnvironment.RANDOM_PORT)
public class HeroesApplicationTests {
    @Autowired
    private TestRestTemplate restTemplate;

    @Test
    public void add_update_find_delete_hero() {
        Hero hero = new Hero();
        hero.setName("Jack");

        // add hero
        hero = restTemplate.postForObject("/api/heroes", hero, Hero.class);
        assertThat(hero.getId()).isNotNull();

        // update hero
        hero.setName("Jacky");
        HttpEntity<Hero> requestEntity = new HttpEntity<>(hero);
        hero = restTemplate.exchange("/api/heroes", HttpMethod.PUT, requestEntity, Hero.class).getBody();
        assertThat(hero.getName()).isEqualTo("Jacky");

        // find heroes by name
        Map<String, String> urlVariables = new HashMap<>();
        urlVariables.put("name", "m");
        List<Hero> heroes = restTemplate.getForObject("/api/heroes/?name={name}", List.class, urlVariables);
        assertThat(heroes.size()).isEqualTo(2);

        // get hero by id
        hero = restTemplate.getForObject("/api/heroes/" + hero.getId(), Hero.class);
        assertThat(hero.getName()).isEqualTo("Jacky");

        // delete hero successfully
        ResponseEntity<String> response = restTemplate.exchange("/api/heroes/" + hero.getId(), HttpMethod.DELETE, null, String.class);
        assertThat(response.getStatusCodeValue()).isEqualTo(200);

        // delete hero
        response = restTemplate.exchange("/api/heroes/9999", HttpMethod.DELETE, null, String.class);
        assertThat(response.getStatusCodeValue()).isEqualTo(400);
    }
}
Actuator监控
Actuator用来监控和管理Spring Boot应用,支持很多的endpoint。
| ID | Description | JMX Default Exposure | Web Default Exposure |
|---|---|---|---|
| beans | Exposes audit events information for the current application | Yes | No |
| auditevents | Displays a complete list of all the Spring beans in your application | Yes | No |
| conditions | Shows the conditions that were evaluated on configuration and auto-configuration classes and the reasons why they did or did not match | Yes | No |
| configprops | Displays a collated list of all @ConfigurationProperties | Yes | No |
| env | Exposes properties from Spring’s ConfigurableEnvironment | Yes | No |
| flyway | Shows any Flyway database migrations that have been applied | Yes | No |
| health | Shows application health information | Yes | Yes |
| httptrace | Displays HTTP trace information (by default, the last 100 HTTP request-response exchanges) | Yes | No |
| info | Displays arbitrary application info | Yes | Yes |
| loggers | Shows and modifies the configuration of loggers in the application | Yes | No |
| liquibase | Shows any Liquibase database migrations that have been applied | Yes | No |
| metrics | Shows ‘metrics’ information for the current application | Yes | No |
| mappings | Displays a collated list of all @RequestMapping paths | Yes | No |
| scheduledtasks | Displays the scheduled tasks in your application | Yes | No |
| sessions | Allows retrieval and deletion of user sessions from a Spring Session-backed session store | Yes | No |
| shutdown | Lets the application be gracefully shutdown | Yes | No |
| threaddump | Performs a thread dump | Yes | No |
为了启用Actuator需要增加以下dependency:
<dependency>
    <groupId>org.springframework.boot</groupId>
    <artifactId>spring-boot-starter-actuator</artifactId>
</dependency>
默认访问Actuator需要验证,端口与application相同,base-path为/actuator(即访问endpoint时的前置路径),这些都可以配置,application info信息也可以配置。
management:
  server:
    port: 8090
  endpoints:
    web:
      base-path: /actuator
      exposure:
        include: health,info
  endpoint:
    health:
      show-details: always

info:
  app:
    name: heroes
    version: 1.0
在WebSecurityConfig configure(HttpSecurity http)方法中增加权限配置:
.authorizeRequests()
.requestMatchers(EndpointRequest.to("health", "info")).permitAll()
默认,除shutdown外所有endpoint都是启用的,启用shutdown的配置如下:
management.endpoint.shutdown.enabled=true也可以禁用所有的endpoint,只启用你需要的:
management.endpoints.enabled-by-default=false
management.endpoint.info.enabled=true访问URL:http://localhost:8090/actuator/health http://localhost:8090/actuator/info ,更多信息请查阅Spring Boot文档。
Sonar集成
增加如下plugin配置:
<plugins>
    <plugin>
        <groupId>org.codehaus.mojo</groupId>
        <artifactId>sonar-maven-plugin</artifactId>
        <version>3.4.1.1168</version>
    </plugin>
    <plugin>
        <groupId>org.jacoco</groupId>
        <artifactId>jacoco-maven-plugin</artifactId>
        <version>0.8.1</version>
        <configuration>
            <destFile>${project.build.directory}/jacoco.exec</destFile>
            <dataFile>${project.build.directory}/jacoco.exec</dataFile>
        </configuration>
        <executions>
            <execution>
                <goals>
                    <goal>prepare-agent</goal>
                </goals>
            </execution>
        </executions>
    </plugin>
</plugins>
为生成测试报告需要使用jacoco-maven-plugin。生成Sonar报告的命令如下:
mvn clean org.jacoco:jacoco-maven-plugin:prepare-agent test sonar:sonarCI集成
Jenkins支持pipeline后大大简化了任务配置,使用Jenkinsfile定义pipeline并提交到SCM,项目成员修改CI流程后Jenkins能自动同步。以下是简单的Jenkinsfile示例:
node {
    checkout scm
    stage('Test') {
        bat 'mvn clean org.jacoco:jacoco-maven-plugin:prepare-agent test'
    }
    stage('Sonar') {
        bat 'mvn sonar:sonar'
    }
    stage('Package') {
        bat 'mvn clean package -Dmaven.test.skip=true'
    }
}Jenkinsfile文件一般放在项目根目录下(文件命名为Jenkinsfile)。Pipeline支持声明式和Groovy两种语法,声明式更简单,Groovy更灵活。例子使用的是Groovy语法,适用于windows环境(linux将bat改为sh),详细的介绍请查看Pipeline Syntax。
在创建Jenkins任务时选择Pipeline(流水线)类型,然后在定义pipeline时选择“Pipeline script from SCM”,配置好SCM后填写Pipeline路径即可。
集成Spring Security与JWT
JWT
JSON Web Token (JWT) is an open standard (RFC 7519) that defines a compact and self-contained way for securely transmitting information between parties as a JSON object. This information can be verified and trusted because it is digitally signed. JWTs can be signed using a secret (with the HMAC algorithm) or a public/private key pair using RSA.
JSON Web Token由三部分组成:
- Header 包含token类型与算法
- Payload 包含三种Claim: registered、public、private。
Registered包含一些预定义的claim:iss (issuer)、 sub (subject)、aud (audience)、exp (expiration time)、nbf(Not Before)、iat (Issued At)、jti(JWT ID)
Public 可以随意定义,但为避免冲突,应使用IANA JSON Web Token Registry 中定义的名称,或将其定义为包含namespace的URI以防命名冲突。
Private 非registered或public claim,各方之间共享信息而创建的定制声明。 - Signature
生成的JWT Base64字符串以点分隔,格式如下:
eyJ0eXAiOiJKV1QiLCJhbGciOiJIUzI1NiJ9.eyJzdWIiOiJ0ZXN0IiwiaXNzIjoidGVzdCIsImV4cCI6MTUxOTQ2MzYyMCwiaWF0IjoxNTE5NDU2NDIwfQ.lWyU0c0r2lh8f8pzETfmvGWaPpBixOUsHJ9Q2mPQyaI
JWT用于用户验证时,Payload至少要包含User ID和expiration time。
验证流程
浏览器收到JWT后将其保存在local storage中,当访问受保护资源时在header中添加token,通常使用Bearer Token格式:
Authorization: Bearer <token>JWT验证机制是无状态的,Server并不保存用户状态。JWT包含了所有必要的信息,减少了查询数据库的需求。
示例使用的是Auth0 Open Source API - java-jwt。
说明:
- Auth0 implements proven, common and popular identity protocols used in consumer oriented web products (OAuth 2.0, OpenID Connect) and in enterprise deployments (SAML, WS-Federation, LDAP).
- OAuth 2.0 is an authorization framework that enables a third-party application to obtain limited access to resources the end-user owns.
创建和验证JWT Token
JWT支持HMAC、RSA、ECDSA算法。其中HMAC使用secret,RSA、ECDSA使用key pairs或KeyProvider,私钥用于签名,公钥用于验证。当使用KeyProvider时可以在运行时更改私钥或公钥。
示例
使用HS256创建Token
Algorithm algorithm = Algorithm.HMAC256("secret");
String token = JWT.create().withIssuer("auth0").sign(algorithm);
使用RS256创建Token
RSAPublicKey publicKey = //Get the key instance
RSAPrivateKey privateKey = //Get the key instance
Algorithm algorithm = Algorithm.RSA256(publicKey, privateKey);
String token = JWT.create().withIssuer("auth0").sign(algorithm);
使用HS256验证Token
String token = "eyJhbGciOiJIUzI1NiIsInR5cCI6IkpXUyJ9.eyJpc3MiOiJhdXRoMCJ9.AbIJTDMFc7yUa5MhvcP03nJPyCPzZtQcGEp-zWfOkEE";
Algorithm algorithm = Algorithm.HMAC256("secret");
JWTVerifier verifier = JWT.require(algorithm).withIssuer("auth0").build();
DecodedJWT jwt = verifier.verify(token);
使用RS256验证Token
String token = "eyJhbGciOiJIUzI1NiIsInR5cCI6IkpXUyJ9.eyJpc3MiOiJhdXRoMCJ9.AbIJTDMFc7yUa5MhvcP03nJPyCPzZtQcGEp-zWfOkEE";
RSAPublicKey publicKey = //Get the key instance
RSAPrivateKey privateKey = //Get the key instance
Algorithm algorithm = Algorithm.RSA256(publicKey, privateKey);
JWTVerifier verifier = JWT.require(algorithm).withIssuer("auth0").build();
DecodedJWT jwt = verifier.verify(token);
JwtTokenUtil
示例使用了HMAC算法来生成和验证token,token中保存了用户名和Authority(验证权限时不必再访问数据库了),代码如下:
package org.itrunner.heroes.util;

import com.auth0.jwt.JWT;
import com.auth0.jwt.JWTVerifier;
import com.auth0.jwt.algorithms.Algorithm;
import com.auth0.jwt.interfaces.DecodedJWT;
import org.apache.commons.logging.Log;
import org.apache.commons.logging.LogFactory;
import org.itrunner.heroes.config.Config;
import org.springframework.beans.factory.annotation.Autowired;
import org.springframework.security.core.userdetails.User;
import org.springframework.security.core.userdetails.UserDetails;
import org.springframework.stereotype.Component;

import java.util.Date;

@Component
public class JwtTokenUtil {
    private static final Log LOG = LogFactory.getLog(JwtTokenUtil.class);

    private static final String CLAIM_AUTHORITIES = "authorities";

    @Autowired
    private Config config;

    public String generate(UserDetails user) {
        try {
            Algorithm algorithm = Algorithm.HMAC256(config.getJwt().getSecret());
            return JWT.create()
                    .withIssuer(config.getJwt().getIssuer())
                    .withIssuedAt(new Date())
                    .withExpiresAt(new Date(System.currentTimeMillis() + config.getJwt().getExpiration() * 1000))
                    .withSubject(user.getUsername())
                    .withArrayClaim(CLAIM_AUTHORITIES, AuthorityUtil.getAuthorities(user))
                    .sign(algorithm);
        } catch (IllegalArgumentException e) {
            return null;
        }
    }

    /**
     * @param token
     * @return username
     */
    public UserDetails verify(String token) {
        if (token == null) {
            return null;
        }

        try {
            Algorithm algorithm = Algorithm.HMAC256(config.getJwt().getSecret());
            JWTVerifier verifier = JWT.require(algorithm).withIssuer(config.getJwt().getIssuer()).build();
            DecodedJWT jwt = verifier.verify(token);
            return new User(jwt.getSubject(), "N/A", AuthorityUtil.createGrantedAuthorities(jwt.getClaim(CLAIM_AUTHORITIES).asArray(String.class)));
        } catch (Exception e) {
            LOG.error(e);
            return null;
        }
    }
}
AuthorityUtil(UserDetails Authority转换工具类)
package org.itrunner.heroes.util;

import org.itrunner.heroes.domain.Authority;
import org.springframework.security.core.GrantedAuthority;
import org.springframework.security.core.authority.SimpleGrantedAuthority;
import org.springframework.security.core.userdetails.UserDetails;

import java.util.List;
import java.util.stream.Collectors;
import java.util.stream.Stream;

public final class AuthorityUtil {

    private AuthorityUtil() {
    }

    public static List<GrantedAuthority> createGrantedAuthorities(List<Authority> authorities) {
        return authorities.stream().map(authority -> new SimpleGrantedAuthority(authority.getName().name())).collect(Collectors.toList());
    }

    public static List<GrantedAuthority> createGrantedAuthorities(String... authorities) {
        return Stream.of(authorities).map(SimpleGrantedAuthority::new).collect(Collectors.toList());
    }

    public static String[] getAuthorities(UserDetails user) {
        return user.getAuthorities().stream().map(GrantedAuthority::<String>getAuthority).toArray(String[]::new);
    }
}
UserDetailsService
实现Spring Security的UserDetailsService,从数据库获取用户数据,其中包括用户名、密码、权限。UserDetailsService用于用户名/密码验证和生成token,将在后面的WebSecurityConfig和AuthenticationController中使用。
package org.itrunner.heroes.service;

import org.itrunner.heroes.domain.User;
import org.itrunner.heroes.repository.UserRepository;
import org.springframework.beans.factory.annotation.Autowired;
import org.springframework.security.core.userdetails.UserDetails;
import org.springframework.security.core.userdetails.UserDetailsService;
import org.springframework.security.core.userdetails.UsernameNotFoundException;
import org.springframework.stereotype.Service;

import static org.itrunner.heroes.util.AuthorityUtil.createGrantedAuthorities;

@Service
public class UserDetailsServiceImpl implements UserDetailsService {
    @Autowired
    private UserRepository userRepository;

    @Override
    public UserDetails loadUserByUsername(String username) {
        User user = userRepository.findByUsername(username).orElseThrow(() -> new UsernameNotFoundException(String.format("No user found with username '%s'.", username)));
        return create(user);
    }

    private static org.springframework.security.core.userdetails.User create(User user) {
        return new org.springframework.security.core.userdetails.User(user.getUsername(), user.getPassword(), createGrantedAuthorities(user.getAuthorities()));
    }
}
JWT验证Filter
从Request Header中读取Bearer Token并验证,如验证成功则将用户信息保存在SecurityContext中,用户则可以访问受限资源了。在每次请求结束后,SecurityContext会自动清空。
AuthenticationTokenFilter
package org.itrunner.heroes.config;

import org.itrunner.heroes.util.JwtTokenUtil;
import org.springframework.beans.factory.annotation.Autowired;
import org.springframework.security.authentication.UsernamePasswordAuthenticationToken;
import org.springframework.security.core.context.SecurityContextHolder;
import org.springframework.security.core.userdetails.UserDetails;
import org.springframework.security.web.authentication.WebAuthenticationDetailsSource;
import org.springframework.web.filter.OncePerRequestFilter;

import javax.servlet.FilterChain;
import javax.servlet.ServletException;
import javax.servlet.http.HttpServletRequest;
import javax.servlet.http.HttpServletResponse;
import java.io.IOException;

public class AuthenticationTokenFilter extends OncePerRequestFilter {
    @Autowired
    private JwtTokenUtil jwtTokenUtil;

    @Autowired
    private Config config;

    @Override
    protected void doFilterInternal(HttpServletRequest request, HttpServletResponse response, FilterChain chain) throws ServletException, IOException {
        String authToken = request.getHeader(config.getJwt().getHeader());

        if (authToken != null && authToken.startsWith("Bearer ")) {
            authToken = authToken.substring(7);
        }

        UserDetails user = jwtTokenUtil.verify(authToken);

        if (user != null && SecurityContextHolder.getContext().getAuthentication() == null) {
            logger.info("checking authentication for user " + user.getUsername());
            UsernamePasswordAuthenticationToken authentication = new UsernamePasswordAuthenticationToken(user.getUsername(), "N/A", user.getAuthorities());
            authentication.setDetails(new WebAuthenticationDetailsSource().buildDetails(request));
            SecurityContextHolder.getContext().setAuthentication(authentication);
        }

        chain.doFilter(request, response);
    }
}
AuthenticationEntryPoint
我们没有使用form或basic等验证机制,需要自定义一个AuthenticationEntryPoint,当未验证用户访问受限资源时,返回401错误。如没有自定义AuthenticationEntryPoint,将返回403错误。使用方法见WebSecurityConfig。
package org.itrunner.heroes.config;

import org.springframework.security.core.AuthenticationException;
import org.springframework.security.web.AuthenticationEntryPoint;
import org.springframework.stereotype.Component;

import javax.servlet.ServletException;
import javax.servlet.http.HttpServletRequest;
import javax.servlet.http.HttpServletResponse;
import java.io.IOException;

import static org.springframework.http.HttpStatus.UNAUTHORIZED;

@Component
public class JwtAuthenticationEntryPoint implements AuthenticationEntryPoint {
    @Override
    public void commence(HttpServletRequest request, HttpServletResponse response, AuthenticationException authException) throws IOException, ServletException {
        // This is invoked when user tries to access a secured REST resource without supplying any credentials
        // We should just send a 401 Unauthorized response because there is no 'login page' to redirect to
        response.sendError(UNAUTHORIZED.value(), UNAUTHORIZED.getReasonPhrase());
    }
}
WebSecurityConfig
在WebSecurityConfig中配置UserDetailsService、Filter、AuthenticationEntryPoint、需要验证的request,定义密码加密算法。
package org.itrunner.heroes.config;

import org.itrunner.heroes.config.Config.Cors;
import org.springframework.beans.factory.annotation.Autowired;
import org.springframework.beans.factory.annotation.Value;
import org.springframework.boot.actuate.autoconfigure.security.servlet.EndpointRequest;
import org.springframework.context.annotation.Bean;
import org.springframework.context.annotation.Configuration;
import org.springframework.security.authentication.AuthenticationManager;
import org.springframework.security.config.annotation.authentication.builders.AuthenticationManagerBuilder;
import org.springframework.security.config.annotation.web.builders.HttpSecurity;
import org.springframework.security.config.annotation.web.builders.WebSecurity;
import org.springframework.security.config.annotation.web.configuration.EnableWebSecurity;
import org.springframework.security.config.annotation.web.configuration.WebSecurityConfigurerAdapter;
import org.springframework.security.config.http.SessionCreationPolicy;
import org.springframework.security.core.userdetails.UserDetailsService;
import org.springframework.security.crypto.bcrypt.BCryptPasswordEncoder;
import org.springframework.security.crypto.password.PasswordEncoder;
import org.springframework.security.web.authentication.UsernamePasswordAuthenticationFilter;
import org.springframework.web.cors.CorsConfiguration;
import org.springframework.web.cors.CorsConfigurationSource;
import org.springframework.web.cors.UrlBasedCorsConfigurationSource;

import static org.springframework.http.HttpMethod.*;

@Configuration
@EnableWebSecurity
@SuppressWarnings("SpringJavaAutowiringInspection")
public class WebSecurityConfig extends WebSecurityConfigurerAdapter {
    private static final String ROLE_ADMIN = "ADMIN";

    @Value("${api.base-path}/**")
    private String apiPath;

    @Value("${management.endpoints.web.exposure.include}")
    private String[] actuatorExposures;

    @Autowired
    private JwtAuthenticationEntryPoint unauthorizedHandler;

    @Autowired
    private Config config;

    @Autowired
    private UserDetailsService userDetailsService;

    @Override
    protected void configure(AuthenticationManagerBuilder auth) throws Exception {
        auth.userDetailsService(userDetailsService);
    }

    @Override
    protected void configure(HttpSecurity http) throws Exception {
        http.cors().and().csrf().disable()
                .exceptionHandling().authenticationEntryPoint(unauthorizedHandler).and()
                .sessionManagement().sessionCreationPolicy(SessionCreationPolicy.STATELESS).and() // don't create session
                .authorizeRequests()
                .requestMatchers(EndpointRequest.to(actuatorExposures)).permitAll()
                .antMatchers(config.getJwt().getAuthenticationPath()).permitAll()
                .antMatchers(OPTIONS, "/**").permitAll()
                .antMatchers(POST, apiPath).hasRole(ROLE_ADMIN)
                .antMatchers(PUT, apiPath).hasRole(ROLE_ADMIN)
                .antMatchers(DELETE, apiPath).hasRole(ROLE_ADMIN)
                .anyRequest().authenticated().and()
                .addFilterBefore(authenticationTokenFilterBean(), UsernamePasswordAuthenticationFilter.class) // Custom JWT based security filter
                .headers().cacheControl(); // disable page caching
    }

    @Bean
    @Override
    public AuthenticationManager authenticationManagerBean() throws Exception {
        return super.authenticationManagerBean();
    }

    @Bean
    public AuthenticationTokenFilter authenticationTokenFilterBean() {
        return new AuthenticationTokenFilter();
    }

    @Bean
    public PasswordEncoder passwordEncoder() {
        return new BCryptPasswordEncoder();
    }

    @Bean
    CorsConfigurationSource corsConfigurationSource() {
        CorsConfiguration configuration = new CorsConfiguration();
        Cors cors = config.getCors();
        configuration.setAllowedOrigins(cors.getAllowedOrigins());
        configuration.setAllowedMethods(cors.getAllowedMethods());
        configuration.setAllowedHeaders(cors.getAllowedHeaders());
        UrlBasedCorsConfigurationSource source = new UrlBasedCorsConfigurationSource();
        source.registerCorsConfiguration("/**", configuration);
        return source;
    }
}
说明:
- 在Spring Boot 2.0中必须覆盖authenticationManagerBean()方法,否则在@Autowired authenticationManager时会报错:Field authenticationManager required a bean of type 'org.springframework.security.authentication.AuthenticationManager' that could not be found.
- 在初始化数据时的密码是调用new BCryptPasswordEncoder().encode()方法生成的。
- POST\PUT\DELETE请求需要"ADMIN"角色。调用hasRole()方法时应去掉前缀"ROLE_",方法会自动补充,否则请使用hasAuthority()。
Authentication Controller
AuthenticationController
验证用户名、密码,验证成功则返回Token和Authority。
package org.itrunner.heroes.controller;

import io.swagger.annotations.Api;
import org.itrunner.heroes.util.JwtTokenUtil;
import org.slf4j.Logger;
import org.slf4j.LoggerFactory;
import org.springframework.beans.factory.annotation.Autowired;
import org.springframework.http.HttpStatus;
import org.springframework.http.MediaType;
import org.springframework.security.authentication.AuthenticationManager;
import org.springframework.security.authentication.UsernamePasswordAuthenticationToken;
import org.springframework.security.core.Authentication;
import org.springframework.security.core.AuthenticationException;
import org.springframework.security.core.authority.AuthorityUtils;
import org.springframework.security.core.context.SecurityContextHolder;
import org.springframework.security.core.userdetails.UserDetails;
import org.springframework.security.core.userdetails.UserDetailsService;
import org.springframework.web.bind.annotation.*;

@RestController
@RequestMapping(produces = MediaType.APPLICATION_JSON_VALUE)
@Api(tags = {"Authentication Controller"})
public class AuthenticationController {
    private static final Logger LOG = LoggerFactory.getLogger(AuthenticationController.class);

    @Autowired
    private AuthenticationManager authenticationManager;

    @Autowired
    private JwtTokenUtil jwtTokenUtil;

    @Autowired
    private UserDetailsService userDetailsService;

    @PostMapping(value = "${jwt.authentication-path}")
    public AuthenticationResponse login(@RequestBody AuthenticationRequest request) {
        // Perform the security
        final Authentication authentication = authenticationManager.authenticate(new UsernamePasswordAuthenticationToken(request.getUsername(), request.getPassword()));
        SecurityContextHolder.getContext().setAuthentication(authentication);

        // Reload password post-security so we can generate token
        final UserDetails userDetails = userDetailsService.loadUserByUsername(request.getUsername());
        final String token = jwtTokenUtil.generate(userDetails);

        // Return the token
        return new AuthenticationResponse(token, AuthorityUtils.authorityListToSet(userDetails.getAuthorities()));
    }

    @ExceptionHandler(AuthenticationException.class)
    @ResponseStatus(HttpStatus.FORBIDDEN)
    public void handleAuthenticationException(AuthenticationException exception) {
        LOG.error(exception.getMessage(), exception);
    }
}
AuthenticationRequest
package org.itrunner.heroes.controller;

public class AuthenticationRequest {
    private String username;
    private String password;

    // getter & setter
}
AuthenticationResponse
package org.itrunner.heroes.controller;

import java.util.Set;

public class AuthenticationResponse {
    private String token;
    private Set<String> authorities;

    public AuthenticationResponse() {
    }

    public AuthenticationResponse(String token, Set<String> authorities) {
        this.token = token;
        this.authorities = authorities;
    }

    // getter & setter
}
重启Spring Boot,用postman来测试一下,输入验证URL:localhost:8080/auth、正确的用户名和密码,提交后会输出token。
此时如再请求localhost:8080/api/heroes将会收到403错误,将token填入到Authorization header中,可以查询出hero。
用户"admin"可以执行CRUD操作,"jason"只有查询权限。
更新集成测试
启用用户验证后,执行集成测试前要先登录获取token,并添加到request header中,增加如下代码:
    @Before
    public void setup() {
        AuthenticationRequest authenticationRequest = new AuthenticationRequest();
        authenticationRequest.setUsername("admin");
        authenticationRequest.setPassword("admin");
        token = restTemplate.postForObject("/auth", authenticationRequest, AuthenticationResponse.class).getToken();

        restTemplate.getRestTemplate().setInterceptors(
                Collections.singletonList((request, body, execution) -> {
                    HttpHeaders headers = request.getHeaders();
                    headers.add("Authorization", "Bearer " + token);
                    headers.add("Content-Type", "application/json");
                    return execution.execute(request, body);
                }));
    }
也可以针对某一请求添加token,如下:
// update hero
hero.setName("Jacky");
HttpHeaders httpHeaders = new HttpHeaders();
httpHeaders.add("Authorization", "Bearer " + token);
HttpEntity<Hero> requestEntity = new HttpEntity<>(hero, httpHeaders);
hero = restTemplate.exchange("/api/heroes", HttpMethod.PUT, requestEntity, Hero.class).getBody();
assertThat(hero.getName()).isEqualTo("Jacky");
集成Swagger
启用Swagger
启用Swagger非常简单,仅需编写一个类:
package org.itrunner.heroes.config;

import com.fasterxml.classmate.TypeResolver;
import org.itrunner.heroes.exception.ErrorMessage;
import org.springframework.context.annotation.Bean;
import org.springframework.context.annotation.Configuration;
import org.springframework.http.ResponseEntity;
import springfox.documentation.builders.ApiInfoBuilder;
import springfox.documentation.builders.PathSelectors;
import springfox.documentation.builders.RequestHandlerSelectors;
import springfox.documentation.service.*;
import springfox.documentation.spi.DocumentationType;
import springfox.documentation.spi.service.contexts.SecurityContext;
import springfox.documentation.spring.web.plugins.Docket;
import springfox.documentation.swagger2.annotations.EnableSwagger2;

import java.time.LocalDate;
import java.util.List;

import static com.google.common.collect.Lists.newArrayList;

@EnableSwagger2
@Configuration
public class SwaggerConfig {

    @Bean
    public Docket petApi() {
        return new Docket(DocumentationType.SWAGGER_2)
                .select()
                .apis(RequestHandlerSelectors.basePackage("org.itrunner.heroes.controller"))
                .paths(PathSelectors.any())
                .build()
                .apiInfo(apiInfo())
                .pathMapping("/")
                .directModelSubstitute(LocalDate.class, String.class)
                .genericModelSubstitutes(ResponseEntity.class)
                .additionalModels(new TypeResolver().resolve(ErrorMessage.class))
                .useDefaultResponseMessages(false)
                .securitySchemes(newArrayList(apiKey()))
                .securityContexts(newArrayList(securityContext()))
                .enableUrlTemplating(false);
    }

    private ApiInfo apiInfo() {
        return new ApiInfoBuilder()
                .title("Api Documentation")
                .description("Api Documentation")
                .contact(new Contact("Jason", "https://blog.51cto.com/7308310", "[email protected]"))
                .version("1.0")
                .build();
    }

    private ApiKey apiKey() {
        return new ApiKey("BearerToken", "Authorization", "header");  // 用于Swagger UI测试时添加Bearer Token
    }

    private SecurityContext securityContext() {
        return SecurityContext.builder()
                .securityReferences(defaultAuth())
                .forPaths(PathSelectors.regex("/api/.*")) // 注意要与Restful API路径一致
                .build();
    }

    List<SecurityReference> defaultAuth() {
        AuthorizationScope authorizationScope = new AuthorizationScope("global", "accessEverything");
        AuthorizationScope[] authorizationScopes = new AuthorizationScope[1];
        authorizationScopes[0] = authorizationScope;
        return newArrayList(new SecurityReference("BearerToken", authorizationScopes));
    }
}
然后在WebSecurityConfig中配置不需验证的URI:
    @Override
    public void configure(WebSecurity web) throws Exception {
        web.ignoring().antMatchers("/api-docs", "/swagger-resources/**", "/swagger-ui.html**", "/webjars/**");
    }
spring.resources.add-mappings要设为true,api-docs路径可自定义:
spring:
  resources:
    add-mappings: true

springfox:
  documentation:
    swagger:
      v2:
        path: /api-docs
访问Api doc: http://localhost:8080/api-docs
访问Swagger UI: http://localhost:8080/swagger-ui.html
API Doc
在以前的HeroController代码中未进行API Doc配置,文档会自动生成,可添加Annotation定义更详细的文档内容。
package org.itrunner.heroes.controller;

import io.swagger.annotations.Api;
import io.swagger.annotations.ApiOperation;
import io.swagger.annotations.ApiParam;
import org.itrunner.heroes.domain.Hero;
import org.itrunner.heroes.service.HeroService;
import org.slf4j.Logger;
import org.slf4j.LoggerFactory;
import org.springframework.beans.factory.annotation.Autowired;
import org.springframework.dao.DataAccessException;
import org.springframework.http.MediaType;
import org.springframework.http.ResponseEntity;
import org.springframework.web.bind.annotation.*;

import java.util.HashMap;
import java.util.List;
import java.util.Map;

@RestController
@RequestMapping(value = "/api", produces = MediaType.APPLICATION_JSON_VALUE)
@Api(tags = {"Hero Controller"})
public class HeroController {
    private static final Logger LOG = LoggerFactory.getLogger(HeroController.class);

    @Autowired
    private HeroService service;

    @ApiOperation(value = "Get hero by id")
    @GetMapping("/heroes/{id}")
    public Hero getHeroById(@ApiParam(required = true, example = "1") @PathVariable("id") Long id) {
        return service.getHeroById(id);
    }

    @ApiOperation(value = "Get all heroes")
    @GetMapping("/heroes")
    public List<Hero> getHeroes() {
        return service.getAllHeroes();
    }

    @ApiOperation(value = "Search heroes by name")
    @GetMapping("/heroes/")
    public List<Hero> searchHeroes(@ApiParam(required = true) @RequestParam("name") String name) {
        return service.findHeroesByName(name);
    }

    @ApiOperation(value = "Add new hero")
    @PostMapping("/heroes")
    public Hero addHero(@ApiParam(required = true) @RequestBody Hero hero) {
        return service.saveHero(hero);
    }

    @ApiOperation(value = "Update hero info")
    @PutMapping("/heroes")
    public Hero updateHero(@ApiParam(required = true) @RequestBody Hero hero) {
        return service.saveHero(hero);
    }

    @ApiOperation(value = "Delete hero by id")
    @DeleteMapping("/heroes/{id}")
    public void deleteHero(@ApiParam(required = true, example = "1") @PathVariable("id") Long id) {
        service.deleteHero(id);
    }

    @ExceptionHandler(DataAccessException.class)
    public ResponseEntity<Map<String, Object>> handleDataAccessException(DataAccessException exception) {
        LOG.error(exception.getMessage(), exception);
        Map<String, Object> body = new HashMap<>();
        body.put("message", exception.getMessage());
        return ResponseEntity.badRequest().body(body);
    }
}
API Model
API使用的model类,可以使用@ApiModel、@ApiModelProperty注解,在使用Swagger UI测试时,example是默认值。
package org.itrunner.heroes.controller;

import io.swagger.annotations.ApiModelProperty;

public class AuthenticationRequest {
    @ApiModelProperty(value = "username", example = "admin", required = true)
    private String username;

    @ApiModelProperty(value = "password", example = "admin", required = true)
    private String password;

    // getter & setter
}
Swagger UI测试
使用Swagger UI测试有以下优点:
- 可直接点选要测试的API
- 提供需要的参数和默认值,只需编辑参数值
- 只需一次认证
- 直观的显示Request和Response信息

先测试auth api来获取token,点击Try it out,然后输入username和password,点击Excute,成功后会输出token。
下一步进行验证,点击页面上方的Authorize,输入token,验证后就可以进行其他测试了。
Angular
Angular 5.0新特性
- 编译性能提升,AOT编译速度加快,已成为开发中推荐的编译方式
- i18n支持新的number、 date、 currency pipes
- 使用StaticInjector替代ReflectiveInjector,不再需要Reflect polyfill,减少app大小。
- exportAs支持多个名字
- 原@angular/http模块已过期,推荐使用HttpClient
- 新增Router Lifecycle Events
GuardsCheckStart, ChildActivationStart, ActivationStart, GuardsCheckEnd, ResolveStart, ResolveEnd, ActivationEnd, ChildActivationEnd - 语法检查更严格
Angular 6.0新特性
- CLI Workspaces
CLI v6支持包含多项目的workspace,使用angular.json代替了.angular-cli.json,详细内容请查看angular.json。 - Angular CLI更新
新增ng add、ng update、ng generate libraryng add <collection> Add support for a library to your project ng update <packages> [options] Updates your application and its dependencies ng generate library <name> create a library project within your CLI workspace - Tree Shakable Providers
从module引用服务改为服务引用模块,使得应用更小。
之前:
@NgModule({
  ...
  providers: [MyService]
})
export class AppModule {}
import { Injectable } from '@angular/core';
@Injectable()
export class MyService {
constructor() { }
}现在:
import { Injectable } from '@angular/core';

@Injectable({providedIn: 'root'})
export class MyService {
  constructor() { }
}- Angular Material Starter Components
运行ng add @angular/material,生成3个新的starter component:
Material Sidenav![Angular 6集成Spring Boot 2,Spring Security,JWT和CORS]()
Material Dashboard![Angular 6集成Spring Boot 2,Spring Security,JWT和CORS]()
Material Data Table![Angular 6集成Spring Boot 2,Spring Security,JWT和CORS]()
- Angular Elements
- Animations Performance Improvements
- RxJS v6


配置开发环境
- 安装Node.js8.x或以上版本
- npm版本要求5.x或以上,如版本低请更新:
npm i npm@latest -g- 安装Angular CLI
npm install -g @angular/cli@latest更新Tour of Heroes
Tour of Heroes使用了“in-memory-database”,我们要删除相关内容改为调用Spring Boot Rest API。
- 删除in-memory-data.service.ts,删除app.module.ts中的InMemoryDataService、HttpClientInMemoryWebApiModule。package.json中的“angular-in-memory-web-api”也可删除。
- 配置environment,编辑environment.ts、environment.prod.ts,内容如下:
environment.ts
export const environment = {
  production: false,
  apiUrl: 'http://localhost:8080'
};
environment.prod.ts
export const environment = {
  production: true,
  apiUrl: 'http://localhost:8080' // 修改为实际IP
};- 编辑hero.service.ts将“api/heroes”替换为"
${environment.apiUrl}/api/heroes" :
import {environment} from '../environments/environment';
...
private heroesUrl = `${environment.apiUrl}/api/heroes`;- 修改add hero代码
Hero domain设定name不能重复,如添加重复记录,原代码会出现问题,修改如下:
heroes.component.ts
add(name: string): void {
  name = name.trim();
  if (!name) { return; }
  this.heroService.addHero({ name } as Hero)
    .subscribe(hero => {
      if(hero) {
        this.heroes.push(hero);
      }
    });
}
hero.service.ts
addHero (hero: Hero): Observable<Hero> {
  return this.http.post<Hero>(this.heroesUrl, hero, httpOptions).pipe(
    tap((hero: Hero) => {
        if (hero) {
          this.log(`added hero w/ id=${hero.id}`)
        }
      }
    ),
    catchError(this.handleError<Hero>('addHero'))
  );
}- 显示错误信息,修改如下:
hero.service.ts
private handleError<T>(operation = 'operation', result?: T) {
  return (response: any): Observable<T> => {
    console.error(response.error); // log to console instead

    this.log(`${operation} failed: ${response.error.message}`);

    // Let the app keep running by returning an empty result.
    return of(result as T);
  };
}
当添加重复记录时,显示如下信息:
- 安装、启动Angular:
npm install
ng serve
测试:
此时访问,页面输出以下错误:
HeroService: getHeroes failed: Http failure response for http://localhost:8080/api/heroes: 403 OK
Authentication Service
AuthenticationService请求http://localhost:8080/auth 验证用户,如验证成功则在localStorage中保存用户token和Authority。
import {Injectable} from '@angular/core';
import {HttpClient, HttpHeaders} from '@angular/common/http';
import {Observable, of} from 'rxjs';
import {catchError, tap} from 'rxjs/operators';
import {environment} from '../environments/environment';

const httpOptions = {
  headers: new HttpHeaders({'Content-Type': 'application/json'})
};

@Injectable({providedIn: 'root'})
export class AuthenticationService {

  constructor(private http: HttpClient) {
  }

  login(username: string, password: string): Observable<boolean> {
    return this.http.post<any>(`${environment.apiUrl}/auth`, JSON.stringify({username: username, password: password}), httpOptions).pipe(
      tap(response => {
        if (response && response.token) {
          // login successful, store username and jwt token in local storage to keep user logged in between page refreshes
          localStorage.setItem('currentUser', JSON.stringify({username: username, token: response.token, authorities: response.authorities}));
          return of(true);
        } else {
          return of(false);
        }
      }),
      catchError((err) => {
        console.error(err);
        return of(false)
      })
    );
  }

  getCurrentUser(): any {
    const userStr = localStorage.getItem('currentUser');
    return userStr ? JSON.parse(userStr) : '';
  }

  getToken(): string {
    const currentUser = this.getCurrentUser();
    return currentUser ? currentUser.token : '';
  }

  getUsername(): string {
    const currentUser = this.getCurrentUser();
    return currentUser ? currentUser.username : '';
  }

  logout(): void {
    localStorage.removeItem('currentUser');
  }

  isLoggedIn(): boolean {
    const token: String = this.getToken();
    return token && token.length > 0;
  }

  hasRole(role: string): boolean {
    const currentUser = this.getCurrentUser();
    if (!currentUser) {
      return false;
    }
    const authorities: string[] = currentUser.authorities;
    return authorities.indexOf('ROLE_' + role) != -1;
  }
}
创建登录页面
在src\app下新建login目录,然后增加组件:
login.component.ts
LoginComponent调用AuthenticationService,如验证成功则跳转到dashboard页面,否则显示错误信息。
import {Component, OnInit} from '@angular/core';
import {Router} from '@angular/router';
import {AuthenticationService} from '../authentication.service';
import {MessageService} from '../message.service';

@Component({
  templateUrl: './login.component.html',
  styleUrls: ['./login.component.css']
})

export class LoginComponent implements OnInit {
  model: any = {};
  loading = false;

  constructor(private router: Router, private authenticationService: AuthenticationService, private messageService: MessageService) {
  }

  ngOnInit() {
    // reset login status
    this.authenticationService.logout();
  }

  login() {
    this.loading = false;
    this.authenticationService.login(this.model.username, this.model.password)
      .subscribe(result => {
        if (result) {
          // login successful
          this.loading = true;
          this.router.navigate(['dashboard']);
        } else {
          // login failed
          this.log('Username or password is incorrect');
        }
      });
  }

  private log(message: string) {
    this.messageService.add('Login: ' + message);
  }
}
login.component.html
<div class="col-md-6 col-md-offset-3">
  <h2>Login</h2>

  <div class="alert alert-info">
    Username: admin<br/>
    Password: admin
  </div>

  <form name="form" #f="ngForm" novalidate>
    <div class="form-group" [ngClass]="{ 'has-error': f.submitted && !username.valid }">
      <label for="username">Username</label>
      <input type="text" class="form-control" id="username" name="username" [(ngModel)]="model.username" #username="ngModel" required/>
      <span *ngIf="f.submitted && !username.valid" class="help-block">Username is required</span>
    </div>
    <div class="form-group" [ngClass]="{ 'has-error': f.submitted && !password.valid }">
      <label for="password">Password </label>
      <input type="password" class="form-control" id="password" name="password" [(ngModel)]="model.password" #password="ngModel" required/>
      <span *ngIf="f.submitted && !password.valid" class="help-block">Password is required</span>
    </div>
    <div class="form-group">
      <button [disabled]="loading" class="btn btn-primary" (click)="login()">Login</button>
      <img *ngIf="loading"
           src="data:image/gif;base64,R0lGODlhEAAQAPIAAP///wAAAMLCwkJCQgAAAGJiYoKCgpKSkiH/C05FVFNDQVBFMi4wAwEAAAAh/hpDcmVhdGVkIHdpdGggYWpheGxvYWQuaW5mbwAh+QQJCgAAACwAAAAAEAAQAAADMwi63P4wyklrE2MIOggZnAdOmGYJRbExwroUmcG2LmDEwnHQLVsYOd2mBzkYDAdKa+dIAAAh+QQJCgAAACwAAAAAEAAQAAADNAi63P5OjCEgG4QMu7DmikRxQlFUYDEZIGBMRVsaqHwctXXf7WEYB4Ag1xjihkMZsiUkKhIAIfkECQoAAAAsAAAAABAAEAAAAzYIujIjK8pByJDMlFYvBoVjHA70GU7xSUJhmKtwHPAKzLO9HMaoKwJZ7Rf8AYPDDzKpZBqfvwQAIfkECQoAAAAsAAAAABAAEAAAAzMIumIlK8oyhpHsnFZfhYumCYUhDAQxRIdhHBGqRoKw0R8DYlJd8z0fMDgsGo/IpHI5TAAAIfkECQoAAAAsAAAAABAAEAAAAzIIunInK0rnZBTwGPNMgQwmdsNgXGJUlIWEuR5oWUIpz8pAEAMe6TwfwyYsGo/IpFKSAAAh+QQJCgAAACwAAAAAEAAQAAADMwi6IMKQORfjdOe82p4wGccc4CEuQradylesojEMBgsUc2G7sDX3lQGBMLAJibufbSlKAAAh+QQJCgAAACwAAAAAEAAQAAADMgi63P7wCRHZnFVdmgHu2nFwlWCI3WGc3TSWhUFGxTAUkGCbtgENBMJAEJsxgMLWzpEAACH5BAkKAAAALAAAAAAQABAAAAMyCLrc/jDKSatlQtScKdceCAjDII7HcQ4EMTCpyrCuUBjCYRgHVtqlAiB1YhiCnlsRkAAAOwAAAAAAAAAAAA=="/>
    </div>
  </form>
</div>
login.component.css
.alert {
  width: 200px;
  margin-top: 20px;
  margin-bottom: 20px;
}

.alert.alert-info {
  color: #607D8B;
}

.alert.alert-error {
  color: red;
}

.help-block {
  width: 200px;
  color: white;
  background-color: gray;
}

.form-control {
  width: 200px;
  margin-bottom: 10px;
}

.btn {
  margin-top: 20px;
}
在app.module.ts中添加LoginComponent:
  declarations: [
    AppComponent,
    DashboardComponent,
    HeroesComponent,
    HeroDetailComponent,
    MessagesComponent,
    HeroSearchComponent,
    LoginComponent
  ]
接下来,编辑app.component.html,添加login链接
<h1>{{title}}</h1>
<nav>
  <a routerLink="/login">Login</a>
  <a routerLink="/dashboard">Dashboard</a>
  <a routerLink="/heroes">Heroes</a>
</nav>
<router-outlet></router-outlet>
<app-messages></app-messages>
保护你的资源
完成登录页面,那如何防止未登录用户访问其他页面呢,使用Auth Guard。
CanActivateAuthGuard
import {Injectable} from '@angular/core';
import {ActivatedRouteSnapshot, CanActivate, Router, RouterStateSnapshot} from '@angular/router';
import {AuthenticationService} from './authentication.service';

@Injectable({providedIn: 'root'})
export class CanActivateAuthGuard implements CanActivate {

  constructor(private router: Router, private authService: AuthenticationService) {
  }

  canActivate(route: ActivatedRouteSnapshot, state: RouterStateSnapshot): boolean {
    if (this.authService.isLoggedIn()) {
      // logged in so return true
      return true;
    }

    // not logged in so redirect to login page with the return url and return false
    this.router.navigate(['/login']);
    return false;
  }
}
CanActivateAuthGuard调用AuthenticationService,检查用户是否登录,如未登录则跳转到login页面。
然后在app-routing.module.ts中给受保护页面配置CanActivateAuthGuard,并添加login组件。
import {NgModule} from '@angular/core';
import {RouterModule, Routes} from '@angular/router';

import {DashboardComponent} from './dashboard/dashboard.component';
import {HeroesComponent} from './heroes/heroes.component';
import {HeroDetailComponent} from './hero-detail/hero-detail.component';
import {LoginComponent} from './login/login.component';
import {CanActivateAuthGuard} from './can-activate.authguard';

const routes: Routes = [
  {path: '', redirectTo: '/dashboard', pathMatch: 'full'},
  {path: 'login', component: LoginComponent},
  {path: 'dashboard', component: DashboardComponent, canActivate: [CanActivateAuthGuard]},
  {path: 'detail/:id', component: HeroDetailComponent, canActivate: [CanActivateAuthGuard]},
  {path: 'heroes', component: HeroesComponent, canActivate: [CanActivateAuthGuard]}
];

@NgModule({
  imports: [RouterModule.forRoot(routes)],
  exports: [RouterModule]
})
export class AppRoutingModule {
}
添加Bearer Token
如何将JWT Token添加到header中呢?
一种方式是在http请求中添加httpOptions。
const httpOptions = {
  headers: new HttpHeaders({
    'Content-Type': 'application/json'}),
    'Authorization': 'Bearer ' + this.authenticationService.getToken()
};
另一种方式使用HttpInterceptor
import {Injectable} from '@angular/core';
import {HttpEvent, HttpHandler, HttpInterceptor, HttpRequest} from '@angular/common/http';
import {Observable} from 'rxjs';

@Injectable()
export class AuthenticationInterceptor implements HttpInterceptor {

  intercept(req: HttpRequest<any>, next: HttpHandler): Observable<HttpEvent<any>> {
    const idToken = this.getToken();

    if (idToken) {
      const cloned = req.clone({
        headers: req.headers.set('Authorization', 'Bearer ' + idToken)
      });

      return next.handle(cloned);
    } else {
      return next.handle(req);
    }
  }

  getToken(): string {
    const userStr = localStorage.getItem('currentUser');
    return userStr ? JSON.parse(userStr).token : '';
  }
}
HttpInterceptor会自动在所有http请求中添加token。HttpInterceptor需要在app.module.ts中注册
  providers: [
    [{provide: HTTP_INTERCEPTORS, useClass: AuthenticationInterceptor, multi: true}]
  ],
权限控制
新增一个directive,用于根据用户角色显示页面元素。
HasRoleDirective
import {Directive, Input, TemplateRef, ViewContainerRef} from '@angular/core';
import {AuthenticationService} from './authentication.service';

@Directive({
  selector: '[appHasRole]'
})
export class HasRoleDirective {
  constructor(private templateRef: TemplateRef<any>, private viewContainer: ViewContainerRef, private authenticationService: AuthenticationService) {
  }

  @Input()
  set appHasRole(role: string) {
    if (this.authenticationService.hasRole(role)) {
      this.viewContainer.createEmbeddedView(this.templateRef);
    } else {
      this.viewContainer.clear();
    }
  }
}
将HasRoleDirective添加到AppModule的declarations中。
修改heroes.component.html和hero-detail.component.html,使用appHasRole:
heroes.component.html
<h2>My Heroes</h2>

<div *appHasRole="'ADMIN'">
  <label>Hero name:
    <input #heroName />
  </label>
  <!-- (click) passes input value to add() and then clears the input -->
  <button (click)="add(heroName.value); heroName.value=''">
    add
  </button>
</div>

<ul class="heroes">
  <li *ngFor="let hero of heroes">
    <a routerLink="/detail/{{hero.id}}">
      <span class="badge">{{hero.id}}</span> {{hero.name}}
    </a>
    <button class="delete" title="delete hero" (click)="delete(hero)" *appHasRole="'ADMIN'">x</button>
  </li>
</ul>
hero-detail.component.html
<div *ngIf="hero">
  <h2>{{hero.name | uppercase}} Details</h2>
  <div><span>id: </span>{{hero.id}}</div>
  <div>
    <label>name:
      <input [(ngModel)]="hero.name" placeholder="name"/>
    </label>
  </div>
  <button (click)="goBack()">go back</button>
  <button (click)="save()" *appHasRole="'ADMIN'">save</button>
</div>
修改heroes.component.spec.ts,在TestBed.configureTestingModule的declarations中添加HasRoleDirective。否则执行ng test时会报如下错误:
HeroesComponent should be created FAILED
Can't bind to 'appHasRole' since it isn't a known property of 'div'
JWT集成完毕,来测试一下吧!
单元测试与集成测试
使用Angular CLI创建的App已配置好测试环境,生成了测试配置文件和样例代码。默认,Angular单元测试使用Jasmine测试框架和Karma测试运行器,集成测试使用Jasmine测试框架和Protractor end-to-end 测试框架。
单元测试
单元测试配置文件karma.conf.js 和 test.ts,默认测试文件扩展名为.spec.ts,使用Chrome浏览器。在使用CLI创建component、service等时会自动创建测试文件。执行CLI命令 ng test 即可运行单元测试:
ng test在控制台会输出测试结果,还会打开浏览器:
浏览器会显示测试结果,总测试数,失败数。在顶部,每个点或叉对应一个测试用例,点表示成功,叉表示失败,鼠标移到点或叉上会显示测试信息。点击测试结果中的某一行,可重新运行某个或某组(测试套件)测试。代码修改后会重新运行测试。
运行单元测试时可生成代码覆盖率报告,报告保存在项目根目录下的coverage文件夹内:
ng test --watch=false --code-coverage如想每次测试都生成报告,可修改CLI配置文件angular.json:
"test": {
  "options": {
    "codeCoverage": true
  }
}
可设定测试覆盖率指标,编辑配置文件karma.conf.js,增加如下内容:
coverageIstanbulReporter: {
  reports: [ 'html', 'lcovonly' ],
  fixWebpackSourcePaths: true,
  thresholds: {
    statements: 80,
    lines: 80,
    branches: 80,
    functions: 80
  }
}
测试报告中达到标准的背景为绿色。
集成测试
使用CLI创建App会生成一个e2e项目,其中包含集成测试配置protractor.conf.js及测试代码。测试文件扩展名必须为.e2e-spec.ts,默认使用Chrome浏览器。执行CLI命令 ng e2e即可运行集成测试:
ng e2eCI集成
在CI环境中运行测试不必使用浏览器界面,因此需修改浏览器配置,启用no-sandbox(headless)模式。
karma.conf.js增加如下配置:
browsers: ['Chrome'],
customLaunchers: {
  ChromeHeadlessCI: {
    base: 'ChromeHeadless',
    flags: ['--no-sandbox']
  }
},
在e2e根目录下创建一名为protractor-ci.conf.js的新文件,内容如下:
const config = require('./protractor.conf').config;

config.capabilities = {
  browserName: 'chrome',
  chromeOptions: {
    args: ['--headless', '--no-sandbox']
  }
};

exports.config = config;
注意: windows系统要增加参数--disable-gpu
使用以下命令运行测试:
ng test --watch=false --progress=false --browsers=ChromeHeadlessCI
ng e2e --protractor-config=e2e\protractor-ci.conf.js
生成的覆盖率报告文件夹中有一文件lcov.info可与Sonar集成,在Sonar管理界面配置LCOV Files路径,即可在Sonar中查看测试情况。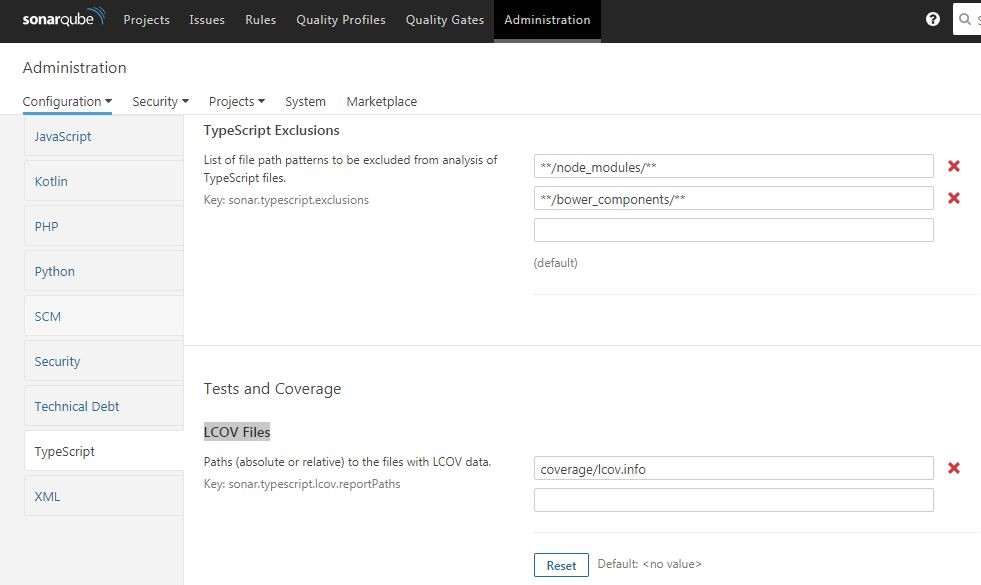
与Jenkins集成同样使用Jenkinsfile,示例如下:
node {
    checkout scm
    stage('install') {
      bat 'npm install'
    }
    stage('test') {
      bat 'ng test --watch=false --progress=false --code-coverage --browsers=ChromeHeadlessCI'
      bat 'ng e2e --protractor-config=e2e\protractor-ci.conf.js'
    }
    stage('sonar-scanner') {
      bat 'sonar-scanner -Dsonar.projectKey=heroes-web -Dsonar.sources=src -Dsonar.typescript.lcov.reportPaths=coverage\lcov.info
            -Dsonar.host.url=http://127.0.0.1:9000/sonar -Dsonar.login=1596abae7b68927b1cecd276d1b5149e86375cb2'
    }
    stage('build') {
      bat 'ng build --prod --base-href=/heroes/'
    }
}
说明:
- Sonar需安装SonarTS插件
- Jenkins服务器端需安装Node.js、Angular CLI、sonar-scanner和Chrome。
部署
后台执行mvn clean package后,将heroes-api-1.0.0.jar拷贝到目标机器,然后执行:
java -jar heroes-api-1.0.0.jar前台执行以下命令编译:
ng build --prod将编译好的dist目录下的文件拷贝到Apache Server的html目录下即可。如果部署在服务器的子目录下,需设置--base-href(如index.html位于/my/app/目录下):
ng build --prod --base-href=/my/app/这是最简易的部署方式,更进一步您可以使用docker。
附录
如何配置审计日志
增加一个appender,配置一个单独的日志文件;再增加一个logger,注意要配置additivity="false",这样写audit日志时不会写到其他层次的日志中。
<?xml version="1.0" encoding="UTF-8"?>
<configuration>
    <springProfile name="dev">
        <property name="LOG_FILE" value="heroes.log"/>
        <property name="AUDIT_FILE" value="audit.log"/>
    </springProfile>
    <springProfile name="prod">
        <property name="LOG_FILE" value="/var/log/heroes.log"/>
        <property name="AUDIT_FILE" value="/var/log/audit.log"/>
    </springProfile>

    <include resource="org/springframework/boot/logging/logback/base.xml"/>

    <logger name="root" level="WARN"/>

    <appender name="AUDIT" class="ch.qos.logback.core.rolling.RollingFileAppender">
        <encoder>
            <pattern>%d{yyyy-MM-dd HH:mm:ss.SSS} %5p --- %m%n</pattern>
        </encoder>
        <file>${AUDIT_FILE}</file>
        <rollingPolicy class="ch.qos.logback.core.rolling.FixedWindowRollingPolicy">
            <fileNamePattern>${AUDIT_FILE}.%i</fileNamePattern>
        </rollingPolicy>
        <triggeringPolicy class="ch.qos.logback.core.rolling.SizeBasedTriggeringPolicy">
            <MaxFileSize>10MB</MaxFileSize>
        </triggeringPolicy>
    </appender>

    <logger name="audit" level="info" additivity="false">
        <appender-ref ref="AUDIT"/>
    </logger>

    <springProfile name="dev">
        <logger name="root" level="INFO"/>
    </springProfile>
    <springProfile name="prod">
        <logger name="root" level="INFO"/>
    </springProfile>
</configuration>
调用:
private static final Logger logger = LoggerFactory.getLogger("audit");自动重启
开发Angular时,运行ng serve,代码改变后会自动重新编译。Spring Boot有这样的功能么?可以增加spring-boot-devtools实现:
<dependency>
    <groupId>org.springframework.boot</groupId>
    <artifactId>spring-boot-devtools</artifactId>
    <optional>true</optional>
</dependency>
参考文档
Angular
Spring Boot
Spring Security
JWT Libraries
JSON Web Tokens (JWT) in Auth0
Springfox Swagger
Postman
Angular Security - Authentication With JSON Web Tokens (JWT): The Complete Guide
Integrating Angular 2 with Spring Boot, JWT, and CORS, Part 1
Integrating Angular 2 with Spring Boot, JWT, and CORS, Part 2
使用SpringBoot开启微服务之旅
Spring MVC @RequestMapping Annotation Example with Controller, Methods, Headers, Params, @RequestParam, @PathVariable
The logback manual
测试框架-Jasmine
Version 6 of Angular Now Available
Lombok 介绍
Project Lombok